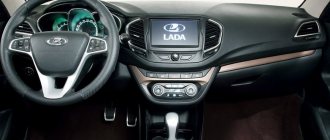
The multi-steering wheel on the Lada Vesta car ensures comfortable movement in the car. In addition, the steering wheel is an element of the interior, a lever for controlling the behavior of the car and additional options. The Lada Vesta multifunctional steering wheel, also known as the multifunction steering wheel, is present in the top-end and luxury configurations of the Lada Vesta. In other variations, its capabilities do not go beyond the standard. Finishing materials are not of high quality. But it can be connected using a special adapter for the multifunction steering wheel.
Steering wheel size: diameter 37-39 cm.
Installing a multifunction steering wheel on a Lada Vesta car is possible, even if it is not included in the factory equipment. This function allows you to put buttons on the steering wheel, increasing the level of safety while driving, since climate control and the operating mode of the multimedia system are adjusted using the keys on the steering wheel. You can change the covering materials (braid, leather trim, trim - also known as a cover) yourself if you know the size and diameter of the Lada Vesta steering wheel. You can also do heating. The heated steering wheel function on the Lada Vesta is especially pleasant on frosty days in winter. After reconstruction, you will get a multifunctional unit. Read the article to the end and master all these repair skills!
Recommendations from experienced
The process of replacing the steering wheel is simple, but requires attention on the part of the repairman. A car enthusiast without basic skills in servicing a technical device is better off turning to service station specialists for help.
Sequence of actions when removing the steering wheel on a Lada Vesta:
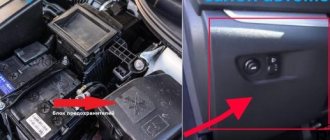
- Remove the block - airbag module.
- Unscrew the central bolt - clamp.
- Remove the steering wheel.
- After maintenance, install the steering wheel again.
Stages of self-installation of the steering wheel
- ratchet;
- extension;
- Torx head T50;
- two-fingered puller;
- rags, gloves;
- additional lighting as needed;
- torque wrench.
Algorithm of actions for withdrawal:
- We place the car on a flat platform, provide safety measures, fix the rear wheels, and squeeze the parking brake.
- Open the hood.
- Remove both terminals from the battery.
- Open the driver's door.
- We set the steering wheel to the position of linear movement of the technical device.
- We move the metal latches on the steering wheel.
- We remove the airbag module.
- Disconnect the connectors with wires from the airbag and the transport fuse.
- Unscrew the steering wheel retaining bolt.
- We remove the steering wheel from the splines.
Then we carry out preventive maintenance and replacement as necessary. We install the steering wheel (hereinafter referred to as the steering wheel) again. Tightening torque 3.8-5.0 kgf/m (38-50 Nm) with a torque wrench.
Note to the driver!
After removing the steering wheel, do not violate the angle of rotation of the wheels or rotate the column shaft. With such actions, you run the risk of disrupting the wheel alignment angle; another diagnostic will be required at a stand at a service station.
How to install multifunction steering wheel
In addition to the steering wheel itself, you will need several small elements:
- A special blue mini-ISO connector labeled C3.
- The contact connector for the snail is BLS.
- 5 pieces of wire 3 meters long with a cross-sectional diameter of 0.5 mm. But it is better to buy a ready-made wiring harness so that the connection is convenient.
Tools and materials needed to connect to the radio:
- Insulating tape.
- Several types of screwdrivers, nails and knitting needles. Such a tool may be required to remove the airbag.
- Torx bit T50 (TORX). The multifunction steering wheel is secured with a bolt with the same type and size of head. It is difficult to unscrew the bolt with another wrench.
Installation on the “Lux” package is more convenient. It has wires for connecting the cruise control system, a “snail” (a switch under the steering wheel with wires for the buttons). This is easy to check. You need to remove the top half of the steering wheel cover and see what's there.
The multifunction steering wheel can only be installed with the ignition switch turned off. In addition, it is recommended to disconnect the negative cable from the battery. Otherwise, you risk short circuiting the wiring.
Connecting steering wheel buttons to the MMC radio
- After connecting the cruise control circuit, we connect the block with wires to the multimedia device (blue).
- If a freelance MMC is installed, you will need an adapter for this brand of radio.
- We insert the plastic cover and assemble the RC again.
Review of Manufacturer Prices
The size of the steering wheel in the original version is 37-39 cm in internal and external diameters, respectively.
| Name/article | Price in rubles |
| Original steering wheel 8450009837 (18 years old) | From 5000 |
| Plastic cover with function keys 8450006832 | From 2500 – 3000 |
| Airbag module 8450149058 | From 4500 |
| Steering wheel complete with airbag 8450006832 | From 8500 |
How to remove the steering wheel cover on a Lada Vesta
- Carefully pry up the sides with a plastic spatula or something similar.
- Remove the latches from the grooves.
- After carrying out the preventive maintenance, guide the latches into the grooves and press them moderately.
Conclusion
Removing the steering wheel on your own is not difficult if you strictly follow the given algorithm. If difficulties arise, contact service station specialists for help.
As for installing a plastic cover on the steering wheel or buying a new original assembly, it is a personal matter for each car enthusiast. Based on the availability of funds, the size of the budget allocated for maintenance, and upgrading the machine. When purchasing, give preference to original products.
Reviews
| № | Positive |
| 1. | Dmitry Vasilyevich , 43 years old (drive2.ru): Lada Vesta has basic equipment, steering wheel without functional buttons. I’m used to it, I’m not going to change it, and it’s expensive when buying a new original one. |
| 2. | Sasha , 48 years old (prom.ua): in the third year of operation of the car, I decided to replace the RK. I bought the original one with the factory part number, the price is 5600 rubles without the airbag module. |
| 3. | Ivan , 39 years old (autotoday.com): bought a plastic cover with buttons for 2,500 rubles. Although not original, it fit perfectly. I connected it myself, I didn’t contact the service. |
| 4. | Gennady Mikhailovich , 45 years old (rozetka.ua): on the advice of his comrades, he installed an overlay on the RK with buttons. I ordered the service at a service station. Satisfied with the quality of work, functionality, affordable price. |
| 5. | Nikolai Petrovich , 43 years old, (avtoflit.com): I bought the car second-hand, got it from the previous owner in good technical condition. The standard steering wheel has a plastic cover with buttons for adjusting speed and radio volume. |
| 6. | Semyon Vasilievich , 46 years old, (autotoday.com): I am satisfied with the quality and functionality of the remote control with buttons, it was not in vain that I paid over 6,000 rubles. I installed it myself, I didn’t go to a workshop. |
| 7. | Gennady Vasilyevich , 43 years old, (drive2.ru): two years after buying the car, he replaced the standard steering wheel with a new one with mechanical buttons. Now I’m less distracted by activating modes, switching, and watching the road situation more. |
| Negative | |
| 8. | Sergey Nikiforovich , 50 years old (prom.ua): installing a plastic cover on the steering wheel was not successful for me. The speed increase button in cruise control mode is inactive. I will contact the service station for diagnostics. Garage mates suggested that there was a defect in the mechanical key. |
| 9. | Georgy Semenovich , 47 years old, (avtoflit.com): I do not recommend buying plastic steering wheel covers for the Lada Vesta. It's better to pay more and buy a factory part. |
| 10. | Zhorik , 34 years old, (drive2.ru): twice contacted auto electricians at service stations to diagnose mechanical keys on the overlay. There are always some problems with non-original accessories. |
| 11. | Vasilyevich , 49 years old, (autotoday.com): The plastic cover served me for two years, after which the mechanical buttons began to fall out. The quality is very, very primitive. |
How to install multifunction steering wheel on other configurations
In simple configurations of the Lada Vesta, the design will have to be modified more. You will have to connect the cruise control system yourself, as this is not provided in the packages. Additionally, you will need a set of three wires with a snail.
The Lada Vesta multi-steering wheel in such cases is installed in the following order:
- Remove the regular steering wheel from the car.
- Install the new multifunction steering wheel, being careful.
- Route the wiring harness.
- Connect it to the connector. All operations are carried out by analogy, as in the “Lux” configuration.
The three-wire harness is pulled through the technological hole, which is located above the pedals. The harness is routed to the electronic control unit. The electrical connection must be made according to the diagram shown below.
Contact No. 11 of the block should receive 12 volts. Check this parameter using a voltmeter or multimeter.
The second end of the wiring harness is inserted into the block to connect the cochlea. This end of the harness runs along with the radio wiring.
Recommendations in general
In general, it must be said that in order to completely install the multifunction steering wheel without problems, not only an installation specialist, but also a microelectronics specialist must be present during the installation.
Come to our installation center! We have everything, we successfully carry out this work!
What else do we do:
– Installation and SALE of radar detectors and recorders
– firmware for the Grant/Kalina instrument panel to indicate engine and ambient temperature
-sale and installation of parking radars
-installation of anti-theft lock "Garanta"
– installation of the “Dragon” lock on the gearbox
If we consider only externally, the steering wheel of the Lada Vesta and X-Ray are identical, but not everything is so simple. One of the significant differences between the steering wheels of both models is that the crossover does not have backlighting for the radio control keys. Therefore, in the dark, it is inconvenient to control the sound of music using the multifunction steering wheel.
However, you can solve this problem yourself by independently installing the backlight of the radio buttons on the steering wheel of the Lada X-Ray.
IMPORTANT! The owner of the SUV carries out all manipulations at his own peril and risk. Tampering with the car's electrical system may cause the dealership to refuse the warranty for the crossover.
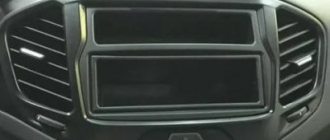
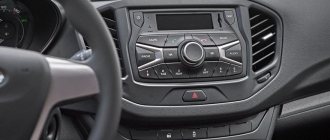
Lada Vesta head unit with navigation: review, technical specifications
The standard car radio with navigator is equipped with a multimedia screen. There are no external buttons on the sides; at the bottom there is a rotating knob and Mute and Mode buttons.
There are 3 pairs of keys on the steering wheel:
- with arrows and a picture of a handset for scrolling through files and songs, and in the “Phone” mode – for managing calls;
- duplicate Mode and Mute;
- adjusting sound volume.
Lada Vesta standard radio with navigation.
You can control the multimedia system without being distracted from the road. Loading and shutting down the MMC occurs automatically when you turn the key in the ignition.
System filling
Installed software – Windows CE. The software requires a small amount of memory (32 KB) to operate. The RAM capacity of the standard MMC is 256 MB.
The processor is not the fastest, but it is powerful enough to process GPS and Glonass signals. 2 GB of internal memory are allocated for the firmware, another 8 GB are intended for storing cards.
Screen and menu
The 7-inch screen is equipped with TouchScreen technology. Vesta's manufacturers chose a resistive display that can operate without failures at subzero temperatures and in hot weather. One of the disadvantages of this type of screen is that finger touches are poorly recognized. You have to use a stylus or a substitute object.
Vesta owners complain about the poor placement of the screen: the display is placed at an angle, the image cannot be seen if the panel is illuminated by the sun.
The icon sizes are large: the buttons are grouped on separate tabs. On one you can control radio, audio, telephone and navigation. Photos, videos and a button for activating the AUX connector are transferred to the second.
Connectors and supported cards, formats
The Vesta multimedia device with navigation includes:
- SD card slot (carrier volume is at least 1 GB, upper limit is 4 (SD) and 32 (SDHC) GB);
- USB port (memory capacity of the connected device up to 64 GB);
- AUX port;
- Bluetooth communication unit.
The maximum current for recharging the phone is 1.5 A. The more files on the device, the longer it will take to read the information (the download time increases). There are restrictions on the number of root folders (no more than 4). Maximum capacity: 1024 files and 256 folders.
Bin files cannot be downloaded to external connected devices. This is the format of the firmware. The car radio will start updating and stop working.
Modes
There are 8 modes on the radio of the Lada Vesta car:
- Radio. FM and AM modulations are supported. There is an auto search function. Vesta's standard MMS stores up to 8 radio stations. When the “Radio” mode is turned on, the name of the received wave is displayed on the screen.
- Audio. Allows you to play music from an SD card, flash drive or received via Bluetooth. The sound is adjusted using the equalizer. 6 standard settings are included (jazz, rock and others). Music formats Mp3, WMA, WAV, FLAC are played.
- Telephone. You can load your smartphone's address book onto the radio, then when there is an incoming call, the phone number and the installed photo of the subscriber will be displayed on the screen. There is a speakerphone in the cabin.
- Navigation. Allows you to determine the location of the car, display a map and build the optimal route. The standard MMS has the offline navigator "CityGID 7".
- Photos. MMS reads files in jpeg, jpg, jpe, bmp, gif, png formats.
- Video. The car radio plays WMV3 files with a resolution of 320x240 pixels. A paused movie will continue from the interrupted point even when you exit to the main menu and then return to viewing mode.
- The MMC will begin to play files from the external media connected through the corresponding port.
- Rear View Camera. The mode is activated automatically when reverse gear is engaged. Markings are visible on the screen, allowing you to determine the distance to the car bumper with an accuracy of +/- 0.5 meters.
In any mode, files are played in the order they were recorded. So you won’t be able to set up a playlist by simply numbering the songs in the required order.
Setting the Keys
The work will require materials and tools.
Materials:
- SMD LEDs categories 0603 and 1104.
- SMD resistors types 0603 or 0805 - the resistor value should be 4-8 Ohms. A high rating means the diodes will last longer, but will produce dimmer light.
Tools:
After completing the preparation, the actual process of installing the backlight of the radio buttons on the steering wheel of the Lada X-Ray begins. Installation begins with identifying suitable areas on the board and gluing LEDs to these areas (everything is done through a contact rubber band).
Areas on the board
Limiting resistors are glued to the back side, which are then connected to the diodes through a drilled hole.
Everything is opened with varnish for greater reliability.
IMPORTANT! The Vesta radio control key block is not suitable for the Lada X-Ray.
Button layout
Additional buttons on the steering wheel of the Lada Vesta make it possible to control the music system and cruise control. The music on the steering wheel is controlled by buttons located to the left and right of the horn button. On the left there is a cruise control unit that allows you to perform the following actions:
- Enable – disable cruise control.
- Speed limit - on and off.
- Increase or decrease cruise control speed.
- Suspension of cruise control, speed limit.
- Setting the stored speed.
Lada Vesta is the first AvtoVAZ car to have a multifunction steering wheel installed.
The music unit is located on the right side of the steering wheel, and can allow manipulation, including downloading music from the steering wheel. Although this is a joke, there is no such function.
- Select the playback source - music while driving.
- Mute. The buttons allow you to quickly turn off music playback, and then turn it back on at the same volume as it was.
- Navigation through the music menu.
- Receive a call from your phone, hang up the call.
- Adjust the volume – loud music while driving is not always useful, so you can turn the volume down or up.
- Switch music tracks. When music is playing, the girl driving, especially the blonde one, can easily turn on a different song.
In addition to the listed functions, the Vesta multifunction steering wheel has a built-in airbag. There is also a standard beep. Unfortunately, you won't be able to download music with this device. Such a function is not provided here.
Connection
First you need to apply a voltage of +12V to pin 11 of the steering column switch. To add a contact to the plug, the connector must be disassembled, for which the white color retainer is first pryed off with a screwdriver.
As for +12V, you can get it from the steering angle sensor (pin 8), which is located under the steering wheel. But on X-Rays equipped with power units from Renault-Nissan, +12V can be taken from the plug plug, which is located between the headlight adjustment and mirror adjustment controls - pin 8 means +12V backlight, and pin 1 +12V from the ignition, respectively.
Next, you need to make sure that the necessary wiring is present on the steering wheel - from the block with the keys to the 11th contact. If there is none, you will need to run the wire yourself.
At this point, the actual installation of the backlighting of the radio buttons on the steering wheel of the Lada X-Ray is completed and you can put everything back together.
2 din connection via ISO connector
The connection diagram for a Chinese 2 din radio is described in detail in the operating instructions supplied with it from the manufacturer. To facilitate installation work, on the back panel of the player, as a rule, there is the necessary marking of all components and connections. Mostly, the difficulties for car enthusiasts who are faced with the installation of a standard or non-standard radio for the first time are caused by the correct connection of the car's electrical wiring to the receiver.
All work on connecting the car radio is carried out through the ISO connector, which consists of two plug boxes - A and B (each contains eight contact connections) or one combined box, where A is the plug for the power connections of the radio, B is responsible for the car acoustics.
- Budget set: monitor + rear view camera. Installation.
The standard wire connection diagram (pinout) is as follows.
- Connector A. 1, 2 and 3 pins are not used.
- 4 - yellow power cable going to the car battery;
- 5 - blue wire, amplifiers and external antenna;
- 6 — orange cable, backlight;
- 7 - red - ignition;
- 6 - black. Weight.
- Block B. Everything here is also quite simple.
- Contacts 1 and 2 - purple, purple-black wire. Plus and minus of the right rear speaker (speakers);
- 3, 4. Gray. Gray-black. Plus or minus the front right column;
- 5, 6. White. White-black wire. Front left plus or minus;
- 7 and 8. Green and green-black wire. Rear left positive and negative contact.
When connecting a car radio, it is very important not to mix up the contact groups of wires. Since the sound quality of your equipment depends on them. And often the safety of the equipment itself.