What should I do if the problem remains after replacing the module?
First of all, it is necessary.
Checking the ignition module
Resistance between contacts: 1 and 4, 2 and 3 - should not be higher than 5.8 kOhm!
If after replacing the ignition module nothing has changed, it means that others are faulty.
Spark plugs and ignition system
If this does not help, then you need to check the spark plugs and replace them if necessary.
(cm. ).
Inspecting the condition of the spark plugs
Before this, you need to remove the tips of the armor wires. To unscrew the spark plugs, you will have to use a special wrench. Then the candles need to be inspected: they should have a normal brown color and there should be no soot or soot on the surface.
If replacing the module did not correct the situation, and . This means the rings or pistons are worn out.
, they need to be replaced, and the spark plugs must be cleaned and put back into the socket. It is also worth checking - too long a distance has a bad effect on the operation of the devices.
Electrical diagram of the VAZ 2114 starting system
The figure shows an electrical diagram of the VAZ 2114 starting system. As can be seen from the figure, it consists of:
- Battery;
- Ignition switch;
- Relay that turns on the ignition;
- Hall Sensor;
- Semiconductor signal receiver from the sensor;
- Electronic switch;
- Ignition module.
- High voltage terminals.
The electrical diagram also shows the fuses of the power supply circuits of the electronic units. Let's try to look at the device and operating principle of the ignition coil. As already noted, there are two of them in the block; they are identical in design. The ignition coil circuits of one and the other are also absolutely identical. The principle of operation of the ignition coil remains the same. Both consist of cores made of electrical steel. Two windings are wound on them. One of them is low-voltage, and the second produces high-voltage voltage to ignite the working mixture.
The ignition coil connection circuit is made in such a way that one end of the low-voltage winding is connected to the supply voltage, and the other end of these windings is connected to a transistor generator. Each coil has its own transistor. The high-voltage leads are connected directly to the spark plugs; each winding supplies energy to two spark plugs. One of them outputs pulses to cylinders 1 and 4, and the second to cylinders 2 and 3.
The wires on the ignition module are arranged as follows. Contacts A and B receive control pulses from the electronic switch, pin D receives power from the machine’s on-board network. The terminal marked with the letter C is connected to the vehicle ground.
conclusions
Thus, replacing a faulty ignition module is not very difficult. At the same time, it is important not to confuse the locations of high-voltage wires; this leads to rapid failure of the new device due to a strong change in the internal resistance in the wires. It is worth keeping in mind that the malfunction is sometimes not related to a breakdown of the ignition module.
The VAZ-2114 ignition module is also called a high-voltage coil, which serves to transmit current to the spark plugs. This module has its own signs of malfunction, by which it is necessary to determine when to replace the failed part. What are these signs? This will be discussed in this article.
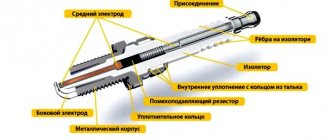
MODULE DEVICE
Design (circuit) of the VAZ 2114 ignition module
The device includes two coils, the main task of which is to generate high voltage. A two-channel electronic switch helps them in this. All these parts are contained in a housing made of durable plastic. The housing has a low-voltage connector for connecting the supply voltage and supplying control pulses. There are also leads for connecting high-voltage wires that are connected to the spark plugs.
VAZ-2114 ignition module and its features
The passenger car ignition module is specially designed to improve the starting of a car engine. Since two high-voltage coils operate as the main components of the module, it is often called the “ignition coil”.
Let's look at the structure of this part:
- coils for generating high voltage;
- two-channel electronic switch;
- durable plastic case;
- low-voltage connector for supplying control pulses;
- terminals for connecting high-voltage wires to spark plugs.
The main operating elements of the ignition module are high-voltage coils that distribute the igniting spark to the spark plugs. This is possible thanks to the following design:
- Wires for high voltage transmission.
- Low voltage terminals.
- The windings on the core are secondary (for igniting the working mixture) and initial.
- Electrical steel core.
The mechanism of operation of the ignition coil is as follows:
- the electronic engine control unit collects all signals from the sensors located on it;
- The ECU generates a control signal;
- the signal goes directly to the ignition coil;
- that, in turn, forms a high-voltage voltage;
- voltage from the coil is supplied to the engine cylinder spark plug;
- the fuel-air mixture ignites;
- the engine starts.
Even an inexperienced car enthusiast can find this part: just trace the path of one of the high-voltage wires - from the spark plug to the plastic case.
This housing houses the ignition module.
Ignition coil VAZ 21124 16 valves price
We're sorry, but the requests coming from your IP address appear to be automated. For this reason, we are forced to temporarily block access to the site.
To continue, please enter the characters from the image in the input field and click "Submit".
Cookies are disabled in your browser
. We will not be able to remember you and correctly identify you in the future. To enable cookies, follow the tips on this page.
Why did it happen so?
Perhaps the automatic requests do not belong to you, but to another user accessing the network from the same IP address as you. You need to enter the characters into the form once, after which we will remember you and be able to distinguish you from other users exiting from this IP. In this case, the page with the captcha will not bother you for quite a long time.
THIS IS INTERESTING: Timing belt for Lada Granta
You may have add-ons installed in your browser that can make automatic search requests. In this case, we recommend that you disable them.
It is also possible that your computer is infected with a virus program that is using it to collect information. Maybe you should check your system for viruses.
If you have any problems or would like our support team, please use the feedback form.
Ignition coil 21124 BOSCH
The ignition coil is one of the most important elements for igniting fuel in the engine cylinders. It is a device that consumes low-voltage current from a car battery and converts it into high-voltage pulses. At the right moment, they form a spark between the electrodes of the spark plug and ignite the fuel-air mixture.
Delivery to regions
- Delivery of an order worth over 5,000 rubles is free if the delivery cost does not exceed 500 rubles; in other cases, delivery of goods is paid upon receipt of the goods.
- Delivery to the transport company is FREE.
- The timing, cost and method of delivery depend on the weight, dimensions and cost of the ordered product.
- Delivery options can be selected by the online store manager.
Source: https://automotocity.com/avtovaz/katushka-zazhiganija-vaz-21124-16-klapanov-cena.html
VAZ-2114 ignition module: various signs of malfunction
At home, all stages of the checks can be performed independently. The first stage is checking the spark plugs. It is carried out in the following sequence:
- We remove the spark plugs from their sockets - remove the tips of the high-voltage wires (a special spark plug wrench is suitable for this).
- We examine the candles.
- We clean them from possible soot.
- We set the correct distance between the electrodes.
- We check the spark plugs for operation using improvised means (for example, from a device made from a piezo lighter) or on a car engine with a working ignition system.
If the spark plugs are in good condition, you can proceed to the next stage of checking for faults in the ignition module.
The second step is to check the crankshaft sensor. This test is carried out using a multimeter, thanks to which two characteristics are checked - voltage and resistance. To do this proceed as follows:
- Remove the crankshaft sensor.
- Measure resistance:
- a special ohmmeter mode is installed on the device;
- the terminals of the device are connected to the ends of the winding, which is brought to the surface;
- with optimal sensor operation, digital readings will range from 500 Ohms to 700 Ohms.
- Measure voltage:
- switch the device to the mode for measuring alternating voltage;
- terminals are connected to the ends of the winding;
- any handy object made of metal should be passed along the body of the crankshaft sensor;
- When the sensor operates optimally, the device will show increased voltage readings because there will be a metal object nearby.
Otherwise, the faulty sensor will have to be replaced with a new one, because it also affects the operation of the VAZ-2114 ignition module. If after this there are still signs of coil malfunction, then you should proceed to the third stage of the test.
The third stage is checking the ignition coil itself. This part is checked as follows:
- The easiest way is to replace the coil with a new one;
- while the car engine is running, you can move the coil and knock on it (if there are visible changes in the functioning, it is time to judge a faulty contact in the coil itself);
- take measurements with a multimeter for resistance readings, such indicators are taken from paired coils - they should be identical, approximately equal to 5.4 kOhm.
What to do if you don’t have a multimeter, but you need to check the electrical circuit? Experts recommend using a twelve-volt light bulb. To do this, one of the wires coming from it should be connected to the terminal, and the second wire should be shorted to the motor housing. If the control light flickers when the starter starts, then everything is in working order.
If the car owner has problems performing such diagnostics himself, he can always turn to qualified specialists at a service station.
Checking the condition of the ignition module with a multitester
In a VAZ-2114 injector with 8 valves, you can check the operation module using a multitester. All that remains is to arm yourself with a cunning device and determine the serviceability of the winding. During the procedure, follow the step-by-step instructions:
Determine the operating format of the multitester in ohmmeter mode; it measures the resistance that occurs between the terminals of the secondary winding. Mount the probes by connecting the 1st and 4th cylinders to the terminals. Then fix to the 2nd and 3rd cylinders. An adequate result indicating the absence of a breakdown in the winding is approximately 5.4 kOhm, fluctuations in values plus or minus 0.1 kOhm are acceptable
What you should pay attention to? The resistance between the terminals in a pair must correspond in terms of indicators to each other - be the same. If the difference is more than 100 Ohms, then we can say with confidence that the fault lies in the secondary winding.
How can I solve this problem? Only by replacing the ignition module.
Methods for preventing the ignition module on a VAZ-2114
Malfunctions of automobile ignition coils on the VAZ-2114 can be avoided if preventive procedures are regularly carried out. These include:
- Periodic unraveling of high-voltage wires (associated with greatly increased internal resistance, as this can damage the module).
- Checking the spark gap between the electrodes of the spark plugs (if the distance between the electrodes changes, this will affect the efficient operation of the ignition coils).
If faulty spark plugs are identified, they are replaced, after which the car will function properly again.
The ignition module on the VAZ 2114 and on other VAZ models is designed to supply high voltage through the PVN (high voltage wires) to the spark plugs. Some car owners call the ignition module a coil, which is not entirely correct.
Ignition coils were installed in carburetor vases. The VAZ 2110-15 uses the ignition module.
Design
The design of the ignition module is quite complex, since it combines technology and electrics. The device serves to create high voltage transmitted to the spark plugs. It is this supplied current that is the basis for ignition.
The operation of the module ensures fuel combustion and, accordingly, engine operation. In very simple terms, the car won’t go anywhere without the module.
We recommend: Injection and carburetor engines operate intermittently - find out the causes of the malfunction
For VAZ models, the use of two types of ignition modules is provided:
- Separate;
- Block.
Block ones differ in that the coils operate one per pair of spark plugs. These are the devices that are installed on the “fourteenth” model of the domestic automaker.
The coil distributes power to two candles at once, and its design includes the following elements:
- High voltage wires;
- Low voltage terminals;
- Secondary and primary winding;
- Core.
Separate modules, where the coils supply a separate circuit to each of the 4 sections, are distinguished by the output of high-voltage wires through a spring contact. Block ones are easier to check, they are easy to remove and return to their place.
It is noteworthy that with a size of 11x11x7 centimeters, this block weighs about 1.5 kilograms.
Operating principle and location
The ignition module is controlled by a controller, which in turn receives information about the state of the vehicle from various sensors (, and others). The controller also sets the sequence of operation of the ignition coils or, in other words, regulates the supply of current to the spark plugs. The ignition module operates at temperatures from -40° to +130°.
Finding its location is not difficult; high-voltage wires (HV) go from the module to the spark plugs; along them you can find the module.
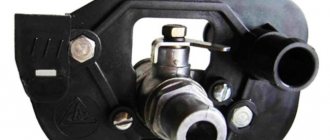
Diagram of the correct connection of wires to the ignition module
If, after checking the wires, you are convinced that they are all tightly connected to the spark plugs, let’s check that the wires themselves are connected correctly. Of course, if no one has climbed into the engine before you, then there is no point in checking. If there was traction and it disappeared, the reason could be both in the coil and in the wires themselves - they could be pierced. But in any case, let's check that the connection is correct. The ignition module shows the numbering of the cylinders to which the wires fit.
- 1 cylinder – central lower outlet
- Cylinder 2 – left output
- Cylinder 3 – top outlet
- 4 cylinder – right output
The diagram is shown for a coil installed on a vehicle.
If after checking no problems are identified, you should consider replacing the coil or wires. It is advisable to change both.
The cost of PVN, depending on the manufacturer, ranges from 300 to 600 rubles per set. The most popular manufacturers:
- TESLA
- BRISK
- BAUTLER
- Egorshinsk
The cost of an ignition coil is from 1300 to 2500 rubles. Modules from the following companies can be found in stores:
- SOATE (St. Oskol)
- MZATE
- HOFER
- FENOX
- BOSCH
When choosing a module, you should pay attention not only to the manufacturer, but also to the coil itself; it comes in old and new designs. Therefore, it is better to dismantle yours and bring it to the store.
Possible reasons for failure of the ignition module
Before repairing the main part in the car’s ignition system, you need to understand the nature of the problem. To do this, the consumer must be aware of the signs of a malfunction, as well as the causes of the breakdown.
The main reasons for device failure
Causes of problems:
- The ignition system uses spark plugs that do not match the vehicle parameters. They may not have the gap specified by the manufacturer. Also, the spark plugs themselves may not be working or dirty; this can be determined by visual diagnostics. If there are traces of carbon deposits on the devices, they must be removed.
- Malfunctions in the operation of the MH can arise as a result of frequent spark checks. At the time of diagnosis, a high load is placed on the device. If it appears frequently, it will lead to equipment failure or incorrect operation.
- The ignition module in the VAZ 2114 operates with the high-voltage cables disconnected. This also leads to device failure. The products themselves may be damaged, which affects the functioning of the engine as a whole.
- The device operates under severe vibration conditions. Their impact may be due to poor quality fixation of the module in the seat. As a result of vibrations, the factory soldering inside the equipment structure is damaged. This leads to its incorrect operation.
- The contact inside the plug with the low-voltage cables is broken.
- Initial use of a defective device or module with poor build quality. This factory defect can only be eliminated by replacing the mechanism; repairing the equipment is pointless.
- Moisture getting inside the case. This problem is unlikely, but exposure of the device to liquid may cause it to short out and break.
Signs of coil malfunction
The main symptoms of a malfunction in the VAZ 2114 ignition module:
- Difficulties arise when trying to start the engine. Starting the car engine may be difficult due to the fact that there is no spark on a spark plug or several.
- When idling or parking with the internal combustion engine running, the speed of the power unit floats. Their change is not associated with pressing the gas pedal and other third-party factors. This happens randomly.
- There are dips in the power of the car's engine. This is especially felt when driving uphill or sharp acceleration. Problems can also occur when driving on a flat road.
- Several cylinders stopped working. Usually these devices operate in pairs, so elements 1-4 or 2-3 could fail. Non-working cylinders may be indicated by “triple movement” of the engine.
- A “Check Engine” warning light appeared on the dashboard.
If the ignition module malfunctions, problems will appear not only in engine operation, but also when starting it.
The “Simple Opinion” channel, using the Lada Priora car as an example, spoke in detail about the symptoms that appear in the operation of the ignition modules.
Replacing the ignition module yourself
So, first of all, we are looking for a module (for those who don’t know). The PVNs from the spark plugs go to it.
- Remove the negative terminal from the battery
- Disconnect the wire block from the module
- Disconnect the PVN
- Unscrew the module itself and remove it
- Now install the new module and reassemble in reverse order.
When installing, do not confuse the position of the PVN on the reel.
Helpful note!
If you are installing a new coil and old wires, pay attention to them. If there are yellow stripes on the tips of the spark plugs and wires, then the wires need to be replaced.
After replacing the module, you need to check its operation. We start the engine and enjoy the work done.
At different times, different engines were installed on the VAZ-2110 car, both carburetor and injection. However, regardless of the type of power system and the number of valves (8 or 16), all engines are assembled on the unit base of the old engine 21083 and 21093. The most progressive of these engines is the 16-valve 1.6-liter VAZ 21124 engine with a power of 89 horsepower. Today we will touch on the ignition module for 8-valve engines 2111 and 21114 (1.6 l), check its performance and find a suitable replacement for the failed module.
CHANGING THE IGNITION SYSTEM MODULE
When repairing the ignition module does not produce positive results, all that remains is to look for and install a new device. Most mechanics recommend choosing a “GM” device as a very reliable product. Its cost varies in different regions, but is close to 2000 rubles. Replacing the ignition module can be done independently, there are no special features, and no special devices are needed. For work, prepare:
- Ignition unit for replacement;
- Key to "13";
- Rags.
The work can easily be done in a garage or on level ground. Work order:
- Open the engine compartment hood and disconnect the battery terminals. It is quite enough to remove the terminal only from the negative side.
- After this, we remove the high-voltage wires from their installation locations. You need to remember where which wire was located. If you doubt your abilities, then make marks. Wires cannot be swapped. A new spare part can be damaged.
- At the next stage, carefully disconnect the connector with wires from the module. Use the key set to “13”, which unscrews the three nuts securing the device to the motor.
- When the nuts are removed, the device is removed from the engine.
Now they use rags to wipe the installation area and around it. Carefully inspect the new device and begin installing it. It is carried out in the reverse order to removal. Once again I would like to remind you of the importance of installing high-voltage wires in their places. If difficulties still arise, then take another look at the block. It shows the numbers of high-voltage wires.
Numbers – the order of arrangement of explosive wires in the module
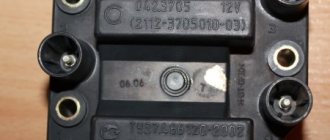
It should be noted that on sale you can still find old-style ignition modules that do not have wire numbers marked on the high-voltage terminals. If you purchased just such a device, be careful when installing it.
Version of the module on the 8-valve VAZ-2110
The top ten was equipped with two 8-valve engines of different sizes - 1.5 (2111) and 1.6 liters (21114). The ignition modules for these engines are different.
- The one and a half liter engine
has a module with article number 2112-3705010, - and the 1600 cc
is equipped with module 2111-3705010.
A module for a 1.5 liter engine costs about 1500-2100, and the second one is 500 rubles cheaper.
Which is better?
SOATE devices manufactured in Stary Oskol have proven themselves to be the most reliable ignition modules.
Module structure
The module consists of two ignition coils and two high-voltage switch switches.
Inside the module there is a board with radio components and ignition coils filled with compound.
The coil generates a high voltage pulse, and it is a simple transformer with two windings, primary (induction voltage about 500 V) and secondary (induction voltage at least 20 kV). All this is assembled in a single housing, on which there is a connector for signal wires (from the engine control unit) and four terminals for high-voltage wires.
Schematic diagram of the module.
The module operates on the principle of an idle spark - it distributes sparks in pairs to cylinders 1-4 and 2-3 according to impulses transmitted from the ECU.
The principle of operation of the ignition coil.
The module is a kind of connecting link: from the electronic control unit, which controls its working process, a certain signal is sent to the winding (in the form of charged pulses); then, the module produces high voltage, which is transmitted to the spark plugs through high voltages. This action allows the candles to produce the necessary spark to start the internal combustion of the air-fuel mixture in the chamber space.
The new generation VAZs, including the fourteenth, are equipped with an ignition system coil; it is not included in the general module, since its other important part - the switch - is located in the electronic unit. If you take the old-style VAZs, including the fourteenth with a 1.5-liter engine, then they have an ignition system module: two coils and two switches in a single housing. Two coils are connected to the cylinders by high-voltage wires (each for two cylinders: one for the 1st and 4th, the second for the 2nd and 3rd).
Signs of a faulty ignition coil:
- When accelerating you feel a failure,
- Power drops
- At idle the engine behaves unstable,
- The engine has problems (cylinders fail).
Before deciding what to do with a failed ignition coil, you need to check it. No special skill is required, just know what a multimeter is and how to hold it in your hands. Depending on the test result, you should make a decision: replace or repair.
In principle, the fundamental malfunction of the ignition coil is always the lack of normal contact. Maybe the mass has broken, maybe the contacts are stuck or oxidized. A small deposit of dust can put an entire cylinder out of working order, not to mention a modest module.
Along with possible module malfunctions, it is recommended to check all sensors - from mass air flow to DS - there is a serious possibility of failure of one of them.
Malfunctions of ignition modules on the VAZ-2110. DIY diagnostics
The main task of the module is to distribute a high-quality spark sufficient to ignite the working mixture.
If this does not happen, problems begin with the motor:
- power drop;
- high gasoline consumption;
- failures during acceleration;
- unstable idle speed;
- engine failure when starting.
Signs
- If one of the module coils completely fails, then two cylinders do not work
. This is clearly visible even to the naked eye - the engine is feverish at idle, starting is difficult, fuel consumption is sky-high, loss of dynamics. - To exclude all other components of the ignition system, make sure that the spark plugs are in working order
. To do this, unscrew them and check the spark on each of the spark plugs by cranking the engine with the starter and placing the spark plug with the high-voltage wire on the head so that the body (threaded part) of the spark plug touches the engine mass. If there is no spark or it is weak, replace the spark plug with one that is known to work. - If this does not lead to anything, check the high-voltage wires
. Thus, we will exclude spark plugs, caps and high-voltage wires from the list of non-working elements. Next we will check the ignition module.
How to check the ignition module?
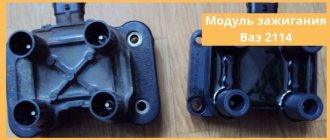
- First of all, we carefully inspect the module body. There should be no chips, burns or cracks on its surface. A module with a damaged casing is replaced without any hassle.
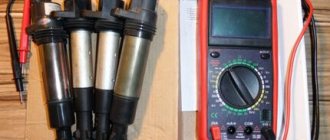
- If the spark is unstable only on cylinders 1-4 or 2-3, one of the module coils is probably damaged. In any case, we will conduct a comprehensive check of the device. For this we will need a regular multimeter
.
Multimeter for checking the ignition module.
Diagnostic procedure
The diagnostic procedure can be as follows:
- Disconnect the connector with signal wires from the module.
Remove the connector from the module by moving the lock slightly and pulling the wire. - Turn on the ignition and check the voltage at terminal 15 (central) of the control wire block.
The rated voltage is 12 V. A drop or absence of voltage when the battery is charged indicates that the engine control unit does not supply power to the module. This means the reason lies in the ECU. We check the voltage between pin 15 and the block ground. - We remove the high-voltage wires, unscrew the module mounting bots and remove it.
- We check the resistance of the primary windings of the coils - put the multimeter in resistance measurement mode and take readings from the rightmost and central terminals, then from the leftmost and central terminals.
The nominal resistance of the primary windings is approximately 0.5 Ohm. Scheme for checking the primary windings. - We measure the resistance of the secondary windings between terminals 1-4 and 2-3 high-voltage wires.
Nominal value: 5.4 kOhm. If the readings do not correspond to the nominal value, the coil is not working correctly. Scheme for checking secondary windings. - Check the module for a short circuit.
To do this, install one tester probe on the central pin 15, the second on the metal body. The device should show the absence of a short circuit (one or infinity). Otherwise, one of the coils has shorted to the housing. Scheme for checking the module for short circuit.
Errors
A module malfunction can also be determined using an error scanner. Error codes associated with the module are:
- R-3000, R-3001, R-3002, R-3003 and R-3004
- gaps in sparking, the module itself, spark plugs, high-voltage wires or the ECU may be to blame; - R-0351
- the coil of cylinders 1-4 does not work; - R-0352
- the coil of 2-3 cylinders does not work.
The scanner readings do not yet indicate problems with the module itself.
It is possible that the spark plugs are not working or the high-voltage wires are broken, but if we initially diagnosed them, then the fault lies entirely with the ignition module. In this case, we can repair it ourselves, or buy a new one, which is faster, easier and guarantees uninterrupted operation of the ignition system. Good luck to everyone, strong spark and good roads!
We check module 2114 using available methods
The most effective way to find out that the ignition module is not working is to take a device that is known to work and try to start the engine on it . It is clear that not every module from the second generation eights, nines and Samars may be suitable.
Depending on the type of ignition system, Samara may have a coil installed instead of a module, but we need exactly the module from the 8-valve injection 2114. Everything is simple here - the engine is running, which means the module has become obsolete, we replace it with a new one. However, there is a high probability that the high-voltage wires are broken and this will ruin not only the entire diagnostic picture, but also someone else’s ignition module.
Checking the integrity of high-voltage wires
Therefore, before checking the module itself, you need to make sure that the high-voltage wires are in order, do not break through to ground and allow current to pass through.
The action algorithm for subsequent verification is as follows:
- Checking the ignition module on the high-voltage circuit for an open circuit. To do this, you will need a multimeter that is set to resistance measurement mode. In the module, the ignition coils are connected in parallel - the first and fourth, second and third. To check, take the multimeter probes and install them (with the ignition off) into the connectors for high-voltage wires on the module. First 2 and 3, then 1 and 4 cylinders. The resistance between parallel coils should be 5.1-5.5 ohms. If the resistance is infinite, there is a break in the network and the module must be replaced.
Checking the ignition module for a break
- The last, traditional way to check any device is to knock, tug, move . No matter how ridiculous it may sound, sometimes after such a request the module comes to life. At least it’s enough to get to the nearest auto store and buy a new module, which costs between 2-2.2 thousand rubles.
Video about checking the ignition module on a VAZ-2114
How to replace the ignition module on a VAZ 2113-VAZ 2115?
2) Then find the location of the ignition module in the engine, and after finding it, disconnect the four high-voltage wires that are connected to it.
4) Next, remove the three nuts that secure this module to the bracket.
Note!
To make it easier for you to visually determine, look at the photo below, which shows the places where three nuts secure the module to the bracket!
5) Then remove the module from the three long pins that are present on the bracket.
Installation:
The ignition module is installed in the reverse order of removal, but when installing it back, you must know two things:
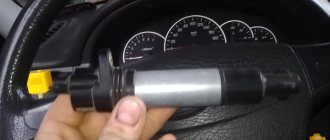
1. After the ignition module is installed, look at its surface, you see the numbers shown there: 1, 2, 3, 4. So, these numbers indicate the numbers of the corresponding cylinders.
2. Have you noticed that the same numbers are present at the tips of the high-voltage wires: 1, 2, 3, 4. All this was done to make it easier for you to determine which of the high-voltage wires should be connected to the module where.
Note!
When reinstalling the module, connect all high-voltage wires strictly by numbers, for example: “the first wire - to the first terminal”, “the second wire - to the second terminal”, etc.
Checking the ignition module for functionality:
To test the module, you will need a " high voltage arrester"
", which can be purchased at a car store for a price in the region of 900-1500 rubles. Using this spark gap, you can check for serviceability: the ignition module, the ignition coil, and the high-voltage wires themselves for the presence of sparking.
Note!
The video clearly shows that the ignition module is working properly, because when all the wires are connected to it one by one, a spark constantly appears on the spark gap, but the last check shows that the spark breaks off a little, but still the module performs well and does not need to be replaced !
Important!
When working with the ignition module, be careful, and under no circumstances carry out any actions with it without de-energizing the battery!
HOW TO CHECK THE SYSTEM FOR OPERATION
In any case, the check begins with the candles. To do this, they need to be removed from their nests. This is also easy to do. Remove the tips of the high-voltage wires from them and, using a wrench for turning out the spark plugs, remove them from their places.
Next comes their inspection, cleaning and testing. They should have a working brown color, with no soot or soot. If their presence is observed, then there may be wear on the pistons and rings. In any case, the spark plugs are cleaned, checked and, if necessary, the gap between the electrodes is adjusted. After this you can check their functionality
There are special probes for these purposes. “Craftsmen” manage to make such products themselves from a piezo lighter. If nothing like this is available, then check it on the engine. It’s good if there is a car nearby with a known good starting system. This will make it possible to make an accurate diagnosis for candles. If they are in good condition, the search continues further.
Many publications recommend checking for the presence of high voltage voltage at the terminals of the device. Doing this in a garage is problematic due to the lack of a special measuring device. A conventional tester is used here, since it cannot measure several tens of kilovolts of high voltage. If you have experience as a radio amateur, you can assemble a voltage divider.
Checking for the presence of high voltage is dangerous due to a possible sensitive electric shock, so we will touch on other methods. Let's talk about how you can determine ignition coil malfunctions and check this system:
- The simplest method is to replace the unit with a working device. It is not always possible, since not all drivers carry this device with them in reserve;
- They also advise, which has been tested many times, to move the device or knock on it while the motor is running. If changes are noticeable, they indicate poor contact inside the device. Sometimes it's fixable;
- Check with a tester or multimeter in resistance measurement mode. The resistance of the paired terminals of the coils, 1 and 4, as well as 2 and 3, is measured. It should be identical for both windings and equal to approximately 5.4 kOhm.