Necessary parts and tools for repair
Troubleshooting the cylinder head begins with the purchase of original parts and various consumables, the list of which is as follows:
- Fuel intake system valve 8 pcs. (art. 21120-1007010).
- Exhaust gas valve 8 pcs. (art. 21120-1007012).
- Set of hydraulic compensators 16 pcs. (art. 21120-1007300).
- Gaskets for valve cover, cylinder head, intake manifold, exhaust manifold (all come as a set art. 21120-1002064-86).
- Bolts securing the cylinder head to the engine crankcase (art. 21120-1003271-018).
- Timing belt (art. 2112-1006040-02RU), timing tension roller (art. KT100507/100513), drive belt for mounted units (art. BP638).
- Engine oil and oil filter.
- Cooling system fluid.
Installation of valves on a VAZ 2112 is carried out using a standard set of tools, as well as several specialized types of keys:
- standard set of spanners from 8 to 24 mm;
- socket sockets in a set from 8 to 27 mm;
- end internal hexagons;
- mechanical valve retaining ring remover (depressurizer);
- torque wrench for tightening the cylinder head and camshaft bolts;
- paste for grinding valves (set for rough and fine grinding);
- metalworking cloth gloves to protect hands while working.
The work of replacing 16 valves on a VAZ 2112, the price of which as of this fall is about 50 thousand rubles at AvtoVAZ dealerships (or approximately 35-40 thousand rubles at ordinary car repair shops), is not a very complicated process. You can carry out the work yourself, for which it is enough to purchase the above-described spare parts and the necessary tools.
Valve cover gasket: keeping the engine clean and protecting the valve train
In engines with overhead valves and other timing devices, a cover is provided that is installed on the cylinder head through a gasket. Read the article about what a valve cover gasket is, what types it is and how it is designed, as well as about its correct selection and replacement.
What is a valve cover gasket?
Valve cover gasket (cylinder head cover gasket) is a sealing element of piston internal combustion engines with overhead valves; an elastic gasket for sealing the volume closed by the cylinder head cover installed on the cylinder head.
The cylinder head cover gasket performs several functions:
- Ensuring tight installation of the cover to the head;
- Sealing the volume covered by the lid to prevent oil leaks;
- Protection of valve mechanism parts and oil from contamination (from dirt, dust, exhaust gases, etc.).
The valve cover gasket is not a critical part for engine operation; without it, the power unit will function just fine. However, it ensures the cleanliness of the engine, its fire safety (preventing oil leaks and contact with heated parts - exhaust manifold and others) and ease of maintenance. In addition, the gasket contributes to maintaining the cleanliness and performance of the engine oil. Therefore, if leaks appear from under the cover, the gasket should be replaced, and in order to make the right choice, you should understand the types, features and characteristics of these parts.
Types, design and characteristics of valve cover gaskets
Regardless of the type, all valve cover gaskets have a fundamentally identical design. This is a flat elastic part that follows the shape of the plane of contact of the cover to the cylinder head, and has holes for fasteners and other parts. The gasket is placed under the cover and, due to its elasticity, seals the gap between the cover and the cylinder head (filling micro-irregularities and compensating for small deviations of their mating surfaces from the plane), ensuring its sealing.
In this case, gaskets can have different designs:
- Whole (non-breaking) - an ring gasket or a gasket of a more complex shape (for example, under the covers of engines with two camshafts on the cylinder head) without breaks, which is simply installed under the cover;
- Composite - a gasket with gaps and inserts for sealing the camshaft inlet or other parts;
- Complete - in addition to the main gasket, the kit may include additional ring seals for spark plug wells and other holes in the cover.
Valve cover gaskets can be divided into several types according to the material of manufacture and applicability with different types of cylinder head.
Depending on the material used to make the gaskets, there are:
- Rubber;
- Rubber cork;
- Paronite;
- Cardboard.
The first type of product is made on the basis of heat-resistant and oil- and petrol-resistant rubber, which is modified with the help of additives and subsequent vulcanization.
The rubber gasket is made from various types of rubber; it is the most elastic, however, due to the shortcomings of the manufacturing material, it can significantly change its characteristics when the temperature changes (soften at high temperatures, become less elastic in the cold) and generally has less durability.
Rubber cork gaskets are made from rubber with added granulated cork or other porous fillers. This material provides a high degree of sealing and vibration isolation, however, gaskets made from it are very demanding on the quality of installation and installation of the cover; they often require additional treatment with liquid sealant and have a limited service life.
Paronite gaskets are made from paronite, a rubber-based material with various mineral additives, which is subsequently molded and vulcanized. Paronite can be asbestos or non-asbestos, but today manufacturers are abandoning the use of asbestos in favor of safer materials. Also, paronite gaskets can be ordinary unreinforced or reinforced with steel wire, thin perforated sheet metal, etc. It is paronite cylinder head cover gaskets that are most widely used today due to their high reliability, resistance to negative influences and good sealing qualities.
Valve cover and its bolts for Kia Sorento 2.5 CRDi
| Manufacturer | vendor code | price, rub. |
| Original | ||
| Hyundai/Kia | 22410-4A401 | 4710 |
| Analogs | ||
| Zikmar | Z16302R | 4500 |
For installation, we chose the original manufacturer Hyundai/Kia with article number 22410-4A401. It is not recommended to use analogues when carrying out such a replacement.
With the valve cover we also change the mounting bolts. Hyundai/Kia bolts with article number 22448-4A001 (5 pcs). The average cost of such a kit is 65 rubles.
What tools are needed?
- 10 mm hex head ;
- Large ratchet;
- Small head 10 mm ;
- Small ratchet;
- The extension cord is short;
- Small 5mm ;
- Open-end wrenches 14, 17, 29 mm ;
- Blow gun;
- Sealant REINZOSIL +300 Victor Reinz;
- Pliers.
Difficulties that may arise when dismantling the valve covers on Sorento 1
- Dismantling the injectors (the injector nozzle may break off) - it is necessary to disassemble the cylinder head;
- Sticking of the valve cover mounting bolts - drill out from the seat (extremely rare).
Removing the cover
In order to work with the valve cover without interference, the first step is to remove the air filter.
Removing the filter
- We unscrew the three nuts securing the filter cover and remove it, as well as the filter itself.
- Unscrew the four nuts securing the filter housing to the carburetor.
- Disconnect the hose from the air intake breather and remove the filter housing.
- Disconnect the carburetor damper drive rod (if there is a retaining ring, you must first remove it).
- Disconnect the choke cable by slightly loosening the nut securing it.
Now we can safely work on the lid.
Removing the cover
- We unscrew the eight nuts securing the cover - it is most convenient to do this using a ratchet with an extension and a 10mm socket.
- We rock the lid a little and begin to remove it. The lid comes out at a certain angle and you need to catch it. If you feel that the cover does not stretch at any angle, check that you have unscrewed all the nuts. Remember, you must apply force when removing the cover, but do not pull it.
What is she?
This spare part can be seen immediately after you open the hood. The purpose of this element is to seal the neck of the gas distribution mechanism (so that oil does not penetrate into unnecessary places). The cover itself is secured with several bolts or nuts. And the VAZ valve cover gasket is made from special rubber, which does not lose its properties even with prolonged heating. However, nothing in the world is eternal, and even such material loses its elastic properties over time.
Valve cover gasket: purpose and causes of failure
After the driver lifts the hood and looks into the engine compartment, the valve cover is the first element to look at.
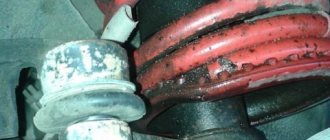
This cover is designed to seal the timing belt, which is located in the cylinder head. This element also has an oil filler neck for pouring oil into the internal combustion engine. The cover is usually attached to the cylinder head with bolts. Removing the cover allows you to get to some elements of the timing mechanism without having to remove the cylinder head. The cover is attached to the head through a sealing gasket. However, it should be noted that oil leakage through the valve cover gasket leads not only to increased lubricant consumption, but also to severe external contamination of the engine, which requires periodic cleaning of the internal combustion engine. Moreover, heavy oil leakage through the valve cover gasket on many engines means that oil gets into the spark plug wells, spark plugs become dirty, etc.
The gasket itself is a rubber product, which allows the element to operate under conditions of constant temperature changes and not lose its properties as a result of constant contact with engine oil. In this case, sooner or later the rubber dries out and becomes hard, and the gasket material cracks. For this reason, oil begins to gradually leak through the gasket, contaminating the engine compartment and the outside of the power unit.
During vehicle operation, replacing the valve cover gasket is a standard procedure that has to be carried out quite often on some internal combustion engines. The valve cover gasket is usually replaced in the following cases:
- an oil leak has appeared or oil leaks have become too intense;
- when the engine or timing belt is repaired, that is, the valve cover is removed;
In other words, you can change the valve cover gasket both when subtle signs of leakage are detected, and during repair work that involves disassembling the internal combustion engine, removing the cylinder head, etc. Let us add that some car enthusiasts change the gasket every 15-30 thousand kilometers traveled, regardless of whether there is a leak or not. This is quite justified considering how much a valve cover gasket costs, it allows you to always keep the power unit clean, and also makes it possible to assess the condition of individual timing elements after removing the cover to replace the gasket.
How to replace the valve cover gasket?
If you need to replace the valve cover gasket, then do not rush to contact a specialist. It is quite possible to perform such a procedure independently, the main thing is to know exactly how it is done. To perform the replacement, you must follow the following sequence of actions:
- Purchase a new gasket, sealant and degreaser;
- Disconnect all pipes from the cylinder block cover;
- Remove the rubber rings under the bolts;
- Clean the joints between the cover and the cylinder head;
- Take a new gasket and install it on the cylinder head;
- Replace the cover and tighten the bolts.
As you can see, in general, the procedure for replacing the cover does not seem to be anything out of the ordinary. It is possible to do it on your own, the main thing is to do everything in the correct sequence, without unnecessary haste and carefully.
More information about replacing the valve cover gasket will be discussed in this video:
The labyrinth is by definition clean. For 3 tkm it won’t clog like that. unless you get it right in the first place
Check the valve cover with a propeller to see if there are any cracks (my version from the factory was placed on sealant and on the drum 2 times)
I doubt that the lid can be removed with sandpaper (there is a huge stone) the corners still “fall over” Only on a router or surface grinder, the price will be considerable.
but ideally there is no need to remove it, that is, there is a gasket. Also written on stone.
regarding the sealant - I wrote my opinion (not only I have already passed this)
After capitalization, she was put on sealant. Went for a break-in and passed it in for an oil change and adjustment. I drove 2 km from the service station - oil filled the collector with stink and smoke. The gasket came out at the back. I returned it with a new gasket. They put it on sealant. After 5 days it came out again, now from the front. how to secure it there? Or maybe there are some popular solutions like cutting out something that won’t come out?
ABOUT! I have two lids. Come in, I’ll give you one.
I wonder how you tighten it like that, I’m in shock because the gasket was squeezed out.
I calmly tightened it with a screwdriver and everything fits normally, there doesn’t seem to be any leakage, so maybe you filled in a lot of oil and it’s leaking. YES, and why tighten it there too much? You want to knock it down in the head, which is made of aluminum alloy. And there’s no fucking sealant there, especially since they smear sealant onto the rubber gasket as well as the paddon gasket.
In short, apparently Strength is not a good idea, it’s not for nothing that they installed a screw there at the factory. They didn’t twist any kind of shoes.
A leaking engine valve cover gasket is a fairly common occurrence on many cars. It is worth noting that the degree of engine wear in this case is not always the main indicator, since engine oil leaks through the valve covers often appear on almost new internal combustion engines and engines with low mileage. As for units with a fairly long service life (especially on budget cars), owners of such cars perceive leaking valve covers almost as the norm. At the same time, there are also many engines in parallel (usually on middle-class and higher models) on which the cover gasket does not leak.
Let's start with the fact that a leaking engine valve cover gasket is a malfunction, so you should not ignore this problem and simply compensate for the decrease in the engine oil level by periodically adding lubricant. In such a situation, it is better to change the valve cover gasket correctly once. Next, we will look at what a valve cover gasket is for, why it leaks, and how to select and replace an engine valve cover gasket.
Read in this article
Replacing valve covers Sorento 1
The reason for the application of the car owner Kia Sorento I (JC) 2.5 CRDi D4CB 2007. At the service station there was a leak of engine oil. Diagnostics revealed damage to the valve cover (burst). Such a breakdown is quite rare, and usually only requires replacement of the valve cover gasket. But if you change it incorrectly, do not observe the tightening torques, or get a frontal impact in an accident , then damage to the cover may occur.
If you also experience oil leaks in the area of the valve cover gasket, but you are not sure what is oozing from under the gasket and not through the valve cover, then use a dry piece of cotton to remove dirt from the valve cover and start the engine. Then, for some time, carefully observe where it will ooze from.
Repair
The cylinder head removed from the engine and placed on a workbench is disassembled. The fasteners of the camshafts are unscrewed and they are carefully removed, then the hydraulic compensators are removed from their seats and, using a screw depressurizer, the valve retaining rings (crackers) are dismantled, after which they are pulled out from their workplaces. After disassembling the cylinder head, we thoroughly clean it of technical contaminants. Each new valve must be ground into its working surfaces; this is done using a drill and a special grinding paste.
Having finished sanding, the working surface is thoroughly wiped with a cloth. All new parts are installed on the cylinder head. The timing mechanism (valve lifters, hydraulic compensators, camshafts and their front seals) is reassembled and the cylinder head is ready for installation on the engine.
How and why to remove the valve cover
In this article it is necessary to touch on this issue, since it is in order to service everything that is in the space under the valve cover that motorists have to deal with the cover itself. There are several operations that require access to the valve cover:
- pouring oil into the engine;
- gas distribution mechanism maintenance;
- replacing the cover itself or the gasket under it.
Filling the engine with oil is perhaps the simplest operation that requires access to the valve cover, because it is on it that the oil filler hole is located, covered by the cap. After the engine has stood for 15-20 minutes, you need to remove the test dipstick, wipe it with a rag and put it back in place and immediately remove it.
If the oil on the dipstick is below the minimum mark, it must be added. To do this, open the cap that blocks access to the oil filler neck and pour in the required amount of oil in small portions, checking the level with a dipstick. It is very important not to overfill the oil, otherwise it will leak. Finally, don’t forget to close the oil filler hole with a lid.
The modern Cummins isf 2 8 crankshaft is designed to operate in difficult temperature conditions and under heavy loads. Therefore, it is made from high-tech durable steels or cast irons using sophisticated equipment.
The installation location and type of piston rings depend on their application profile. The set of rings for a solid piston will differ from the set of a composite piston, since the latter includes an intermediate second ring. A detailed description of piston rings can be found here.
When installing the cover, special attention must be paid to ensure that it does not warp and is not tightened on one side more than on the other. To do this, be sure to observe the tightening torques of the bolts that secure the valve cover to the cylinder head. All moments of force must be equal. In this case, the possibility of squeezing the gasket and leaking oil will be eliminated, since the cover will fit evenly over the entire surface.
The bolts should be tightened firmly, but not overtightened. The order in which the bolts are screwed in is also important: they need to be screwed in diagonally, each in three steps, to ensure an even fit.
Installation
They start by cleaning the surface of the engine crankcase from gasket remnants and traces of leaks of technical fluids, then a new cylinder head gasket is installed in the seat and the assembled head is carefully put on special guides, after which, according to a special scheme, its mounting bolts are tightened with a torque wrench to the required forces.
The next step is to install the timing belts and generator, screw all the attachments into place, pour new oil and antifreeze into the engine, start the engine and carefully monitor it for fluid leaks and extraneous noise. Also watch the video of replacing valves on a VAZ 2112 (16-valve):
Hatchbacks of the 2112 family were produced with different 16-valve engines - 21124 and 21120. Before removing the valve cover, on the VAZ-2112 you will need to disassemble the intake module mount, as well as remove all the brackets attached to the top of the cover. The high-voltage wires are also disconnected, and the ignition module is removed from the 21120 engine. Let's look at all the steps in more detail.
The following video shows what the part that needs to be removed looks like.
VAZ 2112 with a 16-valve cylinder head: how to replace the valves with your own hands?
The first cars were equipped with a timing belt driven engine.
Despite a number of improvements, their typical problem was "bent" valves, which became deformed when the belt broke. In 2004, the problem was solved by manufacturers by increasing the depth of the piston groove. However, modern drivers still face the need to replace valves, although not as often. In general, this process is not complicated, so every driver can make repairs without contacting a service center.
Replacing piston rings yourself
Piston rings are open rings that fit tightly into grooves on the outer surfaces of the pistons. Wear of piston rings occurs due to interaction with mechanical parts and exposure to gases. Sooner or later they have to be changed, but how to replace piston rings on your own? Piston rings perform three main functions:
- Sealing (sealing) of the combustion chamber (or expansion chamber).
- Improved heat transfer through the cylinder wall.
- Regulating lubricant consumption.
Replacing piston rings for VAZ 2110
- Fig1. We won’t focus on how to remove the valve cover; those who have forgotten can read it in the Murzilka.
- Fig2. Unscrew the 2 10mm nuts and remove the ground wires.
- Fig3. Unscrew the 13mm nut and remove the engine ground wire. In this case, it is located on the thermostat stud. If you do not have it on the block head, then you do not need to remove it.
- Fig4. Unscrew the nut securing the block head support bracket.
Using two 17mm wrenches we unscrew the fuel lines. To avoid mixing them up when reinstalling, it is recommended to mark them. Disconnect the connector from the fan switch sensor and unscrew the 2 nuts securing the thermostat.
- Fig 1. Move the thermostat to the side, if the hoses allow this, or unscrew the clamps and remove the hoses. Disconnect the connectors from the throttle position sensor and IAC.
- Fig 2. Unscrew the nut of the right bracket.
- Fig. 3. Unscrew the tension roller nut.
- Fig 4. Remove the roller and pull off the timing belt.
- Fig. 1. Using a screwdriver, fix the camshaft pulley and unscrew the bolt securing the pulley.
- Fig. 2. Using a slight rocking motion, remove the camshaft pulley. Be careful not to lose the key.
- Fig 3. Unscrew the pin.
- Fig. 4. Bend the protection, or remove it completely by unscrewing another nut and the pump.
- Fig. 1. Under the car, unscrew the 4 nuts securing the exhaust pipe to the manifold. When reassembling, it is recommended to use new copper nuts to prevent them from sticking in the future.
- Fig 2. Unscrew the bracket securing bolt and remove it. Pull out the connector from the oil level sensor.
- Fig 3. Remove the connector from the crankshaft position sensor.
- Fig 4. Remove the connector from the oil pressure sensor and pull out the wiring harness from the sensors.
- Fig. 1. Unscrew the 10 bolts securing the head (manual). And remove the cylinder head, preferably with the help of a partner. Disconnect the connector of the wiring harness going to the injectors. It is located behind the thermostat.
- Figure 2. Pistons and cylinders.
- Fig. 3. Under the car, unscrew the plug on the pan and drain the oil.
- Fig. 4. Unscrew and remove the flywheel protection. We unscrew the many bolts securing the pallet around the perimeter and remove it.
- Fig. 1. Unscrew the 3 bolts of the oil intake and, shaking it slightly, remove it.
- Fig 2. Turn the crankshaft so that the piston of the desired cylinder is at bottom dead center. Unscrew the 2 connecting rod cover nuts.
- Fig. 3. By rocking the lid, remove it. Use a wooden rack to push the piston and connecting rod up. We do the same with the remaining cylinders. Pistons and caps are not interchangeable. And they should be placed in the same place where they stood. (Disassembly and assembly of VAZ 2110 engine)
- Fig. 4. We clean the pistons from carbon deposits and look at the piston class according to the markings. We buy piston rings according to the piston class.
Installing piston rings
- Fig 1. Insert new rings into the cylinder and check the gap in the ring lock. Nominal 0.25-0.45 maximum permissible 1mm. If the gap is less than the nominal one, file the ends of the ring with a file. Each ring is adjusted to the cylinder where it will work.
- Fig 2. Remove the old rings and clean the piston. We clean the oil drain holes with a suitable wire. Lubricate the grooves under the piston rings with engine oil (fresh).
- Fig. 3. We put on the piston rings, starting with the oil scraper. We place the joint of the oil scraper ring expander on the opposite side of the joint of the ring itself. (Do not put the rings on in a twist to avoid the formation of microcracks and further breakage of the rings.).
- Fig 4. Wipe the cylinder walls, crankshaft journals, and connecting rod bearings with a clean cloth. Lubricate everything with fresh engine oil.
The troubleshooting process, piston ring clearance and other details are in the manual. We install the piston in the same cylinder from which it was removed, crimping the piston rings with a special mandrel. We install the covers on the connecting rods and tighten them to a torque of 50 N*m. Reassemble in reverse order. Do not forget about the marks when installing the timing belt (instructions) and the tightening torques of the cylinder head bolts (instructions). Tip: When reinstalling the pan, drip sealant around the perimeter, apply a gasket and let it dry. Thus, it will not slip during installation. Along the way, you can check the tightness of the valves and, if necessary, grind them in.
FAQ on replacing car piston rings
When do you need to change piston rings, are there any symptoms or do they change with mileage?
- Mileage may vary, it all depends on how often the engine oil was changed and what quality the oil was.
- There are several symptoms of piston ring wear, for example, high oil consumption or low compression in the cylinders.
- You can definitely check in one way: pour a little oil into the cylinders through the spark plug holes, then check the compression; if it is higher than with dry measurements, then it’s time to change the piston rings.
If the pistons are nominal, then should I buy the rings too?
- Such repairs will give a temporary effect. If the pistons are nominal, then the rings are nominal. Although you can try to insert the first repair kit, if there is a lot of wear then they will do.
Are the rings sold as a set?
- Yes. You can buy piston rings in online stores (section “Spare parts”).
- Example of a kit, 21083-1000100-32, piston ring size: 82.8 mm repair
Do the connecting rod bearings need to be replaced?
- Leave the original liners, or bore the shaft for repair liners.
What tools are needed to replace piston rings? What is their approximate price?
- Wrenches and sockets from 10 to 19, a wrench for head bolts, a crimp for piston rings (or cut a strip from roofing iron and crimp the rings on the pistons with it). I think the price will be no more than 500 rubles.
What is the total budget if you change the piston rings yourself?
- Replacing rings will cost up to 2,000 rubles, not counting oil and antifreeze.
- The price of piston rings is about 500 rubles.
How long does it take to replace?
- From 1 to 2 working days.
How to check valve tightness?
- By measuring compression in the cylinders.
What else should be replaced along with replacing the piston rings?
- At the same time, it is recommended to replace the front crankshaft seals. The rear one is also desirable, but for this you will have to remove the gearbox.
- What to change at the same time becomes clear after disassembling the internal combustion engine and assessing its condition.
Anything to add? Then we supplement the article with comments. xn--2111-43da1a8c.xn--p1ai
How to measure blood pressure
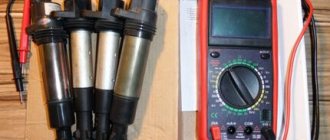
The pressure is created by a special pump. This is necessary so that the lubricant in the gas distribution mechanism circulates better through the channels in the engine itself. Each engine can have its own oil pressure indicator. This information is precisely stated in the documentation that comes with the machine's operating manual.
On the instrument panel, when the oil pressure decreases, the corresponding sensor will light up. However, if the pressure is high, it will not give any signals. And the level can only be determined using third-party devices. To do this, you need to connect a measuring liquid pressure gauge to the motor. The readings taken will allow you to determine what exactly caused the oil leak: a gasket that needs replacing or a pressure surge.
So, if high pressure arose due to a malfunction of the lubrication system, the next step is to carry out an assessment by eliminating violations in the following order:
There is no ventilation inside the crankcase
This is the most common breakdown on AvtoVAZ cars. It occurs when free gas exchange in the engine becomes impossible, gases concentrate inside the engine and provoke high pressure on the cover. This way the oil does not find a cavity in a closed space and seeps out from under the valve cover. Because of this, oil can get directly into the air filter.
What prevents accumulated gases from escaping? Causes:
- the oil separator mesh inside the crankcase is clogged;
- The hoses of the ventilation system are attached to the fittings, and dirt has accumulated inside them.
How to fix the situation? Wash the mesh and fittings from carbon deposits and growths.
The oil filter itself is clogged with soot and dust
The oil in the cylinder head moves through narrow channels. In the case of low-quality oil or its counterfeit, the engine is subject to constant overheating, soot and dirt can accumulate inside, the channels become narrowed, because all excess settles on their walls and on the oil filter. This provokes an increase in pressure on the walls of the channels, and hence a leak forms from under the cover.
The same thing happens if you do not replace the oil filter for a long time. It stops leaking engine oil in vain, and the pressure pushes it out.
How to solve a problem? Flush the lubrication system by pouring the appropriate flushing agent into it, and then install a new oil filter.
The valve is broken
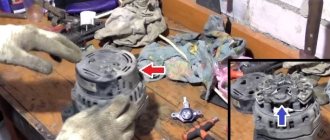
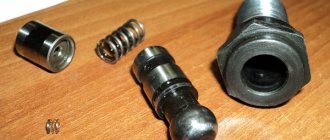
The oil pump contains a pressure reducing valve. If it is closed and jammed, then this definitely provokes an increase in oil pressure. A similar thing happens (rarely) if foreign bodies are clogged inside the pump or soot and dirt get into it.
How to solve a problem? The oil pump is removed, the valve is carefully disassembled and cleaned from the inside.
Removing the valve covers on engine 21120 (16v 1.5)
None Removing the box with the air filter To remove the filter, loosen clamps 1 and 2, and then disconnect connector 3. Pipes 1 and 2 are removed from the box. Use a 10mm wrench to unscrew the screw on the body, then remove the box from its mountings.
With a plastic cover, everything looks simple: either it is screwed on with bolts (key “10”), or held on with rubber bands. In the first case, the bolts are unscrewed, in the second, the cover is pulled up. The main thing is to unscrew the filler plug.
To disconnect high-voltage cables, you need to pull the caps out of the wells. The cables are also disconnected from the ignition module. It is pressed to the valve cover with three 10mm nuts.
We've sorted out the ignition module. Don't forget to disconnect the low-voltage connector and dismantle the module. If you do not unscrew the module, you will not be able to remove the valve cover on a VAZ-2112.
VAZ 2112 engine breakdowns and repairs
To solve the problem of preserving valves from deformation when the timing belt breaks, you can install pistons from a 124 engine, but in this case several horsepower is lost. Therefore, when using a belt drive, as the instructions indicate, you need to periodically listen to the sound that the drive makes. So:
- At the beginning of wear, the rollers begin to squeak when cold, then rustle, then collapse.
- The pump begins to leak, which will lead to the presence of coolant on the belt.
- Seals that have become unusable lead to oil getting onto the belt.
- When the shafts wear out, the belt begins to slide to the side, which then rubs against the roller flange, which creates a grinding sound when cold.
- The belt may slip due to bending of the rollers.
- All of the above reasons can lead to belt rupture and, as a result, valve deformation.
Repair of valves for VAZ 2112 cars
First of all, it is necessary to disassemble the valve block of the VAZ 2112 engine:
- All parts that are attached to the cylinder head are removed: timing belt, pulleys, thermostat, rollers, intake manifold, exhaust pipe, all wires are disconnected.
- The valve cover is disconnected.
- A brush is put on the drill and the cylinders are wiped clean from carbon deposits until they shine, for which you need to turn the crankshaft twice.
- Using a special device that clamps the spring, the valves are loosened and removed with tweezers.
- Diamond chips are applied to the edge of the valve, as shown in the photo.
Applying diamond chips to the valve
- A rubber pipe is placed on the end of the guide valve and the valve is turned with both hands. Grinding must be carried out until a ring-shaped uniform mark is formed on the seat and valve plate.
Tip: To increase friction, the valve needs to be pulled down a little.
- Carefully remove any remaining lapping paste from the seat and valve.
Valve after lapping
- The valve is installed in place.
- If grinding does not help, the gap does not decrease, the valve must be replaced.
- Assembly is performed in reverse order.
Advantages of the VAZ 2112 with 16 engine valves
By installing 16 valves in the cylinder head, record engine power is achieved, whether it is turbocharged or naturally aspirated. So:
- to an increase in power. So the 8 valve VAZ 2112 engine with a volume of 1500 cc. centimeters has 77 horsepower, and the 16 valve engine in the VAZ 2112, which has the same volume, produces up to 90 horsepower.
- Changing the shape of the combustion chamber makes it possible to increase the knock resistance of the engine with 16 valves. This indicator is important, especially when low quality fuel is used.
- In such devices, the engine cooling system works better, which increases the reliability and durability of the unit.
- During the layout, the intake and exhaust tracts are spaced in different directions from the head on a VAZ 2112 with a 16 valve engine. This makes it easier to install the correct intake and exhaust manifolds.
Eight-valve engine tuning
To increase the power of an 8-valve engine, it can be equipped with a 16-valve cylinder head. To do this, the 8-valve engine of a VAZ 2112 is disassembled and parts are replaced:
- The bolts that attract the head to the cylinder block are changed; they differ from the 16-valve device in diameter and length. When installing the cylinder block and head from different engines, modified bolts are required. In this case, the bolts are used with a diameter similar to that of an 8-valve engine and a length similar to that of a 16-valve engine.
- To install a 16-valve head, you need to drill holes for installing bolts.
- The head gasket is also being finalized, its holes are also drilled out.
- Installing modified bolts increases engine reliability.
- Before installing the cylinder head, the cylinder block itself is assembled.
- The pistons of 16 and 8 valves are different. Therefore they need to be replaced.
- If the car is equipped with old connecting rods used on the VAZ 2108, then they need to be replaced with others from the VAZ 2110. This is due to the fact that the piston pin is pressed into the old connecting rods, and 16-valve pistons can only be mounted in a new type connecting rod.
- After assembling the motor, it is necessary to modify the wiring. This is due to the displacement of some sensors, which leads to lengthening of the wires for them.
Tip: To avoid additional expenses associated with replacing the engine control unit, you need to leave the old ignition module and connect it via high-voltage wires to the spark plugs.
- The last operation is to configure the VAZ 2112 16 valve engine control unit using a special program.
Tip: To increase power, you can install tuning of the exhaust manifold; its price is much lower than that of a standard 16-valve manifold with a catalyst.
This is how the VAZ 2112 engine turns out to have 16 valves. 8 valves are replaced by 16, which increases the power and reliability of the car.
Tuning a 16 valve engine
On a VAZ 2112 16 valve engine tuning is done to increase its power and reliability:
- The simplest and most standard way to increase the power of a VAZ 2112 engine is to replace the camshafts with STI-1 (standard receiver).
- Installation of a light ShPG from a 126 engine.
- Replacing the throttle valve to a diameter of 54 - 56 millimeters.
After such changes, the output power is 120 hp. Increase power to 150 hp. possible by:
- Installations of wide-phase camshafts.
- Using lightweight T-valves.
- Performing modifications to the cylinder head intake manifold.
To obtain increased power, you can install a compressor.
Installing a compressor on a VAZ 2112
How a similar device is installed on a VAZ 2112 16 valve engine can be seen in the video. The engine power will be more than 130 hp. Timely replacement and repair of valves will increase the reliability and durability of the engine.
What you need to know about a torque wrench
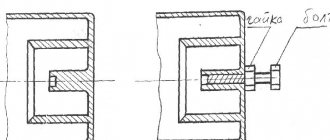
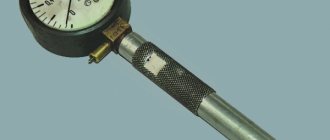
The bolts are tightened in a certain sequence - from the center to the edges, one at a time. If you are not a motor mechanic with extensive experience and an experienced hand, then the main condition for the correct performance of the work will be the use of a torque wrench. This tool is widespread everywhere, it is easy to buy or rent - just look at the newspaper advertisements or go to your neighbor’s garage.
Torque wrenches come in different designs, but they are all designed to measure the tightening force of threaded connections. When choosing a key, you need to find out in what units the measurement is taken and whether it matches the car manufacturer’s instructions.
In the international SI measurement system, the tightening force is called newton meters, in Russia it is often called kilogram meters, for some foreign cars you can find measurements in pound-force feet. To avoid errors when converting one unit of measurement to another, you can purchase a key with different scales.
Table: how to convert measurements from newton meters to pound-force feet
| Newton meter | 10 | 50 | 100 | 250 | 500 | 1 000 | 2 500 | 5 000 |
| Pound-force-foot | 7.376 | 36.878 | 73.756 | 184.391 | 368.781 | 737.562 | 1 843.906 | 3 687.811 |
To make sure your actions are correct, you can use a protractor to monitor the angle of rotation of the bolt after tightening it with a torque wrench.
This is what a torque wrench looks like, allowing you to correctly determine the force for tightening threaded connections
Video example: how to fix an oil leak from under the cylinder head cover
One of the essential elements of any internal combustion engine is the intake and exhaust valve. Their correct operation allows us to ensure high quality operation of the fuel system, and therefore the entire vehicle as a whole. Valves are installed not only in the engine, but also in many other parts of the machine: injectors, fuel rail, gearbox. They circulate liquid and gas through various car systems, and their breakdown can lead to a number of problems.
During vehicle operation, cylinder head valves are subject to severe wear and therefore require replacement over time. Every car enthusiast knows that cars with different numbers of cylinders have different numbers of devices installed, but the procedure for dismantling them is similar. Today we’ll talk about how valves are removed on a VAZ-2112 1.6 with a 16-valve engine, and we’ll look at the features of the procedure.
Typical mistakes when replacing gaskets
The seemingly simple procedure for replacing the elastic gasket sometimes causes difficulties for some car owners. After installing a new gasket, the oil leak not only does not stop, but even increases. Errors can be different, but the most common ones are:
- Use of poor quality gasket;
- uneven application or use of rough (old) sealant;
- uneven tightening of the cover bolts and, accordingly, its distortion.
Before you begin repair work, you should definitely find a diagram for tightening the cover fasteners in your car’s operating manual (the so-called “manual”) and follow it exactly. In this case, the tightening force should be monitored using a torque wrench.