Payment methods for goods:
- It is possible to send cargo with a thirty percent (30%) advance payment with blocking and removal of blocking upon full payment.
- It is possible to send cargo without prepayment, provided that the buyer pays for the services of the transport company in both directions at the branch of the transport company.
- Sending by PEC by cash on delivery with the condition of prepayment of delivery in both directions (this way we are safe from fraudsters) - in PEC before payment you can inspect the goods received, PEC charges a commission for this service in the amount of: 1.5% for cash and 3% for non-cash calculation
You can make any changes (tuning/additions) to the standard engine configuration BUT the warranty will be 3000 km or 3 months of operation
You can also make any set of attachments (standard and non-standard) if you have some of the equipment - write what to add/exclude from the set, the manager will write a price change.
Working volume 0.75 l
Cylinder diameter 82 mm
Stroke 71 mm
Number of valves 4
Carburetor power system
What does the engine package include: Block, crankshaft, pistons, rings, connecting rods, bearings, half rings, oil seals, cylinder head assembly with camshaft, crankshaft pulley, flywheel, oil pump with oil receiver, iron oil pan (aluminum can be installed - check price with manager), valve cover, gas distribution mechanism with a closed cover, spark plugs. Sensors: oil, temperature, phase sensor (if injector), knock sensor, antifreeze drain plug, dipstick, break-in oil (10v40 semi-synthetic Lukoil, recommended after break-in 1000-1500 km, oil change).
Packaging: everything is mounted on a wooden stable pallet, screwed on, the engine itself is made of cardboard on all sides and wrapped with stretch film. The transport company is packed in a wooden box. At the request of the client, we can dismantle any component of the engine or replace it with a non-standard sports or tuned part.
History of VAZ 1111/11113 engines
The engineers who developed the Oka car faced a rather difficult task - to make a compact and affordable vehicle, made from common components and with good maintainability. Similar requirements were put forward for the engine - it had to be simple, reliable and easy to repair in the event of a breakdown outside specialized service stations with qualified personnel.
In the first versions of the Oka, the developers used a two-cylinder power unit from Daihatsu Quore with 30 horsepower. Several prototypes were made with this engine. But, although the engine had a well-functioning and reliable design, they refused to copy it, since the foreign power unit required high quality engine parts and assembly standards. In addition, copying required assembling engines from scratch and mastering the corresponding technical process, and this would make the car unacceptably expensive and seriously delay the production of serial samples.
Then the engineers turned to existing engine solutions in the domestic auto industry.
The G8 engine was already fully developed, so to equip the new compact youth car, it was decided to create a two-cylinder engine based on the G8 engine, which at that time was the main one in VAZ production. Through a series of technical manipulations, the 1111 engine was obtained, which they began to equip the Oka with.
General design
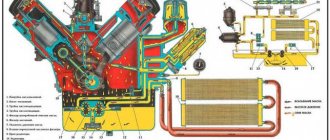
The lubrication system for the power units of the Oka small car is a combined one. Some engine components are lubricated by force, others by splashing, and others by flowing oil (gravity lubrication).
The general design of this component for the VAZ-1111 includes:
- Channels passing through the block, cylinder head, as well as some nodes;
- Pallet;
- Dipstick;
- Oil intake;
- Oil pump (its design also includes a pressure reducing valve);
- Filter (with bypass valve);
- Pressure meter;
The lubrication system is filled with lubricant through the oil filler neck located on the cylinder head cover. The total lubricant volume is 2.5 liters.
Canals and highways
The channels do the main job - they deliver lubricant to the rubbing surfaces. They can be roughly divided into main and distribution (through which lubricant is supplied to specific surfaces).
They were done in:
- Block (through them, oil is supplied to the crankshaft and directed to the cylinder head);
- Cylinder head (for supplying lubricant to the camshaft journals);
- The crankshaft (through which oil is supplied to the connecting rod journals).
Lines are used only to supply lubricant to surfaces that are forcibly lubricated.
Forced lubrication occurs due to the supply of oil under pressure. Lubricant is supplied by an oil pump.
Pan, dipstick, oil intake
The pan is a container for storing and collecting lubricant. It is attached to the bottom of the crankcase. To drain the oil during replacement, a drain plug is installed in the pan.
There are also special partitions inside that act as dampers and prevent the oil from splashing.
A technological hole has been made in the crankcase for installing a dipstick. Through it, the end of the probe with marks to control the amount of lubricant passes into the pan.
Oil intake – a tube for collecting lubricant. A mesh is installed at the end of it to prevent large foreign particles from entering the system channels.
The end cap with the mesh is lowered into the pan, so it is constantly in oil, which ensures a constant supply of lubricant to the pump.
Pump
The Oka uses a rotary-type gear pump driven by the crankshaft. It consists of two gears (external and internal), located in the pump housing. The drive gear interacting with the crankshaft is internal.
The pump is located in the front of the engine and is fixed to the inner wall of the block.
The pump housing also contains a bypass valve that prevents pressure from exceeding a critical value. It consists of a channel that connects the lubricant supply line to the internal space of the crankcase. A small closing rod with a spring is placed in this channel.
Its operating principle is simple - as long as the pressure is within normal limits, the spring presses on the rod, which is why the bypass channel is closed. If the pressure is higher than normal, then the oil, overcoming the force of the spring, will lift the rod, and part of it will simply flow into the pan, causing the pressure to decrease.
Filter
One of the most important factors for the normal operation of the engine is the cleanliness of the lubricant and the absence of impurities and wear products in it. Cleaning of the lubricant is ensured by a filter. Therefore, the oil pumped by the pump passes through the filter element before entering the channels.
To eliminate the possibility of oil starvation of a number of components, valves are installed in the filter, which, if necessary, release lubricant into the lines, bypassing the filter.
Source
VAZ 1111 | Removing and replacing the speedometer drive
Removing and replacing the speedometer drive
Cars of these models are equipped with two types of mechanical speedometer drive. On cars up to 1987 issue. A conventional cable drive is used, which consists of a helically cut gear driven directly from the differential. The gear remotely transmits rotation to the speedometer by rotating the flexible inner cable shaft.
Incorrect, unstable speedometer readings, such as the needle falling or jumping, which cannot be corrected by replacing the speedometer drive cable, may be a consequence of gear wear; A detailed description of the procedure for removing and replacing the gear is given in the next subsection.
Cars after 1987 model. equipped with an electronic sensor instead of a gear. This system measures the rotation speed of the main gear of the transmission, the results of which are converted into an electrical signal, which is then sent to the speedometer module on the instrument panel. The signal is also used as one of the input signals of the electronic control device of the engine management system (and, where available, the electronic control device of the speedostat, the trip computer and the electronic control device of the traction control system.
Mechanical speedometer drive
When removing the drive gear from transmissions with a manufacturing serial number prior to 310568, there is a risk that the gear may accidentally fall into the transmission after removing the locking ring; the design of transmissions of later production does not allow this possibility.
Note to car owners
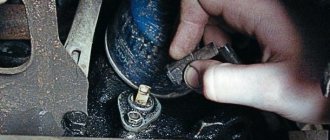
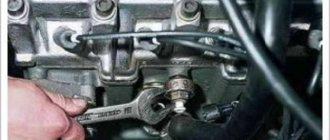
Quite often, the self-replacement procedure ends in a fiasco, since installing a new device does not give any result; lubricating fluid continues to flow from under it.
But the point here is not at all the crookedness of your hands or lack of repair experience. If you did everything according to the instructions, the culprit in this situation is no longer you, but the sensor itself.
Therefore, your task is to take the defect you purchased along with the receipt and go to the store where you purchased it. The store employees are obliged to exchange the device for you or return your money. Of course, if you do not save the receipt, you will not be able to return the money or change the sensor according to the law. Therefore, think twice before throwing away this piece of paper.
Another important piece of advice is to avoid such purchases on so-called spontaneous markets. This is where the largest number of fakes and defective devices are concentrated. There are many reliable, certified outlets selling auto parts. If you go to a service station to replace the sensor, you will have to pay more than if you repair it yourself, but you will be provided with a quality guarantee. A kind of protection against counterfeiting.
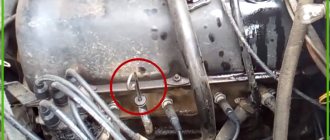
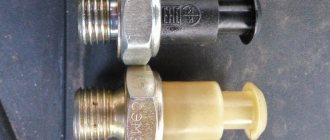
How to install a new oil pressure sensor on a BAZ-2106 or other cars
There are drivers who do not like the sensors that are installed on later VAZ models. For example, on 8s and 9s it makes sense to install an oil pressure sensor from a VAZ 2106. The procedure for replacing the sensor is quite simple, and anyone can handle it.
- First you need to buy a new sensor with an indicator and wires. An adapter is also needed that will connect the new system to the cylinder block.
- The 9 or 8 does not have room for a pressure indicator, unlike the 6. Some owners replace the headlight range control knob, which does not work, with a sensor indicator. And for those whose headlight range control knob works, it makes sense to cut a special socket in the instrument panel to accommodate the oil pressure sensor indicator. Such a nest can be made with an electric drill with a thin drill. The holes must be drilled in a pre-marked circle, then using a round file, adjust the location for the VAZ 2106 oil pressure sensor. An adapter with a copper O-ring must be placed in the place where the standard sensor was located. Then you need to attach the sensor from the VAZ 2106 through this copper ring.
- Next, you need to connect the dial indicator to the sensor using wires.
But this is for those who really liked the oil pressure sensor from the 6. Of course, a simple system, clear instruments that show exactly what pressure is in the oil line, and if the sensor breaks down, you can simply throw it away and install a new VAZ 2106 oil pressure sensor yourself; it is not at all expensive - about 300 rubles.
And then a video on how to distinguish a high-quality sensor from a fake:
My installation of the oil pressure indicator on the OCU
CABIN PRESSURE INDICATOR
INSTALLING OIL PRESSURE SENSORS (BOTTOM VIEW)
Explosion diagram of the installation of oil pressure sensors on the OCU
I decided to install an oil pressure gauge. For what ? just . In theory, everything is simple - you need an adapter (tee) to install an oil pressure sensor, a pressure sensor and the indicator itself (I used both and the third from a VAZ-2106). I bought everything for about 250 rubles (2002). When installing the adapter in place of the emergency oil pressure sensor (2101-3810600), the oil filter flange broke off!! Although I pulled with a regular open-end wrench without any extensions! The flange is made of aluminum alloy and is quite fragile. The next day I had to go to Moscow and buy this filter flange (1111-1012024) and its gasket 1111-1012030. The next day (I did everything in the evening after work) I began installing the flange. When installing the flange, I broke the “6” key. (the flange is secured with two M8x30 screws with a 6-point hexagon socket) Having decided that I had tightened it enough, I filled it with oil and drove off without looking. After 5 km, all the oil leaked out and we had to go back in tow. The next day I bought oil (Luxoil Extra 0W40 - the cheapest of the liquid ones, since it was heading towards winter), a high-quality set of hex keys, and a sealant gasket. Spitting on the advice of car manufacturers who do not recommend installing oil system parts on sealant, I installed a flange with a paronite gasket on the sealant, applying sealant on both sides of the gasket, only trying to spread the sealant in a thin layer and letting it dry longer so as not to get into the oil system. I started installing the adapter. This also has its pitfalls. Firstly, the engine compartment of the OKI is cramped, and installing an adapter with pressure sensors (for the pointer and for the warning lamp) is inconvenient - the mudguard gets in the way. And secondly, the main thing, it seems to me, is that there is a danger of these sensors-adapters-fittings touching the mudguard when the power unit vibrates - on bumps, etc. It is impossible to position the sensor so that the sensor is pointing upward at OKE - the filter gets in the way. Place it so that the sensor is pointing down? There is a danger of them touching the ground. Consequences? - see above . Therefore, I removed the mudguard (right mudguard 1111-2802022), with difficulty unscrewing the rusty screws, and installed the tee so that the sensor axis is directed approximately horizontally. After this, in my opinion, there was much less dirt in the engine compartment. And only the next day (the sealant polymerizes for a day) I filled it with oil and was on wheels.
VAZ 1111 | Oil pressure has dropped
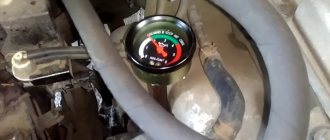
There is an engine oil pressure indicator light on your car's dashboard. For reliable engine operation, it is necessary that sufficiently high pressure is constantly provided in the engine lubrication system.
If the oil pressure warning light comes on while the engine is running and remains on at increased speed, this is an alarming sign. You need to stop immediately, stop the engine and find out the cause. Continued operation of the engine with low oil pressure can lead to serious engine damage and large financial costs for repairs.
Drive unit
Drive shaft, CV joint (grenade), Outer CV joint, Inner CV joint, Right CV joint, Left CV joint, CV boot, Tripoid, CV joint nut, Retaining ring, Cardan, Crosspiece, Suspension bearing, Cardan bearing, Elastic coupling, Axle, Front axle, Rear axle, Axle reducer, Gearbox bearing, Gearbox oil seal, Differential, All-wheel drive sensor, Haldex coupling, Differential bearing, Differential oil seal, Planetary gears, Axle bearing, Axle shaft, Axle shaft bearing, Axle oil seal, Axle shank, Shank bearing, Axle bearing, Transfer case, Transfer case, Transfer case oil seal, Transfer case bearing, Transfer case chain
Oka lubrication system
Despite the fact that the power units of the Oka car -1111 and 11113 are two-cylinder, in their general design they do not differ from 4-cylinder units - the most common in passenger cars.
When creating engines for the Oka, the designers took the engines installed on the VAZ-2108 as a basis. If we look at it in general, then when designing the 4-cylinder G8 engine, 2 cylinders were simply removed. This design solution made it possible to use the general principle of motor construction and unify many components. Therefore, the design of many systems in the Oka and VAZ-2108 installations is identical, including the lubrication system.
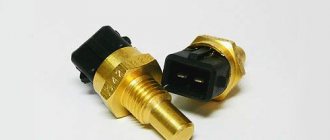
Oil pressure sensor: types, device, purpose, photo, video.
A car engine cannot operate without an oil system. It is necessary to supply oil to the rubbing parts of the engine, which reduces their wear, and also cools them to prevent overheating. Every driver knows that it is necessary to monitor the level and quality of oil in the engine, but some forget about another important indicator of the oil system - pressure. A system of mechanisms in the oil system maintains its pressure during engine operation. Due to this, lubricants reach all important engine elements, affecting them in the necessary way.
You can check the oil level in the engine using a dipstick, and special sensors are used to monitor pressure. If they fail, the driver will no longer understand whether sufficient pressure is created in the oil system and whether the engine parts are properly lubricated. This can lead to serious problems, including engine failure, so it is important to replace pressure sensors as soon as possible if they are faulty.
Note to car owners
Quite often, the self-replacement procedure ends in a fiasco, since installing a new device does not give any result; lubricating fluid continues to flow from under it.
But the point here is not at all the crookedness of your hands or lack of repair experience. If you did everything according to the instructions, the culprit in this situation is no longer you, but the sensor itself.
Therefore, your task is to take the defect you purchased along with the receipt and go to the store where you purchased it. The store employees are obliged to exchange the device for you or return your money. Of course, if you do not save the receipt, you will not be able to return the money or change the sensor according to the law. Therefore, think twice before throwing away this piece of paper.
Another important piece of advice is to avoid such purchases on so-called spontaneous markets. This is where the largest number of fakes and defective devices are concentrated. There are many reliable, certified outlets selling auto parts. If you go to a service station to replace the sensor, you will have to pay more than if you repair it yourself, but you will be provided with a quality guarantee. A kind of protection against counterfeiting.
https://youtube.com/watch?v=nFAB7h_nVGw
Source
Purpose of the sensor
The oil pressure sensor is designed to promptly and accurately inform the driver about low lubricant pressure inside the internal combustion engine. So, as soon as the rapid detection of such a malfunction will allow you to avoid unnecessary problems and even greater engine breakdowns in the shortest possible time. It's no secret that dry engine operation can cause very serious damage to the engine. But on the other hand, you shouldn’t immediately panic and draw conclusions; it’s enough to first check the sensor itself.
Mistakes in hasty conclusions
When the oil pressure light comes on, many car owners sound the alarm and begin to fix this problem in all but not the most important ways, and these include:
- Oil change and fuel filter replacement.
- It is washed.
- The pressure is measured.
But after this, the result does not happen! Therefore, always check the oil pressure sensor first, as this is the most common and common cause.
Sensor check
It is necessary to check the functionality of the sensor in the following order:
- We remove the wire from the sensor and lean it against ground, possibly on the motor housing.
- Check to see if the light on the instrument panel lights up again.
- If the lamp stops burning, then the wiring is working properly and you can move on to the next stage of dismantling the faulty sensor.
- And if it continues to burn, then it is necessary to “ring” the wires at the entire stage from the sensor to the instrument panel to detect a breakdown or short circuit in the circuit.
Service
This section includes not only changing the oil, but also adjusting the clearances in the valve mechanism.
The first step is to talk about the simplest thing, changing the engine oil. To do this you will need the following tools:
- key to 17;
- small container for waste liquid;
- new oil;
- screwdriver.
Before starting work, you need to turn off the car engine and install supports for the wheels. This is necessary for safety, so that no surprises happen during work.
Change of oil
If you want to completely change the oil type (if the oil type remains the same, then the following steps are not necessary):
- first flush the entire system with flushing oil;
- To do this, you need to pour in a little liquid to the lower mark and start the engine from the Oka. Experts recommend letting it run for 10 minutes. During this time, a special liquid will pass several times throughout the entire system and collect all the slag.
- After this, you can drain it and replace the oil filter. This is necessary to ensure that the new oil does not receive unknown substances while passing through the filter.
- Engine oil should be filled to the top mark, to the maximum. Next, wait about 10 minutes and add engine fluid if necessary.
- Turn the filler cap and remove it;
- Remove the drain plug under the car engine. This is necessary so that the old oil is drained into a special container;
- Screw the plug back;
- It is worth remembering that the oil is very hot during draining. Next, you can unscrew the oil filter and put it aside. It won't be needed anymore;
- To unscrew the filter, it is better to use a special wrench;
- Fill the filter cavity with new oil to the middle;
- Do not forget about lubricating the o-ring, which is located on the filter;
- Fill the filler neck with new engine oil to the maximum and screw on the cap;
- We start the engine and let it run for a few seconds. During this time, you can check for leaks and oil level. If necessary, it can be increased.
Gap adjustment
To compensate for the expansion of parts during operation, the designers provided a special gap between the valve stem and the cam itself. If the gap increases, the valves may not open, and if the gap decreases, they may not close. This needs to be monitored almost every day.
You only need to check the gap on a cold engine when all parts are in standard condition. The minimum clearance of the intake valve should be 0.2 millimeters, and the exhaust valve 0.35 millimeters. If this is not observed, the Eye's engine will operate unstably, with some noise and whistling.
The valves must be counted from the camshaft belt: the 1st and 4th valves are exhaust, and the 2nd and 3rd are intake. It is worth noting that the order of adjustment is not important. That is, adjustments can be made in any order.
For this job you will need a 10mm wrench, a set of screwdrivers, feeler gauges and tools for adjusting the gaps. If you cannot turn the crankshaft, you can use the following advice. Engage fourth gear and drive the vehicle very slowly until the cam is in position.
Remove the air filter; Cover the carburetor with a special rag so that nothing gets in there; Unscrew the cylinder head cover; Turn the crankshaft several times using a special wrench. To simplify this action, you can engage the gear and remove the spark plugs; The marks on the alternator pulley and the front cover must match. If this does not happen, then you have not fully rotated the wheel. During this step, you can begin adjusting the car valves
It is worth paying attention to the fact that there are two marks on the cover. You only need to focus on the long mark; Next, measure the thermal gap using a flat feeler gauge
These values can be written down in a notebook and compared with the nominal values in a special manual; Attach a special device to the lid; Put on the washers and turn them; Press the lever and push the pusher down. Insert the clamp under the camshaft so that the protrusion fixes the pusher; Next, you can pry the adjusting washer and remove it. Record the thickness of the washer; We calculate the thickness of the new washer using the formula: H = B + A - C, where H is the thickness of the new washer; B - thickness of the old washer; A is the value of the measured gap; C—nominal clearance; We install it in the pusher and perform the actions in the reverse order; Rotate the crankshaft 360 degrees and adjust the thermal gap; We install the parts in the reverse order so that the Oka engine is in its previous condition.
Subaru Forester Red Devil › Logbook › Installing a Depo Racing 60 mm oil pressure sensor.
I installed the long-awaited oil pressure sensor on my fork. I didn’t see anything difficult during installation. In addition to the sensor, you will need a hose fitting to install the sensor, fum tape (or sealant) and wires to extend those that come with the sensor.
1. Remove the negative terminal from the battery, as it will remove the generator. 2. Remove the generator; to do this, you need to loosen the generator belt tensioner, then unscrew the 2 bolts on the generator (12 head). Raise the generator slightly and in front of you will be a standard oil pressure sensor. It is unscrewed with a 23 key! (Unfortunately, I didn’t take a photo, don’t be angry).
3. Did you unscrew it? Throw it the hell away, because it is of no use, your light will only come on when the engine dies in the literal sense of the word.
5. The sensor is installed through a hose fitting, first we screw a fum tape onto the thread of the fitting, on one side and the other, screw the sensor on one side, and the other side into the block. Installing the sensor through a fitting is done because these “barrel” type sensors do not like vibration and have a weak membrane,
6. Put the generator back, put on the belt, and tighten it.
7. Next we need to connect the wires to the sensor and extend the chip into the interior. We connect the wires, they are marked and insert the chip into the interior through a technological rubber plug.
8. Let's move into the cabin, remove the panel under the dashboard and the side panel on the right pillar.
9. We start the wires and chips, there are 4 wires in total for power supply: Black - minus, we throw it on the body. Red is a permanent plus, I connected it to the cigarette lighter, since I already had a boost sensor coming from it. White and orange are responsible for the backlight, you can connect one or both so that you can change the backlight, I connected both. I threw orange on the clearance, as a result, during the day when I drive with the clearances and fogs, the blue light is on, in the evening when I turn on the low beam headlights, the white light is on. We connect, put on the negative terminal.
10. We check the operation of the sensor and assemble the panels in the interior in the reverse order.
The oil pressure on a warm car is 1.9-2 bar, with active driving it is 5.9-6.1 bar. True, if it’s normal to push the car like this, the pressure drops by 1.4 bar, but not lower than 1.2) and this despite the fact that it’s not summer. Still, I think this sensor is very useful, as it will allow you to monitor oil pressure and, if something happens, save your engine from serious damage.
source
General wiring diagram
- Headlights;
- Front direction indicators;
- Electric fan activation sensor;
- Sound signal;
- Electric engine cooling fan;
- Side direction indicators;
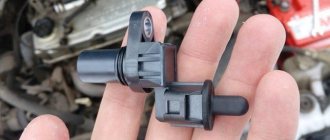
- New formation moment sensor;
- Spark plug;
- Ignition coil;
- Windshield washer pump motor;
- Accumulator battery;
- Generator;
- Oil pressure warning light sensor;
- Carburetor solenoid valve;
- Coolant temperature sensor;
- Reversing light switch;
- Switch;
- Plug socket for portable lamp;
- Brake fluid level sensor;
- Starter;
- Windshield wiper motor;
- Relay-breaker for direction indicators and hazard warning lights;
- Headlight high beam relay;
- Relay for low beam headlights;
- Starter activation relay;
- Electric fan switch relay;
- Fuse box;
- Parking brake warning light relay;
- Windshield wiper relay;
- Rear window wiper and washer switch;
- Rear window heating switch;
- Rear fog lamp switch;
- Carburetor choke warning lamp switch;
- Fog light circuit fuse;
- Carburetor air damper warning lamp;
- Hazard switch;
- External lighting switch;
- Heated rear window relay;
- Heater fan motor switch;
- Brake light switch;
- Cigarette lighter;
- Additional resistor for heater fan motor;
- Ignition switch relay;
- Ignition switch;
- Three-lever switch;
- Interior lighting;
- Lamp switches located in the door pillars;
- Instrument cluster;
- Parking brake warning lamp switch;
- Level indicator and fuel reserve sensor;
- Heater fan motor;
- Tail lights;
- Rear window wiper motor;
- Rear window heating element;
- License plate lights;
- Rear fog lamp;
- Rear window washer pump electric motor;
A
— The order of conditional numbering of plugs in the block of the spark torque sensor;
B
— The order of conditional numbering of plugs in the gear motor blocks of the windshield and rear window wipers and the windshield wiper relay breaker;
B
- The order of conditional numbering of plugs in the blocks of the ignition switch and three-lever switch;
D
- Order of conditional numbering of plugs in the instrument cluster blocks
Replacement and repair
It is easy to determine where the oil pressure sensor is located from the descriptions given above. There are other meters located in this sector, so care should be taken when performing work to replace or repair the sensor (it is possible to mistakenly remove the coolant temperature sensor).
This type of control element is inexpensive, so it is irrational to waste time trying to fix the problem yourself. Moreover, after self-repair, the correctness of the performance of such a device will remain a big question. If there is a suspicion that the oil pressure sensor is faulty, it should be replaced.
The work is carried out in the following sequence:
- Turn off the ignition.
- Remove the contact wire from the terminal.
- Using a wrench, unscrew the sensor.
- Install the new sensor in the reverse order of removal.
In this case, care should be taken not to overtighten the threads, the failure of which will require much more expensive repairs.
Maintenance
The declared resource of Oka engines under conditions of timely and correct maintenance is 120 thousand km. That is, these units, despite a number of inherent problems, can be called relatively reliable in their category.
The scheduled maintenance period is every 15 thousand kilometers. As part of the service, the oil is changed (it is advisable to use a synthetic lubricant; if semi-synthetics were poured into the engine, the interval is reduced to 10 thousand km). Therefore, when choosing which oil to pour into the Oka engine and when, you should clarify what liquid is already in the crankcase. When replacing, the oil system is washed and the oil filter is changed. Oil viscosity grade – 0W 40. 5W 40, 10W 40, depending on the season.
Valve clearance adjustment is supposed to be done every 30 thousand, but in fact it is carried out according to necessity and the actual condition of the engine. Also at this mileage you should clean the carburetor and adjust the idle speed.
After 60 thousand mileage, the fluid in the cooling circuit should be changed. If this is not done on time, the substance will degrade and lose its anti-corrosion and lubricating properties, reducing the life of the system as a whole. At this mileage, it is strictly necessary to replace a worn timing belt: if it breaks, the valves will bend, which will lead to the need to change the engine or make expensive repairs.
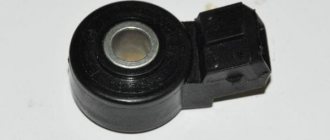
Principle of operation
An emergency vehicle device, like that of Ford Focus and Transit, Nexia or Opel Corsa cars, works using a membrane mechanism. There is a special membrane inside the sensor that reacts to the most minor changes in oil level. When the engine just turns on, there is no oil pressure in the system and the contact terminals of the detector are in a closed state. A lamp lights up on the dashboard, indicating that the system is working and is ready for operation. When the engine starts and warms up, the oil pressure increases, the fluid acts on the membrane, and it turns off the lamp.
Photo - operating principle of the oil pressure sensor
But as soon as the oil pressure begins to drop below the required level, the membrane returns to a level position and the contacts close, ensuring that the lamp turns on. If the indicator light on the instrument panel lights up while the car is running, this indicates that the pressure is very low.
The control sensor is designed a little differently. It is equipped with a slider that is connected to the plate using a special thread. A wire is connected to the slider, which is connected to the oil pressure control membrane. As soon as the oil level drops or rises, the membrane changes its position and the needle on the dial monitor moves with the help of a mechanism. This device is used to monitor the level drop at the moment, often it is not equipped with a warning light.
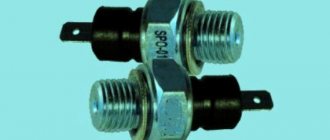
TYPES OF OIL PRESSURE SENSORS
Two types of oil pressure sensors are used in the automotive industry: Electronic, which is often called emergency. It is capable of working in two modes: yes/no. That is, it is impossible to obtain accurate readings from such a sensor, and its task is to signal to the driver that the oil pressure in the engine has completely disappeared. Mechanical. Unlike electronic, it allows you to accurately determine the oil pressure, which the driver is informed about by a dial on the instrument panel. Some cars use two types of sensors at the same time, allowing drivers to monitor the exact oil pressure and instantly react to the situation if it drops to zero.
FAULTS
VAZ 1111 engine - features and design
The 650 cc engine 1111 is “half” of the 2108 engine. To create it, they simply took half of the engine and cylinder block, since it was easier and cheaper to develop equipment for such a solution than for a new unit. Thus, the 1111th is a two-cylinder in-line petrol carburetor engine, with 2 valves per cylinder and an overhead camshaft configuration.
1111 assembled:
Main characteristics of the Oka engine:
- power - 30 forces;
- volume – 649 cubic meters. cm.;
- torque - maximum 44 Nm at 3400 rpm;
- recommended fuel is gasoline with an octane rating of 92;
- cylinders: 2;
- type of food – carburetor;
- valves – 4;
- fuel consumption – about 4.7 liters per 100 km;
- engine cooling – liquid;
- engine environmental standard: Euro-0.
Weight and dimensions of the Oka engine:
- weight – 66.5 kg without gearbox and clutch;
- overall dimensions – 550*640*670 mm.
The entire working process takes place in two revolutions of the crankshaft, due to which the engine experiences severe vibration loads. To compensate for them, two balancing shafts are provided to reduce motor vibration.
The supply of the fuel mixture is controlled by the carburetor. The lubrication system, as in 2108, is created with the installation of a gear pump. Engine oil is taken from the crankcase and supplied to the friction pairs of the camshaft and crankshaft. The cylinders are irrigated with oil mist generated during the operation of the crankshaft, and the engine gas distribution mechanism and valve rods are lubricated by gravity.