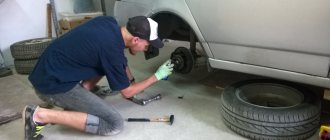
Replacing the front wheel bearing of a VAZ classic model
Wheel bearings facilitate the rotation of the wheels, they account for part of the car's support, while they fix its axles and bear a high load. This part is an important element of the chassis, and if it breaks, the front wheel bearing of the VAZ classic models will need to be replaced. If this is not done in time, an unpleasant hum will appear, the vehicle's rolling will worsen, and fuel consumption will increase. If the bearing fails, the machine will be unusable.
How to change a wheel bearing
Repairing your car yourself can be a fun and exciting experience. Replacing a wheel bearing is not a quick task, but having done it once, if necessary, you can repeat the replacement yourself more than once. After long-term use of the car, the wheel bearing fails, due to which, when driving, characteristic tapping sounds begin from the side of the wheel on which the bearing has worn out. A bad wheel bearing can be a serious driving problem, causing the wheel to lock, the car to brake suddenly, and the car to pull to the side instead of straight.
A bearing is a small part that can cause big problems. If this part is found to be faulty, try to make repairs as quickly as possible. Do not neglect your safety and the safety of your passengers.
Repairing a wheel bearing takes some time and is not an easy task. Take a free day for repair work, find a convenient place, it is advisable to call a second person for help.
Sign of a faulty VAZ classic wheel bearing.
A faulty bearing usually produces extraneous sounds in the form of a hum or grinding sound, and the wheel can also hang on such a bearing due to wear or due to a poorly tightened wheel nut.
To diagnose a bearing, it is enough to hang the wheels (or each separately) and rock the wheel in different directions. If there is play when rocking in all planes (wheel rotation left and right and tilt up and down), the wheel bearing may need to be replaced. But the backlash can also be due to tired silent blocks or ball bearings. To exclude a suspension malfunction, you need a second person who will check whether the wheel wobbles together with the steering knuckle or walks separately from it. If the wheel moves separately from the steering knuckle, then the wheel bearing is definitely faulty (in this case, tightening the wheel nut may briefly save the situation).
A sign of a malfunction may also be extraneous sounds when the wheel rotates (usually a hum, sometimes a grinding sound) or its uneven rotation.
You can also determine a faulty bearing by an excessively heated wheel (for example, if the front right wheel disc is much warmer than the front left one). But you can’t compare the temperature of the rear and front wheels because... They have brakes of different designs.
And so, let’s summarize everything we’ve read. The wheel bearing is replaced if:
- The wheel dangles separately from the steering knuckle.
- A hum and grinding noise is heard when the wheel rotates.
- The wheel does not spin evenly.
- The wheel rim gets very hot.
How to change a wheel bearing. Detailed instructions for dummies
To replace this part yourself, you will need several tools available to people who repair cars, several hours of free time, patience, and preferably take a friend who knows about cars.
Tools needed for repair:
- Car jack.
- A special wrench for unscrewing the hub nut, diameter 30.
- Round nose pliers or special pliers for removing the hub nut. Here, choose from what is easier to get or buy.
- Puller for pressing out the wheel bearing.
- Screwdriver or knife
- Before starting work, put the car on the handbrake, jack up the side you are going to work on, place bricks or wheel chocks under the car, the car should stay well on the ground. If there is an inspection hole, it will be more convenient to work in it.
- Before removing the bolts and the wheel itself, it is worth determining exactly which side the bearing needs to be changed, as described above. Remove the bolts from the wheel. After removing the cap, take a screwdriver and use it to straighten the deformed rim of the wheel nut for easy removal of the hub bearing.
- Use a socket extension to loosen the hub nut, but do not remove it completely.
- After loosening the hub nut, you need to completely remove the wheel from the mount. Do this carefully; before these manipulations, it is advisable to learn how to properly remove a wheel from a car.
- After removing the wheel, remove the brake caliper completely to locate the wheel bearing. The brake caliper cannot be completely removed; prepare a wire in advance to hang it on, otherwise there will be a lot of hassle later with putting the brake caliper back on. Perform all actions carefully and patiently.
- Take a 30mm wrench and remove the nuts holding the ball joint and steering knuckle together. Then take a crowbar, insert it under the steering knuckle, press on the crowbar, holding the lever. When squeezing the lever, move the brake CV joint to the side with your free hand or ask a friend to help you with this action.
- To avoid having to do a wheel alignment, after moving the brake CV joint to the side, mark the eccentric with some marker relative to the front strut. When reassembling, be sure to put everything in the place where you marked it with a marker, then you won’t need to go to the wheel alignment.
- Pull the hub out of the steering knuckle; it is advisable to do this using a special tool.
- Remove the outer and inner races from the wheel bearing.
- Remove the deformed bearing from the structure and then replace it with a new one, being sure to wipe and then lubricate the new part.
In words, replacing a wheel bearing seems difficult and time-consuming, but in life everything goes faster, especially for people who understand the structure of their car. Replacing this small but important part yourself seems difficult the first time, but the second time you will be able to carry out repairs faster and more efficiently, and most importantly, save money on car repairs.
After reading how to remove a wheel bearing, you are unlikely to become a car guru, but your knowledge will increase. There are many bumps and other obstacles on Russian roads; such small parts often fail, so learning how to replace them yourself will be a useful experience for you and, possibly, your friends.
What bearings to put
When a wheel bearing requires replacement, the question immediately arises of which part to install. Many people advise using original components. However, today the quality of parts leaves much to be desired and the issue of choice remains quite relevant.
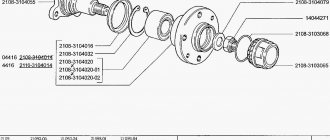
Table: type, installation location, and size of bearings
| Installation location | Bearing type | Size, mm | Quantity |
| Front wheel hub (outer support) | Roller, conical, single row | 19,5*45,3*15,5 | 2 |
| Front wheel hub (inner support) | Roller, conical, single row | 26*57,2*17,5 | 2 |
| Rear axle shaft | Ball, radial, single row | 30*72*19 | 2 |
Manufacturer's choice
When choosing a manufacturer of a wheel bearing for a VAZ “Seven”, we can recommend SKF , SNR, FAG, NTN, Koyo, INA, NSK. The companies listed have many locations around the world. These products are of high quality and meet the most stringent requirements.
Among the domestic manufacturers that supply bearings for cars of the Togliatti plant, we can highlight:
- CJSC "LADA Image" - manufactures and sells original Lada wheel bearings through secondary markets;
- Saratov plant - produces parts under the SPZ brand;
- Volzhsky Plant - uses the Volzhsky Standard brand;
- Vologda plant - sells products under the VBF brand;
- Samara plant SPZ-9.
Wheel Bearing Adjustment
The main parameter when carrying out a replacement is setting the correct hub clearance. The procedure is performed in two ways: using a dial indicator or by touch.
- Prepare an indicator stand.
- Place the device on the brake disc and secure with bolts.
- Place the end of the indicator against the end of the trunnion, as shown in the figure.
- Rotate the hub to measure the play.
- If the value is more than 0.15 mm, it is necessary to loosen the nut and tighten it with a torque of 9.6 N*m. Spin the disk several times. Loosen the nut (approximately 20-25 degrees), tighten with a torque of 6.8 N*m.
- Check the backlash value.
- Lock the nut.
Setting the gap without an indicator:
- Put on the wheel.
- Evenly tighten the nut while rotating the hub.
- Rock the wheel in a vertical plane to “feel” for play. To do this, place your finger on the end of the trunnion. A barely noticeable gap should be felt when the wheel rocks.
- If the play is caught, tighten the nut to a torque of 19.6 N*m. Don't counter.
- Rotate the assembly several times in both directions (to self-install the bearing). Check the gap.
- Lock the nut.
The rebuilt unit should rotate easily, without wedging.
Front wheel bearing for VAZ-2107
After removing the consumable, it is necessary to inspect and, if necessary, repair the bearings. To do this, do the following:
- It is necessary to remove the bearings for inspection and lubrication. To do this, it is worth fixing the hub with a vice.
- Perform gentle blows on the outer part of the bearing race to knock it out of the hub without damaging it.
- Remove the oil seal by prying it with a screwdriver. Underneath there is a spacer sleeve that also needs to be pulled out.
- Using careful movements, knock out the inner bearing.
How to replace and adjust
Because bearings wear out over time, they must be replaced. When disassembling, you need to take them out and carefully inspect them.
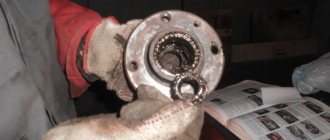
To do this, you need to clean the bearings and hub from old grease and contaminants. They are first wiped with a rag, then washed with kerosene. After these parts are completely cleaned, they need to be inspected.
At the same time, check the degree of wear and the presence of mechanical damage. If necessary, they replace the wheel bearings on the VAZ-2107. The new ones will also have to be lubricated and installed in place - in the hub. After this, the wheel is assembled and installed.
If the parts are suitable for further use, they are installed in place after cleaning and lubrication.
Replacement of bearings and hub cuffs of a VAZ-2107 car
Signs that a wheel bearing needs to be replaced are:
— increased noise when the wheel rotates;
— the impossibility of adjusting to achieve the nominal clearance in the bearings.
We are preparing the car to remove the wheel bearing.
We take out the brake pads and remove the caliper.
We hang the caliper in the wheel well so that the brake fluid supply hose is not strained.
Unscrew the hub nut and remove the washer and inner race of the outer bearing
If necessary, if the outer bearing cage is damaged along the way, we do not press out the outer ring of the bearing, but replace only its inner part.
At the first opportunity, we install a new bearing assembly.
Carefully, trying not to damage the cuff, remove the hub together with the brake disc from the steering knuckle axis.
In order not to disturb the mutual balancing of the disk and the hub, it is better not to disconnect the disk unnecessarily, and when removing it, mark its original position on the hub.
Using a 12mm wrench, unscrew the two guide pins and remove the brake disc and spacer ring from the hub.
We clean the inner cavity of the hub from old lubricant, wash all parts with kerosene and add fresh lubricant.
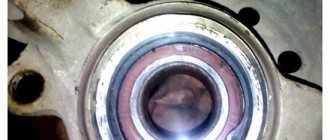
To remove the outer race of the outer bearing, secure the hub in a vice.
Using a beard, trying not to damage the hub, we apply light blows along the perimeter of the outer ring of the bearing and...
...knock it out of the hub.
We take out the hub cuff by prying it off with a screwdriver.
A spacer bushing is installed under the cuff.
We remove the inner bearing from the hub in the same way as the outer one.
We press the outer rings of the bearings in a vice, using the corresponding rings from old bearings.
The old rings should be oriented with a smaller cone diameter inside the hub to facilitate their removal after pressing in the new rings.
Using caution, the outer bearing rings can be pressed in by lightly hammering them through the spacer.
We put about 40 g of Litol-24 lubricant into the inner bearing separator and the inner cavity of the hub.
Cover the new cuff with the same lubricant.
Install the inner bearing into the hub.
Install the spacer bushing.
Carefully press in the new cuff using a hammer and a suitable tool (installation blade).
Trying not to damage the cuff, install the hub on the steering knuckle axle.
Lubricate and install the inner ring of the outer bearing, the washer and tighten the hub nut
We adjust the clearance in the hub bearings (see Adjusting the clearance in the front wheel hub bearings) and install the protective cap.
Before installing it, put Litol-24 lubricant in the hub cap.
Repair of VAZ 2101, 2106, 2107 hub
Maintenance-free front hubs on VAZ 2107 (bushing drawing)
This time we will talk about maintenance-free front hub bearings. Having changed 3 bearings over the winter (sometimes they didn’t last, sometimes they overtightened them, sometimes they fell apart during maintenance), I got tired of all this, surfing the Internet and DRIVE came across articles about maintenance-free bearings on the front. There are several options: 1. Buy a ready-made kit. There are people who sharpen hubs and axles for them. 2. hub with axle from Izh od (also suitable) - I couldn’t find it 3. Rear hub from 08 VAZ + bearing also rear and + adapter sleeve - that’s what you need and in terms of cost.
How to repair a car
In this article we will look at how to change the rear wheel bearing of a VAZ-2101, VAZ-2104, VAZ-2105, VAZ-2106, VAZ-2107, Classic and how to check the rear wheel bearing of a VAZ.
It was time to change this bearing a long time ago, but for some reason I only got around to it now. On the highway the car still behaves normally, but on the off-road the rear of the car began to wobble, and it began to creak when cornering.
The easiest way to check the rear wheel bearing is to press the outside of the wheel with your foot to wiggle it (you will hear a distinct thud). The wheel will simply dangle.
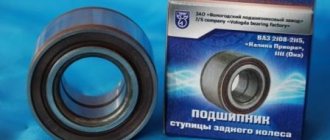
You can buy bearings for about 260-300 rubles. There are more expensive ones, but who cares, we take those that are cheaper.
One thing can be said, if you drive carefully, these spare parts will last a long time, if you don’t drive carefully, you will gouge everything, even those spare parts that cost 100 rubles more. The most important thing to understand is that careful driving extends the life of any part and the car as a whole. The bearing must be well filled with grease.
Now let's start removing the wheel and see how to change the rear wheel bearing of
a VAZ-2101, VAZ-2104, VAZ-2105, VAZ-2106, VAZ-2107, Classic. Changing the rear bearing is very easy, not like the front wheel bearing.
1. We begin to remove the wheel. We tear off the bolts when the wheel is on the ground, it’s more convenient. And there is no need to put it on the handbrake, since you will have to remove the brake drum.
2. When you lift the car with a jack, be on the safe side. The picture shows that the car rested against the jack and the safety stump. If the jack falls out, the box will rest against a stump. Even if the box bends, it’s okay, but you will remain alive.
We knock out the bearing (the blows should fall on the inner race, since the outer race is very thin and will crumble).
6. All that remains is to hammer in the new bearing. In order for the bearing to seat well, lubricate the walls of the cage with oil. Align the wheel bearing as level as possible. And carefully hammer the bearing evenly, the main thing is that it does not warp. If the bearing is installed level, it will easily go into place. Install the retaining ring and screw it back on.
If you hit the hub, the inner part of the bearing race will come out, this cannot be allowed. Therefore, we score with light blows using a pipe. All that remains is to tighten the nut so that nothing dangles. The bearing must be tightened, the tighter the better. Tighten tightly and loosen a little, and seal.
8. All that remains is to install the wheel. The wheel will no longer dangle. 2 years should be enough.
Replacing the rear wheel bearing of a VAZ-2101, VAZ-2104, VAZ-2105, VAZ-2106, VAZ-2107, Classic can be done with your own hands, it is not difficult.
Replacing the wheel bearing of a VAZ 2107
The chassis of the VAZ 2107, like all classic models, is not distinguished by its design complexity, but at the same time it fully complies with the somewhat inflated endurance requirements that road surfaces impose on us. The 7 has a reliable and simple wishbone suspension, but it does not last forever, and can remind you of itself from time to time with tapping and creaking.
Content:
Signs of a worn out bearing
We immediately pay attention to the knocking of the suspension and play in the steering, and try to find and neutralize the tired part as soon as possible. The front wheel bearing behaves completely differently. As a result of wear and tear, it does not immediately show its fatigue, but gradually. When turning right, the left wheel bearing begins to hum, and when turning left, vice versa.
It is quite possible that the bearing adjustment nut has become loose, but then the hum should be accompanied by a knocking sound. This can be easily determined by checking the play on the front wheel. To do this, hang the car on a jack and grab the wheel by the lower part and the upper part with your hands, then rock it. If there is play, then it will be enough to tighten the adjusting nut with a torque of 2 kg/cm and tighten it with a blunt chisel. If the hum continues after this, it means the bearing has worn out and needs to be replaced.
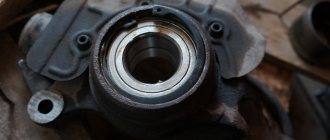
Removing the front hub of a VAZ 2107
Before starting work, place the car on a level surface, secure the rear wheels with wheel chocks and tighten the handbrake. After this, we jack up the front wheel with a jack, but it is advisable to place a stand under the lower arm after we remove the wheel. We loosen the jack, the bulk of the car falls on the stand, and now the car is securely fixed.
- Using a blunt chisel or screwdriver, remove the hub protective cap.
- Remove the front brake caliper. To do this you will need to remove the brake pads. We unpin the pad pin, take it out, and then you can use a pry bar or a large screwdriver to press the pistons into the caliper. After this, you can remove the brake pads.
- The front brake caliper is attached to the axle with two bolts that need to be unscrewed. In order not to disconnect the caliper from the brake system, we hang it on a wire so that the brake hose is not stretched.
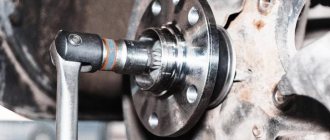
- Let's move on to the hub. Using a 27mm socket, unscrew the hub adjustment and fastening nut. To avoid any surprises, let us remind you that the right wheel has a left-hand thread, and the left one has a right-hand thread. It's hard to confuse. Having oriented towards the cardinal points, unscrew the nut.
- Remove the hub from the axle and place it on a horizontal surface.
Work order
The process of replacing such a front wheel bearing will consist of the following mechanical operations:
1. It is necessary to block the rear wheels with the hand brake, engage a lower gear, and install anti-rolling stops under the rear wheels.
2. Loosen the bolts securing the wheel on the hub of which the bearing is planned to be replaced. Then you should unscrew the hub bearing mounting nut using a 30mm socket wrench. If the car is equipped with light metal alloy wheels, you must first remove the wheel and ask your assistant to depress the brake pedal. In this case, you need to unscrew the hub nut.
3. Use a screwdriver to press out the caliper, and using a 17mm wrench, unscrew it from the steering knuckle.
Tie the caliper to prevent it from sagging on the brake hose. Then you should unscrew the brake disc from the hub itself.
4. Set orientation marks. After this, you should unscrew and knock out the bolts securing the steering knuckle to the rack itself, using a soft guide. Unscrew the mounting bolts on the ball joint. Then you need to remove the steering knuckle.
5. Next, using a socket with a suitable diameter, you should knock out the hub from the old bearing.
Then, after removing the retaining ring, you need to install the puller in a mechanical vice and dismantle the bearing.
6. Clean and lubricate the seat for the new bearing. Install a new bearing and install the retaining ring.
Subsequent assembly should be carried out in reverse order. After the bearing mounting nut on the hub has been tightened, the side of the nut itself should be pressed down.
Watch the video from exe TV for more details.
Replacement of the VAZ front wheel bearing has been completed.
Instructions for replacing the wheel bearing on a VAZ-2107 with your own hands
Removal
Put the car on the handbrake. Place a shoe under the wheel to prevent the machine from rolling away. Loosen the front wheel nuts.
Raise the car and place a support under the body. Remove the wheel. Unscrew the caliper mounting bolts located on the inside and remove the caliper. To avoid damaging the brake hose, it is better to tie up the caliper.
Using a screwdriver, pry up and remove the hub cap. Unscrew the hub nut. After removing the nut and washer, pull out the outer separator. Pull the brake disc towards you and remove it together with the hub. After unscrewing the two guide pins, remove the brake disc from the hub.
Using a screwdriver, pull out the oil seal and separator, and then the spacer ring. Now you need to knock out the clips. Using a mandrel of the required diameter or a drift, knock out both clips with a hammer.
Installation
Before assembly, wash all components with any grease-cleaning liquid. Remove the races from the new bearings and, holding them in a vice, press them into place through spacers (it is best to use the old race as a mandrel).
Lubricate the inner bearing cage and install it in place. Insert the spacer ring, press the oil seal through the spacer, being careful not to damage it. We put on and secure the brake disc with studs.
We install the unit in place. Having pre-lubricated, insert the outer bearing separator into place and, having installed the washer, tighten the nut until it stops. We put on the wheel. We turn it several times to ensure complete seating. Then slowly unscrew the nut until a small amount of play appears. Lock the nut in this position.
We clean the hub cap of old grease, fill it with new one and install it in place.
Having examined how the wheel bearing is replaced on a VAZ-2107, we can conclude that this repair is not so complicated. And if desired, almost every car enthusiast can do this.
Timely maintenance and the use of high-quality spare parts will extend the life of your car. It is important not to forget that the serviceability of the car’s front suspension is a guarantee of your safety.
Elements protecting hinges on front-wheel drive VAZ vehicles
The boot is a hinge protection element on front-wheel drive Zhiguli cars, made of special corrugated rubber. It is installed on the internal and external drive joints and protects them from external factors. It also holds the lubricant necessary for operation inside the joint.
Power Torque: Front Wheel Bearing Replacement
Basic concepts on how to replace a defective front wheel bearing. The list of main transitions will allow you to independently carry out this operation.
Replacing bearings yourself
Modern drivers often encounter such a problem as the occurrence of hum and various extraneous noises in the car suspension. The main reason for this is usually the presence of faults in the bearings. This means it's time to replace them. To carry out repair work
Determining the causes of a windshield wiper malfunction on a VAZ car
wipers If suddenly the wipers on your car stop working, this is not a reason to panic. This device is quite simple and, if desired, anyone can independently eliminate the cause of the malfunction by following the further instructions. And so, let's find out why the wipers on your VAZ-2105 do not work.
How to independently replace CV joint boots on a VAZ 2109.
The CV joint boots are a front-wheel drive unit, which is popularly called a “grenade”. The reasons that lead to their damage can be different: aging of the material, hitting an obstacle, as well as careless operation of the car.
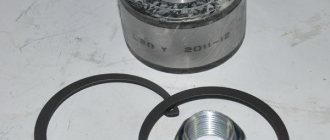
Adaptation kit for wheel bearing 2108 for VAZ 2101-2107
- Engine Crankshaft
- Flywheel
- VAZ cylinder head
- Sports camshafts
- Sport timing valves
- Cylinder head components
- Belts | Timing gears
- Gaskets | Oil seals
- Intake system
- Throttle valve
- Clubturbo pistons
- TDMK pistons
- Federal Mogul pistons
- Piston rings
- Connecting rods
- Engine mounts
- Inserts for VAZ engines
- ACL earbuds
- Oil catchers
- Oil crankcase
- Oil pump
- Miscellaneous
- Turbo Turbo kit
- Turbochargers
- Turbo manifold
- Bypass valves
- Westgates
- Intercooler for VAZ
- Intercooler kit
- Piping kit (air ducts)
- Turbo parts
- Adapters for installing an oil cooler | sensors
- Straight pipes
- Blocking
- Vacuum booster
- Clubturbo suspension
- Silencers for VAZ
- Control units | Wiring
- Filler necks
- Moto kits Turbo
- Adapters for installing sports steering wheels
- Keychains
- Bumpers tuning for VAZ
- Hoses | tubes
- Thermal insulation
- home
- Catalog
- Transmission
- VAZ drive
- Adaptation kit for wheel bearing 2108 for VAZ 2101-2107