02/16/2021 2,561 VAZ 2110
Author: Ivan Baranov
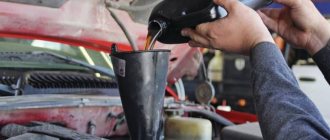
In practice, owners of domestic “ten” cars quite often encounter the problem of an indicator appearing on the dashboard indicating low engine fluid pressure. As a rule, this may be due to a decrease in the level of consumables in the system or a malfunction of the pressure controller. You can learn more about where the VAZ 2110 oil pressure sensor is located and how to replace it in this article.
[Hide]
Oil pressure sensor for VAZ 2110
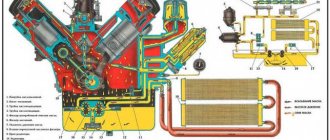
All internal combustion engines have a lubrication system. Thanks to it, the rubbing units work for a long time and without interruption, regardless of the load. The lubrication system consists not only of the oil pump, filter and channels in the cylinder block. The VAZ 2110 has another important part - an oil pressure sensor. This is a simple part that has a responsible function. The article will discuss how it works, where it is located and how to check the oil pressure sensor on a VAZ 2110.
Other VAZ cars
Let's look at how to check the oil level on VAZ series cars using the example of the VAZ 2112 and Lada Priora 16 valves.
Level measurements on these vehicles are carried out only on a warm engine. The probes here have a special appearance - a corrugated area with marks along the edges without letters.
Therefore, if the engine is cold, you will have to start it and warm it up until the fan turns on.
Then turn off the engine, wait 3-5 minutes until the oil drains into the crankcase and take measurements, see the algorithm above.
Since the dipstick itself between the marks has a corrugated shape, this causes a problem for many drivers.
Everything is simple here - the working fluid must be in the grooved zone, then the level is considered normal. But where this place should be, opinions differ.
Experienced drivers recommend proceeding from the operating conditions of the vehicle.
If the VAZ 2112 and Lada Priora are operated under normal conditions on flat terrain, then it is considered normal if the oil level is in the middle in the corrugated zone.
If cars are driven on moderately rough terrain, then the normal level may be 2/3 from the bottom mark in the corrugated zone, and if in mountainous terrain, then 3/4.
Also, many experienced car owners rely on the number of engine revolutions.
If during driving the number of crankshaft revolutions does not exceed 3000 rpm, then the oil level can be kept in the middle, if more than 4000 - at 3/4 of the lower mark. Filling 1 liter means raising the level from the lower to the upper marks.
Purpose
This device detects the oil pressure level and displays the corresponding information on the control panel. Timely notification allows the car owner to quickly fix the problem. If you ignore it, problems may begin with the engine, leading to expensive repairs. After all, if there is not enough oil in the engine, the piston of the car runs “dry”.
The oil pressure sensor on a VAZ not only notifies that this liquid has run out. Sometimes a glowing red indicator may indicate a malfunction in the pump. This happens even if there is enough lubrication in the motor.
How to check the oil sensor: recommendations from experts
The easiest way to check is to use the built-in sensor. These devices can be:
- emergency;
- additional.
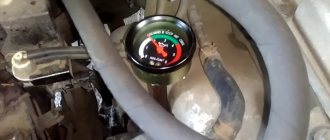
Most drivers use a hazard warning light, usually displayed on the dashboard in the form of an illuminated oil can icon. It shows only two states of the oil system: normal oil pressure and no pressure. This device only signals a critical drop in pressure in the lubrication system, allowing you to avoid only the most serious problems. For example, it notifies of a breakdown that will occur in the coming hours or days if the pressure is not checked and adjusted to normal.
The operating principle of the device is based on a membrane mechanism. When the ignition is turned on, but the engine is not running, the oil pump also does not work and the sensor contacts are in a closed state. The indicator lights up. As soon as the engine starts, oil pressure increases, arching the diaphragm and acting on the pusher, which in turn opens the contacts in the circuit. The indicator goes out, indicating normal pressure. As soon as the pressure drops to critical, the diaphragm returns to its original position, closing the circuit and causing the indicator to light up. For constant and precise monitoring of the lubrication system, additional sensors are used, which are more complex in the device. They are equipped with a dial showing accurate current data in the oil system. This makes it possible to continuously check the oil system and thereby extend engine life to the maximum.
There are two types of such indicators:
Mechanical pressure gauges.
Used mainly by owners of old cars. The devices consist of a housing, a pusher, a membrane, a slider and a nichrome winding. In addition to these elements, there are also additional small parts that cause the device to show incorrect data if these parts fail. In operating mode, the position of the pointer indicator is determined by a slider located on a plate with a nichrome winding. When pressure is present, the membrane bends, acting on the pusher, which transmits pressure to the mechanism for changing the resistance. The final pressure information can be checked on the dial with a pointer indicator.
Electronic signaling devices.
Used in modern cars. They convert mechanical force into an electrical signal, which is then processed by the on-board computer system. This type of alarm is less susceptible to breakdowns than a mechanical one, since its design is much simpler. It consists of a housing, a membrane, a pusher and contacts connected to a network that also includes a built-in emergency oil pressure sensor. The principle of its operation is the same. When the engine is not running, the membrane is in a “relaxed” state and the circuit is closed. When the ignition is turned on, the emergency indicator will light up. Starting the engine creates pressure in the oil system, which tensions the membrane and, using a pusher, opens the circuit contacts. When the pressure drops, the membrane straightens again, the contacts close, the indicator lights up, signaling to the driver about a malfunction in the oil system. In addition, the light also lights up if there is a malfunction in the indicator itself, giving a reason to check it.
The indicators in additional sensors change as follows. The pressure of the lubricating fluid deforms the diaphragm, pushing the slider along the nichrome resistor. The resistance in the circuit changes, to which the pointer reacts accordingly. Depending on the amount of resistance change, it will show the current oil pressure.
Some automakers equip cars with two types of devices at once - in case one of them fails.
How the sensor works and how it works
The oil pressure sensor on the VAZ 2110 includes the following components in its design:
- movable and fixed contacts;
- body (usually metal);
- membrane;
- pusher in the form of a rod.
On the VAZ 2110 model there is a contact sample sensor. It connects to the warning light on the panel. When you turn on the ignition, a “plus” from the vehicle’s power supply goes to one contact of the light bulb. The remaining, second contact, contacts the moving part of the meter.
The working principle of the part is not complicated. The algorithm is based on the fact that the lamp terminals are connected to ground. This is the functional task of the moving contact - it is through it that the pusher is connected to the diaphragm. Under the diaphragm itself there is a cavity in contact with the lubrication system in the engine block. When the pressure inside it increases, the load on the diaphragm also increases. And it begins to bend, as a result of which the movable contact moves away from the stationary one. If there is no pressure, the contacts remain closed and the corresponding indicator lights up on the dashboard. For the circuit to open, the pressure must rise above 0.3 atmospheres. At the same time, the light bulb goes out.
Device
The oil sensor may have a different design depending on the principle of operation and additional functions that it can perform. Most modern devices are electronic. Their connection also depends on the principle on which they will work.
The simplest sensor is connected from the on-board electrical network. When it is triggered, the contact of the light closes, which will indicate that it is necessary to replenish the level in the pan. As for electronic modifications, their operating principle boils down to activating the corresponding algorithms programmed in the microprocessor.
When the device is triggered, corresponding signals are generated in the electrical circuit. They go to the control unit. The ECU determines which signal needs to be output to the instrument panel. In some vehicles, an audible signal or graphic is activated along with the illuminated indicator.
The photo shows a simple sensor in cross-section:
A) minimum oil level; B) maximum oil level; 1) magnetic contact; 2) float with magnet; 3) body; 4) connector for wiring.
The device of the simplest sensor (float type) includes the following elements:
- Magnetic contact (reed switch) . This element reacts to the movement of the magnetic float. When the magnet is in the field of action of the contact, the electrical circuit is closed and the signal on the dashboard lights up.
- Float . This element is located on top of the body. When the sensor is in a liquid, under the influence of a dense medium, the float is displaced and is constantly located on top of the oil. The float contains a permanent magnet. Changing the level in the tank causes the float to move. When it drops to the minimum value, the reed switch contact closes.
- Frame . This is a long hollow tube, inside of which the reed switch itself and its electrical component (insulated thin metal rods with an opening contact) are located. A float with a magnet, made in the shape of a ring, moves outside the body.
- Connector for connecting an electrical circuit . In the simplest scheme, the sensor is powered from a battery, and a signal light is connected in series to it.
This design can be used not only in oil tanks. The gas tank or cooling system may receive a similar sensor. In most cases, the device is installed using a threaded connection (screwed into the tank itself: engine block, fuel tank, gearbox housing, etc.).
Where is
In the tenth VAZ model it can be located in two places, which depends on how many valves the engine has.
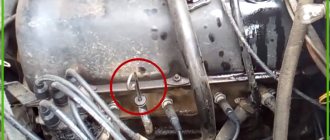
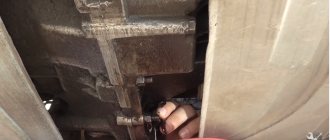
For 2110 8 valves, it is located in the rear right part of the engine, in the cylinder head socket, not far from the belt guard. It is easy to find by the single wire.
Drivers of a VAZ with a 16-valve working unit will have to look for it in a slightly different place. It is also located behind the engine, but to the left. The sensor is mounted on the camshaft block. There is also one wire coming from it, but nearby there are two bundles of cables protected with black insulation.
Features of the oil quality sensor
A sensor that determines the quality of engine oil is also optional. However, since various contaminants inevitably enter the oil during engine operation (coolant, wear products, carbon deposits, etc.), its actual service life is reduced, and it is not always correct to rely on the manufacturer’s recommendations for replacement periods.
Engine oil quality sensor
The operating principle of the engine oil quality control sensor is based on measuring the dielectric constant of the medium, which varies depending on the chemical composition. That is why it is positioned in such a way as to be partially immersed in oil. Most often this area is located between the filter and the cylinder block.
Structurally, the sensor for oil quality control is a polymer substrate on which copper strips (electrodes) are applied. They are directed in pairs towards each other, forming a separate sensor in each pair. This allows you to receive the most correct information. Half of the electrodes are immersed in oil, which has dielectric properties, causing the plates to act like a capacitor. A current is generated at the counter electrodes and supplied to the amplifier. The latter, based on the current value, supplies a certain voltage to the car’s ECU, where it is compared with the reference value. Depending on the result obtained, the controller may display a message about low oil quality on the dashboard.
Correct operation of the lubrication system sensors and monitoring of the oil condition ensures proper operation and increased engine life, but most importantly, the safety and comfort of vehicle operation. Like other parts, they require regular technical inspection, serviceability checks, and appropriate replacement if a breakdown is detected.
Source
Possible faults
There are a number of situations that lead to the breakdown of the DDM on the VAZ-2110 8 valves:
- the membrane is damaged;
- the resistive layer is worn out;
- the heating element of the bimetallic plate has failed or is deformed;
- the channels through which oil is supplied are clogged;
- Wires are oxidized or torn. This leads to “parasitic” resistance;
- The sensor relay has failed. The relay's job is to sound a buzzer if there is not enough pressure in the system. It just starts at certain engine speeds (more than 1500). At idle, it is inactive, because the pressure does not even reach mark 1.
How to replace
The replacement is easy to do with your own hands; you don’t even have to go to the garage or visit a service station, where the car owner will be charged a tidy sum.
Replacing a sensor is a task similar in complexity to replacing a wheel. What will be useful for work:
- spanners;
- gloves to avoid getting your hands dirty;
- new device.
Instructions for disconnecting the old sensor and installing a new one:
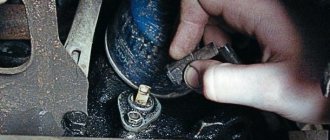
- Disconnect the wire going to the device.
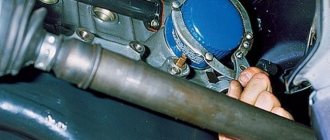
- Remove the sensor using a 21 mm wrench.
- They take it out.
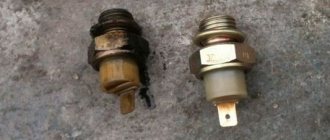
- Together with the DDM, the sealing ring, usually made of aluminum, is removed. It is also better to replace it with a new one.
- Install and tighten a working sensor.
- Connect the wire that was disconnected at the very beginning.
This is what the procedure for replacing a node looks like. You should be careful when buying DDM, since now about 40% of these products are fakes.
When to change the oil pressure sensor
On average, this needs to be done after 10 thousand kilometers. In addition to the distance traveled, the need for an early oil change is also affected by the vehicle's driving mode. For example, prolonged engine operation under increased loads on poor quality roads (slipping). And, of course, the change of season - in winter (when the cold is more than -5°C) and in summer (when the atmospheric temperature rises after the cold to +5°C).
Monitoring the operation of engine oil in the VAZ 2110 engine is provided by several sensors:
- engine oil pressure sensor;
- engine oil level sensor.
How much oil to pour into the "ten"
Quite often, the owners of the corresponding car have a question - how much VAZ 2110 oil is needed for normal engine operation. According to the manufacturer's recommendations, this volume is 3.3 liters. But experienced owners are not limited to the manufacturer’s recommendations and claim that in practice you can fill in from 3.5 to 4 liters of engine oil.
We recommend: Why doesn't reverse gear engage on the VAZ 2109?
Returning to the choice of oil fluid, it is worth paying more attention to the viscosity indicator. Each brand is characterized by its own characteristics, but all have a common, firmly established designation. The first digit of this marking indicates the viscosity of the oil at sub-zero temperatures. The lower this indicator, the better the oil viscosity. The second digit of the marking reflects the viscosity indicator at high temperature.
Having understood the categories of oils and learned how much oil to fill the VAZ 2110, you should study in more detail the reasons for its replacement. The main factor requiring replacement is the deterioration of the properties of the oil during its operation. Like other raw materials, motor oil is subject to the aging process. If you adhere to the established regulations, you should replace it every 30 thousand kilometers of the vehicle.
When choosing cheap, low-quality oil, you need to be prepared for the corresponding negative consequences. After a little time, you can observe phenomena such as a peculiar crunch at the moment of gear shifting or the appearance of a noise effect in the gearbox. When regularly checking the level, car owners sometimes encounter a problem - VAZ 2110 oil leaks.
Moreover, leakage can occur both inside the engine and outside. The main cause of leakage is failure of oil seals or wear of gaskets. Under such circumstances, the best solution would be to replace all worn parts. To be more sure, you can change the gasket located on the filler cap. It would also be a good idea to tighten the fasteners.
As an urgent and short-term solution to the problem, you can use special additives. If oil is leaking inside the engine, it is recommended to replace the rings.
What does the oil pressure sensor on the VAZ 2110 consist of?
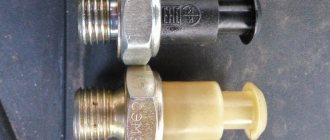
The engine oil pressure sensor is a small part consisting of:
- metal case;
- aluminum sealing ring;
- elastic inner membrane (it is exposed to engine oil after the engine starts running);
- pusher (this is a complex of two smaller parts - a movable electrical contact and a bimetallic leaf spring).
On the dashboard of the VAZ 2110 there are corresponding indicators that display the information collected by the sensors listed above. Sometimes, when the engine is running, one of them lights up - in the form of an oil can. This indicates problems with oil pressure in the system.
When you see the oil can indicator light, you need to do the following:
- Turn off the engine.
- Check not only the oil pressure sensor itself, but also the indicator, as well as the oil pump and oil filter.
Oil level sensor malfunctions
Damage to the oil level sensor cannot be ignored. If the driver misses the moment when the lubricant level drops to a critical minimum value, the engine will experience oil starvation. In addition to the lubricating effect, engine oil performs the function of removing heat from parts of the unit that are not in contact with the cooling jacket.
If there is not enough lubrication, the load on the motor increases, especially thermal (parts are poorly cooled). This negatively affects their work resource. In real life, reviews from many car owners show that even the minimum level of lubrication may not be critical if you do not run the internal combustion engine at high speeds until the oil is changed or until an additional portion of lubricant is added.
A sensor failure is indicated by a constantly burning oil lamp light on the dashboard. If the alarm does not disappear after topping up or completely changing the oil, the sensor must be replaced. This can also happen when the ECU receives incorrect signals.
In addition to the constantly burning light on the dashboard, the engine icon may light up or the oil can periodically light up and go out suddenly. In this case, the control unit receives incorrect data from the lubricant level sensor. The microprocessor determines this as a serious malfunction, and may even block the operation of the motor.
If the car does not have a dipstick for checking the oil in the engine, then there is no way to determine the breakdown except for diagnostics at a service station. Service center workers connect a car scanner and diagnose all equipment. In addition to this method, in the case of some cars, quick self-diagnosis is possible.
An error code is displayed on the vehicle's on-board computer. In most cases, error P250E indicates a malfunction of such a sensor (but often this refers to in-depth diagnostics, which are carried out by a special auto scanner). Details on how to call up the diagnostic menu on the car’s on-board computer are described in another review .
The oil level sensor stops working for the following reasons:
- A large amount of oil deposits have accumulated on the surface of the scanning device;
- Wiring insulation failure or line break;
- The fuse has blown (the pinout, which is usually indicated on the housing cover, will help you find the corresponding element in the fuse box);
- For VAG models, sensor problems are directly related to a breakdown of the hood switch.
It would seem that this has nothing to do with the hood and the oil level sensor. The manufacturer’s logic (applies to cars coming off the assembly lines of companies owned by the VAG concern ) is as follows. The electronic circuit is looped through the hood switch. When the driver notices that the oil can light on the dashboard, naturally, he will open the hood to add oil or at least check its level.
The activation of this sensor gives a signal to the control unit, saying that the driver has made the necessary changes and went to the service station. Counting on this course of action, the manufacturer programmed the ECU to turn off the alarm signal on the dashboard until the car has driven about 100 kilometers (if the oil has not been added).
Problems with the limit switch are regarded as a breakdown of the oil sensor. For this reason, before installing a new sensor in such machines, you must first check the serviceability of the limit switch. Otherwise, even a working lubrication system sensor will not make the oil can on the dashboard go out.
The nuances of replacing the oil pressure sensor on a VAZ 2110
When replacing the oil pressure sensor with a new one, remember the following nuances:
- you need to check the cleanliness of the surface of the wire contacts. If there is contamination or oxidation film, they must be removed;
- in addition, you need to check the seal that protects the oil pressure sensor from dust - if it is damaged, it must be replaced;
- Often new sensors, even those purchased at expensive auto parts stores, do not work correctly (for example, oil leaks) and may need to be replaced.
Checking the operation of the oil pressure sensor
After replacing the oil pressure sensor, it is recommended to check the operation of the oil level sensor.
The oil level sensor inherently duplicates the operation of the oil level meter dipstick and displays them on the indicator panel. The most common on the VAZ 2110 are float-type oil level sensors.
A float-type oil level sensor is a magnetic float freely moving along a rod, inside of which there is a reed switch (an electrical element that breaks or, conversely, forms a contact in the circuit). Accordingly, when the oil level in the system changes, the indicator on the VAZ 2110 dashboard will light up or go out.
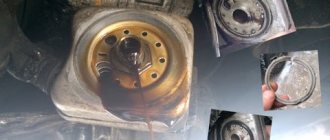
To replace the engine oil level sensor, find it near the oil filter - in the crankcase of the VAZ 2110 engine. After this, you need to disconnect the wiring contact leading to the indicator from it. Using a key set to “10”, carefully unscrew the sensor.
Attention! Be careful not to damage the sensor, even if you plan to replace it. The reason for this is possible contamination of the oil with fragments of the float and subsequent complete flushing and replacement of the oil in the engine of your VAZ 2110.
Installation of a new oil level sensor is carried out in the reverse order. It is recommended not to forget about the O-ring and check the cleanliness of the contacts.
Source
Oil pressure sensor VAZ 2114: device, principle of operation and replacement
If we consider the oil pressure sensor of the VAZ 2114, then it is worth noting that it is an important component in the car. The manufacturer says that the car must contain at least 3.5 liters of engine oil
In this case, it is necessary to monitor the quality and level of the oil, replacing it on time.
Such a sensor serves an important purpose; it is necessary to inform the driver about any existing malfunctions in the oil system. If there are any problems, this will be indicated by a light on the dashboard - emergency pressure light
When considering this issue, it is worth emphasizing that the liquid that is poured into the system is located in the crankcase. If necessary, its level can be checked using a dipstick, which has special lines. Usually it marks the maximum possible level and the minimum possible level.
It should be borne in mind that it is not always possible to carry out such measurements; the engine must be cold to carry out the check. The fact is that after startup, the liquid is distributed throughout the system under the influence of a special pump. It is supplied to the main line, passing through a filter; the essence of the work is to create the necessary pressure in the system.
Examination
So, the oil is not leaking anywhere, but the light indicating a critical level of pressure in the oil system stubbornly refuses to go out. In this case, the best solution is to check the condition of the sensor, which is responsible for the pressure.
But how can we check that the problem is precisely in the element we are interested in?
- First, make sure that all the wires going to it are in good condition. They often lose their integrity during operation. Connect the wires to the power unit. If the light comes on, then everything is fine with the wiring.
- Oiliness. Often it is the oil itself that causes the problem. The contact is broken and the device cannot work properly. Check if there are traces of oil on the device. If the sensor turns out to be dry, then this is not the cause of the problem either.
- Most likely, the device itself is not working. This is a completely natural thing for such a unit. There is no point in repairing it, since it is not repairable.
Replacing it is not difficult with your own hands and not expensive. Today, the cost of a new sensor for a domestic “ten” is about 100 rubles .
Varieties
In accordance with the provisions of clause 1.1.2 of GOST 28725-90, sensors are divided into protected from water and dust. There is also a separate category of explosion-proof devices.
Depending on the resistance of the device to mechanical stress in accordance with clause 1.3 of GOST 28725-90, oil level sensors can be divided into vibration-resistant and vibration-resistant.
The sensor is based on some phenomena related to the physical, chemical or electrical properties of oil, as a substance with a stable state of aggregation throughout the entire operating process. Today, the most popular types of oil level sensors, depending on the principle of operation, are:
- Thermal;
- Ultrasonic;
- Electrothermal;
- Capacitive;
- Float
Rice.
3. Thermal oil level sensor Thermal sensors (see Figure 3) are the most common in automotive practice. Structurally, their construction principle is designed for the cooling rate of the sensitive element, usually a metal wire. To measure the level, a wire located in the oil is heated to a set temperature that is in advance higher than the current heating of the oil. After this, the wire cools down, and depending on the time it takes for its temperature to equalize to the value of the oil medium, the degree of filling of the tank is determined.
Where is he located?
A completely natural question for those who plan to replace it themselves, but are doing it for the first time.
Sensor installation location
And its location depends on the number of valves on the engine.
- 8 valves. On an eight-valve engine, the oil pressure sensor is located directly under the valve cover on the right, near the timing belt housing, made of plastic.
- 16 valves. If it is a VAZ 2110 with 16 valves, its oil pressure sensor is located on the left between the ignition module, the oil filler neck and the air filter.
Replacement
In terms of complexity, replacing a sensor is equivalent to replacing a wheel. Difficult? Absolutely not.
To get started, prepare the necessary tools and materials:
- Spanners;
- Gloves that will allow you to avoid unnecessary contamination of your hands;
- New sensor.
Next, following the simple instructions step by step, you can easily remove the old one and install a new oil pressure sensor.
- Disconnect the wire that goes to your device.
- Dismantling of the device is carried out using a regular 21 mm wrench.
- The sensor is now removed.
- Along with the device, you should get an o-ring made of aluminum. It is not recommended to reuse it. Replace with a new ring.
- Armed with a new sensor, insert it in place of the old one, screw it in and secure it.
- Reconnect the wires you disconnected in the first step. The matter can be considered completed.
What you need to know about DDM?
Before diagnosing and replacing the oil pressure sensor, you need to know where the oil pressure sensor is located. First, let's briefly talk about the purpose and installation location of the device.
Purpose and location
The VAZ 2110 oil pressure sensor is a device used to notify the car owner about the low level of consumable pressure in the engine. Thanks to this controller, the owner of the “ten” can promptly determine the cause of the malfunction, as well as avoid possible problems that may occur as a result of “dry” operation of the power unit. But it should be borne in mind that if the oil light on the dashboard suddenly lights up on a VAZ 2110, there is a possibility that the problem lies in the regulator itself.
We recommend: Connecting fog lights to the legendary “Nine”
To check the device, you must first find it - the device can be located in two places, depending on the design features of the motor:
- On an 8-valve engine, the device is located on the rear of the power unit, on the right in the cylinder head connector, not far from the belt guard. One wire is connected to the DDM.
- As for engines with 16 valves, in this case the DDM should also be looked for on the rear of the internal combustion engine, only on the left, directly on the camshaft block. One wire is also connected to this controller, however, next to it there are two more bundles with wiring (the author of the video is the Auto_Remont channel).
Diagnostic features
If you notice that the emergency engine fluid pressure indicator on the dashboard is constantly on, then you should diagnose the regulator. It would be a good idea to check the wiring as well. Diagnostics of the device begins with checking the electrical circuit in the area directly from the DDM to the indicator on the device.
Diagnostics is carried out as follows:
- First, on an 8- or 16-valve engine, disconnect the wire and connect it to ground, in particular, the body or engine.
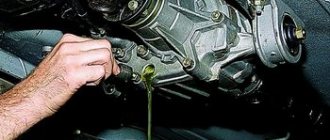
- If, after connecting the wire, the indicator on the device starts to light up, this indicates that this section of the electrical circuit is working properly, so you can start diagnosing the regulator. Dismantle it and carefully inspect the device - if it is dry and operational, then the reason for the lit indicator most likely lies elsewhere. For example, this could be a filter or oil pump. But if the controller itself is wet, in motor fluid, then this indicates that it should be changed.
If your oil pressure light comes on, first of all you need to check the oil level; in some cars the light comes on when the oil filter is clogged and the bypass valve in it has opened.
Replacement instructions
How to replace the VAZ 2110 oil pressure sensor:
- First you need to disconnect the power cord from the regulator.
- Using a 21mm wrench, you need to unscrew the DDM from its seat, and its steel seal is removed along with it.
- A new DDM is installed in place of the dismantled device; it is also necessary to replace the seal, which should be included in the kit.
- After the regulator is installed, it is necessary to clean the contacts on the connector, and also check the integrity of the dust seal. If everything is fine, then connect the power cable to the DDM and check its functionality.
Photo gallery “Replacing FLS on 8- and 16-valve engines”
1. Removing the FLS on an 8-valve engine
2. Removing the regulator on a 16 valve engine
Note to car owners
Quite often, the self-replacement procedure ends in a fiasco, since installing a new device does not give any result; lubricating fluid continues to flow from under it.
But the point here is not at all the crookedness of your hands or lack of repair experience. If you did everything according to the instructions, the culprit in this situation is no longer you, but the sensor itself.
Therefore, your task is to take the defect you purchased along with the receipt and go to the store where you purchased it. The store employees are obliged to exchange the device for you or return your money. Of course, if you do not save the receipt, you will not be able to return the money or change the sensor according to the law. Therefore, think twice before throwing away this piece of paper.
Another important piece of advice is to avoid such purchases on so-called spontaneous markets. This is where the largest number of fakes and defective devices are concentrated. There are many reliable, certified outlets selling auto parts. If you go to a service station to replace the sensor, you will have to pay more than if you repair it yourself, but you will be provided with a quality guarantee. A kind of protection against counterfeiting.
Source