In VAZ 2109 cars, the steering rack is responsible for controlling the rotation of the wheels, converting the rotation of the steering wheel into the translational movement of the steering rod. Wear or breakage of parts leads to an increase in play, as a result of which the car’s handling deteriorates, the wear of car tires from uncontrolled “yaw” increases, and the movement of the car itself becomes dangerous on multidirectional turns. The owner of a domestic passenger car will be able to repair the VAZ 2109 steering rack with his own hands, guided by these detailed instructions and a diagram of this unit.
- 2 Symptoms of malfunction
- 3 Removing and disassembling the steering rack in a VAZ 2109 car
- 4 Repair of the steering rack in a VAZ 2109 car
4.1 Video: repair of the steering rack of VAZ 2108, 2109, 2113, 2114, 2115
Replacing the steering rack of a VAZ 2109
Replacing the steering rack of a VAZ 2109 is a simple procedure. It requires two workers (however, in a different situation, one can do it), a steering rod puller, several flat-head screwdrivers, a standard set of wrenches and a cylinder head.
But before we get to it, let’s discuss the moments when this very replacement of the steering rack should be done. And there is only one: if you hear a crackling or knocking sound in the area of the steering rack when you turn the steering wheel sharply to the left or right with the wheels initially set to neutral, it’s time to replace the rack. You can, of course, try to tighten the nut a little tighter, but this will not always solve the problem, and often, on the contrary, can even lead to increased resistance when turning the steering wheel (read the link for how to adjust the steering rack). Repairing the rack may well be a way out of the situation, but without special knowledge and skills you are unlikely to be able to do it. So let's dwell on the replacement and determine its stages.
We remove the steering rack of VAZ 2108, 2109, 21099
On VAZ 2108, 2109, 21099 cars and their modifications, we remove the steering rack for repairs ( the rack “knocks”) or to replace the protective cover. In other cases, you can check and adjust it using a special wrench.
Necessary tools and equipment
— Curved socket wrench or high head on “13”
— Tie rod end puller or pry bar and hammer
— We hang up the front of the car and remove the front wheels
How to remove the steering rack of VAZ 2108, 21081, 21083, 2109, 21091, 21093, 21099 cars
— Disconnect the tie rod ends on both sides of the car
If there is a puller, use it; if not, then knock out the tips with a hammer. Read more: “Replacing tie rod ends on VAZ 2108, 2109, 21099 vehicles.”
disconnect the tie rod end 2108, 2109, 21099 using a pry bar and a hammer
— Disconnect the steering shaft flange from the steering rack
To do this, use a key set to “13” to unscrew the coupling bolt of the lower flange of the steering shaft coupling. We remove the bolt.
Using a slotted screwdriver, slightly open the coupling flange so that the rack shaft located in it is not pinched.
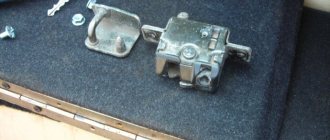
— Disconnect the right steering gear mounting bracket
Using a wrench or socket 13, unscrew the two fastening nuts and remove the bracket from the studs.
— Disconnect the left steering gear mounting bracket
Using a wrench or socket 13, unscrew the two fastening nuts and remove the bracket from the studs.
— We take out the steering mechanism
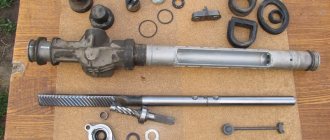
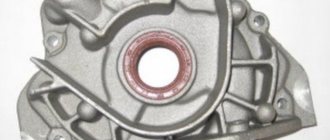
See photo at the beginning of the article. All work on removing the rack is carried out on the left side of the car, in the left wheel arch. We move the steering mechanism down relative to the steering shaft to remove the rack shaft from the shaft coupling flange. Turn the steering mechanism so that the rack shaft faces upward. We remove it through the hole in the left mudguard of the engine compartment.
All steering racks of VAZ 2108, 2109, 21099 cars have been removed.
We install it in reverse order.
— There is another option for removing the steering rack of VAZ 2108, 2109, 21099 - without disconnecting the tie rod ends. Instead, we unscrew the bolts securing the steering rods themselves to the steering rack. We use the key on “22”.
More articles on the steering rack of VAZ 2108 cars, 2109, 21099
— Checking the tie rod ends of VAZ 2108, 2109, 21099 cars
— Steering device for VAZ 2108 cars, 2109, 21099
Replacing the steering rack on a VAZ 2109
Sometimes the driver behind the wheel may be accompanied by a feeling of discomfort, which is provoked by a dull tapping and it becomes especially noticeable on uneven surfaces. After undergoing diagnostics, experts render a verdict that the steering rack must be replaced, but this procedure can be carried out independently. Next, we will consider in more detail how to remove the steering wheel on a VAZ 2109 and carry out further replacement, taking into account all the technological nuances.
Thus, replacing the steering rack requires the following materials:
- Movil aerosol can;
- three plastic clamps 200 by 4 millimeters;
- not wool rags;
- WD-40 for loosening rusted and burnt connections
- White spirit in the amount of one liter
- Grease for bearing machining. Mobil Grease XHP 222, FEOL and other similar materials may be suitable.
Also, replacing the steering rack requires the following spare parts:
And finally, replacing the steering rack on a VAZ 2109 with your own hands implies that you have the following tools:
- A bearing nut wrench in the form of a twenty-four octagonal rod with a recess;
- The key for the rack is in the form of an internal octagon, which is inserted into the pressure nut;
- Tip puller;
- Hammer;
- The extension mechanism for the key is preferably with a ratchet;
- Socket heads.
Before repairing the steering rack on a VAZ, it is necessary to process all connections one day (the nut for tightening the rack stop, four nuts for fastening the rack, the threads of the tips). After an hour and a half, treat all areas again and the next day you can begin the procedure.
How to tighten the steering rack on a Ford Focus 2
It is better to pull the steering rack on an overpass
Your actions:
- We drive onto an overpass or inspection hole
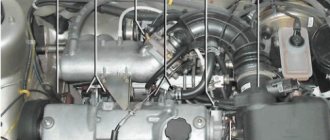
- Removing the plastic engine protection
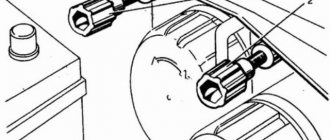
- We find the intersection of the steering shaft and the rack. There is a nut for adjustment here. It comes with a plastic plug installed from the factory. Remove it using a flathead screwdriver
- Then, using a short 17mm wrench, which should be purchased in advance, we tighten the adjusting nut clockwise. Stretch it 10-15 degrees and check for play
- The check is carried out in the following way. We sharply pull the rack in any direction and, if you cannot hear any noises or knocks, then there is no longer any need to tighten the nut
- There is no point in installing the stopper back - it will no longer be useful.
We will answer your questions for FREE regarding deprivation of rights, road accidents, insurance compensation, driving into the oncoming lane, etc. Daily from 9.00 to 21.00
Moscow and Moscow region
St. Petersburg and Leningrad region
Free call within Russia 8-800-350-23-69 ext.418
Replacement and disassembly of the VAZ-2109 steering rack
Removing and disassembling the steering mechanism
The steering mechanism is removed and disassembled to replace the protective cover or other parts. We remove the steering mechanism together with the steering rods. We press the fingers of the outer steering rod ends out of the rotary arms of the struts. In the cabin, we unscrew the bolt of the terminal connection of the elastic coupling flange with the gear shank.
In the engine compartment, use a 13mm socket to unscrew the nuts securing the steering brackets to the front of the body on the right...
...and the left side.
Remove the steering gear mounting brackets.
We move the steering mechanism forward until the splined end of the gear shank exits the hole in the front of the body...
...and take it out through the hole in the left mudguard.
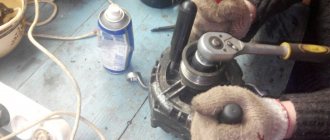
We clamp the steering gear housing in a vice with soft metal jaw linings.
To remove the steering rods, unlock the bolts by bending the edges of the locking plate.
We unscrew the bolts with a 22mm head.
Remove the locking and connecting plates.
We take out the steering rods.
Remove the support and spacer ring on the right side of the steering gear housing.
We cut off the clamps securing the protective cover (they are disposable).
Remove the protective cover.
Remove the support and protective cap on the left side of the crankcase.
Using a special wrench with a 17-point octagonal head, unscrew the rack stop nut...
...and take it out.
Removing the spring...
...and a retaining ring.
By hitting the crankcase on a wooden stand, we knock the rack stop out of its socket. A rubber sealing ring is installed in the annular groove of the stop.
Remove the front panel seal.
Using a screwdriver, remove boot .
Remove the lock washer.
To unscrew the gear bearing mounting nut, use a special wrench with a 24-point octagonal head (the diameter of the hole for the gear shaft is at least 18.5 mm).
Unscrew the gear bearing mounting nut...
...and remove it from the shaft.
Grab the flat of the gear with a 14" wrench and lean it against the mounting blade,
READ DAEWOO Nexia heater fan does not work
...remove the gear assembly with bearing from the crankcase,
...and then the rail.
Using a screwdriver, pry up the support sleeve and remove its protrusions from the crankcase holes.
We take out the bushing.
Before installing a new support bushing into the crankcase, we put new damping rings on it so that their thin part is opposite the cut of the bushing.
We install the bushing, making sure that its protrusions fit into the crankcase hole.
We cut the rubber rings along the contour of the bushing and remove the cut parts.
Remove the retaining ring from the gear shaft...
...and use a two-legged puller to press out the ball bearing.
To press out the needle bearing we use a special puller.
If there is none, use a drill with a diameter of 2 mm to drill two holes in the end of the crankcase so that they extend onto the end of the needle bearing ring.
Through the holes we knock the bearing out of the crankcase.
We wash the cavity of the steering mechanism housing. We press the needle bearing with a piece of pipe. To seal the holes, you can use “fast steel” or “cold welding”. Having generously lubricated the teeth of the rack, drive gear and bearings with FIOL-1 lubricant, and filled the cavity above the drive gear bearing nut with UNIOL-1 lubricant, we assemble the assembly in the reverse order.
We install the protective cover in place and secure it with clamps.
We set a gap of 0.12 mm between the nut and the rack stop (the adjustment is shown on the steering mechanism installed in the car).
Having adjusted the rack clearance, we tighten the stop nut by bending the crankcase threads.
We attach the steering rods to the steering mechanism in a position in which their axes are parallel to the steering mechanism housing.
Replacing the VAZ 21099 steering rack boots at home
Steering rack - designed to convert the rotational motion that comes from the steering wheel into the translational movement of the tie rods, which turn the wheels and allow the car to steer. In order to prevent dirt, water and small particles of sand from getting on the steering rack, special boots were invented.
As you know, boots have many components, such as CV joints or struts. These anthers are something like protective covers; they come in a variety of sizes and shapes, and protect valuable parts from environmental influences. The material for making anther is most often rubber or a rubber alloy; due to its characteristics, ability to take various shapes and low cost, rubber anthers have gained great popularity among automakers.
In the steering rack, elements that require protection are located on both sides of the rod, at the junction with the steering rods. Like everything else in a car, over time, the steering rack boots wear out, the rubber ages, cracks appear, and then the boot ruptures. As a result, the hinge joints are exposed to dust, dirt and water, and ultimately the steering rack fails completely. The worst thing is that this can happen while driving at high speed; I don’t think it’s worth commenting on further developments. This is why the steering rack boots must be replaced on time.
Replacing the steering rack boot is an activity that almost every motorist can perform, even with a minimum level of knowledge. The main thing is to maintain consistency and have “hands growing from your shoulders”, everything else is a trifle.
How to replace the steering rack boots of a VAZ 21099 on your own
The purpose of the steering rack is to convert the rotational motion, which is transmitted from the steering wheel into the translational motion of the steering rods that turn the wheels. To prevent dirt, water, and sand from getting into the rail, special boots are installed.
Car owners know that there are many components on the boots, for example CV joints or struts. Anthers, having a variety of shapes and sizes, protect important parts from the negative effects of the environment. Most often they are made of rubber or its alloys, since these materials easily take on different shapes and are low in cost.
The elements that need protection are located on both sides of the rod at the junction with the steering rods. Over time, the steering rack boots fail and cracks appear on them, which subsequently leads to rupture of these protective elements and contamination of the steering rack.
Replacing the VAZ 21099 steering rack boots at home
Steering rack - designed to convert the rotational motion that comes from the steering wheel into the translational movement of the tie rods, which turn the wheels and allow the car to steer. In order to prevent dirt, water and small particles of sand from getting on the steering rack, special boots were invented.
As you know, boots have many components, such as CV joints or struts. These anthers are something like protective covers; they come in a variety of sizes and shapes, and protect valuable parts from environmental influences. The material for making anther is most often rubber or a rubber alloy; due to its characteristics, ability to take various shapes and low cost, rubber anthers have gained great popularity among automakers.
In the steering rack, elements that require protection are located on both sides of the rod, at the junction with the steering rods. Like everything else in a car, over time, the steering rack boots wear out, the rubber ages, cracks appear, and then the boot ruptures. As a result, the hinge joints are exposed to dust, dirt and water, and ultimately the steering rack fails completely. The worst thing is that this can happen while driving at high speed; I don’t think it’s worth commenting on further developments. This is why the steering rack boots must be replaced on time.
Replacing the steering rack boot is an activity that almost every motorist can perform, even with a minimum level of knowledge. The main thing is to maintain consistency and have “hands growing from your shoulders”, everything else is a trifle.
Preparing for replacement
Replacing the steering rack boot is done differently for different cars. It would be good if it is possible to use a lift or inspection hole. If this is not possible, you will have to be content with a car jack.
Some car models require removal of the engine compartment protection from the bottom of the car. On other machines it will be necessary to dismantle the generator and battery. On VAZ cars with front-wheel drive, you will have to remove the air filter housing and adsorber.
Any work on parts of the steering mechanism of the car leads to violations of the installation angles of the front wheels. If you want to minimize wear on the rubber of the steering wheels, make visible marks for the tip, linkage, and steering rack so that they can be aligned during assembly. Upon completion of work, check the installation angles on the stand.
Required Tool:
before replacing boot .
Then remove the heat shield, it is secured with three nuts (two at the bottom and two at the top).
Using pliers, a screwdriver and a hammer, flare the tie rod bolts.
Unscrew the bolts using a 22mm wrench.
Pull the tie rods out of the steering rack.
After this, on the right side, use a key set to “13” to unscrew the steering rack mounting clamps.
Remove the fastener along with the side elastic.
Bite the clamps and unscrew the absorber with the “10” key.
Now remove boot , if it rests against the body, you need to slightly unscrew the steering rack on the left, with the key set to “13”.
Clean the rack from dirt, if any, then using a lubricant (Litol 24 for example) lubricate it, as well as the surface of the steering rack, so that the new boot can be easily put on and not torn in the process.
READ Changing the oil in the Opel Astra h gearbox
During installation, try to put it on and not twist it.
Take the bolts and tie rods and try to get into the steering rack. Until this moment, do not even think about turning the steering wheel.
Tighten the tie rods with a wrench to “22” and reassemble everything in the reverse order.
How to change the boot
First of all, it is necessary to purchase new anthers to replace the failed ones and clamps to secure them. Tools you will need:
- car jack;
- car body stands;
- a set of wrenches, screwdrivers, hammer, pliers;
- joint lubricant.
When the steering rack boot is changed, the clamps securing the protective cover are usually changed. It is advisable to carry out the work on a cold engine, otherwise you can burn your hands.
After jacking up the car, be sure to install stands for safety. This will prevent the machine from lowering inadvertently. VAZ cars with front-wheel drive have a steering rack and two tips, and the VAZ “classic”, for example 2107, already has four tips and a longitudinal rod with protective covers.
For convenient replacement, access to the mechanism should be provided. On a VAZ, this is prevented by the protective cover of the rack from the exhaust manifold. The adsorber, which will have to be removed, will also interfere.
There may be a problem with removing the clamps that secure it. They are not expensive, so many owners simply eat them and install new ones during assembly. The next procedure will be something like this:
- A hammer with a screwdriver and pliers come into play. With their help, the tie rod locking pin is removed;
- after this, use a 22mm wrench or a socket to unscrew the nut on it and remove it from the mechanism;
- The boot is torn and needs to be removed. To do this, remove the steering rack mount from the right side of the mechanism. It is secured with two nuts that are unscrewed;
- Now it is possible to remove the damaged boot for replacement.
Before installing a new part, be sure to thoroughly clean the opened part of the steering rack from any dirt that has got there and apply new lubricant. Lubrication also makes installing the new cover somewhat easier.
It is necessary to pay attention to the correct installation of the boot so that it does not twist.
Sometimes the steering wheel turns, this does not make it possible to install the tip in its place; you should turn it a little and the rods will take their places in the steering rack.
Next, screw a nut onto the screw part, tighten it with a wrench, lock it with a cotter pin, and straighten its antennae with a screwdriver. After the nut is tightened, install the rail in its place, install the fastener and tighten it.
At the same time, check the clamp on the left side of the mechanism and, if necessary, tighten the nuts. Then you can put the removed parts back in place. Taking advantage of the fact that the car is raised and partially disassembled, check the rods, their condition and the integrity of the protective covers. If the slightest damage is noticeable, replace the anthers, otherwise you will have to replace the entire rods.
The operation of replacing the traction boot is similar to the process of working on other VAZs, for example, 2107 and the like.
It should be remembered that some VAZ models have power steering. There, the operation of replacing the boot is somewhat different from the process described.
Replacement of VAZ 21099 steering rack boots
Steering rack boots play an important role in ensuring the performance of the rack itself. Since the main task of the steering rack is to convert rotational moment into translational moment (from the steering wheel into the movement of steering rods, which turn the wheels and ensure the controllability of the car). The main task of anthers on numerous car components, including VAZ, is to protect the unit from dirt, dust, small particles, including oil particles, and water. Based on this task, the shape of the anthers corresponds to the node that it has to protect.
In addition to the steering rack, cars are equipped with anthers on struts, constant velocity joints, etc. - that is, those components that are of greatest importance for ensuring traffic safety, as well as the uninterrupted operation of the main components. Replacing the VAZ steering rack boots, as well as most components, can be carried out by motorists with a minimum level of knowledge and skills; the main thing is the desire to carry out the replacement yourself.
Anthers in most cases are made of rubber, as well as materials based on it. Today, more and more anthers are made from plastics, but rubber is still more profitable due to its cheapness, which, in turn, is also explained by large production volumes.
The steering rack boots are located on both sides of the rod, at the junction of the steering rack with the steering rods. Timely replacement of boots protects the hinge joints, which can ultimately protect against failure of the steering rack. And, therefore, it protects the driver and his passengers, because the steering rack most often falls apart during maneuvers at high speeds. By the way, videos or photo comments help to replace steering rack boots no worse than the advice of an experienced mechanic who is nearby.
Tools that you need to have in order to replace the steering rack boots:
- hammer;
- screwdriver;
- pliers;
- keys for 10, 13 and 22.
Important: unlike oil change work, replacing the steering rack boot on a 2109 or other VAZ model is carried out on a cold engine. If the work is carried out in a workshop or garage, to which you had to travel, you will need to let the engine cool.
The work of replacing the VAZ 21099 steering rack boots takes place in several stages:
The boot itself can be removed using a 13mm wrench by slightly unscrewing the steering rack on the left side. After dismantling the worn boot, carefully clean the steering rack from dirt and dust, lubricate its surface with something like Litol 24 to make it easier to put on a new boot .
Important: it is necessary to lubricate the steering rack before putting on a new boot, and very carefully. Lack of lubrication can lead to ruptures of the new boot, and ruptures make the boot unusable, i.e., you will have to spend money on buying new boots again.
It is also important to put the boot on carefully, maintaining its shape and not deforming it.
The point of no return has been passed! Now we assemble the steering racks and steering rods (the most important thing is to get the bolts into the steering rack, everything else is much easier). Further assembly of the units is carried out similarly to disassembly, in reverse order. Thus, the price for replacing the steering rack boot in this case turned out to be more than affordable - just a few tens of minutes and a little effort.
Installation
This is done in the reverse order of removal, simply hammering the end of the rod into the lever a little. Then, while tightening the nut, make sure the tip fits snugly into the lever and stays there. Finally, insert a cotter pin into the hole to prevent the nut from coming loose while driving on rough roads.
Price issue
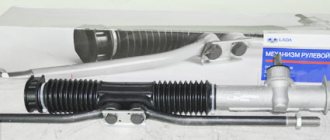
The cost of new slats depends on the manufacturer, region, and even the specific store where you are going to purchase them.
Good slats cost from 2.3 thousand rubles, but there are better ones for about 3.5 thousand rubles.
Replacement kit
If you don’t want to change it yourself, then get ready to pay about 1.5-2 thousand rubles for the services of specialists from service stations. Today this is the average price of such repairs. Again, it all depends on the level of the car service, and sometimes on its arrogance.
Replacing steering rods on VAZ 2108, VAZ 2109, VAZ 21099
The car has two steering rods attached to telescopic struts. Thanks to these rods, the wheels move. If they fail, they become deformed, steering play appears and, possibly, some wheel will move incorrectly (not completely) when the steering wheel is turned all the way.
Installed rods are difficult to show on a car, because... they are covered with many details. We decided to post a diagram on which you can clearly see the location of the rods (indicated by the number 11 and number 6), they are located under the hood of the car.
Rod repair
Note! In this section we will describe the process of replacing tips, and also tell you how to change the boot.
You need to start by fixing the traction, for example, with a vice. Loosen the nut securing the tip to the rod (arrow 1 in photo). Unscrew the tip by hand and remove it from the rod, but when unscrewing, count how many turns you make. When installing a new tip or replacing the old one, you will need to repeat the number of turns as when unscrewing.
To replace a torn boot, first remove it from the O-ring, then remove the snap ring and finally remove the boot itself. Once you get inside, check to see if it is very dirty, then remove the grease from the tip and look again to see if any dirt has gotten into the inside of the joint. Got it? – change the tip, no? – put grease directly into the boot, half its volume, and install the new boot in place. Place the edge of the boot onto the seat on the hinge body and securely fasten it with the two rings removed earlier.
Note! Check the tightness of the fit; any hole will soon render the tip unusable due to dirt getting inside.
Additional video
with video footage below:
Tool
- Screwdriver;
- Hammer;
- Pliers;
- Keys for 22, 13 and 10. The steering rack repair is completed. Good journey and fair wind!
Replacement is a simple procedure. It requires two workers (however, in a different situation, one can do it), a steering rod puller, several flat-head screwdrivers, a standard set of wrenches and a cylinder head.
But before we get to it, let’s discuss the moments when this very replacement of the steering rack should be done. And there is only one: if you hear a crackling or knocking sound in the area of the steering rack when you turn the steering wheel sharply to the left or right with the wheels initially set to neutral, it’s time to replace the rack. You can, of course, try to tighten the nut a little tighter, but this will not always be a solution to the problem, and often, on the contrary, can even lead to increased resistance when turning the steering wheel (read about how to adjust the steering rack). The way out of the situation may well be. but without special knowledge and skills you are unlikely to be able to produce it. So let's dwell on the replacement and determine its stages.
READ Replacing the heater radiator for Toyota Corolla 150
Required tools:
The engine must be cold to start operating.
- Remove the rubber band shown in the photo.
- Remove the four fastening nuts (two at the bottom, two at the top) of the heat shield, and dismantle the shield itself.
Replacing the steering rack boot of a VAZ 2108
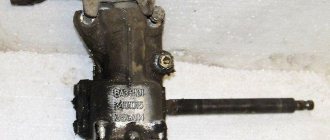
Dismantling
You will not be able to assess the current condition of the steering rack unless you dismantle the device.
There is no optimal way to dismantle the steering rack, since the process in any case involves quite labor-intensive, time-consuming work that involves disassembling many components.
- Suspend the front of the car with a jack to be able to remove the front wheels. Be sure to carefully consider safety measures, install wheel chocks and boots so that the machine does not move while the rack is being repaired.
- Disconnect the gas adsorber, disconnect the wires and take them to the side. This will give you full access to the steering rack.
- Unscrew the bolt from the spline connection. Before doing this, be sure to align the wheels using the steering wheel. The bolt is located near the pedals. To dismantle the fasteners, use a cardan head or a simple spanner.
- Clean the tie rod mounting nuts from accumulated dirt, then undo them using pliers. Unscrew the nuts using a spanner.
- Using a special puller, the rods are disconnected.
- Next, unscrew the rods from the steering rack housing. However, experts recommend dismantling the crankcase with the rods together, since in a vice the removal process is much easier.
- Once you have the rack free, remove it from under the car through the wheel arch. Clean, rinse and clamp in a regular vice.
Now you have a choice - completely replace the steering rack or try to repair it. The second option will take more time, but will save an impressive amount of money.
Why replacement is necessary
The boot should not be allowed to tear, because road dust, dirt, moisture and other foreign objects penetrate into the joint through the damage. They, mixed with lubricant, begin to act as an abrasive.
Abrasion of the surface leads to an increase in the gap in the connection, and this worsens the car's handling. If you put off work until “later” and change the torn cover of the steering rack or tip late, then this will require additional costs to restore worn-out components.
It will be much easier and less expensive to change one or more boots than to wait for the tie rods to wear out.
With steering racks it is even worse, where the penetration of moisture and dirt can “eat” the worm pair, leading to jamming of the mechanism, which can create preconditions for an emergency.
The safety of the driver, passengers and other road users must be paramount. Therefore, pay close attention to the condition of all parts of the car’s steering mechanism.
Signs of breakdown
By means of steering racks, rotational movements from the steering wheel through a rack and pinion mechanism are transmitted to the rotary levers, which turn the front wheels with rods.
How to replace the steering rack boot of a VAZ 2109
If you find one of the symptoms listed below on your car, be sure to conduct a full diagnosis of the condition of the unit, and then repair it.
Signs of a faulty steering rack include:
- A grinding noise is observed in the rack area when the steering wheel is rotated;
- The steering wheel periodically sticks;
- Lubricant begins to leak from the seals;
- The steering wheel has noticeable play.
These symptoms may also indicate problems in other components of the steering mechanism, but first you must check the condition of the rack, disassemble it and decide whether to replace or repair it.
Typical breakdowns
Torn steering rack boot
There are several most common reasons why a unit may need to be replaced:
- The rail has exhausted its service life;
- The vehicle is regularly driven on uneven roads;
- Having turned the steering wheel to its extreme position, sharp accelerations are often made;
- The presence of mechanical damage due to collisions with potholes, accidents, etc.
Drivers should pay attention to the behavior of their car, which itself may indicate that the steering is out of order. This may manifest itself as follows:
- The rack knocks when turning the steering wheel;
- The steering wheel jams and turns to the sides with some difficulty;
- There is knocking and vibration during travel;
- The play at the steering wheel has increased;
- The wheel alignment is disrupted. This can be determined by uneven wear of the rubber.
Repair
The proposed kits are incomplete and complete. You will definitely need the following kit components:
- Needle bearing;
- A pair of rubber seals for the bushing;
- Support sleeve made of plastic;
- Set of gaskets;
- Spring;
- Retaining rings;
- Support bearing;
- Drive gear;
- Boot cover;
- Rail;
- Set of ties for the boot.
Now that the kit is ready, the tools are available, and there is also enough free time, you can get to work.
- First, remove the boot, end caps and stops. As you disassemble elements, even the smallest and insignificant at first glance, be sure to evaluate their current condition. If necessary, all worn-out elements will be replaced with new ones taken from the repair kit.
- Using an octagon, unscrew the screw plugs, which will allow you to remove the springs, retaining rings, and thrust bushings.
- Remove the bearing and check if it has any play. The repair kit includes a new bearing, so if the old component is in satisfactory condition, it is better to replace it immediately. It’s not for nothing that you took on such a complex process to get everything done 50%.
- Remove and inspect the drive gear. Next, you can completely remove the rail itself.
- Be sure to replace the support shaft bushing, not forgetting about the rubber bands. They are also included in the kit.
- Take your time to remove the rubber bands from the sleeve. First, insert the element into the crankcase, after which you can cut off the elastic with scissors or a sharp knife.
- The most difficult step is replacing the needle bearing. To remove it, you will need a special key. But you can do without it. In this case, arm yourself with a 1.5 mm drill bit and a drill. Using a drill, make a hole in such a way as to loosen the end of the bearing. Use a punch to knock out the old bearing from the crankcase.
- Before installing the new needle bearing, be sure to thoroughly clean the steering rack housing of accumulated debris and steel shavings from drilling.
- The hole made cannot be left. To eliminate it, you can mix metal filings with superglue. This mixture will harden quickly and give an excellent result.
- Lubricate literally everything that can be lubricated in the steering rack assembly. Experts advise using Litol 24 or other lubricants of similar quality. It wouldn't hurt to lubricate the CV joints.
- Reassemble the unit by following the reverse sequence of dismantling.
Repairing the steering rack yourself allows you to significantly save on replacement, plus you can gain vast experience in performing far from the simplest work related to your VAZ 2109. But you can do it easier, without taking any risks, by contacting a trusted car service center.
Checking status
Having completed the repair, you should not think that now the steering rack will serve tens of thousands of kilometers and will no longer cause you trouble. Like many other components, the condition of the rack must be periodically monitored.
What to look for
These fasteners are subject to vibration after repair as they are used. Therefore, it is recommended to check and tighten them every 250-300 kilometers.
You can check it a little less often, approximately every 500-1000 kilometers, depending on the operating conditions of your car. Due to different quality, some anthers can last quite a long time, while others will require replacement after 10 thousand kilometers. The choice is yours which parts to use
The rack itself should be constantly monitored. Listen to the behavior of the steering mechanism, pay attention to the above signs of malfunction. As part of a scheduled technical inspection, be sure to include a check of the steering racks in the list of activities.
The repair cannot be called complicated, but it takes quite a lot of time. Plus, it is extremely important to perform all operations as carefully and efficiently as possible. Otherwise, the result will not last long and you will soon have to interfere with the design of the VAZ 2109 steering unit again
Sources:
https://ladafakt.ru/zamena-pylnika-na-rulevoj-rejke-vaz-2109.html https://vaz-remont.ru/zamena-pylnikov-rulevoj-rejki-vaz-21099-v-domashnix-usloviyax / https://videovaz.ru/vaz-2109/1515-zamena-pylnikov-rulevoj-rejki-vaz-21099 https://tuning-vaz2106.ru/1-2/zamena-rejki-vaz-2109-instrukciya- po-zamene-rulevoj-rejki.html https://luxvaz.ru/vaz-2109/367-samostoyatelnyy-remont-rulevoy-reyki-video.html
When is replacement required?
There are three ways to solve the problem of faulty steering racks.
| Way | When is it relevant? |
| Adjust the rack | If diagnostics show that the unit does not require repair or replacement |
| Repair | If diagnostics allows for partial replacement of elements. Replacement is provided using a repair kit |
| Replacing the unit | If the test shows a complete failure of the node. Installation can be carried out with new rods or old ones, depending on their condition. |
Let us add that if the old steering racks on your VAZ 2114 have covered more than 100 thousand kilometers, their malfunction is unlikely to be corrected with the help of a repair kit. The best option in this case is a complete replacement of the unit.