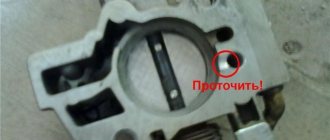
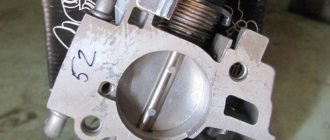
Where is the throttle valve located?
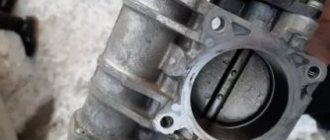
The entire throttle body is located in the engine compartment. It is located between the “intake manifold” and “air filter” ligament. In other words: air enters the air filter, passes through the mass air flow sensor, enters the throttle assembly, and from there it goes into the engine through the intake manifold (receiver). To find out where the throttle valve is located, pay attention to the figure (number 3).
Throttle valve malfunctions VAZ 2114
The mechanism itself is not a complex structure and is designed for the entire service life of the engine. However, some design features of the motor and a number of external negative factors, over time, create obstacles to its normal operation. In most cases, problems with the damper are the result of simple contamination. The reasons for the appearance may be the following:
- untimely replacement of the air filter, resulting in the entry of dusty, unpurified air;
- the presence of defects and cracks in the air system and its elements (for example, a defective air filter, a torn pipe), the result is the same - contamination of the air flow;
- the appearance of carbon deposits and oil residues on the inner walls of the throttle assembly and valve.
The result of the above reasons is the incorrect operation of the unit; the damper may not fully open or close, which directly negatively affects the operation of the engine.
Although the filtration and air flow purification process can be controlled, it will not be possible to completely get rid of carbon deposits.
Therefore, automakers recommend periodic cleaning of the unit from contamination every 25 thousand kilometers. We believe that this recommendation is completely justified in the conditions of Russian reality, the quality of fuel and the condition of the road surface.
Throttle valve VAZ 2114
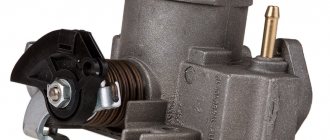
The VAZ 2114 throttle valve is an important engine component that provides a dosed supply of purified air to the engine, thereby ensuring the saturation of the fuel with oxygen to ensure its active combustion.
Finding this element is not difficult. To do this, you will need to open the hood of your car, find the air filter and the black pipe for supplying air to the engine. Run your gaze in the direction of air movement (from the filter) closer to the windshield, determine the location of its connection with the metal element with the tubes connected to it. This will be the throttle assembly.
Throttle valve malfunctions VAZ 2114
The mechanism itself is not a complex structure and is designed for the entire service life of the engine.
However, some design features of the motor and a number of external negative factors, over time, create obstacles to its normal operation. In most cases, problems with the damper are the result of simple contamination. The reasons for the appearance may be the following:
- untimely replacement of the air filter, resulting in the entry of dusty, unpurified air;
- the presence of defects and cracks in the air system and its elements (for example, a defective air filter, a torn pipe), the result is the same - contamination of the air flow;
- the appearance of carbon deposits and oil residues on the inner walls of the throttle assembly and valve.
The result of the above reasons is the incorrect operation of the unit; the damper may not fully open or close, which directly negatively affects the operation of the engine.
Although the filtration and air flow purification process can be controlled, it will not be possible to completely get rid of carbon deposits.
Therefore, automakers recommend periodic cleaning of the unit from contamination every 25 thousand kilometers. We believe that this recommendation is completely justified in the conditions of Russian reality, the quality of fuel and the condition of the road surface.
Troubleshooting
Before taking any action, you need to check the VAZ 2114 throttle valve for possible problems.
In order to accurately diagnose a malfunction or incorrect operation of the throttle, there are characteristic signs inherent to it. These are:
- Instability of engine speed at idle, their unreasonable increase;
- Periodically stalling engine;
- Jerking while moving;
- The discrepancy between the effort when squeezing the gas pedal and the final result (the proper reaction from the engine does not occur, power does not increase, the car does not pick up speed or does it late).
- Noticeable increase in fuel consumption in standard driving mode.
Please note that problems may be caused by:
- The TPS sensor is faulty, resulting in the wrong amount of fuel being supplied to the system.
- Malfunction of the idle speed controller.
Therefore, sometimes it is advisable to check these important elements of the system.
Cleaning the throttle valve of a VAZ 2114
There are two cleaning methods:
- Without removing the unit;
- And accordingly with its dismantling.
We will describe in detail the process of complete removal after which the first option will not be difficult to complete.
So, let's begin:
- To begin, unscrew the cap of the expansion tank with antifreeze. This is necessary in order to “relieve” the pressure and avoid antifreeze leaking out of the hoses.
- Next, we need to unscrew and loosen all the clamps that tighten the hoses attached to the throttle block. The same applies to the air pipe. To carry out the work we will need a 13mm wrench or socket.
- After removing the clamps, disconnect the hoses themselves. We disconnect the pipe from only one side and, for convenience, move it to the side.
- Now remove the throttle cable from the throttle drive selector.
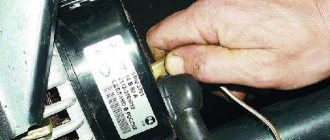
- Turn off the power to the sensors.
- Take the 13mm head, unscrew the two bolts and remove the throttle assembly. Remove the old gasket.
- To treat contamination, you can use carburetor cleaner and a clean rag or rag. If the degree of contamination is very high, then you can use a toothbrush with hard bristles.
- Just before cleaning, disconnect the idle air control. Apply the product to the contaminated surface. Using progressive movements, remove carbon deposits from the metal surface. If you are not satisfied with the result, repeat the operation again until complete cleansing. It is very important to clean or blow out the channels that are in the product. A large amount of dirt accumulates there. It is most convenient to carry out purging using compressed air. To do this, you can use a regular car pump.
- If the sensor socket and the sensor are clogged, be sure to clean them too.
- Do not forget to carefully clean the junction of the throttle assembly and its internal cavity. To do this, apply some cleaning product to a rag. Distribute evenly on the inner walls of the parts. Take a brush and clean the problem areas. After finishing the treatment, wipe the cleaned areas with a damp cloth and remove any remaining dirt.
- After washing the unit, it is recommended to clean and blow out the disconnected pipes.
- We expect a short amount of time.
- We install a new gasket at the junction of the throttle assembly.
- We attach and secure the knot in place.
- We connect the IAC sensor.
- We pull the hoses onto the fittings of the cooling system and connections to the adsorber.
- We put on the throttle body pipe.
- We fix the cable on the drive.
- Tighten the clamps of all attached elements.
- We connect the sensor chips.
- Close the cap of the expansion tank with coolant.
- We start the car and test its operation.
The non-removal method is somewhat similar to the one we described earlier. The only difference is that we will only remove the air duct pipe and nothing else.
The work steps are as follows:
- Remove the pipe;
- We repeat point number 10 of the previous method.
- We connect and secure everything in the reverse order, not forgetting to replace the old gasket with a new one.
Keep in mind that this method is most suitable for preventative, light, superficial cleaning. If malfunctions or incorrect operation of the engine occur, use only the removal method.
Now we know how to clean the throttle valve on a VAZ 2114 using two different methods, quickly and without much difficulty.
Troubleshooting
Before taking any action, you need to check the VAZ 2114 throttle valve for possible problems.
In order to accurately diagnose a malfunction or incorrect operation of the throttle, there are characteristic signs inherent to it. These are:
- Instability of engine speed at idle, their unreasonable increase;
- Periodically stalling engine;
- Jerking while moving;
- The discrepancy between the effort when squeezing the gas pedal and the final result (the proper reaction from the engine does not occur, power does not increase, the car does not pick up speed or does it late).
- Noticeable increase in fuel consumption in standard driving mode.
Please note that problems may be caused by:
- The TPS sensor is faulty, resulting in the wrong amount of fuel being supplied to the system.
- Malfunction of the idle speed controller.
Therefore, sometimes it is advisable to check these important elements of the system.
When is throttle valve flushing necessary?
Dust, dirt, and soot from the crankcase settle on the body from the inside and outside. The unit becomes contaminated, and along with this, characteristic symptoms of malfunctions appear.
It is extremely important to clean the throttle valve on a VAZ-2114 with an electronic pedal, since such a drive is much weaker than a cable. And even a small amount of dirt can disrupt the normal operation of the system.
Symptoms that may indicate that service is required:
- Jerking when driving at low speed (the accelerator pedal does not move).
- The crankshaft speed is either too high or varies over a wide range.
- Unstable engine starting.
- The engine stalls immediately after starting.
Similar symptoms are observed in case of malfunctions of the crankshaft sensors, throttle position sensors, and idle speed control. Therefore, before starting cleaning, it is advisable to perform diagnostics, at least with a simple scanner, in order to identify possible breakdowns.
How to properly clean and flush the throttle valve?
Before you clean the throttle valve on a VAZ 2114, you need to purchase a suitable product for this. WD40 is most often used, but MEDIC, FluxOff, CTEPUP, etc. are also suitable (any liquid for flushing carburetors will do).
It is important that the DZ cleaning product is aerosol and includes a special thin tube that allows you to reach the most remote channels.
Cleaning the unit can be either superficial (without removing the unit) or complete.
Each method has its own characteristics, namely:
Surface method - to perform this you will need a cleaning agent, a rag and a soft brush. All accessible elements of the remote control are coated with the product and left in this form for 10-15 minutes. After this, use a brush to remove all dirt and carefully wipe all parts with a soft cloth. Further operation of the car is possible after the DZ has completely dried.
It should be noted that the effectiveness of this method is low, since it is impossible to obtain full access to all elements without removing the assembly.
Complete cleaning - involves removing the unit, cleaning, as well as replacing the seal and O-ring.
After removing the damper, its surface is sprayed several times (depending on the degree of contamination of the part from 3 to 5) with a cleaning agent. The whole process will take about 30-40 minutes. Particular care should be taken to apply the product to all calibrated channels, since it is in them that carbon deposits accumulate the most. All dirt is removed with a soft brush, and then the parts are wiped dry with a rag.
After complete cleaning, the assembly is assembled in the reverse order to that given above (to remove the remote control).
Please note that with any method of cleaning the throttle body, you should not use metal brushes, as they can significantly damage the surfaces.
How to clean the throttle valve of a VAZ 2114: two ways
There are two cleaning methods:
- Without removing the unit;
- And accordingly with its dismantling.
Which method should I choose? It all depends on the degree of pollution. If the mileage has been up to 25 thousand since cleaning or replacing the throttle. Then, most likely, it is possible to limit ourselves to superficial cleaning and prevention without removing the part. In other cases, it is recommended to completely dismantle the unit for deep, thorough processing, cleaning and gaining access to hard-to-reach places.
We will describe in detail the process of complete removal after which the first option will not be difficult to complete. So, let's begin:
The first method of cleaning the throttle valve of a VAZ 2114
- To begin, unscrew the cap of the expansion tank with antifreeze. This is necessary in order to “relieve” the pressure and avoid antifreeze leaking out of the hoses.
- Next, we need to unscrew and loosen all the clamps that tighten the hoses attached to the throttle block. The same applies to the air pipe. To carry out the work we will need a 13mm wrench or socket.
- After removing the clamps, disconnect the hoses themselves. We disconnect the pipe from only one side and, for convenience, move it to the side.
- Now remove the throttle cable from the throttle drive selector.
- Turn off the power to the sensors.
- Take the 13mm head, unscrew the two bolts and remove the throttle assembly. Remove the old gasket.
- To treat contamination, you can use carburetor cleaner and a clean rag or rag. If the degree of contamination is very high, then you can use a toothbrush with hard bristles.
- Just before cleaning, disconnect the idle air control. Apply the product to the contaminated surface. Using progressive movements, remove carbon deposits from the metal surface. If you are not satisfied with the result, repeat the operation again until complete cleansing. It is very important to clean or blow out the channels that are in the product. A large amount of dirt accumulates there. It is most convenient to carry out purging using compressed air. To do this, you can use a regular car pump.
- If the sensor socket and the sensor are clogged, be sure to clean them too.
- Do not forget to carefully clean the junction of the throttle assembly and its internal cavity. To do this, apply some cleaning product to a rag. Distribute evenly on the inner walls of the parts. Take a brush and clean the problem areas. After finishing the treatment, wipe the cleaned areas with a damp cloth and remove any remaining dirt.
- After washing the unit, it is recommended to clean and blow out the disconnected pipes.
- We expect a short amount of time.
- We install a new gasket at the junction of the throttle assembly.
- We attach and secure the knot in place.
- We connect the IAC sensor.
- We pull the hoses onto the fittings of the cooling system and connections to the adsorber.
- We put on the throttle body pipe.
- We fix the cable on the drive.
- Tighten the clamps of all attached elements.
- We connect the sensor chips.
- Close the cap of the expansion tank with coolant.
- We start the car and test its operation.
The second method of removing the throttle valve
The non-removal method is somewhat similar to the one we described earlier. The only difference is that we will only remove the air duct pipe and nothing else. The work steps are as follows:
- Remove the pipe;
- We repeat point number 10 of the previous method.
- We connect and secure everything in the reverse order, not forgetting to replace the old gasket with a new one.
Keep in mind that this method is most suitable for preventative, light, superficial cleaning. If malfunctions or incorrect operation of the engine occur, use only the removal method. Now we know how to clean the throttle valve on a VAZ 2114 using two different methods, quickly and without much difficulty.
Cleaning the throttle valve of a VAZ 2114
- To begin, unscrew the cap of the expansion tank with antifreeze. This is necessary in order to “relieve” the pressure and avoid antifreeze leaking out of the hoses.
- Next, we need to unscrew and loosen all the clamps that tighten the hoses attached to the throttle block. The same applies to the air pipe. To carry out the work we will need a 13mm wrench or socket.
- After removing the clamps, disconnect the hoses themselves. We disconnect the pipe from only one side and, for convenience, move it to the side.
- Now remove the throttle cable from the throttle drive selector.
- Turn off the power to the sensors.
- Take the 13mm head, unscrew the two bolts and remove the throttle assembly. Remove the old gasket.
- To treat contamination, you can use carburetor cleaner and a clean rag or rag. If the degree of contamination is very high, then you can use a toothbrush with hard bristles.
- Just before cleaning, disconnect the idle air control. Apply the product to the contaminated surface. Using progressive movements, remove carbon deposits from the metal surface. If you are not satisfied with the result, repeat the operation again until complete cleansing. It is very important to clean or blow out the channels that are in the product. A large amount of dirt accumulates there. It is most convenient to carry out purging using compressed air. To do this, you can use a regular car pump.
- If the sensor socket and the sensor are clogged, be sure to clean them too.
- Do not forget to carefully clean the junction of the throttle assembly and its internal cavity. To do this, apply some cleaning product to a rag. Distribute evenly on the inner walls of the parts. Take a brush and clean the problem areas. After finishing the treatment, wipe the cleaned areas with a damp cloth and remove any remaining dirt.
- After washing the unit, it is recommended to clean and blow out the disconnected pipes.
- We expect a short amount of time.
- We install a new gasket at the junction of the throttle assembly.
- We attach and secure the knot in place.
- We connect the IAC sensor.
- We pull the hoses onto the fittings of the cooling system and connections to the adsorber.
- We put on the throttle body pipe.
- We fix the cable on the drive.
- Tighten the clamps of all attached elements.
- We connect the sensor chips.
- Close the cap of the expansion tank with coolant.
- We start the car and test its operation.
Helpful advice
Please note that if you do not have a carburetor cleaner available, you can use other cleaning products, for example the well-known WD-40.
Pay for goods by credit card, using QIWI, Yandex.Money or WebMoney and save on your purchase from 4%, avoiding postal and bank commissions
13 customers chose this product
Weight, kg: 0.05 Dimensions, cm: 45 x 2 x 2 Volume, m3: 0.00018
How to clean the throttle valve on a VAZ 2114
The injection VAZ-2114 has 8 valves and 16 valves and has a throttle valve that collects dust and oil particles. Over time, it becomes dirty, which causes engine failure. If there are dirt roads in your area, then in the summer the damper should be cleaned more often, at least twice a season, regardless of mileage. The fact is that the dust that rises when the car moves inevitably settles on this unit. Let's figure out how to clean the throttle valve of a VAZ-2114.
Useful video
You can get additional information on cleaning the throttle valve from the video below: After installing the remote control, you do not need to start the car right away. You should turn on the ignition, wait at least 40-60 seconds and only then start the engine.
ATTENTION! The electronic catalog of spare parts intended for reference purposes only! Our company does not sell all spare parts presented in this list.
If there is a “Cost” link in the right column, these spare parts are on active sale. Availability in warehouses for details and prices, see the product card. If there is no “Cost” link in the right column, we do not sell such parts and do not accept orders for them.
CategoryAvtovaz
General characteristics
If we consider the throttle assembly as a whole, it will consist of several parts:
- coolant outlet and supply pipes;
- ventilation system tube;
- a sensor that controls the position of the damper;
- RXX;
- the damper itself;
- condensation system pipe.
Knowing the throttle structure and what it looks like is necessary for cleaning. This unit is one of the most important components of the intake system. When the throttle operates correctly, a sufficient amount of air is sent to the engine, which is used to enrich the fuel mixture. The damper is controlled by an electronic gas pedal, which, when pressed, changes the opening angle.
This mechanism is located between the intake manifold and the air filter. Getting to it for preventive cleaning will not be difficult even for someone who has just become a car enthusiast.
To work, you will need to prepare tools and materials for cleaning.
Signs of damper contamination
The car itself may tell you that it’s time to start cleaning the damper. To do this, you need to listen to the engine. A few main signs:
- when the e-gas pedal is released, the engine speed decreases jerkily;
- difficulty starting in winter;
- When starting, a strong smell of gasoline may be felt in the garage;
- at the beginning of operation, the engine stalls, since not all cylinders start at the same time;
- the car jerks during acceleration;
- it is impossible to brake with the engine and coast;
- when switching to low speeds, the car may stall;
- When driving at low speeds, shocks are felt.
The appearance of these symptoms is due to the fact that insufficient air enters the engine and the fuel mixture becomes poorly enriched. Due to the design features, combustion product residues accumulate on the damper - unprocessed fuel, soot, drops of oil. Dust and small particles of sand are added to them from the air supply system, which makes the mass very thick. The intervals between preventive cleanings are shortened by poor quality fuel and engine oil.
When the layer of dirt becomes thicker, the damper cannot move smoothly, and its opening angle becomes smaller. Because of this, the amount of air entering the cylinders is reduced and engine power is reduced.
Step-by-step instruction
Before starting work, purchase a special cleaner for carburetors, and also prepare a set of screwdrivers and a 13mm wrench. If you want to get to the hidden places of the damper, then also take cotton swabs. When disassembling it often turns out that the reservoir o-ring and throttle body gasket are unusable, it is best to replace them at the same time as cleaning, so that later you do not have to waste time disassembling the assembly again. You need to purchase parts based on engine size and number of valves. The gaskets for 1.6 are slightly different than for a motor with other parameters.
- Lift the hood and remove the plastic cover from the engine. If you have not a mechanical, but an electronic damper, which was installed on cars of later years of production, then remove the terminals from the battery and disconnect the electronic damper control chip.
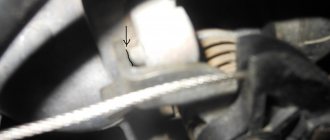
- Disconnect the rubber ventilation hose. This hose is held in place by a clamp, so you will need a screwdriver. If you see dirt in this part of the assembly, wipe the connections and components with a rag.
- To reduce the pressure in the cooling system, remove the liquid supply tubes from the throttle assembly. To do this you will need to loosen the clamps. To prevent dirt from getting into the cooling system, plugs are put on the tubes. There you can do with all the hoses.
- Lastly, remove the fuel tank ventilation hose.
- After this, it is enough to unscrew two bolts and disconnect the accelerator pedal cable to get to the damper.
Examine the part and decide how you will proceed next:
- carry out superficial cleaning without removing the entire assembly;
- completely remove all contaminants, replace the gasket and o-ring.
In the first option, you need to remove a layer of dirt using a rag or cotton pad from the surface of the damper. In this case, do not use specific cleaning agents - wipe the throttle with gasoline or ordinary solvent. When cleaning, manually adjust the flap to remove dirt not only from the outside, but also from the inside.
For complete cleaning, remove the throttle assembly. To do this, it is enough to remove two bolts with a 13mm wrench. In this case, complete cleaning is carried out with special means and consumables are replaced. After you finish work, be sure to blow out the assembly with a stream of compressed air. Thanks to this, you will get rid of excess moisture in the assembly. With complete cleaning, your manipulations take place in a non-confined space, which allows you to put the entire unit in order. This is exactly what is best to do if you are doing routine throttle maintenance. During the complete cleaning, be sure to pay attention to the idle speed sensor - it is best to remove dirt from it using WD40 and cotton swabs.
Lada 2114 Nefertiti › Logbook › Cleaning the throttle body and oil separator
Everyone knows that components and parts of a car need maintenance and care, namely cleaning. So I decided to get to the throttle body and oil separator. I already had experience with the throttle assembly from a previous car (VAZ-2115), but I was introduced to the oil separator for the first time. I'm sure some car enthusiasts don't even know about its existence. I learned about it thanks to the DRIVE2 portal, where there are hundreds of articles about disassembling and cleaning it. So, let me begin. 1. Cleaning the throttle.
It is recommended to clean it every 20,000 km. To clean the remote control, I purchased the following: — “Carburetor and Throttle Cleaner” aerosol LAVR 400 ml — I used it all, I didn’t regret it [135 rubles]; — gasket between the remote control and the receiver made of paronite [35 rubles]; — I was looking for a gasket between the TPS and the remote control made of foam rubber, since one of the articles said that it was better to install a new one — but I couldn’t find it anywhere. In one store, the seller said that even a new TPS comes without this gasket. So, if you accidentally tore it, you will most likely have to cut it out yourself. I won’t describe in detail what and how to remove - there are a lot of bearded manuals from the time of the first release of VAZ injectors. I’ll just note that you need to disconnect the throttle cable from the damper, the adsorber purge hose, and also disconnect the coolant supply and discharge pipes. Some people drain the coolant before doing this, others just immediately plug the pipes with a bolt/plug/finger... I drained it from the radiator cap. Unscrew the two nuts to “13” and use a Phillips screwdriver to remove the idle speed control and throttle position sensor. We see carbon deposits in front of us everywhere we can. Particular attention should be paid to deep places and the place where the IAC rod and the IAC needle go.
We thoroughly wash off the carbon deposits with carburetor cleaner, using clean rags and cotton swabs. To clean the IAC from carbon deposits, use a toothbrush. By the way, do not try to unscrew the screws inside the throttle to disassemble the valve itself! They are cored at the factory so that they do not unscrew. Otherwise, they will end up in the cylinder, and then only your imagination...
The TPS does not require cleaning with an aerosol. We simply wipe the sensor body from dirt with a rag. We install a new paronite gasket and assemble the assembly. During assembly, you must follow the rules to prevent the formation of an air lock in the engine cooling system. To do this, pour coolant into the expansion tank and finally blow into it until coolant flows out of the pipes that go to the remote control. The manuals say that the coolant should come from the coolant supply pipe (farthest from us), but in practice the coolant flows out of both pipes. 2. Cleaning the oil separator.
As they write on some websites, the crankcase gas cleaning system must be cleaned every 60,000 km. I doubt that everyone follows this method. Therefore, at 107,000 km, I decided to get to the bottom of the oil separator. It is located in the valve cover. It consists of six metal meshes, riveted together. Over time, it becomes clogged, which leads to insufficient crankcase ventilation with all the ensuing consequences. For cleaning you will need: - a screwdriver; — key to “10”; — gasoline; - rags; - Toothbrush; — gas burner/bonfire/other source of flame; — valve cover repair kit (gasket + two bushings) — if your gasket is torn or oil is leaking from under it. Unscrew the ventilation pipes from the valve cover. Then remove the throttle cable holder. Then unscrew the two nuts on the sides of the valve cover. Carefully lift the lid up and take it to the cleaning site.
Inside the cover we see two “10” bolts (one short, the other long). Unscrew it. We go directly to the oil separator. We take out the dirty nets and start cleaning them from the “shit” with a toothbrush and gasoline. From experience, it is better to first try to clean the surface of the oil, and only then burn it. After we have cleaned what came under the brush, we take out a gas burner and burn our meshes. Well, without fanaticism, we clean out the cavity in the lid where the oil separator screens are located.
Well, let's assemble the lid. We pull the bolts well so that they do not unscrew and do not end up where they are not needed.
Before I wanted to clean the oil separator screens, I noticed a cracked lower breather pipe. Replaced it with a new one.
If possible, we also clean all hoses suitable for the valve cover. Somewhere they advise to immediately replace it with new ones...
Source
What is a throttle valve?
It is an integral part of the engine injection system. Its main task in this system is to provide the necessary amount of air to form the air-fuel mixture. The air coming from the air filter encounters an obstacle in its path in the form of a damper. Pressing the gas pedal sets it in motion, and it turns to a certain angle. The greater the pressure on the pedal, the greater the opening angle.
After passing through the throttle assembly, the air is mixed with gasoline and directed into the cylinders. There, the air-fuel mixture is compressed and ignited, causing the pistons, and through connecting rods and the crankshaft, to move. The main characteristics of the motor depend on the degree of cleanliness of the input channel.
When to clean the throttle body
The following signs of a dirty throttle body should alert the driver that it is time to clean the throttle body:
- The smooth transition from high to low speeds disappears. The motor may stop spontaneously;
- It is very difficult to start the engine in the cold season. It may be accompanied by the smell of gasoline from the exhaust pipe;
- When starting the engine, vibration and “triple” are observed, since there is not enough working mixture for all cylinders;
- Inability to coast or engine braking.
To get rid of all this, you need to clean the throttle body. In some cases this happens earlier, in others later, but it is necessary to clean the throttle valve. The main culprits of pollution are small particles of dust, which still penetrate through the air filter, and the fuel mixture. When they get on the moving parts of this unit, they impede their movement, reduce the flow area of the intake tract, and clog the channel and rod of the idle speed sensor. Various sources recommend carrying out preventive work when a car runs away from 40 to 50 thousand km. When operating the car in areas with heavy dust, the car will not reach these mileage figures, the unit will clog earlier. Operation in areas where snow cover persists for a long time, this mileage may be even longer.
The quality of the fuel and engine oil used influences the timing of flushing the throttle assembly. Please also consider this issue very carefully.
When should you clean your throttle body?
As a preventive measure, it is recommended to periodically clean the remote control (every 65-70 thousand km of vehicle mileage). However, some signs may tell the driver that the damper is dirty and requires cleaning now.
Among these signs are:
- problems with starting the engine (especially in the cold). At the same time, the smell of gasoline may come from the exhaust pipe of the car;
- noticeable reduction in engine power;
- increased fuel consumption;
- instability of idle speed;
- jerks when driving a car at low speed, etc.
The main reasons that lead to throttle valve contamination are:
- Insufficient filtration of incoming air by the air filter - the smallest particles of dirt and dust penetrating through the filter settle on the elements of the emergency protection, affecting their mobility. In this case, the flow area of the chamber for passing the air mixture decreases.
- Oiling.
- Crankcase gases.
How to clean the throttle body
In order to clean the VAZ 2114 throttle valve, it must be removed. This is not at all difficult to do, you need to prepare a set of screwdrivers, a socket wrench set to “13”, a carburetor cleaner, and you can get to work.
Removing the throttle valve VAZ 2114
- Remove the decorative plastic cover of the motor;
- Next, the forced ventilation hose is removed. The presence of traces of oil in it serves as indirect confirmation of the need for cleaning;
- Open the cap on the expansion tank and release the clamps on the hoses that provide heating for this unit;
- Remove these hoses and close them with plugs to prevent coolant from escaping;
- The fuel tank ventilation hose and the damper drive cable are disconnected;
- Remove the two screws that secure the damper and remove it.
Now it becomes possible to clean and flush this unit. We hope that why you need to clean the throttle valve is already clear, let’s talk about what to clean and how to clean it.
The best cleansers
To perform this operation, you must first purchase a throttle valve cleaner from retail chains. Today, the choice of such products on store shelves is quite wide. You may be offered a choice of tools such as MEDIC, BD 40, CTEPUP, FluxOff and others.
DZ cleaning agent
There is no point in recommending anything specific. As many chemical products are available for sale, there are as many positive reviews about them. In this case, it is worth listening to the opinions of those drivers who have already carried out similar work on their car; you can look for reviews on the Internet and other sources about this or that brand of cleaning product. The cleaning product should be packaged in an aerosol can with a tube to allow access to remote channels.
How to clean the throttle valve
This unit is not a very complex structure, so cleaning the throttle valve is possible in the garage and can be done by any driver. Cleaning methods are used when it can be superficial and complete. Let's look at them in order.
- The surface method is not very effective and is carried out approximately once every 2-3 thousand kilometers. To perform it, you need to have any chemical agent, a rag and a soft brush. Apply the product to the accessible surface of the damper. Let it sit for about 15 minutes, and then wipe everything thoroughly with a brush and rag. When everything is dry, you can continue further operation of the machine;
- For complete cleaning it is necessary to have a new throttle valve gasket and O-ring. When carrying out such operations, it is advisable to replace them. Their cost is low, and the responsibility for the quality of the supplied air is enormous. It should be noted that they have design differences, so you need to know which spare part to purchase. Spray the removed flap with cleaning agent several times. The number of times can range from 3 to 5, and sometimes more. This depends on the degree of contamination and the type of chemical. This may require 30-40 minutes of your time. Particular attention is paid to all calibrated channels. Most often they are covered with soot. The throttle valve grooves are blown out with compressed air from a compressor or a tire pump with a nozzle is used. If you were able to flush the throttle valve, then do a similar procedure with the idle air regulator.
The damper sparkles in the rays of the garage lamp, which means that it can be returned to its normal place. Installation operations are carried out in the reverse order to its removal. At the end of the installation, there must be a mandatory check of the functionality of the cleaned unit.
Throttle assembly (DU): how to remove it correctly?
To ensure that the process does not cause difficulties, it is important to know where exactly the VAZ 2114 throttle assembly is located.
If you don’t know what the remote control looks like, then look for the air filter housing in the engine compartment. The throttle assembly will be located under it.
To clean the device, remove it by sequentially performing the following steps:
- The battery terminals are removed.
- The expansion tank cap is opened (to release excess pressure).
- Remove the plastic cover that covers the upper part of the engine (if present).
- The forced ventilation hose is disconnected. It should be inspected and any remaining oil (if any) removed.
- The connectors from the throttle sensors are disconnected.
- The outlet pipe is removed.
- The cooling pipe is removed.
see also
This procedure must be performed carefully. You should prepare the plugs in advance that will be needed to prevent coolant from leaking. M13 bolts can be used as plugs.
Now you can start cleaning the device.
Throttle valve VAZ 2114 - complete flushing and effective modification
To begin removing the throttle on a VAZ 2114, you need to determine its location under the hood of the car. The element is located opposite the VAZ intake manifold and serves as the main regulator of the amount of air that enters the manifold. The throttle opens and closes every time the driver presses and releases the gas pedal.
Removing the throttle
Due to the fact that the throttle works with air supplied to it from the street, the element is constantly clogged with dust and small insects. All this settles on the assembly, which is why the part gradually stops opening and closing.
To understand when to start flushing the throttle valve, you should pay attention to the following changes in engine operation:
- the power unit does not start the first time;
- the crankshaft rotation speed has increased;
- the idle speed of the car “jumps”;
- The car sometimes jerks when driving at initial speeds.
Flushing the throttle valve
If you do not find any of the signs of a part being clogged, this does not mean that it is completely clean. For the purpose of prevention, experts advise flushing the throttle valve every 70 thousand km.
Preventative cleaning of the part
In order not to wait until the VAZ 2114 throttle completely stops functioning, it is necessary to carry out surface washing of the part. This cleaning method is very simple. But do not forget that by performing such an operation, you will only clean some parts of the damper from dust. Consequently, the work will not be of much use. However, superficial cleaning will be an excellent start for VAZ drivers who have no experience in servicing the throttle valve.
Surface washing of the part
For preventative cleaning, it is necessary to remove the corrugation from the surface of the part. Next, we spray the internal parts of the damper with a cleaning agent, after which we thoroughly clean its structure with a rag or brush. The same must be done on the reverse side of the throttle valve. After this, install the corrugation and close the hood of the car.
Installing the throttle body corrugation
This cleaning method can be performed every 20–30 thousand km. In this way, you will significantly reduce the clogging of the element and extend its service life.