Purpose of the oil pump on the VAZ 2114 and VAZ 2115
The main task of the oil pump is to create excess pressure in the engine lubrication system and ensure continuous circulation of oil in the lubrication channels.
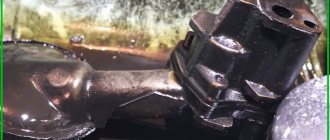
Only rotary oil pumps are installed on the VAZ 2114
Any breakdown of the oil pump leads to a drop in lubricant pressure, after which the friction between the moving parts of the engine increases sharply. As a result, almost all engine components are damaged, and they can only be restored after an expensive overhaul.
Types of oil pumps for VAZ 2114 and VAZ 2115
The design of the VAZ 2114 and VAZ 2115 engines is the same. Therefore, the oil pumps on these machines are also exactly the same. These are adjustable rotary pumps equipped with a pressure reducing valve.
Main design elements of the rotary adjustable oil pump VAZ 2114
On earlier VAZ models, gear oil pumps were installed, but VAZ engineers gradually abandoned these devices, since the rotary oil pump has important advantages:
- rotary oil pumps, unlike gear pumps, almost never foam the engine oil in the system;
- if an adjustable rotary oil pump is installed on the car, then the car owner will not have to change the engine oil too often (since the foaming problem has been solved, the working life of the lubricant increases on average by 2.5 times);
- Due to the design features, the oil rotary pump significantly facilitates engine operation. When using oil pumps of this type, engine power increases by 35%.
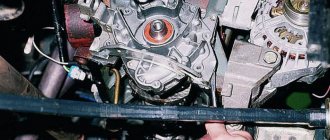
Location of oil pumps on VAZ 2114 and VAZ 2115
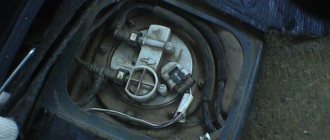
The oil pump on the VAZ 2114 and VAZ 2115 is located under the car engine. It is covered by an oil pan, and the pan, in turn, is covered by a crankcase protection. Therefore, in order to get to the oil pump, the car owner will have to remove these parts, having first driven the car onto an overpass or inspection hole.
To get to the oil pump, you will have to remove the pan and crankcase from the VAZ 2114
Important points
There are a couple of nuances that you definitely need to remember when changing the oil pump:
- Before installing a new oil pump, you need to remove the plastic oil seal from it and generously lubricate its inner edge with engine oil.
This will make it much easier to install the pump on the crankshaft; The inner edge of the oil pump oil seal must be lubricated with oil. - When the pump is completely seated on the shaft, do not immediately tighten the mounting bolts. First you need to tuck the edge of the above plastic seal inside. This should be done using a pointed stick or pencil. It is strictly not recommended to thread the oil seal with a flat screwdriver or a knife: it breaks very easily, and it is almost impossible to find it on sale.
The VAZ 2114 oil pump oil seal should be filled with a pointed stick or pencil
Replacing the oil pump on VAZ 2114 and VAZ 2115 cars is a task that seems impossible only at first glance. Upon closer examination, it turns out that you can cope with it on your own, saving a significant amount on the services of a qualified auto mechanic.
Home → Maintenance and Repair → Engine → Contents
A device such as the oil pump on the VAZ 2114 performs one main function - it serves to supply oil to the moving elements of the engine and, thus, lubricates them. It is powered by the operation of the motor itself. On some VAZ models, the pump is mounted on the crankshaft, on others it has additional adapter units, including an additional shaft, a drive belt and other parts that serve to transmit rotation from the crankshaft to the pump.
- VAZ 2114 fuel pump relay is one of the reasons for fuel system failure
Oil pump VAZ 2114
Due to the fact that the pump itself has a fairly simple design, problems with it are extremely rare. The nominal service life of this unit is at least 120,000 km of vehicle mileage. Maintenance of the pump is also extremely simple - you just need to periodically replace the oil with new one. The recommended replacement period (prescribed by car manufacturers) is every 10,000 km.
In practice, it is recommended to change the oil more often than every 10 thousand km, since used oil contains an increased amount of metal and abrasive particles, which, in turn, can lead to rapid wear of the oil pump.
Operating principle of the oil pump
Causes of oil pump failure
There are a number of typical breakdowns due to which the oil pump completely or partially fails:
- physical wear of the housing, rotor or driven gear. There is a gap of 0.2 mm between the pump gears and the housing. There is also a gap between the teeth of the pump gears - 0.5 mm. As wear occurs, these gaps increase, and the pressure created by the pump at the outlet pipe drops. Since replacing and adjusting worn gears is a very labor-intensive process and not everyone can do it, car enthusiasts follow the path of least resistance and simply change the entire oil pump;
The gaps in VAZ oil pumps are checked with a special feeler gauge - clogging of the oil receiver. If it becomes clogged, the pressure in the car's lubrication system drops sharply, and a red light comes on on the dashboard. A clogged oil receiver is a consequence of a completely clogged crankcase. The solution is to completely drain the used lubricant, remove the pan, crankcase, oil pump and thoroughly wash all these parts in kerosene;
A blockage in the oil receiver can completely damage the VAZ oil pump - oil leak. Sometimes oil begins to leak directly from under the pump. Typically, the driver does not notice a leak immediately, identifying it by indirect signs, for example, by a sharply increased lubricant consumption and oil stains under the car. The cause of the leak is a leak in the pump gasket. Often, when replacing an oil pump, car enthusiasts do not change the gasket located under it, believing that it will serve for some time. This is an error that leads to leaks. The rule is simple: when changing the oil pump, you must also change the gasket, even if it does not look worn out.
Separate mention should be made of motor oil. Its quality also has a significant impact on the service life of the pump and its serviceability. The fact is that the oil pump is the only engine element that is lubricated with unfiltered oil (because the oil filter is installed only on the pump outlet). And if the car owner is used to saving on high-quality oil, then he may not count on long and uninterrupted operation of the oil pump.
Replacing the oil pump on 2114
In general, this happened last summer, after my crankshaft pulley turned and it wouldn’t come off, the “incompetent workers” at the service center decided to cut it off with a grinder... in the end, of course, they cut off the pulley, but also the oil pump))) Yes, they sawed so hard that it was right at the oil seal))
In general, they repaired the whole thing for me with Poxypol, nothing seemed to be leaking and I left the service, realizing that if they also change the pump for me, I’ll end up with a bulkhead xD
Well, one winter I noticed an oil leak, first I replaced the oil seal at a normal service, then I bought a new pan with a gasket, but the leak didn’t stop and I remembered about my pump pump... as a result, 2 weeks ago it was bought and I kept waiting It's a warm day today)))
The replacement took 5 hours, this is the time from the moment you arrived at the garage until you left with all the changing clothes, jacking up the car, etc.))
It’s just that at the service they asked for as much as 3500 O_o for similar work
In total we bought:
Oil pump - 2000 RUR Crankcase and pump gasket + O-ring - 100 RUR The process is not complicated, everything was done without a hole on two tripods)) I attach a photo))
Well, the same question... I didn’t see a mark on the old pump for setting the timing belt, there also seems to be a mark on the box, but not clearly expressed, in the end I set it on the first cylinder when the piston is in the upper position... everything seems to be correct, but It seems to me that the idle speed has increased by 100-150 and I’m sinning on the timing belt by itself... or is this some kind of self-hypnosis and give me an increase of these 100 revolutions?) the car behaves the same)))
Removal
1. Remove the crankshaft toothed pulley and its key (see “Front crankshaft oil seal - replacement”).
10 mm socket wrench
unscrew the six bolts securing the oil pump to the cylinder block.
4. Remove the oil pump from the engine.
Note: The connection between the oil pump and the cylinder block is sealed with a gasket.
Dismantling
Removing the pump yourself is not difficult. Yes, and you are quite capable of performing independent repairs.
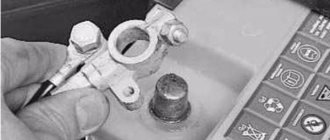
- De-energize the car by removing the negative terminal from the battery.
- Loosen the generator mounting bolts and remove the belt.
- Prepare a clean container by draining the oil from the crankcase into it. Next, you will need to remove the engine protection and oil pan.
- Remove the camshaft drive timing belt.
- Now that the belt is removed, do not turn the crankshaft or camshaft under any circumstances. Otherwise you will damage the valves by hitting them with the pistons.
- Remove the crankshaft pulley by using two flat head screwdrivers and pulling it off the shaft. If the key does not hold well in its seat, it is better to remove it too.
- Next in line for dismantling is the oil receiver. To remove it, you need to unscrew the two fastening bolts located on the main bearing cover, as well as one fastening bolt connecting the oil receiver to the pump (oil).
- Remove the pump, held in place by six bolts.
- After unscrewing all the bolts, carefully slide the oil pump away from the main bearing cap, then remove the oil pump with peace of mind.
Dismantling the device
How to remove and install the oil pump on a VAZ 2114
We carry out work on removing, disassembling and checking the oil pump on the engine of a VAZ 2114, 2113, 2115 car.
To perform work on removing the oil pump you will need: calipers, micrometer, metal ruler.
Removing the oil pump
First of all, remove the crankshaft timing belt.
We remove the oil intake.
Using a 10mm socket wrench, unscrew the 6 bolts securing the oil pump to the cylinder block.
Remove the oil pump.
Disassembling the oil pump
Using a 5mm hex wrench, unscrew the oil pump cover.
Remove the pump cover.
We take the drive gear out of the cover.
We take the driven gear out of the housing.
We wash all the parts of the oil pump clean with diesel fuel or kerosene. We wipe the parts and lubricate them with engine oil.
Checking the oil pump
We carefully inspect all the parts of the oil pump. They should not have cracks, chips, metal envelopment or severe wear.
Using a caliper, check the diameter of the driven gear seat in the pump housing. We check the thickness of the partition between the drive and driven gears. In this case, the diameter of the seat should not exceed 75.1 mm. And the thickness of the partition should not be less than 3.4 mm.
Then use a micrometer to measure the thickness of the drive and driven gears. The thickness of the driven gear must be at least 7.35mm, and the thickness of the drive gear - 7.41mm. If the thickness is less, then the gears must be replaced.
We place the drive gear in the pump housing. We apply a bench ruler with its edge to the mating surface of the oil pump and use a set of flat feeler gauges to check the thickness of the gap. We measure the driven gear in the same way. If the gap between the ruler and the drive gear is more than 0.12mm (for the driven gear it is more than 0.15mm), then the gears must be replaced.
Oil pump installation
We assemble the pump in reverse order. When assembling, you need to install the driven gear with the side with the chamfers and the mark facing the pump housing.
We also install the drive gear with a mark and chamfers on the teeth towards the pump housing.
Reinstall the pump in reverse order.
During installation, you need to replace the gasket between the pump and the cylinder block.
Video on removing the oil pump:
Sources
- remont2114.club/kak-snyat-i-ustanovit-maslyanyj-nasos-na-vaz-2114/
- carnovato.ru/zamena-maslyanogo-nasosa-vaz-2114/
- drive2.ru/l/470208897471218290/
- remontvazov.com/maslyanyy-nasos-vaz-2114
What's fresh?
27.05.2021
Disassembly and repair
After completing the dismantling work, you can proceed in two ways:
- Replace the old pump with a new one;
- Repair the old oil pump.
Repair allows you to identify worn elements and replace them with new ones, which will restore functionality. If the breakdown is more serious than simple wear and tear of consumables, the optimal solution would be to completely replace the oil pump.
Where does withdrawal begin?
To disassemble the pump, follow the instructions.
- Divide the pump into two parts. To do this, we have already unscrewed 6 bolts securing the cover to the body and used a screwdriver to pry off this cover. It came out of the pins on the body. So we remove the element and put it aside.
- Inside the pump housing there are driven and drive gears, which need to be removed and placed aside for now. Then we will check their condition.
- Next, the pressure reducing valve is removed. To do this, first unscrew the valve plug and remove the spring from the hole, and then the valve.
- In some cases, problems may arise with removing the valve. If you encounter this situation, gently tap the oil pump body against a piece of wood or use a wooden cone-shaped pin. It is inserted into the valve hole, the valve is hooked and removed.
- After disassembling your oil pump on the VAZ 2109, thoroughly wash all its components using clean kerosene. Don't forget to wipe the parts dry afterwards.
- Check the condition of the cover and body of your pump for mechanical defects, chips, cracks.
- Pay special attention to the landing spots of the gears, where there should be no signs of wear or other mechanical defects. If they are, the pump will have to be replaced.
In many ways, the performance and maintainability of the old oil pump depends on the results of checking the characteristics of the cover and body of the device. It is necessary to take measurements of the gaps.
Determining which gear is which is not difficult. The leading one has an external tooth, and the driven one has an internal one, that is, the element is smooth on the outside.
Reassembly
Having completed the repair and reassembly of the old oil pump, or having decided to completely replace it, pay attention to several important nuances of reassembly.
- Before installation, rotate the pump gear so that the lugs match the flats on the crankshaft.
- Be sure to lubricate the working edge of the oil seal with engine oil. This will allow you to easily slide the oil seal onto the crankshaft journal.
- When installing, be sure to trim the edges of the seal using a thin piece of wood. After this, you can fix the pump and return to their places all the elements dismantled at the stage of preparation for repair.
- After completing assembly of the unit, be sure to adjust the tension of the generator belt and camshaft belt.
Replacing and repairing an oil pump is quite simple if you have a repair kit and the necessary tools at your disposal. The main objective difficulty lies only in dismantling and reassembling the unit.
Replacing the oil pump
As was said, on the VAZ 2109 the oil pump, which is replaced in the cases given above, must first be removed. Let us give again the main reasons why the oil pump needs to be dismantled:
- at idle speed when the engine is warm, there is not enough oil pressure (often this is due to foreign particles getting under the pressure relief valve or the problem is associated with wear of the oil pump gears);
- When the engine is sufficiently warmed up, excessive oil pressure is observed (the pressure relief valve in the pump gets stuck).
We arm ourselves with the necessary tools:
- keys 10 and 13;
- socket heads;
- extension cord;
- cardan joints.
Dismantling
We begin work on removing the oil pump:
- we lift the car onto the inspection hole;
- remove the mudguard;
Removing the vehicle's mudguard
- drain the oil from the engine crankcase.
Note. Now you need to start dismantling the oil sump. Often the crankcase gasket causes pump failure.
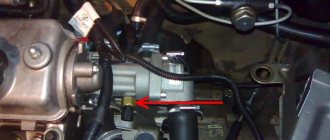
- unscrew the two metal bolts securing the pump;
Two bolts securing the VAZ oil pump
- remove the oil pump.
Note. You should know that the oil pump is installed at the front of the engine and consists of a pump housing, mounting bolts and an inlet pipe. The fastening bolts come in different lengths, and during installation they will need to be mounted in their original places.
Repair of oil pump drive VAZ
VAZ oil pump drive
It is the VAZ oil pump drive gears that often fail. Replacing the VAZ oil pump gear is a very delicate operation that requires certain knowledge.
Replacing the oil vase drive gear
It is worth recalling that on a VAZ 2114 the oil pump is replaced with the following symptoms:
- reducing pump pressure;
- pressure drop in the lubrication system;
- grinding noise when the drive is running, etc.
Advice. If the latter reason is detected and a grinding noise is observed, it means that the oil pump drive gear is most likely damaged.
We arm ourselves with the following tools:
- a set of wrenches;
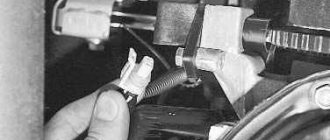
- wooden stick with a pointed end.
We begin repairs:
- disconnect the negative terminal of the cable from the battery;
- remove the ignition distributor;
- we find the spitz hole of the oil pump drive gear and insert a pointed wooden stick there (it should fit into the hole with a tightness that will be noticeable);
- remove the gear from the hole in the engine cylinder block;
Removing the gear using a pointed stick
- installation of parts is carried out in the reverse order;
- After this, the ignition timing is adjusted.
In conclusion
Finally, it is worth noting another important nuance, which was mentioned above - tightening the bolts that secure the oil pump using a torque wrench. Although it is not necessary to do this, it is highly advisable, because if it is too tight, the gaskets may become displaced and oil will begin to leak. In order to avoid this, tighten the bolts securing the oil receiver with a force of 10 Nm, and the bolts securing the pump itself with a force of no more than 12 Nm.
Disassembly and repair
The role of the oil pump in the design of the VAZ 2109 is difficult to overestimate. If it fails, the operation of the vehicle must stop completely. Next, you send the car to a car service center, or carry out the repairs yourself.
Requirements for the VAZ-2115 pump
When buying a pump for the VAZ-2115, follow the selection rules:
Move the pulley slightly along the body - there should be no active movement of the shaft in a quality part. Movement relative to the axis is allowed, but it is difficult to feel such rotation with your hands. Holding the device in your hands, twist it by taking the pulley. The component should rotate smoothly, without jerking, and no special effort is required
No jamming is a good sign that the water pump is working. Look from the side - perhaps the bearing is locking, your task is to select a pump with minimal indicators of the punch hitting the screw part. Pay attention to the design features of the domestically produced oil seal. To do this, evaluate the appearance from the pulley side to the shaft: if it is empty, it is better to put the unit aside; a dark dot is visible - feel free to take it; there is a marking “M 9” or “M 5”, do not refuse such a device.