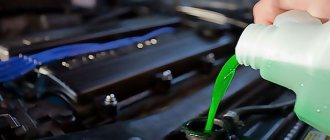
How to remove air from the cooling system of a VAZ 2107
The panel is not seven-dimensional, but it conveys the essence.
Every car enthusiast's worst nightmare is a traffic jam in the engine air system. And it’s good if you caught its presence in time and eliminated it, but what if this stray, due to your carelessness, happened on the road and your strong engine began to boil and refused to go further? What to do? Eliminate traffic jams because there is nothing more to do.
The main thing is not to get boiled with boiling water!! and everything will be fine. Checked, no mines © Avtolyubitel
The arrow kept creeping up, the stove didn’t heat up, the engine began to boil and began to snort antifreeze from the pipes that had long since leaked.
But it was evening and there was no hurry. I decided to google the Internet in search of an answer to the question - damn, how can I get air out of the cooling system of a VAZ 2107?
Found!! There are as many as three ways. And he went to bed contentedly, for the morning is wiser than the evening.
After reading everything possible and impossible, systematizing information on getting rid of air in the cooling system, I came to a conclusion. There is no definite method, it seems that everything works, but you need to select it for yourself, or rather for the individual characteristics of the car, namely with or without a cap on your cooling radiator, above or below the expansion tank relative to the horizon level.
Repair of the VAZ-2107 heater or why the “stove” does not heat?
Why does the VAZ-2107 stove not heat up?
And again the weather threatens with cold weather. For those who have problems with their heater, the most important question is how to make the “stove” heat up? First of all, let's determine the cause of the malfunction. The culprit may be an underheated engine, an airy cooling system, or a malfunction of the heater itself. If the stove fan does not spin, the electrical wiring is faulty - see here.
Often, the cause of cold in the cabin is an underheated engine.
Signs: the temperature on the gauge is in the white zone, the engine takes a long time to warm up. Normal warming up at a temperature of -20 looks like this: start the engine, in 8-10 minutes at idle the engine should warm up to 40-50 degrees (the very beginning of the white sector of the temperature gauge scale). If the temperature rises higher, it’s good, less is bad. Thermostat is faulty. Then we drive in 1-2 gear, and in 5-8 minutes the temperature rises to 80 (the border of the white and green zones). did not warm up to 80 - the thermostat needs to be replaced! Temporarily, you can get by with insulating the radiator with cardboard or something else. But don’t forget that if you put a load on the engine (it’s stuck and slipping), it can boil. Therefore, the cardboard should be pulled out easily and quickly.
Air in the cooling system
First of all, we check the antifreeze level in the expansion tank and the serviceability of the radiator cap. If the antifreeze is diluted with water, it’s bad, it will harden, it needs to be replaced. If the radiator cap is faulty, air will remain in the system, and this will lead to poor circulation and coldness in the cabin. We buy and install a new plug, add antifreeze and the deficiency disappears.
An air lock may remain even after repairing the cooling system. Remove the air by driving the car, preheated to 80 degrees. engine, uphill to raise the front end. Then, having removed the radiator cap, drive the engine at 2000 - 3000 rpm for several minutes. After the air comes out, all that remains is to add antifreeze and close the radiator cap.
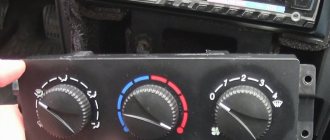
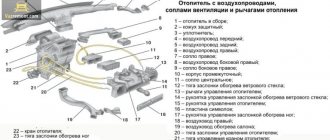
Next, check the correct position of the stove control levers
Blue - controls air supply. Red - antifreeze supply tap. They must be open (all the way to the right). Sometimes the tap turns sour. Find it under the glove compartment and check - it should open all the way, you can help with your hand, simultaneously with the lever. Just work carefully, the parts are thin and fragile and can be broken. It is convenient to move the lever with your left hand and turn the tap with your right.
VAZ 2107 heater valve in the open position
Heater valve in closed position
We check the operation of the air damper with the fan turned on. The lever to the right from the stove blows strongly, to the left it blows much weaker. If there is no difference, it’s bad - the cable has come off, the stove will have to be removed.
The stove blows poorly on the left side
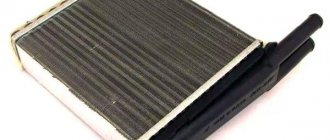
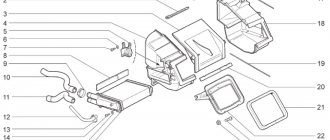
The device of the heater (stove) VAZ-2107
The third lever controls the distribution of warm air between the windshield and side windows. The cable that leads to it (21) controls three dampers - (20) two of them open and close the air supply to the side windows. The third damper is not visible in the figure; it is located here (22) and can block the air outlet to the windshield. Lever position: points to the right on the windshield, points to the left on the side windows. Why does it blow badly on the left side? 1. The fan at the stove is designed in such a way that it turns warm air to the right side, and the left side gets less. This is a design feature and is difficult to change. 2. The stove was disassembled and the air duct (4) or the left damper was damaged. 3. You completely open the lower flap with handle (1), or its latch is broken. For normal glass blowing, this damper must be closed. If the latch is broken, you can adjust the rubber band by hooking it onto the “choke” handle or somewhere else.
Some craftsmen install an additional fan from a computer processor in the deflector (4) of the pipe. You can buy and install a fan on the dashboard with a connection to the cigarette lighter, direct it to the side window and set the speed to a lower speed.
Another reason is poor circulation of antifreeze through the stove
We check the circulation like this: the engine is warmed up to 80, at idle we bring our hand to the outlet of the heater (near the driver’s right foot), give it gas and keep the speed at 2500. If you feel that the air has become noticeably warmer, you have poor circulation through the heater. Reasons: - clogged heater radiator, if the car is old and you poured “sealants”, mustard and other nasty things into the radiator; - there is a non-standard stove valve (ball, ceramic), which has channels of reduced diameter, or does not open completely. There are defective taps. It can block the circulation so that the antifreeze flows in a thin stream. After replacing it with the original faucet, the heat will return. More precisely, we check the circulation like this: at idle, with the engine barely warm (20-30 degrees), remove the upper rubber pipe at the outlet of the stove (under the hood) and place some dishes. The stream should be thick enough and even. A thin trickle, barely running - remove and check first the faucet, and then (if the faucet is in order) the radiator. You can try to rinse a clogged radiator with hot water (into the hole where the tube is), sometimes this helps.
It happens that when assembling the stove, the radiator was sealed poorly
cold air gets past it and it’s cold in the cabin. You will have to disassemble the stove and carefully seal everything. If you decide to disassemble the stove yourself, watch the video.
I’ll add a piece of advice on my own: remove the gearbox lever and you won’t have to disconnect the console (beard) wires. All the best to you and warmth to your salon!
Signs of air appearing in the cooling system of the VAZ 2107
Well, if we exclude the main and main sign of the presence of air in the system - a relatively sharp increase in the temperature of the coolant and direct boiling, followed by squeezing out antifreeze from the expansion tank, then the first and main one is that the heating system does not work, the stove simply does not heat. Even if it is summer, the system must still be filled with the heating tap open.
In addition, the presence of air in the cooling system may not manifest itself immediately. How it happened for me.
The car didn’t boil right away. In some operating modes (city traffic without traffic jams, in the evenings), there were no signs of air in the system. As soon as the car reached an average speed above 80 km/h, after a certain time (different each time), boiling occurred.
How to get rid of air in the cooling system?
Simply put, the network describes three main ways to get rid of air in the engine cooling system:
If your seven is injector . The face must be raised on jacks so that the top dead center of the cooling system becomes the throttle assembly. From which the thin heating pipes are then disconnected and the air is bleed.
If the seven is carburetor , then there is no need to raise the muzzle. It is enough just to disconnect the heating pipe of the starting manifold, located in its rear part.
Theoretically, you can get rid of air forcibly without disconnecting any hoses. Start the engine and let it run for a while. But this method, as operating practice has shown, is not 100%.
If the impeller on the pump is damaged and, therefore, the pressure in the cooling system is lower than recommended, then the pump will not cope with moving air into the expander. Air can simply get stuck in the cooling jackets of the block and cylinder head, or in the thermostat.
Source
Folk way
This method of deflation came to us from the people. That is, in a logical way, drivers came up with the idea of parking the car at an angle so that the air bubble would come out of the heating system during certain actions.
So, you need to find a hill with a slight slope. An overpass will also do. Drive the car onto it so that the front is as high as the rear as possible. The plug will go away if your engine idles for a couple of minutes. However, this method does not always help. However, this method is the cheapest and easiest, so it makes sense to try it. If it doesn’t help, read on to learn how to blow out the heater on a VAZ-2107.
Let's sum it up
Timely diagnostics, preventive cleaning and inspection of elements of the vehicle’s heating system is a guarantee of high-quality operation of the stove. Experts recommend checking the heating system on the VAZ-2107 at least twice a year - in autumn and spring. Any driver can handle preventive cleaning and adjustments of the stove on his own; to do this, you just need to understand the structure of the heating and ventilation system of the cabin and the principle of its operation. The easiest way to do this is to always have a visual instruction manual for your car nearby.
Don’t put off any further work to improve the functioning of your car’s heating system. Proper care will ensure uninterrupted operation of the heater and a comfortable temperature in the interior at any time of the year.
Checking the hoses
The second way to expel air from the VAZ-2107 stove is to find the hoses from the cooler under the hood and move them. It is quite possible that such a mechanical effect will provoke the release of an air bubble.
After the completed manipulations, check the operation of the heater. If warm air comes out, then the problem is solved. If everything remains as it was, it’s time to try the next method of airing.
Improvement of the heating system
The design of the VAZ 2107 stove is far from perfect. Therefore, car owners modify it in a variety of ways. First of all, attempts are being made to improve the tightness of air ducts, especially at joints. This allows you to slightly increase the efficiency of heating the interior.
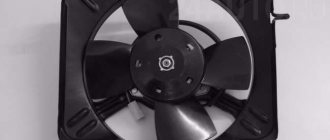
Fan replacement
Often, to improve the operation of the stove, car enthusiasts replace their original fan with a more powerful one, used in other VAZ models (for example, VAZ 2108). The factory fan motor is mounted on plastic bushings, which wear out quickly. As a result, shaft play appears, and a whistling noise becomes audible in the cabin when the fan is operating. Repair and lubrication of bushings in this case, as a rule, do not bring the expected effect. The VAZ 2108 fan electric motor is mounted on bearings. Therefore, installing it in the VAZ 2107 stove will not only increase the efficiency of heating the interior, but will also make the operation of the fan more reliable.
Usually, along with the fan electric motor, a number of other elements of the stove control unit are also changed . The rotation speed of the VAZ 2107 factory fan at a current of 4.5A is 3000 rpm. The VAZ 2108 electric motor consumes 14A at a frequency of 4100 rpm. Therefore, when replacing, you should install the appropriate fuse, resistor (usually from a Niva) and speed switch (for example, from a Kalina).
Video: modification of the VAZ 2107 stove
To dismantle the fan you will need:
- flat and Phillips screwdrivers;
- keys for 7 and 10;
- round nose pliers.
The fan is removed in the following order.
- The instrument panel, shelf and glove box are dismantled.
- Use a 7 key to loosen the casing of the air damper control cable. The cable loop is removed from the lever.
- Use a 10mm wrench to unscrew the nut securing the heater housing.
- Use a flat screwdriver to remove the left and right air ducts from the heater body.
- Use a flat-head screwdriver to remove the latches that secure the fan to the stove.
- The wire terminals are disconnected.
- The fan is removed from the stove body.
- The impeller is removed. If necessary, use pliers.
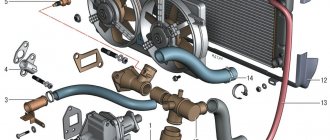
Stove design
How to repair and tune the heating system circuit and what to do if the stove control system does not work? Before you learn how to remove, disassemble and remodel the unit in your car, let's understand the device. The heater is located in a housing inside the VAZ 2107 interior and is fixed to the partition of the engine compartment using four studs. The place where the interior heater connects to the body is sealed with a seal.
Heating system for the "seven"
Main elements of the system:
The air flow that passes through the heater heats up and enters the passenger compartment. The VAZ 2107 stove is equipped with a radiator equipped with two hoses - outlet and inlet, which are led into the engine compartment and connected to the engine cooling system. The circuit is supplemented with a tap, which is installed in the supply line and is designed to regulate the flow of antifreeze into the system.
A fan is mounted directly under the radiator, the electric motor of which is located behind two elastic cushions located in the guide casing. The circuit is also supplemented with an additional resistor element installed in the electric motor power supply network. This resistor allows for faster rotation of the fan, which can be activated using the regulator on the control panel. As for the air ducts that are connected to the fan casing, they direct the air flow not only to the deflectors intended for blowing the side windows, but also to the windshield (the author of the video is A TO FRIEND).
The air flow is controlled by opening and closing the lids, as well as the stove dampers. There are many reasons why you need to remove, repair, tune and modify the VAZ 2107 stove yourself. As a rule, they are all related to the fact that the stove heats poorly or does not heat at all.
The main breakdowns of the unit are:
Reasons for decreased performance
In addition to obvious malfunctions due to which the stove does not work or functions incorrectly, there are other problems with the heating system of the VAZ-2107 interior. The main one is a decrease in stove performance.
If the stove heats poorly, then the reason lies in:
- Malfunctions of the power plant cooling system (reduced pump performance, stuck thermostat).
- Radiator clogged.
- Formation of an air lock in the heater radiator.
- The air intake damper seal is worn out.
How to eliminate air locks in the cooling system?
Method 1: First, open the hood of the car, and then with your hand press three times on the outlet (Indicated by a red arrow), bypass (Indicated by a green arrow) and inlet (Indicated in the photo by a blue arrow) radiator hoses.
Note! Press all hoses only with your hands; under no circumstances use pliers or anything else for this, because this can lead to deformation of the hoses!
Method 2: This method came from the people, it doesn’t always work, but it’s still worth a try:
Find a small slope or overpass, drive the car onto it so that the front part is higher than the rear and then let the engine idle for “5 minutes” and the traffic jam should disappear.
Note! Always remember one important thing, after you try one of the methods, immediately check whether the plug has been eliminated by warming up the engine to operating temperature, and after warming up by turning on the heater - if the air from the heater is warm, then the plug is missing!
see also
Comments 39
I did everything, the issue is closed, THANK YOU ALL SO MUCH! I kicked it out this way: I took off the radiator cap, removed the outlet pipe of the heater, added antifreeze until it flowed out of this pipe, put the pipe back in place and clamped it with a clamp, crushed the pipes, then started the engine and pressed the gas, crushed all the pipes after it warmed up to 90, I drove up a steep hill in front, opened the radiator cap and accelerated to 2500 rpm. I also crushed the pipes until the bulbs completely disappeared)
You need to drive the front of the hill as high as possible. Open the radiator cap and squeeze the pipes you can reach. You'll see how it boils. You still need to give it some gas and also squeeze it, then when the thermostat opens you also have to squeeze it. And everything will be fine with you. Don't forget to open the stove tap
Jenkeee described the best way in the first comment. But in addition to this, I sawed off the radiator cap valve and also pumped it with pipes. A matter of 5 minutes
You pour antifreeze into the radiator, as soon as the neck is full, knead the top and middle pipes, top up, knead some more, top up, knead some more, and so on until the bubbles stop coming out, while the heater tap must be open! At the end, you remove the coolant hose from the intake manifold (this is the heating system it has) and wait until the antifreeze flows from it, as soon as it flows - that’s it, put the hose in place and clamp it, just once again we remove the radiator cap and crumple the pipe at If necessary, top up, that’s it, a proven method, the air from the stove is boiling water and the engine cools down with a bang. Good luck!
Thanks, I'll do it this evening after work
You're welcome) write to PM just in case)
and there is no need for slides, and there is no need to push anything... before adding antifreeze, you remove the hose under the hood from the outlet pipe of the stove, add as much as you need, as soon as it flows, you put it back on... and there are no air locks...
Thanks, I'll take care of it in the evening
Well, yes, firstly, the stove is the highest point of the cooling systems, you don’t need a jack under the beam, but something more tangible. A real hillock. Secondly, how much antifreeze did you use? You need 8 liters. Sometimes the upper thick hose, from the radiator to the pump, bends down and does not allow the antifreeze to pass further. There is at least some kind of slide, until you straighten it with your hands it will not go further. I just put a rigid pipe there.
For some reason I always thought that the heater radiator is the highest point)) vaz2107club.ru/uploads/po…/2013-01/1359312185_2.jpg
nose uphill, start it, heat it up to 90, unscrew the radiator cap and push through the pipes. If unscrewing the heating pipe until the highest point of the coolant flows does not help, start the car and wait until the air comes out, but Step 1 usually helps.
Heater modernization
Every car owner knows that on a VAZ 2107, replacing the heater may be due to its poor performance. But not everyone decides to change the heater - most owners of the “Seven” decide to disassemble, repair, tune and remake the heater as a whole. There are many schemes for tuning and repair, but you need to take into account that it is not so easy to implement them at home. Without any problems, you can seal the joints of the system lines with nozzles with your own hands, and also redistribute the air flows according to need (the author of the video is VAZ 2101-2107 REPAIR AND MAINTENANCE).
How to change the stove in a VAZ 2107
Having found out that the heater needs repair, it will require complete or partial dismantling. If there is a problem with the motor, then it is enough to remove the lower part of the assembly. If there is a problem with the radiator, you must first drain the coolant from the engine cooling system. To carry out repair work you will need the following tools:
To replace the stove you will need a set of keys and screwdrivers
Heater removal
After the coolant has drained and the necessary tools have been prepared, you can begin disassembly. It is carried out in the following order:
Unscrew the clamps and pull the hoses off the radiator tubes
Unscrew the screws and remove the rubber seal
To remove the shelf located under the glove compartment, unscrew the fasteners in the form of screws
To remove the panel with the clock and cigarette lighter, you will need to unscrew the corresponding screws
Disconnect the wires from the cigarette lighter and clock
It is necessary to disconnect the right and left air ducts from the heater
Using a 7 key, unscrew the cable fastener
To remove the lower part of the heater you will need to pry off 4 latches with a screwdriver
After dismantling the lower part, access to the heater fan opens
To remove the radiator, simply pull it towards you.
To completely remove the stove, you need to unscrew 4 10mm wrench bolts.
When the fasteners are unscrewed, remove the upper part of the stove body
In most cases, complete removal of the heater is not necessary. As a rule, the radiator, faucet or motor are replaced.
If you are only replacing the radiator, it would be a good idea to inspect the electric motor and lubricate it.
Step-by-step instruction
The name is an abbreviation for “separate laboratory organic synthesis technology.” Without exception, all coolants contain ethylene glycol and water. The differences are only in the type and quantity of anti-corrosion, anti-cavitation and anti-foam additives added. Therefore, for the VAZ 2107 the name of the coolant is not of great importance.
The danger comes from cheap, low-quality coolants or outright counterfeits, which have recently become widespread and are often found on sale.
Therefore, to cool the engine, you should buy coolant from proven and well-established manufacturers.
To cool the VAZ 2107 engine, you should buy coolant from proven and well-established manufacturers
- Maintaining normal temperature during engine operation (injector).
- Maintaining low temperature in the gearbox (hydraulic fluid that needs to be poured into the automatic transmission).
- Interior heating in winter. Pouring antifreeze provides heat to the car by passing through the heater. The motor heats the liquid, and the fan blows air and transfers heat. Thus, heated air enters the cabin.
Antifreeze in the VAZ 2107 should be replaced every 45,000 km. or once every two years, whichever comes first. Because over time the quality deteriorates and this leads to adverse consequences.
Radiator cap open
Watch an educational video on how to change the coolant in a VAZ car.
We tried to provide you with more detailed instructions for replacing the coolant in a car, now you should try to express your gratitude in our comments.
First, it is worth deciding on the timing of replacing the coolant on the VAZ 2107. And here everything is simple - every 60 thousand km or once every three years. This is when using original AvtoVAZ antifreeze. If you are pouring a different liquid, you should look at the manufacturer’s recommendations. But it’s better not to change the timing - on domestic roads, the coolant resource is used up quickly.
The volume of antifreeze in the system is the same for all Zhiguli models - 9.85 liters. To replace the coolant in a VAZ 2106, you need the same amount of antifreeze as in a VAZ 2101 or 2107. Here you should take a 10-liter container (or two 5-liter containers).
It is recommended to purchase Lada antifreeze. This is an original coolant suitable for any AvtoVAZ car.
When choosing an alternative, you should take antifreeze of class no lower than G12, with a freezing point no higher than -40 degrees Celsius.
It is also worth paying attention to signs of antifreeze depletion. You need to look at the following points:
- Constant engine overheating. The thermometer needle is in the red zone, the fan is running continuously, and steam is coming from the radiator. It occurs more often in the summer, but in worse cases it also happens in winter. But we must remember: the problems listed can also be associated with malfunctions of the cooling system. If the antifreeze has been replaced and the situation has not improved, it is worth checking the functionality of the thermostat, fan, and water pump.
- Unpleasant smell from the radiator. The decomposition products of used antifreeze smell unpleasant. But we must take into account that the appearance of this smell indicates that all replacement periods have already passed. And it is possible that repairs will now be needed.
- Change in color and consistency of antifreeze. If the fluid has darkened slightly but remains clear, replacement is not yet required. But if the antifreeze has thickened, dirt has appeared, and the color can no longer be determined, then it must be changed immediately.
In the described cases, replacement is carried out immediately, regardless of the timing. It’s also worth considering that there are currently no new VAZ 2107s available. And in used cars, the condition of the fluid should be checked immediately after purchase. And if necessary, replace it with high-quality antifreeze.
How to change coolant
Before replacing the coolant in a VAZ 2107, you need to find an expansion tank, decide on the number of liters to fill and the choice of brand.
The expansion tank is located in the engine compartment, located on the left side of the mudguard, where the bracket is. It is secured with a rubber clamp.
You will need to fill in 10 liters of antifreeze or antifreeze. Which is better is up to you to decide.
For example, you can already buy antifreeze ready-made, or you can buy a concentrate and dilute it 50 to 50 with distilled water. Antifreeze is slightly inferior in functionality.
Before replacement begins, it is necessary to check the level and measuring sensor. If the pointer on the sensor initially shows a high temperature, then this is the main sign of urgent replacement. So, let's start checking the level.
- On the body you will see o, so the level should be 3-4 mm higher.
- Unfasten the rubber strap.
- Remember that you only need to unscrew the reservoir cap with a cold and not running engine. Open this plug and look at the mark.
If the element is clearly missing the required mark, then you urgently need to drain and fill in a new one.
You should start by preparing the car and workplace. The machine is placed on an overpass or above an inspection hole. It is recommended to leave it on the handbrake and at speed. And place “corners” under the wheels: stoppers to hold the car. After installation, it is worth checking the position of the machine. It should be level, or the front should be higher than the back. Other options are unacceptable.
The next stage of preparation for replacing the coolant in the VAZ 2107 is the selection of tools. The list is short:
- A key for 13. It is recommended to additionally take a key for 8 and an adjustable key for 30. It is worth considering that used cars do not always use “original” spare parts. Therefore, the sizes of nuts and bolts may differ from the standard. Because of this, experienced drivers prefer to keep a set of keys of different sizes on hand.
- Screwdriver Set. It is worth having a flathead and Phillips screwdriver with you.
- Container for draining used antifreeze. Volume - 11-12 liters.
- Hose for the drain hole on the engine. Needed to remove antifreeze from the internal circuit of the system.
- Antifreeze to replace. Recommendations for selection and required volume are described above.
- Funnel for filling new coolant.
- WD-40 or equivalent. Used to remove dirt and rust from bolts and plugs.
Safety recommendations:
- You need to work on a cool engine. If the antifreeze is hot, allow it to cool. It must be remembered that the operating temperature of the coolant is 60-90 degrees. You cannot open the radiator and check the condition of the antifreeze. After all, the liquid, while hot, is under pressure in the system.
- The machine should be carefully secured in place. Any negligence in this matter can result in serious injury.
- Replacement is carried out in a well-ventilated area. It is worth remembering that antifreeze fumes are bad for your health.
- During operation, antifreeze must not enter the body. In particular, it should not come into contact with the eyes, mouth or respiratory tract.
Now you can proceed to the actual antifreeze replacement procedure. Conventionally, it is divided into three stages: draining the old coolant, flushing, and filling in new antifreeze. Each stage should be described separately.
First you need to remove the crankcase protection. And here it is worth remembering - on Zhiguli cars it is often in a deplorable state. The plate should be washed before removal. The bolts are treated with WD-40 to remove rust.
If necessary, the entire part is cleaned of rust. The bolts are carefully unscrewed and the crankcase protection is removed. An important point: on old cars, the bolts rust and become brittle.
If handled carelessly, they may break.
The heater lever opens in the cabin. It is transferred to the maximum position. There is no need to start the stove itself. Then the radiator filler neck and expansion tank are opened. This is done to speed up the draining. Then a container for used antifreeze is placed under the radiator drain hole. There are two options for draining the liquid.
They depend on the radiator model:
- Option with the “native” radiator of the VAZ 2107. The latest models of Zhiguli have a special tap for draining antifreeze. This faucet is treated with WD-40: it has a habit of turning sour. Then it opens and the liquid drains out.
- If a radiator from older models of the series is installed. There is no drain hole provided here. Therefore, the liquid is drained in one of two ways: The fan switch off sensor is unscrewed. It is located on the inside of the radiator, on the right (if you are facing the car). It will require a 30 key.
- Remove the hose from the lower radiator pipe.
After draining the coolant from the radiator, the internal circuit of the system should be emptied. You need to find the drain plug on the cylinder block. It looks like a 13mm wrench bolt. Use the appropriate wrench to unscrew the plug. The waste liquid is drained. To do this, you need to run the used coolant through a hose into a pre-prepared container.
The next step is draining the antifreeze from the expansion tank. You need to unfasten the container fastening belt. She herself is lifted 30-40 cm up. This will allow the remaining liquid to enter the radiator. From there it is drained using the method already described.
There are three ways to flush the cooling system: with water, household chemicals, and special compounds. And you should choose a method based on your preferences and the condition of the car. However, there is one important recommendation. Washing is not considered a mandatory procedure.
But there are a number of situations when it must be done:
- When switching to another coolant. The composition of different brands of antifreeze may differ. And mixing these liquids is not recommended. Even if both coolants are of high quality. This requires draining and complete flushing of the system.
- When traffic jams form in the system. Cleaning is a must here.
- When replacing the coolant in a recently purchased car. Owners of domestic cars often fill with low-quality antifreeze. And after it, a complete flushing of the system is always required.
You also need to flush the expansion tank. All hoses are disconnected from it and removed from the mounts. The container is thoroughly washed from the inside. Then the tank is put in place. It is worth checking the strength of the fastening belts. If necessary, they are replaced.
Fan replacement
Dismantling
The fan assembly procedure is as follows:
1. Remove the fan. 2. Disassemble the device and repair.
Repair
A disassembled fan must be repaired or replaced with a new, more powerful one, but experts do not advise doing this, since the heating system will have to be completely improved. As for the repair itself, this procedure will not take much time, since all actions associated with it only involve removing and assembling the mechanism. In general, there is nothing difficult about this - if you need to replace the impeller or electric motor, this can be done without problems.
Assembly
How to assemble the device:
Source
Elimination of air locks in the cooling system on VAZ 2101-VAZ 2107
Welcome! Air locks in the cooling system - they usually occur when replacing coolant in a car engine, as well as when replacing individual components of the cooling system and when replacing hoses. If an air lock has formed in your car, then it is recommended to eliminate it because it can cause the engine to overheat.
Note! You may need a small slide to clear the air lock!
Summary:
How can you tell if there is an air lock in the cooling system? This is very easy to do, but only if your stove radiator is in working condition. To check, start the engine of your car and let it warm up to operating temperature, and after warming up, turn on the heater and use your hand to determine what kind of air is coming out of it.
Note! If the air is warm, then there are no plugs in the system, and if the air is cold, then there are plugs in the cooling system and they need to be removed!
Signs of air accumulation
In order to check whether air has accumulated in the heater, you need to turn on the heater and place your hand on the place where air should flow into the cabin. If it blows warmly, then there is no problem. If the air is cold and does not heat up after a maximum of 2 minutes, it means the stove is airy. There are plugs in the cooling system and they need to be removed.
Important: we check the operation of the stove only when the car is warmed up. In addition, make sure that your heater radiator is in working order.
How to eliminate air locks in the cooling system?
Method 1: First, open the hood of the car, and then with your hand press three times on the outlet (Indicated by a red arrow), bypass (Indicated by a green arrow) and inlet (Indicated in the photo by a blue arrow) radiator hoses.
Note! Press all hoses only with your hands; under no circumstances use pliers or anything else for this, because this can lead to deformation of the hoses!
Method 2: This method came from the people, it doesn’t always work, but it’s still worth a try:
Find a small slope or overpass, drive the car onto it so that the front part is higher than the rear and then let the engine idle for “5 minutes” and the traffic jam should disappear.
Note! Always remember one important thing, after you try one of the methods, immediately check whether the plug has been eliminated by warming up the engine to operating temperature, and after warming up by turning on the heater - if the air from the heater is warm, then the plug is missing!
We expel the air lock from the VAZ 2107 cooling system
During the operation of a VAZ 2107 car, it is necessary to carry out not only repairs of failed parts, but also preventive measures. One of these measures is replacing the coolant in the system. However, often after replacing the coolant, air pockets appear in the system. That is why the relevant question is how to remove air from the VAZ 2107 cooling system in order to prevent the engine from overheating and failing.
Prevention of air jams
To keep the engine in order and minimize the risk of airing the system, you must remember the first and most important rule - the car needs the caring attention of its owner. And a manifestation of this attention should be a mandatory monthly technical inspection of the car’s cooling system.
However, this requirement only means that you will drive the car into an inspection pit and examine places of possible leaks of coolant, oil and other liquids. Such preventive inspections can and should be done yourself - you will get to know your car better. It will also help you control your maintenance costs and eliminate operations that are not really needed, and learn to distinguish between those that are truly necessary.
In addition, the coolant in your car must meet quality and safety requirements. It’s not worth saving on it, as well as on other consumables for your car. After all, this is an increase in risks not only for the car, but also for you and your loved ones. A complete replacement of the coolant on VAZ vehicles should be carried out at least every five thousand kilometers.
Signs of air in the cooling system
The presence of an air lock in the engine cooling system causes serious consequences, including overheating of the engine and its failure. The presence of a plug will immediately manifest itself in the form of uneven heating of the engine. The air in the system restricts the passage of coolant in a large or small circle. The fact that the plug is present helps reduce the heat exchange between the engine and the antifreeze, so there will be an increase in temperature above the maximum level, which is unacceptable.
The plug can also prevent the passage of fluid to the heater core, so driving the car in winter will be cold. Heated antifreeze does not pass to the heater radiator through the cooling system of the VAZ 2107, so when it is turned on, a stream of cold air will blow into the cabin.
It is contraindicated to operate the machine in this condition until air has been removed from the system. To remove it, several different methods are known, which are described in detail in the material.
Reasons for the formation of air pockets
The formation of a plug in the cooling system is also called airing. This phenomenon occurs in the pipes and hoses, whereby their throughput capacity is lost, thereby causing overheating of the engine and boiling of the coolant. Before you remove the plug from the system, you will need to understand the reasons for its occurrence.
It is necessary to identify the causes of airing in order to prevent its reoccurrence. So, let's look at the reasons for airing the cooling system of the VAZ 2107 injector:
After identifying and eliminating the causes, you can begin drastic actions to eliminate air pollution on the VAZ 2107.
Stopper removal methods
To remove the plug, or rather to prevent its occurrence, you need to do the following simple steps while pouring coolant:
After pouring antifreeze, you need to start the engine and repeat the procedure of pushing through the pipes, which will prevent the formation of air. Even if a plug has formed, follow the same procedure to try to remove air from the system. This is the first method, which is the simplest and least expensive.
The second way to remove an air lock from the cooling system involves using a slope, which you need to drive the front of the car onto. This technique is simple, and to implement it you need to warm up the engine at idle for at least 10-15 minutes. In this case, the air should leave the system on its own, but be sure to note the time so that the engine has time to warm up to operating temperature, thereby opening a large circulation circle.
This is interesting! You can make sure that airing has disappeared by checking - if the engine reaches operating temperature and does not overheat, and warm or hot air is blowing from the stove, then the problem has been successfully resolved.
The removal of the plug can also be determined by a decrease in the coolant level in the expansion tank. If the level has dropped, it means that the procedure was completed successfully, and all that remains is to add antifreeze or antifreeze to the mark.
Squeezing out the air plug
If air has formed in the stove, then the plug can be removed in a more effective way. This method is more difficult to implement than those listed above, but it is 100% guaranteed to help remove air from the stove. The instructions for squeezing air out of the VAZ 2107 cooling system are as follows:
If adding antifreeze does not lead to a positive result, then proceed to another method. Its essence is to perform the following actions:
This completes the method for removing the plug from the system. Remember to check after each method.
Pipes on the VAZ 2107 - malfunctions and replacement features
Coolant flows through the tubes, so their main condition is tightness. The reason for the leakage of the cooling system of the VAZ 2107 may be the pipes, the specifics of replacing which we will look into in the material.
Reasons for replacement
The elements in question play a very important role in the system, and if they malfunction, liquid leakage occurs.
If the fluid leaks out of the system completely or drops below the level, this will cause overheating and engine seizure.
On VAZ 2107 cars, the carburetor and injector are equipped with rubber pipes of the cooling system, which have minor differences. When choosing them, the main thing is to specify for what type of engine the devices are purchased.
They are replaced not only when damage is detected. The most common case of the need to replace pipes on a VAZ-2107 is when the coolant level is gradually decreasing all the time. This may indicate a leak in the system, which in most cases occurs in the cooling system hoses. To verify this, you will need to perform a visual inspection.
The reasons for the need to replace the hoses of the cooling system of the seven are the following factors:
- Minor damage to the pipe, which will increase over time, so if a leak is detected, immediate action must be taken.
- Leakage from connections due to loose or damaged clamps, but in this case the damage can be repaired without replacing the hoses.
- The presence of minor damage and defects is a reason to replace the elements.
- A pipe rupture, which can occur if the elements are used for a long time without replacing them. To eliminate such cases, it is necessary to regularly replace devices depending on mileage.
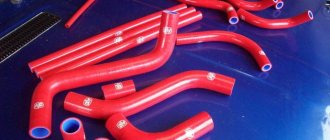
If you are replacing old hoses with new ones, it is recommended to choose silicone hoses, which are several times more effective than rubber ones.
The procedure for replacing cooling system hoses is not difficult, but it is labor-intensive, since you will need to drain the coolant. If the liquid has leaked, then it’s easier, but before installing new pipes, you will need to dismantle the old ones. Before starting the replacement, you will need to prepare the necessary tools and materials.
The materials you will need are a set of pipes, which are different for the injection and carburetor engines. This difference lies in the location of the radiator holes. That is why the radiator pipe on the carburetor seven is longer than on the injection one.
In addition to a set of hoses, you will need clamps for screeds, the diameter of which must correspond to the size of the pipes. These are clamps with a diameter of 35-50 mm, the number of which must be at least 8 pieces.
Moreover, it is recommended to buy not the cheapest, but high-quality devices, since they play a very significant role. It is not necessary to use a sealant, but if you decide to use it, then you need to choose only among the heat-resistant ones.
After replacement, all that remains is to fill in antifreeze or coolant if the previous one is unsuitable for use.
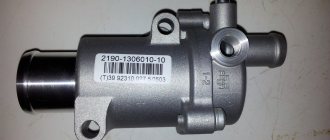
Replacing the pump on a VAZ 2107
The minimum set of tools you will need is a screwdriver or a wrench for unscrewing the clamps. By the way, it is not recommended to use old clamps, since they also have a certain resource.
Let's look at how to replace the cooling system pipes on a VAZ 2107 in more detail. Initially, you will need to drain antifreeze or antifreeze from the system, depending on what the car owner prefers. Instructions for draining the coolant are presented on the website. Next, we proceed to removing the pipes:
- Unscrew the clamps using a screwdriver or wrench. It is recommended to use a socket wrench of “6”, “7” or “8” depending on the type of clamps. It is recommended to loosen all the clamps, but do not disconnect the hoses.
- If the coolant has been drained from the engine block, then do not forget to unscrew the drain plug on the radiator.
- Let's start dismantling the elements. The hoses to which the thermostat is connected should be removed along with the device. When dismantling, it is recommended to remember the locations of all hoses.
- When all the elements have been dismantled, you should begin cleaning the surface of the holes to which new hoses will be connected. It is recommended to do this with fine sandpaper. It is worth noting that silicone hoses are much easier to put on than rubber ones and last much longer.
- After cleaning the surface of the holes, you can begin installing new pipes. It is worth noting that the VAZ 2107 air filter pipe is not included in the package, and it is replaced separately (if necessary).
- If sealant is used, it must be applied to the surface of the hole where the hose will be inserted. After applying the sealant, you should wait a few minutes and install the hoses.
- The connection points are fixed with clamps. Moreover, some drivers prefer to use two clamps for reliability, which is also acceptable.
- The upper pipe should be installed with a pre-connected thermostat, securing it with clamps.
- After all the pipes have been replaced, you need to once again make sure that the clamps are tightened.
If the work was carried out using sealant, then after finishing the work you should wait at least 3-5 hours, and only after that add antifreeze. Before adding antifreeze, make sure that the drain plugs on the engine block and radiator are tightened. When pouring antifreeze, you need to carefully inspect the hose connections where no leaks should appear.
At the end of the work, start the engine and carefully check that there are no coolant leaks. At first, you need to periodically check the level of antifreeze in the expansion tank, which should not decrease.
Run the engine until the fan starts.
If there is no coolant leak, then everything was done correctly and carefully, and you can forget about the problem with faulty pipes and leaking liquid.