The driver's door central locking actuator on the Priora has failed. We need to change it.
I purchased a gear motor for the electric lock of the driver's door lock (4 wires) on a Priora in the store.
Article: 2170-6512110-10. Price 350 RUR
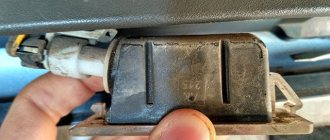
This is the culprit. Served for 4 years.
I'll take it apart later and post a photo report.
Tags: replacing the central locking actuator on a Priora, standard central locking actuator on a Priora, electric door lock motor gearbox on a Priora
Be the first to comment
Leave a comment Cancel reply
You must be logged in to post a comment.
Source
The driver's door central locking actuator on the Priora has failed. We need to change it.
I purchased a gear motor for the electric lock of the driver's door lock (4 wires) on a Priora in the store.
Article: 2170-6512110-10. Price 350 RUR
This is the culprit. Served for 4 years.
I'll take it apart later and post a photo report.
Tags: replacing the central locking actuator on a Priora, standard central locking actuator on a Priora, electric door lock motor gearbox on a Priora
To add comments you must log in or register on the site
I'm incredibly tired of activators that sound like a bolt is moving. I decided to change it to normal. I bought 3 2-pin activators (Phantom brand) for 100 rubles apiece for the passenger doors, but the problem with the driver’s is that it comes with 3-pin from the factory, but in stores there are only 5. (Hence the question: did anyone change the activators and how did they get out of this situation.
After the replacement, I’m as happy with the result as an elephant! everything is quiet and clear) Well, except for the driver’s)
As it turned out, my memory is bad or I can’t count...) In fact, the standard activator has 4 contacts, not 3)
The solution for the driver's door has been found: bite off the white wire, it is not needed, blue - yellow, red - green, brown - brown and black - black.
I bought a 5-pin activator for 150 rubles. I installed it, adjusted the lock in one go, and lo and behold! You can forget about the buzzing and the deadbolt!)
Removing and installing rear door lock of Lada Priora
- Lock, drive rods and rear door
- 1 – outer handle rod
- 2 – external handle
- 3 – intermediate locking
- 4 – intermediate locking lever
- 5 – lock lock button rod
- 6 – internal handle
- 7 – pull of the internal handle
- 8 – internal lock
- 9 – external lock
- 10 – external lock escutcheon
Lock, drive rods and rear door .
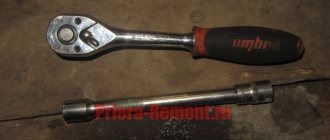
You will need: an “8” wrench, flat-blade and Phillips-blade screwdrivers, and pliers.
- 1. Disconnect the wire from the negative terminal of the Lada Priora battery.
- 2. Replacing the rear door lock. Lada Priora owner's story › replacing the electric door lock drive, turning it in. The procedure for removing and installing a Lada Priora window regulator, a guide for replacing and adjusting the door lock on a Priora, repairing a window regulator. Remove the rear door trim of the VAZ 2170 (see “Removing and installing the rear door trim”).
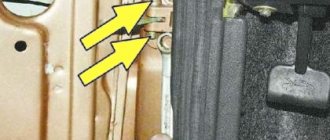
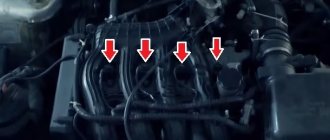
3. Squeeze the pad retainer...
4. ...and disconnect the wiring harness block of the door lock gearmotor.
Common problems and upgrades
The most common problems associated with the servo drive:
- Drive mode does not turn on the first time.
- Jerks when changing gears. The difficulty in identifying this problem is that the clutch control unit adapts to the driving style, and it is difficult to discern the difference in the behavior of the car.
- Overheating of clutch discs. The easiest way to identify this problem is that a corresponding indication appears (including often accompanied by a sound) on the dashboard (often red gears), a specific smell of a burnt clutch is felt, and the box freezes in “N” mode.
If error P0810 was detected during reading by the scanner, it is not recommended to independently initialize the control unit. Incorrect actions can lead to a complete reboot of the ECU, and along with the error, the original gearbox settings will also be lost. This, in turn, can lead to more serious consequences. Therefore, in this case, it is better to contact a specialized service so as not to aggravate the problems and increase the cost of repairs.
What can happen when resetting the original settings:
- Rapid wear of the clutch, since the new parameters will not take into account compensation for an already worn disc. He won't push all the way through.
- Increased likelihood of abnormalities associated with MMT. The disk movement speed will be unacceptably low, resulting in error P
- Partial or complete failure of the control unit. The result is that the car will move jerkily or stop moving altogether.
Lada Priora rear door activator replacement without removing rods and lock
This video shows that if you fixed something in a Russian car, it does not mean that everything is fine. Love yours.
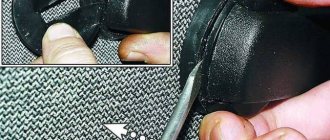
7. Tighten the drive rod end clamp...
8. ...and disconnect the rod end from the inner handle of the VAZ 2171 lock.
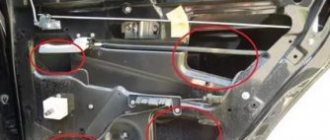
9. Replacement of the driver's door lock electric drive. Using a screwdriver, remove the lock lock intermediate rod holder from the door.
10. Unscrew the screw securing the intermediate locking lever.
11. Lower the intermediate lever down and remove the lock lock from the bracket hole.
13. ...and remove the guide
14. The electric door lock drive does not work. The electric lock motor is to blame. Use a screwdriver to pry the end of the rod of the outer handle of the VAZ 2172 and disconnect the rod.
15. Lada Priora hatchback Rock and Roll Antares › Logbook › Repair of electric door lock drive. Remove the cover.
16. Replacing the side glass of the front door of a VAZ 2110-2112, Priora. The procedure for removing and installing front door glass on VAZ 2110-2112 and Lada Priora cars. Remove the two mounting screws...
17. ...and pull out the lock.
18. screw securing the internal lock.
- 19. ...and remove the internal lock with locking rods and internal handle.
- 20. Install the lock in the reverse order of removal, having first lubricated all rubbing parts with grease. Check the ease of opening and the reliability of closing the door lock. If necessary, adjust the lock in the same way as adjusting the front door lock (see “Adjusting the front door lock of the Lada Priora”).
Source
Reasons for failure of the clutch actuator
The most common actuator failure is jamming of the worm gear shaft bushings. As planned, they should ensure free rotation of the axes in the clutch release mechanism. The surface of the bushings is coated with Teflon to reduce the friction force, but after 80–100 thousand kilometers this layer is destroyed. This negatively affects the operation of the mechanism as a whole. Ultimately, at one “wonderful” moment, the friction forces in bushings without Teflon become insurmountable for the electric motor, and the servo stops functioning and jams. The result is that the mechanism requires repair.
During operation, the compensation spring, compressed by the worm shaft gear, exerts a large force on the actuator bushings. These values reach values of up to 150 kg each. And since the diameter of the bushings is relatively small, it is easy to guess that, experiencing such loads, sooner or later they may require repair and replacement.
In addition, the servo drive axis rotates only within specified limits (small angle). In this case, the lubricant accumulates in one sector, the rest of the friction pair (shaft/bushing) runs dry, which ultimately again leads to the need for repairs.
If during the operation of the car you begin to observe problems that are most likely associated with the clutch release drive, then you can try replacing the servo with a new one or, if you have some skills, risk repairing the clutch actuator yourself.
But before repairing the clutch drive, you need to know exactly what causes the problems in its operation and how it manifests itself.
The driver's door central locking actuator on the Priora has failed. We need to change it.
I purchased a gear motor for the electric lock of the driver's door lock (4 wires) on a Priora in the store.
Article: 2170-6512110-10. Price 350 RUR
Tags: replacing the central locking actuator on a Priora, standard central locking actuator on a Priora, electric door lock motor gearbox on a Priora
To add comments you must log in or register on the site
Removing and installing rear door lock of Lada Priora
- Lock, drive rods and rear door
- 1 – outer handle rod
- 2 – external handle
- 3 – intermediate locking
- 4 – intermediate locking lever
- 5 – lock lock button rod
- 6 – internal handle
- 7 – pull of the internal handle
- 8 – internal lock
- 9 – external lock
- 10 – external lock escutcheon
Lock, drive rods and rear door .
You will need: an “8” wrench, flat-blade and Phillips-blade screwdrivers, and pliers.
- 1. Disconnect the wire from the negative terminal of the Lada Priora battery.
- 2. Replacing the rear door lock. Lada Priora owner's story › replacing the electric door lock drive, turning it in. The procedure for removing and installing a Lada Priora window regulator, a guide for replacing and adjusting the door lock on a Priora, repairing a window regulator. Remove the rear door trim of the VAZ 2170 (see “Removing and installing the rear door trim”).
3. Squeeze the pad retainer...
4. ...and disconnect the wiring harness block of the door lock gearmotor.
5. The lock closer on the car door stopped working. Priora from tens replacement. Unscrew the three screws securing the inner handle.
6. Move the handle away from the interior door panel of the Lada Priora.
Removing and installing the actuator of the switching mechanism of the robotic gearbox of the Lada Vesta car
We prepare the vehicle for work.
We place the car on the lift.
We disconnect the resonator pipes 1, Figure 1, inlet from the air intake and the air filter housing, use a 10mm head to unscrew the two fastening bolts and remove the resonator.
Using pliers, press out the clamp 1, Figure 2, fasteners and disconnect the upper hose 3 of the crankcase ventilation from the pipe of the cover 7 of the cylinder head.
Using a Phillips screwdriver, loosen the fastening clamp 2 and disconnect the intake pipe hose 4 from the throttle pipe.
When performing operations, removing/installing the gear shift mechanism actuator is not allowed:
— disassembling the actuator, except for cases when it is impossible to remove the actuator from the gearbox without disassembling it;
— the actuator falls; if it falls, the actuator must be replaced;
— connect the actuator to the power supply and operate it outside the gearbox;
— rotate the actuator manually using shaft 2, Figure 3, or gear shift lever 4;
—>Auto parts and service stations —>
Today, robotic gearboxes are actively replacing classic automatic transmissions in new mid- and premium-class cars sold on the Russian market. However, despite the growing reliability of this unit, motorists still face a number of problems, one of which is the unreliability of the clutch actuator.
One of the signs that repair of the clutch actuator is just around the corner is the spontaneous transition of the box to the neutral position while driving. But you shouldn’t immediately prepare for the worst, since repairing this component is not as labor-intensive a task as it might seem at first glance. In this article we will take a closer look at this issue.
What is a clutch actuator? This is an electromechanical device (servodrive), which is tasked with compressing the return spring of the clutch release bearing. The actuator is controlled by appropriate commands from the gearbox ECU. It consists of two units, inside one of which there is a small gearbox. Signals from the control unit drive the electric motor and gear and, through a worm gear and rod, overcoming the force of the compensation spring, the servo drive acts on the clutch basket.
But, as experience has shown, the clutch actuator turned out to be the weakest link among all automatic transmission mechanisms. It often fails before the others, immobilizing the car at the most inopportune moment. Accordingly, repairs will be required.
The device includes:
- displacement sensor. Responsible for the correct gear engagement position;
- electric motor Drives a system of gears.
- gear shift mechanism. In turn, it consists of: a shaft coming from the ring gear, an electric motor and the shaft of the gear selection lever.
Replacing the Priora Door Lock Electric Drive
Removing and installing rear door lock of Lada Priora
- Lock, drive rods and rear door
- 1 – outer handle rod
- 2 – external handle
- 3 – intermediate locking
- 4 – intermediate locking lever
- 5 – lock lock button rod
- 6 – internal handle
- 7 – pull of the internal handle
- 8 – internal lock
- 9 – external lock
- 10 – external lock escutcheon
Lock, drive rods and rear door .
You will need: an “8” wrench, flat-blade and Phillips-blade screwdrivers, and pliers.
- 1. Disconnect the wire from the negative terminal of the Lada Priora battery.
- 2. Replacing the rear door lock. Lada Priora owner's story › replacing the electric door lock drive, turning it in. The procedure for removing and installing a Lada Priora window regulator, a guide for replacing and adjusting the door lock on a Priora, repairing a window regulator. Remove the rear door trim of the VAZ 2170 (see “Removing and installing the rear door trim”).
Electrical locking motor for Priora door lock
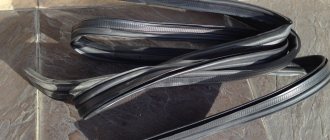
Sealing tape Madeline N 15x2000mm
with 19% discount
Wire clamp for VAZ 2107, 2110-2115, Lada 4x4, Chevrolet Niva
with 19% discount
Wiring harness for injectors 2111-3724036 for VAZ 2110, 2111, 2112
with 12% discount
Pay for goods by credit card, using QIWI, Yandex.Money or WebMoney and save on your purchase from 4%, avoiding postal and bank commissions
This product was chosen by 3 customers
Door lock with 2 contacts.
Weight, kg: 0.15 Dimensions, cm: 15 x 7 x 3 Volume, m3: 0.00032
Lubrication with removal
- Remove the clutch actuator (see these instructions).
- Remove the actuator cover by unscrewing the fastening bolts.
- Lubricate all load points and hinges with special lubricant (for example, Liqui Moly 3352 or LIQUI MOLY Thermoflex Spezialfett)
The process is also shown in the video:
The whole process will take no more than 3 hours. By the way, actuator lubrication is done at a service station, the price of the service is about 2,000 rubles.
Attention!
After lubricating the actuator, it is recommended to adapt the AMT.
Lada Priora rear door activator replacement without removing rods and lock
This video shows that if you fixed something in a Russian car, it does not mean that everything is fine. Love yours.
7. Tighten the drive rod end clamp...
8. ...and disconnect the rod end from the inner handle of the VAZ 2171 lock.
9. Replacement of the driver's door lock electric drive. Using a screwdriver, remove the lock lock intermediate rod holder from the door.
10. Unscrew the screw securing the intermediate locking lever.
11. Lower the intermediate lever down and remove the lock lock from the bracket hole.
13. ...and remove the guide
14. The electric door lock drive does not work. The electric lock motor is to blame. Use a screwdriver to pry the end of the rod of the outer handle of the VAZ 2172 and disconnect the rod.
15. Lada Priora hatchback Rock and Roll Antares › Logbook › Repair of electric door lock drive. Remove the cover.
16. Replacing the side glass of the front door of a VAZ 2110-2112, Priora. The procedure for removing and installing front door glass on VAZ 2110-2112 and Lada Priora cars. Remove the two mounting screws...
17. ...and pull out the lock.
18. screw securing the internal lock.
- 19. ...and remove the internal lock with locking rods and internal handle.
- 20. Install the lock in the reverse order of removal, having first lubricated all rubbing parts with grease. Check the ease of opening and the reliability of closing the door lock. If necessary, adjust the lock in the same way as adjusting the front door lock (see “Adjusting the front door lock of the Lada Priora”).
Removing the interior lock, lock cylinder and outer front door handle
We carry out the work when replacing the lock, its cylinder mechanism and the outer door handle. Remove the front door trim (see “Removing the front door trim”).
Use a slotted screwdriver to disconnect the rod from the cylinder mechanism of the lock.
Use a slotted screwdriver to pry up the mounting bracket for the cylinder lock mechanism...
...and remove the bracket.
We take out the cylinder lock mechanism along with the rubber sealing ring. Disconnect the lock rod from the outside door handle.
Using a 10mm socket, unscrew the two nuts securing the outer door handle...
...and remove the handle.
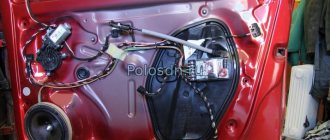
Using a slotted screwdriver, unfasten the clamp securing the wiring harness of the electric locking drive.
By pressing the latch... ...we disconnect the wiring harness blocks of the electric locking drive.
Using a Phillips screwdriver, unscrew the three screws securing the base of the inner handle...
...and the screw for securing the internal lock. We remove the external lock (see “Removing the external door lock”).
We remove the internal lock of the front door with rods and an electric drive for locking the lock through the technological opening of the internal door panel.
Front door lock with electric locking, external and internal door handles
Use a slotted screwdriver to disconnect the rod end of the outer handle from the lock lever.
In the same way we disconnect the rod of the cylinder mechanism of the lock.
Using a slotted screwdriver, we open the spring bracket that secures the rod of the inner handle...
...and remove the bracket. There is a spring washer under the bracket; remove it, and then the rod.
Using a slotted screwdriver, press out the plastic locking rod lock of the lock button, turning the lock around its axis.
In the same way we remove the locking electric drive rod.
Using a Phillips screwdriver, unscrew the two self-tapping screws securing the electric drive to the lock bracket and remove the electric drive.
Electrical locking motor for Priora door lock
Sealing tape Madeline N 15x2000mm
with 19% discount
Wire clamp for VAZ 2107, 2110-2115, Lada 4x4, Chevrolet Niva
with 19% discount
Wiring harness for injectors 2111-3724036 for VAZ 2110, 2111, 2112
with 12% discount
Pay for goods by credit card, using QIWI, Yandex.Money or WebMoney and save on your purchase from 4%, avoiding postal and bank commissions
This product was chosen by 3 customers
Door lock with 2 contacts.
Weight, kg: 0.15 Dimensions, cm: 15 x 7 x 3 Volume, m3: 0.00032