Symptoms of malfunction
- Knock on rough roads . When hitting bumps, you will hear dull or ringing metallic sounds from the front of the car. This does not always happen due to wear on the steering rack; sounds can also arise from other components: ball joint, tip, wheel bearing.
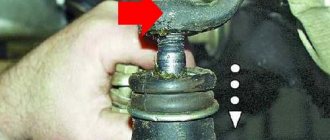
- Large steering play. As the mechanism wears out, the gaps between the teeth increase, causing free play to increase. Play can also appear when the steering tips and ball joints are worn out.
Backlash should definitely be eliminated at the initial stages of its appearance, since delaying repairs can lead to complete failure and the replacement of the element.
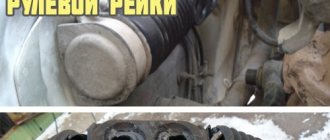
- Steering wheel jamming . Most likely the cause of the problem will be the steering rack. Most often this occurs due to damage to the anthers. Water and dirt begin to enter the mechanism body. The lubricant washes out or thickens, causing the teeth to cling to each other unevenly.
A similar problem also occurs when the element is incorrectly adjusted.
Useful : How much does a new steering rack cost for a VAZ 2114?
What kind of steering wheel can I install?
If you decide to replace your old steering wheel, it means that its appearance did not suit you in some way. Of course, the issue may be a breakdown or external damage, however, even in this case, you should consider installing third-party models. What if you like one of them much more than the previous steering wheel?
Original
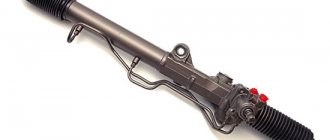
2108-3400012 – original catalog number of the steering rack produced by AvtoVAZ. It fits perfectly into the seats and does not require modification of the fasteners. The average cost is 6,000 rubles.
Original steering rack made by AvtoVAZ
Analogs
In addition to the original part, there are a number of analogues that can be used for installation on a car. Let's look at which ones:
- Weber SG 2108-0012 - average cost is 4,500 rubles.
- Pilenga SR-P 1141 – average cost is 6000 rubles
Pilenga steering rack
- Trialli CR 108 — steering mechanism (rack) for VAZ 2108 (2113-2114) without tie rods (cr 108). The cost of the product is 6,000 rubles.
- Trialli CR S 708 — Steering mechanism (rack) for VAZ 2108 (2113-2114) with tie rods and ends (cr s 708). The average cost is 12,000 rubles.
What you need to know when installing
Please note that not every steering wheel is suitable for installation on VAZ 2114 and VAZ 2115 cars. You need to choose a steering wheel with the same contact group as the original part.
choose a steering wheel with the same contact group as that of the VAZ 2114 and 2115
This is quite easy to do if you plan to install a steering wheel from other VAZ models. For example, a steering wheel with a Europanel from a VAZ 2110 is ideal for these purposes.
If you have chosen a Lada Kalina car, then its steering wheel should be marked 1118–3402010. With it you will also have to install the upper casing marked 2110–3403070–30, as well as the lower casing 2110–3403072–30.
To install a non-standard steering wheel on a VAZ 2114, use the steering shaft housing 2110–12
If you like sports models, then you will have to purchase a special adapter designed for VAZ 2113–2115 cars. This adapter is installed on the steering shaft, and the steering wheel is mounted on top. An adapter model suitable for this purpose is PROSPORT RS-04282.
This is interesting: The CV joint is crunching: reasons, how to determine which grenade is crunching, is it possible to drive and what to do
for installing a sports steering wheel on VAZ 2114 and 2115 cars, the PROSPORT RS-04282 adapter is suitable
Required Tools
To service the mechanism we need the following set of tools:
- Open-end wrenches. It would be good if there was a complete set, but usually the sizes required are: 8, 10, 13, 22.
- Set of heads;
- Flat and Phillips screwdrivers;
- Pliers or round nose pliers;
- Hexagon 17 (better set);
- Jack and wheel wrench;
- Chisel and hammer;
- It would be great to have a special puller for tie rods;
- WD-40 or Liquid Wrench for thread processing.
- Special key for adjusting the rack
Also, for safety, it is necessary to prepare supports for the wheels of the car.
Steering rack repair kit for VAZ 2114
When starting to overhaul the mechanism, you need to consider the market for repair kits. There are several types:
- The first consists only of rubber bands, gaskets and dampers. It is suitable for changing the lubricant inside the mechanism and for light maintenance. The price for a set is about 200 rubles.
- The second is complemented by two bearings, which is also suitable for easy maintenance of the mechanism. The cost of the set is about 500 rubles.
- The latest repair kit has almost all internal mechanisms and implies a complete replacement of units. The price is about 2000 rubles.
Before purchasing a kit, check which rack is installed on your car and write down its number. This will help you avoid making mistakes when purchasing.
Removing the steering rack
When starting to repair the VAZ 2114 steering rack, first of all we need to remove it. We do this using the following technology:
- We park the car on a level surface. For safety, we put supports under the wheels to prevent them from rolling back.
- Raise the car with a jack, loosen the wheel nuts and remove it. Similar work needs to be done on the other side.
- There is a hole in the arch on the right side that is closed with a plug. Let's take it off.
- When the absorber is installed, it is necessary to loosen the clamp and, without disconnecting the hoses, move it to the side.
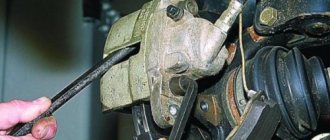
- Using a hammer and chisel, we bend the antennae onto the plates that hold the tie rod nuts.
- We unscrew the bolts and pull them out along with the plate. We move the pulls to the side.
- We find the junction of the column shaft with the gear shaft of the mechanism. It is located at the front panel from the passenger compartment. Let's separate them.
- Using a socket or a 13mm wrench, unscrew the brackets that hold the steering rack. They often become very rusty and unscrewing them becomes problematic, so it is advisable to first treat them with WD-40 and wait a few minutes.
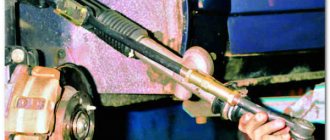
- We move the mechanism towards the engine to free the shaft and remove it.
- We pull it out through the hole described in the third paragraph.
After this, the dismantling is completed and you can begin to repair or replace the mechanism.
How to remove and replace the steering wheel on a VAZ 2114 and 2115 with your own hands
The VAZ 2114 and VAZ 2115 cars are part of the Lada Samara family. Their steering wheels are not distinguished by elegant lines and ease of use, especially on early models. There can be no question of any aesthetic pleasure here. It's not surprising that many owners of these cars are tempted to replace the steering wheel with a better designed part. But how to choose a suitable steering wheel, and is it possible to remove and install it yourself? Let's figure it out together.
How to remove the steering wheel?
Dismantling the steering wheel on VAZ 2114 and 2115 is carried out using the same method. However, remember that according to the Code of Administrative Offenses, replacing a steering wheel with a steering wheel different from the original is considered illegal modification of the steering structure and vehicle control system. Such tuning falls under Part 2 of Article 12.5 of the Code of Administrative Offenses on driving a vehicle in the presence of malfunctions or conditions under which its operation is prohibited. Recently, traffic police officers have been quite zealous in catching violators of this article, so think carefully before embarking on the replacement process.
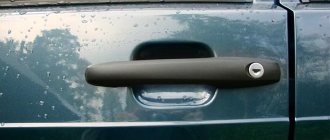
The standard VAZ 2114 steering wheel looks unattractive, so someone may want to replace it
Required Tools
To remove and then install a new steering wheel, you will need the following tools:
- new steering wheel (make sure the part you choose fits your car);
- set of screwdrivers with straight and Phillips slots;
- 24 mm socket head;
- pencil or marker;
- hammer (in some cases);
- a soft metal drift (included with the hammer);
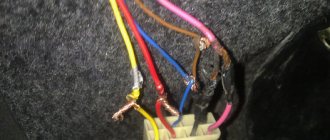
- wire cores (in some cases).
Please note that after completing all the work, you will have to remove traces of a pencil or marker from the steering wheel cover and front panel. To avoid problems with subsequent cleaning, consider the coating material of these interior elements. You should not use permanent, or as they are also called, indelible markers, especially if the parts are covered with high-quality natural leather of a light shade. The easiest way to remove marker is water-based. But it is better to use a regular pencil: it can be erased with a regular eraser.
Steering wheel removal process
There is a signal inside the steering wheel that receives power from the battery, so the first thing you need to do is turn off the power to the car. To do this, you just need to disconnect the negative terminal. After this, you can safely begin the dismantling process.
- Remove the ignition key from the lock.
- Turn the steering wheel so that the system locking the steering shaft is activated. Your steering wheel is now locked in a straight position.
- In order to subsequently correctly install the new part while maintaining control accuracy, apply a mark to the steering wheel with a pencil. Place a similar mark on the dashboard right next to it.
- Using a straight screwdriver, pry the cover with the Lada inscription on the steering wheel and remove it. This element is attached using ordinary plastic clips, so removing it is not difficult. However, due to the thin plastic, the part breaks easily. If you plan to continue using your old steering wheel, be careful.
- Under the trim you will see two screws. They hold the steering wheel cover. Unscrew them using a Phillips screwdriver and then remove the cover.
- In the central part of the structure you will see a large nut. It should be unscrewed using a 24 mm socket.
- The steering wheel no longer holds anything. To remove it, grab the steering wheel with both hands and pull each side in turn. There's no point in trying. If the part has not been dismantled before, it will be quite difficult to move. Do not try to remove the part with one jerk: you may accidentally injure yourself.
- If attempts to remove the steering wheel using the method described in point 7 are unsuccessful, use a small hammer and drift. In addition to additional tools, you will need an assistant. One person from the pair should pull the steering wheel, and the second should hit the drift attached to the end of the steering shaft with a hammer.
Disassembly
If you decide to carry out maintenance yourself, then you should disassemble it in order:
- We cut off or bite through the plastic clamps that are located on the sides of the protective casing. We remove it and inspect it for breaks or cracks.
- The side protective caps are also attached to the clamps. We carry out a similar procedure and remove them.
- Unscrew the adjusting screw with a 17 octagonal wrench.
- Then we take out the sealing and retaining ring, the spring and the stop. We check the emphasis for scuffs and other damage, since its condition directly affects its performance.
- Now we need to remove the steering gear boot. It sits tightly on the body and does not have any special fastenings.
- We take out the lock washer and unscrew the bearing nut. Then remove the o-rings. After the steering shaft.
- We check the condition of the bearing. In case of wear, we knock it down using an extension or a gentle blow with a hammer. We press in the new bearing using a yew or a press.
- Then we check the condition of the needle bearing. We take it out with a screwdriver, carefully lifting it up.
- We take the rail itself out of the body. We clean off the old grease and inspect the condition.
- The last step is to remove the bushing. To do this, use a screwdriver to move it from its seat and after that it can be easily removed.
At this point, the disassembly and inspection of elements for damage is completed and you can begin reassembling the mechanism. The video shows a do-it-yourself repair of a VAZ 2114 steering rack:
Work order
Replacing steering bearings on a vehicle such as a VAZ-2110 consists of a number of stages that must be carried out in the order in which they are listed below.
The whole process can be seen in the video:
First, you need to disconnect the battery on the car to prevent an electrical short circuit. It is enough just to remove one terminal where the “-” sign is indicated.
Then you need to remove the steering wheel. To do this, you will need to turn the car's ignition key, and also turn the steering wheel 90° in either direction. You will see a whole row of nuts, thanks to which the steering wheel is attached to the shaft
Using a special wrench, unscrew the nuts, and then carefully proceed to the recess to remove the steering wheel. This is done due to the fact that in some cars there is a system in the steering wheel that allows the steering wheel to be spring-loaded
If you do not take this into account, you may even get injured.
Using a special wrench, you need to unscrew the nuts where the steering column switch mechanisms are secured. Next, their bases must be moved towards the driver’s seat.
Having found the wire connected to the oil pressure sensor, you need to remove it.
Steering rack repair
Do-it-yourself repair of the VAZ 2114 steering rack involves installing new parts into the mechanism body. But it is worth paying attention to the lubrication of parts. The manufacturer recommends using FIOL-1.
- First, lubricate the rack and the internal cavity of the housing.
- Then apply a generous amount of plastic bushing and place the needle bearing in place.
- The rail can be installed in the housing.
- Lubricate the steering gear shaft.
- Next, we hammer the material into the bearing.
- Afterwards the stop is lubricated, screws and stoppers are installed, as well as the casing and anthers.
The detailed process is described in the previous paragraph.
Lada 21099 kemo sabe › Logbook › Installing an adjustable steering column from a VAZ 2114
It seems like a hackneyed topic, BUT nothing really is written anywhere. For this reason I will write everything down as much as possible. I'll start with perhaps the most exciting question. Is the steering column from 2110 suitable?
There are 3 types of steering columns:
1)
The oldest one is from the VAZ 2110 (the adjustment knob is located on the left side), yes it fits, its casing is similar to 2108, only there is a slot for the handle. In terms of style, this column is best suited for VP IMHO. It fits without the slightest modifications, etc...
2)
The same column from the VAZ 2114, it looks like we are all used to seeing. The adjustment knob is located at the bottom. In terms of the style of the casing, it is best suited for the Euro panel, again IMHO. It gets up just the same without a single hitch.
3)
Well, the third is the steering column from a VAZ 2110 with power steering. The adjustment knob is located at the bottom like the 14, and that’s where the similarities end.
- the shaft on which the steering wheel is directly attached is longer than 14 - the height travel is greater - I came across a column with a spacer plate for a new body with a Europanel for the 10th family
so to summarize, take any column to your taste, just look carefully at the shaft
What kind of blemish is this on the intermediate shaft?
a lot of different crap: - remnants from blocking the shaft (such a blocking crutch) - for balancing and a bunch of other things, to be honest, I don’t know what this is for, so I’ll just advise you to look for a column without it, again IMHO
Well, now let's move on to the installation. unscrew the old column and forget about it. First we stick the new one into the rail (there is a special groove there, so it only fits in one position on the slot). But it is screwed to the body with 2 studs (in the front), in the old version of the body the studs are welded and with 2 shear bolts (I didn’t fool around and installed regular bolts
Well, a general overview, but don’t forget to put the ignition switch back
Well, it’s logical to ask, why is it needed at all? Yes, in fact, the old column was quite tall enough, but when you go out on the highway or, in principle, for long trips along the prima, my hands begin to ache. This is where adjustment should save you. + to top it all off, it was hard for me to see the instrument panel behind the wheel on the VP. Delicious treats to be continued...
Source: www.drive2.ru
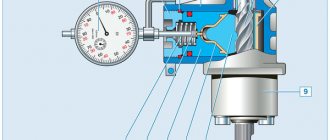
Adjusting the steering rack on a VAZ 2114
To make the adjustment we need a special key. It looks like a hexagon on one side, and on the other side a key for tightening the timing belt.
Next, we need to drive into a hole or overpass to gain full access to the adjusting bolt. If this is not possible, you can jack up the car and crawl under it. Afterwards we need to look under the car on the left side. On the rail we will see a special recess in which the adjustment mechanism is installed. It's better to spray it with WD-40 right away. This will help clean the threads from rust. If the adjustment occurs for the first time, the bolt will be very difficult to turn, since it is cored at the factory so that it does not unscrew due to vibration.
After tightening, you need to conduct a small test, turn the steering wheel in motion. If it turns too tightly, then you have overtightened the nut; you need to loosen it a little. When the work is done correctly, vibration during movement, play and knocking should go away.
The cost of this repair at a car service
In car services, the average price for repairs depends on the complexity of the repair. Approximate cost of work:
- Steering diagnostics - about 300 rubles;
- Adjusting the mechanism costs about 500 rubles;
- Replacing the steering rack costs about 3,000 rubles.
Most services will not undertake to rebuild your rack. If you contact services that do this, prices start from 500 rubles, depending on what you need to replace. The cost, of course, is indicated without withdrawal. Repairing the steering rack on a VAZ 2114 is not as difficult as it might seem at first glance, especially if you are guided by the information from the article. This will help you save half of your budget from spending on repairs at car services.
How to remove the steering wheel in 2 minutes on a VAZ 2114/2115/2110
To watch online, click on the video ⤵
VAZ 2114 EiRSR (50). how to remove the steering wheel! More details
How to replace the steering column bearing of the nine (VAZ-2109, 2108-21099) and eliminate the steering play yourself Read more
VAZ 2108,2109,2110 how to unscrew the steering wheel? More details
How to remove the steering wheel on a VAZ 2110-2112: 3 important points Read more
REPLACEMENT OF STEERING RACK VAZ 2108,2109,21099,2113,2114,2115 Read more
THIRIK 2110 8V STEERING STEERING like on a FOREIGN CAR for 55 rubles / Rubber CUBIC in the steering PARDAN Read more
Thickened steering wheel 2115 More details
HOW TO REMOVE THE STEERING STEERING VAZ 2110 2111 2112 Read more
Installation of Kalina steering wheel on a VAZ 2114 Read more
Installation, replacement of VAZ 2111, 2115, 2110 steering wheel Read more
Repair and modification of the VAZ 2109 steering rack Read more
STEERING FROM KALINA FOR VAZ 2114 WITHOUT MODIFICATIONS / KALINA STEERING STEERING FOR ANY VAZ, no Prior 2 steering wheel is needed Read more
#RULPRIORY2, in VAZ2114, 2110,2109, without EUR, installation, modifications Read more
Why does the steering wheel shake? Trembling and vibrations on the steering wheel? More details
Replacing a VAZ steering wheel Read more
Leopard VAZ steering wheel 2114.2115.2113.2110.2112 Read more
Installation of Priora steering wheel on VAZ 2113, 2114, 2115 Read more
I found the steering wheel at a car dismantling shop and completely covered it with Schweizer BMW eco-leather. VAZ 2110-2115. More details
Easy replacement of steering column bearings 2110 Read more