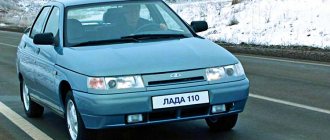
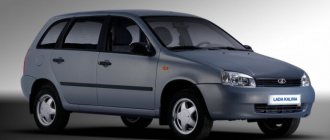
Steering mechanism Lada Kalina
The development of the Lada Kalina design began at AvtoVAZ in the 90s.
A line of cars was conceived, including the 1119 sedan, 1118 hatchback and minivan. The last model was never implemented; instead, a station wagon 1117 was developed. In 1999, a hatchback prototype was demonstrated, and in 2000, a future sedan model was demonstrated. The first generation of cars lasted on the market for about ten years; since 2014, AvtoVAZ has been producing an updated series, including the Kalina Cross all-terrain vehicle, which is distinguished by greater comfort, a new engine and design. On all Lada Kalina models, a steering mechanism was installed only with a rack and pinion drive, depending on the configuration, equipped with or without electric power steering (EPS). Hydraulic power steering (power steering) was installed only on the Lada Priora and the Niva SUV.
Characteristics of the steering mechanism of different modifications of Kalina
The steering mechanism (RM) is one of the most important elements of a car and is designed to change the trajectory of its movement. Control is carried out by turning the steering wheel, and the greater the angle of rotation, the more the car turns. Among the variety of PMs, rack and pinion mechanisms are most widespread due to their simplicity of design, low weight and size, high reliability and low cost.
All models and modifications of the Lada Kalina car have a standard safety rack and pinion mechanism, which is equipped with an electric amplifier.
The steering column can change its angle depending on the driver's height, ensuring comfortable driving. Currently, there are three manufacturers supplying components for electric power steering: Makhachkala, Aviaelectronics in Kaluga and Korea. All electric boosters are available for free sale and you can choose any one, but experienced drivers prefer the Korean device.
Operating principle and design of rack and pinion steering mechanism
When the steering wheel rotates, torque is transmitted through the column shaft through a helical gear to the rack, which is connected to rods that change the angle of rotation of the wheel hub. The working pair in the rack and pinion mechanism is the helical gear located on the column shaft and the PM rack.
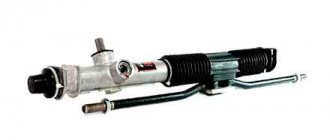
Kalina's steering rack is placed in an aluminum housing (case), which includes a helical gear connected to the column shaft. The helical drive gear meshes with a rack and is supported by two bearings and a bushing on the crankcase. The rack also has an oblique tooth with a variable pitch, with a smaller pitch on the peripheral part. As a result, the driving behavior becomes more natural and comfortable, and the steering wheel angles are reduced. In a car with a variable ratio rack, the steering range of rotation is 720°. In this case, the driver, turning the wheel one revolution, reaches the right or left stop. During linear motion, the gear shaft is in the zone of straight teeth. When cornering or maneuvering, the steering responds more dynamically. In the area of the rack, which has oblique teeth, the gear ratio decreases rapidly as the steering angle increases.
For fans of fast driving, a Kalina Sport steering rack can be installed, which has a gear ratio of 3.1, unlike other models, in which this figure is 4.02. This shortened version allows you to feel the car better, but increases the risk when driving at high speeds.
Steering gear
The rack and pinion steering mechanism is the most common vehicle control unit for passenger cars. The main parts of such a mechanism are the gear and steering rack. The gear is mounted on the steering wheel shaft and is always geared by the rack. When the steering wheel rotates, the steering column rotates, the gear attached to it rotates, the gear drives the rack, which pushes the steering rods and turns the wheels.
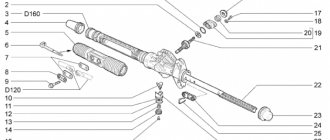
Steering rack and pinion diagram
1-case; 2-lord; 3-spring; 4-ball pin; 5-ball joint; 6-stop; 7-rack steering; 8-gear.
As can be seen from the diagram, the design of the car steering mechanism is simple, but it is sensitive to vibrations while driving on rough roads.
1-outer tie rod end; 2-threaded bushing; 3-inner tie rod end; 4-protective cap right; 5-steering mechanism; 6-shaft-gear; 7-steering gear housing; 8-protective cap left; 9-stop plate for tie rod bolts; 10-connection plate; 11-crankcase pipe.
Rack and pinion steering is installed on front-wheel drive cars. On the Lada Kalina car, the steering rack is placed in an aluminum housing (crankcase). The gear used here is helical and, accordingly, the rack has helical teeth. The steering angle is 720 degrees, that is, 2 full turns: one turn to the right all the way, the second turn to the left all the way.
In order for all suspension parts to serve as long as possible, you need to drive over a speed bump or an “artificial bump” at a speed of 20 to 40 km/h.
Steering mechanisms for VAZ Lada Kalina cars are equipped with rack and pinion steering mechanisms with different gear ratios.
So, for those who like to drive, a steering mechanism with a gear ratio of 3.1 is suitable for street racing.
For ordinary cars, a steering device with a gear ratio of 4.02 is installed.
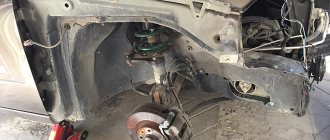
Wear on steering gear parts increases if there is no protection from dust, water and dirt. In Kalina, the parts of the steering device are protected from above by the hood, from below by the sump, but when used in an aggressive manner, water, salts, and dirt still get onto the steering column.
Malfunctions of RM Kalina and ways to eliminate them
Even the most reliable mechanisms wear out, especially if they are not protected from dust, dirt, water and aggressive environments. Although the steering rack of the Lada Kalina is located under the hood of the car and is protected from below by a pallet, during operation, especially in off-road conditions, it is exposed to all of the listed factors. The main malfunctions of the PM can be grouped into three groups:
- large free play of the steering wheel;
- knocking, noise and creaking in the mechanism;
- tight steering wheel.
Increased play, squeaks and knocking of the Kalina PM can be caused by:
- loosening the tie rod nuts,
- wear of their tips and silent blocks,
- loosening the PM fastening nuts,
- large gap between the rack and the adjusting nut.
These faults are easy to fix: you need to tighten the nuts and pin them where necessary, and replace the silent blocks with new ones.
Difficulty turning the Lada Kalina steering wheel can be caused by more serious reasons:
- wear of the bearings of the upper support of the steering column upper universal joint,
- damage to the rack support bushing,
- failure of the telescopic strut of the front suspension,
- faulty electric power steering or low tire pressure.
If the last reason can be dealt with quite easily by inflating the wheels to the level specified in the car’s operating manual, then to eliminate the rest you will need to replace parts and assemblies with new ones.
Many Lada Kalina owners are interested in whether it is possible to replace the standard rack with a mechanism of a different design. It's possible, but not necessary. The manufacturer does not structurally provide for the replacement of the rack and pinion steering mechanism with other types. Worm or screw PMs simply won't do. To facilitate steering wheel rotation, an electric power steering is installed on all Kalina models.
Basic steering rack faults
Seal leakage
French and Japanese cars usually suffer from leaks in the input shaft seals. It occurs due to corrosion of the oil seal area.
Leaking power seals and corrosion of the steering column shaft
This problem occurs when water gets in through the rod boots.
Leaking hydraulic hoses
Connecting elements often leak due to rubbing.
Worn steering rack center tooth
Due to the fact that the steering wheel remains in the central position most of the time, the vast majority of all loads fall on the central part of the rack.
Support bushing knocks
The support bushings are designed to centralize the shaft in the steering rack housing; when it wears out, the shaft begins to knock on the rack housing.
Knocks of the pressure block
Over time, a sample forms on the surface of the cracker and the gasket wears off. At the same time, the cracker begins to knock on the steering rack, dangling in its body.
Steering wheel turns tight to one side
This effect is observed when the hydraulic fluid is contaminated and grooves are formed inside the distributor.
Tight steering in both directions
There could be many reasons:
- grooves described above.
- The Teflon ring on the piston could rupture.
- wear of the working pair could have occurred on the pump.
- The distributor torsion bar could have broken.
Tightening and adjusting the rack
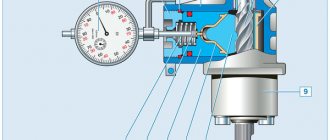
During the operation of the vehicle, natural wear and tear occurs on the contacting parts, including the PM rack. The presence of such wear can be easily recognized by the characteristic knocking sound of the mechanism at low speeds on uneven roads. This sound also produces a vibration that you can feel through the steering wheel. The initial stage of wear is easy to eliminate; this requires adjustment of the Kalina steering rack, which is easy to do with your own hands.
First of all, you need to loosen the three clamps on the air duct pipe:
- on the mass air flow sensor,
- on the crankcase ventilation pipe,
- on the throttle assembly.
After removing the air duct pipe, a large enough space opens up so that you can stick your hand in with a special wrench to adjust the rack and tighten the nut on the end of the PM crankcase. By turning the adjusting nut a quarter turn clockwise, you can begin installing the disassembled pipe and testing the machine. If the knocking noise has disappeared and when the car is moving, the steering wheel automatically returns from its extreme position, then the adjustment was made correctly. If the steering wheel does not return, you have over-tightened the rack. You will have to perform all the procedures again and loosen it somewhat, and then check again. If the knocking noise does not disappear when the nut is fully screwed in, then replacing the steering rack on Kalina is inevitable.
Installation of the Kalina steering mechanism
Before installation, check that the rail is installed in the middle position. To do this, using sliding pliers, use the flat on the gear shaft to rotate the shaft in any direction until it stops, then turn the shaft in the opposite direction two full turns and turn the shaft so that the flat on the shaft is located vertically on the right side along the direction of the car. Otherwise, the installation of the rack is carried out in the reverse order.
Thus, it will take at least 1 hour to replace the steering rack on Kalina. If it is not possible to repair it, then you will have to buy a new one. The steering rack of the Lada Kalina is the same as the rack of the Priora or VAZ 2110-2112 of the new model and has a catalog number: 11183-3400010 (rasp inside 21100-3401068). Price approximately 3500 rub. For Kalina Sport:
- 11183-3400010-10 inside rasp 11183-3401068-00 (3.1 turns)
- 11183-3400010-12 inside rasp 11183-3401068-01
- 11183-3400010-01 without EUR inside rasp 21100-3401068-00 (4.1 turns)
- 11183-3400010-10 with EUR inside rasp 11183-3401223-00
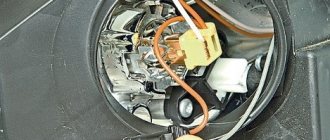
Changing the EUR on Lada Kalina
The electric power steering is mounted on the steering column and is removed along with it. First you need to turn off the power to the car by removing the battery terminal and position the front wheels straight. To dismantle the Kalina steering wheel, remove the lower cross member of the instrument panel, disconnect the wires from the EUR control unit and the switches located on the column, and then lower the steering wheel to the floor.
Now it is convenient to unscrew the nut of the bolt securing the lower universal joint to the steering gear shaft. Then we open the joint connection, use a flat screwdriver to remove the intermediate cardan from the pinion shaft of the RM Kalina and dismantle the column along with the electric power steering. After replacing the EUR with a new one, installation is carried out in the reverse order to that described above.
For safety reasons, replacement of various components and mechanisms should be carried out only with those approved by the Kalina manufacturer. If the vehicle requires repair, it must be carried out immediately, otherwise the risk of creating dangerous situations on the road increases. If damage is detected or there are irreparable faults, the mechanism must be replaced.
Dismantling and disassembling the rack on Lada Kalina
When all the materials for repairing the steering rack have been collected and purchased, you can proceed directly to the repair operations.
Before you begin, you need to completely clean the steering rack. This can be done manually, but it is best to use a steam mechanism under pressure, which will efficiently remove dirt and dust from all elements without damaging the parts.
Now, let's proceed to sequential operations to repair the steering rack:
We put the shoes under the wheels
Removing the coupling fixing bolt
We remove the cotter pins using pliers
Removing tie rod ends using a hammer and crowbar
Disconnecting the EUR connector from the on-board network
Removing the steering rack mounts
We dismantle the steering rack through the wheel arch
We remove the steering rods
Cut off the boot clamps using wire cutters
Removing the rack crankcase cover
We diagnose the condition of all products. Plastic and rubber parts will have to be replaced, and it is also recommended to install a new boot and bearings.
Assembly in the correct sequence
Before assembly, it is necessary to clean all parts and lubricate the rack shaft with lithol or other similar lubricant.
Let's start the assembly:
Installing new bearings
We align the marks on the crankcase and rack so that the steering wheel is level
We put a new boot on the rail
Recommendations
Many automakers do not recommend performing repair operations on the steering rack, but at the same time they produce repair kits. Thus, in the AvtoVAZ repair manual, it is clearly stated that if the VAZ 1117-1119 steering rack fails, it must be replaced with a new one.
Also, car enthusiasts and car steering repair technicians recommend that after repairing the steering rack, after 1000-1500 km, tighten the threaded connections that could have become loose due to vibration.
Car experts recommend that maintenance of this unit should be carried out every 10,000 km. This includes a visual inspection for smudges, checking the condition of the boots, as well as tightening the connections.
Installing a 3.1 turn steering rack on a Lada Kalina (sport), cardan and amplifier.
I installed the rail a long time ago, but there was no time to write.
It all started with the fact that I took out a rack from a Kalina Sport, found the necessary lubricant, bought an intermediate steering shaft SS-20 and a disc spring.
new rack and intermediate shaft SS-20
Everything you need to prepare the rail for installation is written here
A front panel amplifier was also purchased from a technomaster. It is needed so that the rack “walks” less. The effect can be appreciated when turning at high speed.
There is nothing complicated in the replacement itself, the steering cardan is unscrewed from the interior, on one side it connects the rack and on the other the EUR. True, I had to struggle with it to tighten the last bolt, which is closer to the EUR, it’s very inconvenient to climb, I struggled for several hours) I didn’t take a photo, and nothing will be visible there.
Factory intermediate shaft
To replace the rack, first unscrew the cardan from the interior, then remove the steering rods with a puller:
press-out puller
Then we unscrew 4 nuts (2 on both sides), for convenience you need to remove the battery, remove the rack from the studs and take it out through the left (in the direction of travel) opening for the steering rods.
view from under the hood
view from the left steering rod opening
old and new slats on the fret viburnum. New – Lada Kalina Sport
The amplifier is installed very simply; the ears from the amplifier are placed in place of the standard rail mounting ears, then the pipe is screwed to them. It’s just better to do this under the hood, otherwise the rail may simply not fit through.
new rack with amplifier
Then we put everything together in reverse order; we definitely need to do a wheel alignment.
new rack with amplifier view from under the hood
new rack with amplifier view from under the hood
steering rod with old strut
steering rod with new strut. About the suspension on the Lada Kalina Sport here.
Immediately I decided to install rubber protection in the openings of the steering rods:
rubber protection of steering rods
rubber protection for steering rods Lada Kalina
Of course, the advantages are questionable, it is made of very poor quality rubber, as I heard it breaks quickly, it does not fit very well on the left and sticks out a little due to the steering rack. In general, I decided to put it on until it breaks, and then we’ll see.
About the sensations: Driving has become much more comfortable, now you don’t need to grab the steering wheel during a normal turn and turn it back and forth in the parking lot, even 3 turns sometimes seems like a lot and I don’t even want to remember 4) For a long time I couldn’t get used to the fact that I constantly have to turn the steering wheel , even changing quickly from lane to lane was problematic. The effect of the steering cardan and power rack is difficult to describe because I installed everything at once, but in general the steering changed very much for the better, a clear zero appeared, feedback from the road, the steering wheel of course became heavier, but this only made me more comfortable ! Now, for example, all new viburnums and grants are equipped with a 3.1-turn rack and a new EUR. So the steering wheel turns there very easily, but because of this, the information content of the control is lost. Having driven the Grant for a long time, I can say with confidence that my steering is much more informative! Although there were no amplifiers or cardans.
Short steering rack on a VAZ 2110 (installation, pros and cons)
| A pleasant interior, comfortable seating and informative steering, all together, determine the driver's comfort on the road. The latter is to some extent influenced by the steering mechanism (rack), which could vary depending on the configuration and year of production of the “tens”. Do you know what the advantages and disadvantages of a short steering rack are? |
Depending on the type, the steering rack 2110 can have 3.7 turns or 4.2 turns (we are not talking about racks with power steering, see “interchangeability of VAZ racks”). Owners of such steering mechanisms can easily install “short racks”, for example, from the Lada Kalina Sport, which has 3.1 turns. If you buy a short rack assembled with steering rods, then there will be no difficulties during the replacement process.
Installing a short steering rack on the “ten”
You will need: a key “13”, “19”, a mounting blade and a hammer. To remove the VAZ steering rack of the tenth family along with the steering rods, you should:
- In the passenger compartment, under the pedals, unscrew the bolt of the lower flange of the elastic coupling using a “13” wrench.
- Remove the front wheels. Remove the cotter pin, and then unscrew the nut securing the tip to the strut arm using a 19mm wrench. If there is no puller, do not unscrew the nut completely.
- Press the pin out of the lever using a puller. If it is not there, install the mounting blade in the spacer between the steering rod and the strut arm and press the pin out with hammer blows on the end of the strut arm.
- In the engine compartment, unscrew the nuts securing the steering rack brackets to the front of the body on the right and left sides, using a “13” wrench.
Move the rack forward until the splined end of the gear comes out of it. Pull out the steering rack along with the rods through the hole in the right wheel well. Installing a short steering rack is no different from installing the standard rack on a VAZ 2110. All actions are performed in the reverse order, with the rack in the middle position (in the position where the car is moving in a straight line) . That is, the marks on the boot and crankcase must match, and the flat on the gear shaft must be on the right. If the gear was turning, then move the rack to one side until it stops. Then move the rack to the other side one full turn of the mark on the boot and bring the mark to align with the mark on the mechanism housing. After completing all installation work, check and, if necessary, adjust the wheel alignment angles. An example of installing the Kalina Sport steering rack on a VAZ 2110:
Advantages and disadvantages of a short car rack
Drivers who replaced the standard steering racks with short ones (3.1 turns) noticed that the steering became more informative (clear, precise, accurate, sharp and obedient). Now there is no need to turn the steering wheel from side to side, like on a ship. You now have to grab the steering wheel less when maneuvering than before. All this makes driving fun. There is also a drawback - the force on the steering wheel increases, but with the EUR this is not noticeable. By the way, now is the time to install a sports steering wheel or a Kalina steering wheel. xn--2111-43da1a8c.xn--p1ai
Steering rack Lada Kalina
Steering rack lubrication without removal on site Lada Kalina
I did a little maintenance on the steering rack. Removing the entire steering rack from the car is a little problematic, and after installation you need to do the wheel alignment adjustment... I can’t do it on my own. I settled on lubricating it without removing the rack itself, I’ll just open the anthers and take a look
Is it true that everything is so sad with lubrication?
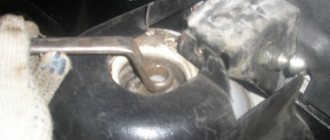
1. For convenience, remove the decorative casing from the engine cover. On the left (right) side, where the washer reservoir is located, we find the steering rack boot...
Use pliers to cut off the tie on which the boot is attached
2. The inside of the boot is clean
3. The rack rod is also clean
4. It’s dry inside and doesn’t smell like grease.
5. And now, after a little manipulation, it “smells” of lubricant) You need to stuff lubricants inside between the body and the rack rod.
You need to lubricate more carefully, don’t skimp on the lubricant
6. Photo of a factory used one. screeds. "Eight" logo
Steering rack casing fastener
7. And here is a comparison of the factory and used ties.
8. Put the boot in place. We fasten with ties. I had zip ties that were slightly smaller in size and width. Therefore, I attached the tie to the tie to increase the length.
9. Let's proceed to the boot from the other side. Turn the wheel (steering wheel) to the right. We jack up the car so that it is higher, and, from the wheel side, we carry out all the manipulations.
10. We look under the boot, there is no lubricant either.
11. Fill with lubricant. We turn the steering wheel from left to right and back... As if we were pumping the lubricant.
12. The boot is in place, zip ties will help it
I'll be removing the rail by summer.
Lubricating the rack on the right side will not have any special effect, because... in that place there is a plastic (or whatever else it’s made of) bushing; you can’t get grease through this bushing into the rack. If we're going to lubricate it, it'll be on the left side and in the middle, where it's not very easy to get to.
Steering rack from Kalina Sport. Lubrication and replacement of the disc spring
More than a month ago I purchased a steering rack from Kalina Sport with a speed of 3.1 instead of 4.02 for a regular rack.
The steering rack is supplied assembled, the photo shows the rack and markings:
By the way, now a short rail is installed on all new viburnums except the standard version.
Additionally, an SS-20 intermediate steering shaft was purchased, you can read about it here: autosystem.ru/index.php? >14:851
I plan to install the rack in the near future, probably combined with changing the tires to summer ones, but for now I decided to lubricate it and change the disc spring to a SS-20 spring (autosystem.ru/index.php? > 15:1678
When lubricating the steering rack at the factory, a special lubricant, RENOLIT JP 1619, is used. Finding one is problematic, but I managed) Usually it is replaced with FIOL, sometimes with Litol (I would not recommend it).
RENOLIT JP 1619
Here is a short description of this lubricant:
RENOLIT JP 1619 is a special grease based on lithium soap and synthetic base oil with an effective additive package to provide excellent anti-wear and extreme pressure properties and load-bearing capacity, as well as to improve boundary friction parameters. It also contains corrosion inhibitors and additives to improve aging resistance and maintain the desired consistency.
The use of carefully selected base oils gives RENOLIT JP 1619 excellent lubricity and good pumpability at low temperatures.
RENOLIT JP 1619 is recommended in cases where good lubricity and minimum starting torque at low temperatures are required. RENOLIT JP 1619 is used for lubrication of fan shafts, steering gears and high-speed spindle bearings, as well as loaded lubrication units of mining equipment, incl. through centralized systems.
Temperature range -50/+120 C
I didn’t disassemble the entire rack; I cut off the ties and lubricated what was visible; by the way, there wasn’t much grease in the rack; it was normal in the steering tips.
I also immediately changed the disc spring, the photo shows how this is done, you need a very high-quality hexagon 6:
Remove the top part and turn it over:
Then we pry it with a screwdriver and remove the top plate, under it there is that same disc spring:
For comparison, on the right is a regular one, on the left is ss-20:
We lubricate everything generously and assemble it in the reverse order:
We count the rack revolutions:
It all started with the fact that I took out a rack from a Kalina Sport, found the necessary lubricant, bought an intermediate steering shaft SS-20 and a disc spring.
new rack and intermediate shaft SS-20
Also, a front panel amplifier was purchased from a technomaster. It is needed so that the rack “walks” less. The effect can be appreciated when turning at high speed.
There is nothing complicated in the replacement itself, the steering cardan is unscrewed from the interior, on one side it connects the rack and on the other the EUR. True, I had to struggle with it to tighten the last bolt, which is closer to the EUR, it’s very inconvenient to climb, I struggled for several hours) I didn’t take a photo, and nothing will be visible there.
Factory intermediate shaft
To replace the rack, first unscrew the cardan from the interior, then remove the steering rods with a puller:
press-out puller
Then we unscrew 4 nuts (2 on both sides), for convenience you need to remove the battery, remove the rack from the studs and take it out through the left (in the direction of travel) opening for the steering rods.
view from under the hood
view from the left steering rod opening
old and new slats on the fret viburnum. New – Lada Kalina Sport
The amplifier is installed very simply; the ears from the amplifier are placed in place of the standard rail mounting ears, then the pipe is screwed to them. It’s just better to do this under the hood, otherwise the rail may simply not fit through.
new rack with amplifier
Then we put everything together in reverse order; we definitely need to do a wheel alignment.
new rack with amplifier view from under the hood
new rack with amplifier view from under the hood
steering rod with old strut
steering rod with new strut. About the suspension on the Lada Kalina Sport here.
Immediately I decided to install rubber protection in the openings of the steering rods:
rubber protection of steering rods
rubber protection for steering rods Lada Kalina
Of course, the advantages are questionable, it is made of very poor quality rubber, as I heard it breaks quickly, it does not fit very well on the left and sticks out a little due to the steering rack. In general, I decided to put it on until it breaks, and then we’ll see.
About the sensations: Driving has become much more comfortable, now you don’t need to grab the steering wheel during a normal turn and turn it back and forth in the parking lot, even 3 turns sometimes seems like a lot and I don’t even want to remember 4) For a long time I couldn’t get used to the fact that I constantly have to turn the steering wheel , even changing quickly from lane to lane was problematic. The effect of the steering cardan and power rack is difficult to describe because I installed everything at once, but in general the steering changed very much for the better, a clear zero appeared, feedback from the road, the steering wheel of course became heavier, but this only made me more comfortable ! Now, for example, all new viburnums and grants are equipped with a 3.1-turn rack and a new EUR. So the steering wheel turns there very easily, but because of this, the information content of the control is lost. Having driven the Grant for a long time, I can say with confidence that my steering is much more informative! Although there were no amplifiers or cardans.
But I still advise everyone who is due to change the steering rack, or you don’t have to wait for this deadline, as I did, to install a short rack of 3.1 turns, especially since now they are quite easy to find on sale. And the effect will be noticeable immediately!
Simpler, but even more expensive: what breaks in steering racks with electric power steering, and how they are repaired
Features of work
Before we start talking about the types of electric amplifiers and their characteristic problems, let's say a few words about the algorithm of their operation.
Immediately after starting the engine, a self-diagnosis of the system is performed to confirm its functionality. In the neutral position, the electric motor does not work: the entire system is waiting for active action. As soon as you start turning the steering wheel, the signal from the steering angle and torque sensor goes to the ECU, which in turn gives a command to the electric motor, which makes your life easier. Moreover, the nature of the operation of the electric booster will be different depending on the speed of the car: in this way, progressive operation of the electric power steering is achieved. After going through a turn and gradually removing force from the steering wheel, the system will return the wheels to the neutral position.
Articles / Practice Expensive and difficult: what breaks in steering racks with power steering, and how they are repaired A rack and pinion steering mechanism with an integrated power steering system, or, more simply, a rack with power steering, is something that the owner of any vehicle hopes to avoid repairing… 37333 0 5 01/25/2017
Surely, owners of front-wheel drive cars with a transverse engine have noticed how the car pulls a little to the side during an active start. This is due to the different lengths of the drive shafts on the right and left sides. So, models with electric power steering can also steer the wheels a little, thereby compensating for the slip. In general, the force on the steering wheel is completely under the control of the EUR - and therefore it is on its conscience that the “emptiness of the steering wheel” and the “artificial force” that is so often talked about and about which numerous journalists complain.
What are electric amplifiers?
These systems are divided primarily according to the location of the power unit (electric motor): on the steering column (almost under the steering wheel) or on the steering rack. In the first case, the steering mechanism will be the most common, for example, as in a V8 or Nissan Micra, and in the second, an electric motor or drive is integrated into the design. Today, in practice, we will look at a more interesting option with a rail-mounted amplifier.
On the steering mechanism itself, the electric motor can be installed in different ways - either separately, or as part of the body of this steering mechanism. There is also a distinction between the type of rack rod drive: an additional gear or a movable screw-nut connection.
1 / 3
2 / 3
3 / 3
In the latter case, the electric motor can transmit rotation through a belt drive, or the drive can be direct (as in Lexus GS racks).
To understand when and how much it is necessary to “help” the driver turn the steering wheel, the system uses data from several sensors - a torque sensor on the steering gear shaft, a steering wheel position sensor, a crankshaft speed sensor and wheel speed sensors. The only sensor that relates directly to the power steering system is the torque sensor.
More about the device
Now let's look at three different designs: rack-and-pinion steering, parallel-drive racks, and direct-drive racks. Each of them has its pros and cons – now we will outline which ones.
Racks with an additional gear incorporate an electric motor that rotates a gear through a worm gear, very similar to the one we rotate through the steering shaft. In this case, on the rack itself there are two notches of teeth. Everything about this design is not bad, but the friction losses are high: after all, it is a worm gear. With this design, the electric motor often has its own housing.
Parallel drive racks are the name given to a mechanism in which rotation from an electric motor is transmitted through a belt to a nut, or, more precisely, to a “screw-nut” pair.
The screw here is a rod with a thread on one side and a serration of teeth on the other.
Between the nut and the screw there are balls through which rotation is transmitted - they also act as a bearing. It works like this: when you start turning the steering wheel, an electric motor comes into action, rotating the nut in one direction or another, helping you turn the steering wheel.
Direct drive racks are a third option in which the steering rack housing is partly an electric motor housing, and the rack rod runs inside it. The rotation from the electric motor is transmitted through the already familiar “screw-nut” pair.
So, these are the main types of structures. Communication with the service technician allowed us to find out another important feature: there is a fundamental difference between Japanese and European slats. The Japanese “hide” the electric power steering control unit away from the steering mechanism itself - as a result, a long trail of wires stretches to the electric motor for control, communication and diagnostics. Europeans mount the control unit next to the electric motor or directly on it.
It’s hard to say which approach is correct. In the case of the “Japanese”, in order to remove the entire system, you need to pull out several meters of wiring and find the control unit itself - but in this case the unit is safe. With a European rail there will be no problems in terms of dismantling: disconnect two or three connectors, unscrew a couple of fastening bolts - and that’s it. However, the control unit in such a scheme is subject to various external influences.
Primary diagnosis
The initial diagnosis of a car arriving at the service area is based on data received from the car owner: for example, a constant knocking noise or only when turning, a biting steering wheel, uneven force on the steering wheel or its absence. Based on this, the rail is dismantled and connected to a special stand (ours is MSG MS561) and errors are read. Using the stand, they simulate the operation of the engine in various modes and study the operation of the steering mechanism in more detail. This is done to localize the fault and understand whether the problem lies in the hardware or in the electrics.
1 / 5
2 / 5
3 / 5
4 / 5
5 / 5
In order about the problems
First, let's talk about the mechanical part of the system. Everything here is the same as with other slats: almost any problem is associated with the rupture of the slats’ boots and the ingress of water and dirt into it. Water means inevitable corrosion, and dirt means excessive wear of rubbing surfaces.
Wear of the side bushing is perhaps the most harmless thing that can happen to the rack rod. Washing out the lubricant from the screw-nut pair can lead to the pair biting or even jamming of the steering mechanism in one position.
In parallel drive mechanisms, moisture entering the belt leads to a sharp increase in its wear and, ultimately, rupture. A sharply increased force on the steering wheel is what the driver feels in this case.
It is rare, but it happens that due to moisture, the bearing of the electric motor is corroded - then you will hear the frantic howling of the latter during operation.
Wear in the gearing of the pinion shaft and rack rod is also a potential cause of boot rupture. But here you can try to cure the disease by tightening the rod stop.
When inquiring from the mechanic about the effect of water on the electric motor, if the drive is direct, we learned that there cannot be any special problems with the motor itself - good insulation of the wires does its job.
Having dealt with the mechanics, we move on to the “source of power” - the electrical part. There are not many potential problems here, but almost all of them are associated with significant costs.
For example, if the electronic system control unit is installed on a rail, it is often not protected in any way, so a pebble flying from somewhere can break the unit cover. And even if you notice this right away (which is unlikely), the unit will still have to be sent for replacement. At the same time, when we say “block,” we mean the entire rail, because blocks are not supplied separately, and at the moment only modest attempts are being made to repair this element. But all attempts are broken against the impregnable wall of the lack of software for programming ECU processors.
Failure of the torque sensor is another unpleasant situation on the road. In this case, the EUR “does not understand” with what frequency and force to help you turn the steering wheel and in which direction.
The amplifier will not turn off completely, since it will “take” the data from the speed sensor and steering wheel angle, but the EUR malfunction indicator will start to light on the dashboard. Moreover, it may happen that you need to turn the steering wheel to the right, but the electric motor will “turn” it to the left.
The sensors themselves can be analog or digital, which is why they have corresponding problems. Analog ones “suffer” from wear: this manifests itself in different forces on the steering wheel or the movement of the mechanism from the central position.
Digital ones, however, also suffer from wear and tear, but not of the sensor itself, but of the cable, which can simply fray.
We treat the rail
Mechanical problems with the rack rod cannot be treated in any way. Corrosion, excessive wear of threads or teeth will send you to purchase a new rod - no grinding or any other treatment is provided here. If everything is in order with the rod, and the cause of the knocking is wear of the side bushing or an increased gap in the gearing, then the bushing can be replaced without problems, and the gap can be adjusted by tightening the rod stop (the same as in the case of hydraulic boosters). Actually, there are simply no other solutions to hardware problems.
Articles / Practice Steering wheels and listen: how to diagnose problems with the steering rack, and what they entail The steering mechanism in the hierarchy of importance, undoubtedly, is on the same level as the brakes - that’s why attention to its technical condition should be appropriate, and “listen” to the car... 22447 2 6 11/16/2016
But with electrics, as mentioned above, everywhere you look there are problems everywhere. If the errors being read are related to improper operation, then you can try to remove them - but if these are breakdowns... Then the solutions are simple, but expensive. Judge for yourself: the slightest crack in the block cover means, in most cases, replacing the entire steering rack. Corrosion of an electric motor bearing means two ways to solve the problem: replacing the electric motor with the control unit or, again, replacing the entire rack assembly. By the way, replacing the assembly is the verdict of any official dealer: the manufacturer usually simply does not provide the possibility of repairing and restoring the steering mechanism with an electric steering gear.
And if the drive is direct, and water gets inside, then what will happen to the electric motor? Fortunately, nothing: it will be washed with gasoline, dried and sent back to service. Regarding this element of the EUR, the master generally noted that he had never encountered problems associated with the failure of the system’s motor.
A broken torque sensor can be treated by replacing the sensor. The only consolation for a design with an analog sensor may be the possibility of a slight adjustment (±1°) of the EUR. But if the sensor socket is significantly broken, then the adjustment will no longer help.
One of the most common reasons for sensor failure is damage to the boot that is installed above it. It begins to rot due to constant moisture and eventually collapses, sending the sensor for replacement - if such a possibility exists. If it is not there, then... You probably already guessed it: replacing the rack assembly. But the most annoying thing that can happen is a banal breakdown of the connector on the rail, because in this case, nothing other than replacing the rail assembly will help.
If you are lucky and the rack was repaired
Upon completion of the work, the rack is assembled and installed on the car.
After installation, it is necessary to initialize or adapt the EUR. This action is extremely important, since it allows you to “teach” the rack to see all the sensors and extreme positions. If this is not done, then the electric motor will spin “until victory”, as a result of which at the end of the stroke the rod will hit the stop with considerable force. After adaptation, the system will sharply reduce the force 5 degrees before the extreme position, protecting the rod from impact.
By the way, there is another small plus associated with adaptation and the very principle of operation of the electric amplifier. If you remember, in systems with hydraulic booster, you cannot hold the steering wheel in the extreme position for a long time - this can lead to overload and damage to the pump. But with a properly adapted electric power steering, everything will be fine in any position.
In conclusion
Despite the apparent simplicity of the electric power steering system and the virtual absence of the need to maintain it, it is worth remembering that it is still one of the most important systems in the car. After all, the EUR helps control the direction of movement - in other words, it makes movement subject to your will. Using the readings of the wheel, engine, and steering wheel sensors, the EUR requires double attention - therefore, if the slightest oddity appears in its operation, do not wait for a “revolt of the machines,” but go for diagnostics.
Special thanks for the preparation of the material and consultations to the company Master Service (MSG), contact details +7 (800) 350-99-23 (Moscow), +380 (57) 738-33-08 (Kharkov).
Survey
Have you encountered problems with the EUR?
Your voice
Total votes:
Steering rack Lada Kalina
Steering rack lubrication without removal on site Lada Kalina
I did a little maintenance on the steering rack. Removing the entire steering rack from the car is a little problematic, and after installation you need to do the wheel alignment adjustment... I can’t do it on my own. I settled on lubricating it without removing the rack itself, I’ll just open the anthers and take a look
Is it true that everything is so sad with lubrication?
1. For convenience, remove the decorative casing from the engine cover. On the left (right) side, where the washer reservoir is located, we find the steering rack boot...
Use pliers to cut off the tie on which the boot is attached
2. The inside of the boot is clean
3. The rack rod is also clean
4. It’s dry inside and doesn’t smell like grease.
5. And now, after a little manipulation, it “smells” of lubricant) You need to stuff lubricants inside between the body and the rack rod.
You need to lubricate more carefully, don’t skimp on the lubricant
6. Photo of a factory used one. screeds. "Eight" logo
Steering rack casing fastener
7. And here is a comparison of the factory and used ties.
8. Put the boot in place. We fasten with ties. I had zip ties that were slightly smaller in size and width. Therefore, I attached the tie to the tie to increase the length.
9. Let's proceed to the boot from the other side. Turn the wheel (steering wheel) to the right. We jack up the car so that it is higher, and, from the wheel side, we carry out all the manipulations.
10. We look under the boot, there is no lubricant either.
11. Fill with lubricant. We turn the steering wheel from left to right and back... As if we were pumping the lubricant.
12. The boot is in place, zip ties will help it
I'll be removing the rail by summer.
Lubricating the rack on the right side will not have any special effect, because... in that place there is a plastic (or whatever else it’s made of) bushing; you can’t get grease through this bushing into the rack. If we're going to lubricate it, it'll be on the left side and in the middle, where it's not very easy to get to.