Brake booster
Almost all modern cars are equipped with vacuum brake boosters. They have a fairly simple design, but are very effective and quite reliable.
Purpose
The VUT serves to transmit and increase force from the pedal to the brake master cylinder (MBC). In other words, it simplifies the driver’s actions when braking. Without it, the driver would have to press the pedal with incredible force to force all the working cylinders of the system to function simultaneously.
VUT serves to increase the driver's effort when pressing the brake pedal
Device
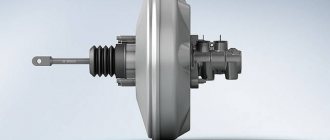
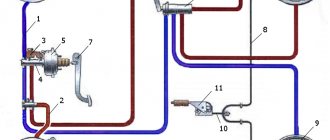
The VUT design consists of:
- housing, which is a sealed metal container;
- check valve;
- plastic diaphragm with rubber cuff and return spring;
- pusher;
- follower valve with rod and piston.
A diaphragm with a cuff is placed in the device body and divides it into two compartments: atmospheric and vacuum. The latter is connected through a one-way (non-return) valve to a source of air vacuum using a rubber hose. In the VAZ 2106, such a source is the intake manifold pipe. It is there that, during operation of the power plant, a vacuum is created, which is transmitted through a hose to the VUT.
The atmospheric compartment, depending on the position of the follow-up valve, can be connected both to the vacuum compartment and to the environment. The valve is moved by a pusher, which is connected to the brake pedal.
The operation of the amplifier is based on the pressure difference in the vacuum and atmospheric chambers
The diaphragm is connected to a rod, which is provided to push the master cylinder piston. When it moves forward, the rod presses on the GTZ piston, causing the fluid to be compressed and pumped to the working brake cylinders.
The spring is designed to return the diaphragm to its initial position upon completion of braking.
How it works
The functioning of the “vacuum tank” is ensured by the pressure difference in its chambers. When the car engine is turned off, it is equal to atmospheric pressure. When the power plant is running, the pressure in the chambers is also the same, but there is already a vacuum created there by the movement of the engine pistons.
When the driver presses the pedal, his force is transmitted to the follower valve through the pusher. Having shifted, it closes the channel that connects the compartments of the device. The subsequent stroke of the valve equalizes the pressure in the atmospheric compartment, due to the fact that the atmospheric channel opens. The pressure difference between the compartments causes the diaphragm to bend, compressing the return spring. In this case, the rod of the device presses on the GTZ piston.
Thanks to VUT, the force applied to the pedal increases by 3–5 times
The force created by the “vacuum driver” can exceed the driver’s force by 3–5 times. Moreover, it is always directly proportional to the applied.
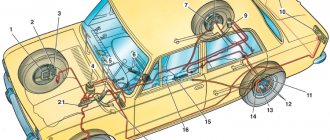
Location
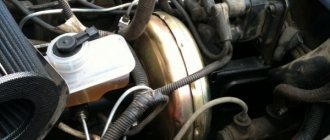
VUT VAZ 2106 is installed in the engine compartment of the car on the left side of the engine shield. It is secured with four studs on the plate of the brake and clutch pedal bracket. The GTZ is fixed on the body of the “vacuum generator”.
The vacuum booster is located in the engine compartment on the left side
Replacement and repair of the vacuum brake booster of VAZ and UAZ
The effectiveness of your car's brakes is important - if the brake system does not work effectively, an accident may occur. To ensure precise brakes, a booster is installed on all modern cars; it ensures that the vehicle stops instantly when you press the pedal.
Repair of the vacuum brake booster is necessary if the brakes become “wobbly” and you have to press the pedal with great force to brake.
Repair of vacuum brake booster VAZ 2106, 2107, 2108, 2109, 2110
The vacuum brake booster (abbreviated as VUT) of VAZ vehicles makes the driver’s work easier - it enhances the effect of pressing the pedal in the braking system (TS). This unit consists of the following main parts:
- valve;
- metal case;
- diaphragms;
- piston;
- rod;
- powerful return spring;
- a pusher that connects to the brake pedal;
- protective cover;
- flange for installing a check valve.
The body of the device is divided into two halves by a diaphragm, and the master brake cylinder is installed on the side where the vacuum is created. A vacuum (vacuum) is created by connecting this part of the housing to the intake manifold of the internal combustion engine, and when the engine is not running, the channel closes the check valve installed in the VUT flange. Air (vacuum) with the help of a rod and piston when pressing the brake enhances the braking effect, thereby making the driver’s work easier - there is no need to press the pedal with great force. After releasing the pedal, a powerful return spring allows the diaphragm inside the housing to return to its original position. When the engine is turned off, no vacuum is created in the system and the vacuum brake booster does not operate.
On VAZ-2106-07 and VAZ-2108-10 cars, brake boosters are installed that differ in appearance, but the principle of operation of the devices is the same. We check the serviceability of the VUT as follows: press the brake pedal and start the engine - if the pedal “falls” (lowers under the pressure of the foot), the VUT works.
The main problem with a vacuum booster is damage to the diaphragm. When the diaphragm is ruptured, air penetrates from the outer part of the housing into the vacuum cavity, and a vacuum is not created in the device. But the malfunction may not necessarily lie in the device itself - often the VUT does not work due to air leaks or for other reasons:
- the “vacuum” check valve is faulty;
- there is air leakage from the hose connecting the intake manifold to the brake booster;
- there is no compression in the internal combustion engine cylinder where the vacuum comes from.
Checking the vacuum brake booster - why such a concern?
The VUT body is divided into two parts by a diaphragm, through which the rod passes. This rod is connected directly to the pedal itself and the other end creates pressure on the piston of the brake cylinder. The most important thing in our movement is safety on the road, which is why instructions on how to check the vacuum brake booster in a car before a trip will be useful. And although its malfunctions will not lead to a breakdown of the entire system, the unexpected stubbornness of the brake pedal can frighten you while driving, and the result of the incident will depend on your reaction.
Checking the vacuum brake booster is an integral part of the vehicle inspection process. True, it makes no sense to climb under the bottom of the car every day; the operation of the VUT can be checked indirectly. We will tell you below what signs can tell you about the condition of the amplifier, and also offer repair options.
Replacing the vacuum brake booster
When removing the booster, the main cylinder of the hydraulic brake drive is not disconnected from the hydraulic system so that air does not get into it.
Removal procedure:
- Using pliers or a screwdriver, remove the locking bracket from the pin connecting the pusher to the brake pedal;
- After removing the pin, disconnect the brake pedal from the vacuum booster pusher;
- Unscrew the nuts securing the master cylinder to the amplifier, remove it from the studs and move it to the side;
- disconnect the hose from the amplifier, or remove the check valve with the hose from the vacuum amplifier housing;
- Unscrew the nuts securing the amplifier to the clutch and brake pedal bracket and remove the amplifier.
Install the vacuum booster in the reverse order. Before installing a new vacuum booster on a car, it is recommended to check with a caliper the amount of protrusion of the rod head relative to the plane on the body. Value A should be in the range of 1.05-1.25 mm.
If the amount of protrusion of the vacuum booster rod head does not correspond to the above, adjust it by rotating the rod head with a 7 mm wrench. We hold the rod from turning with pliers.
Source: https://vazik.ru/plugins/content/content.php?content.381
Common breakdowns of VUT VAZ 2106 and their symptoms
Since the vacuum brake booster has a simple mechanical design, it rarely breaks down. But when this happens, it is better not to delay repairs, since driving with a faulty braking system is unsafe.
Breakdowns
Most often, the “vacuum tank” becomes unusable due to:
- violation of the tightness of the hose connecting the inlet pipe of the manifold and the VUT;
- check valve passage;
- rupture of the diaphragm cuff;
- incorrect adjustment of the rod protrusion.
Signs of a faulty VUT
Symptoms that the amplifier is broken may include:
- dips or too tight brake pedal travel;
- self-braking of the car;
- hissing from the amplifier housing;
- reduction in engine speed when braking.
Dips or difficulty moving the brake pedal
With the engine off and the power steering off, the brake pedal should be pressed with great force, and after 5–7 presses it should stop in the upper position. This indicates that the VUT is completely sealed and all valves, as well as the diaphragm, are in working condition. When you start the engine and press the pedal, it should move down with little force. If, when the power unit is not working, it fails, but does not squeeze out when the power unit is running, the amplifier is leaky and, therefore, faulty.
Spontaneous braking of the car
When the VUT depressurizes, arbitrary braking of the machine may occur. The brake pedal is in the upper position and is pressed with great force. Similar symptoms also occur when the protrusion of the rod is incorrectly adjusted. It turns out that due to its greater length, it constantly puts pressure on the piston of the main brake cylinder, causing arbitrary braking.
Hiss
A hissing “vacuum seal” is evidence of a rupture of the diaphragm cuff or a malfunction of the check valve. If a crack forms in the rubber cuff or detaches from the plastic base, air from the atmospheric chamber leaks into the vacuum chamber. This causes the characteristic hissing sound. In this case, braking efficiency decreases sharply, and the pedal falls down.
If the cuff is damaged, the seal of the chambers is compromised
Hissing also occurs when cracks form in the hose connecting the amplifier to the intake pipe of the manifold, as well as when the check valve, which is functionally designed to maintain a vacuum in the vacuum chamber, fails.
Video: VUT hissing
Reducing engine speed
A malfunction of the vacuum booster, namely its depressurization, affects not only the efficiency of the brake system, but also the operation of the power plant. If there is air leakage in the system (through a hose, check valve or diaphragm), it will enter the intake manifold, leaning the fuel-air mixture. As a result, when you press the brake pedal, the engine may suddenly lose speed and even stall.
Video: why the engine stalls when braking
Checking the operation of the vacuum brake booster on a VAZ 2106 car
If the force on the brake pedal during braking has noticeably increased compared to normal, check the vacuum brake booster on a stationary VAZ 2106. 1. Press the brake pedal 5-6 times with the engine not running. Stop the brake pedal in the middle of its travel. 2. Start the car engine. If the vacuum booster is working properly, the brake pedal should spontaneously move forward another short distance.
3. If the brake pedal does not move forward, open the hood, inspect the flange a
, connection
b
hose with check valve...
4.... hose from the check valve to the engine inlet pipe...
5... connection of the hose to the engine inlet pipe.
NOTE Loosening of fasteners and damage to parts is not allowed. Tighten loose fasteners, replace damaged parts.
6. In case of spontaneous braking of the VAZ 2106 car, check the condition of the valve body shank seal (under the protective cap), to do this, bend the floor mat in the car interior and inspect the protective cap. Suction is not allowed.
7. Remove the cap from the housing cover and turn the cap inside out to facilitate subsequent installation. Start the car's engine. With the engine running at minimum crankshaft speed, rock the valve body shank with slight force in the transverse direction. The characteristic hiss of air passing inside the vacuum amplifier is not allowed.
8. Additionally, check the check valve of the vacuum booster; if it is faulty, the vacuum in the vacuum cavity of the booster does not remain under pressure when the engine load changes or when it stops. To check, hold valve 2 and disconnect vacuum hose 1 from it.
9. Remove the valve from the rubber flange seal a
vacuum booster.
10. Place a rubber bulb (for example, from a hydrometer) onto the valve fitting (short, larger diameter) and squeeze it. If the valve is working properly, the bulb will remain compressed. If the bulb straightens out, replace the valve and recheck the vacuum booster. 11. Install all the removed parts on the VAZ 2106 car in the reverse order of removal.
USEFUL ADVICE If a fault is detected in the vacuum booster, replace it with a new one, since repairing the vacuum booster is very labor-intensive and requires appropriate skills and the use of special installation and adjustment equipment.
- Author: admin
Rate this article: Share with friends!
Removing and installing a vacuum brake booster on a VAZ 2106 car
checking the operation of the vacuum booster check valve on VAZ 2108, VAZ 2109, VAZ 21099 cars
Vacuum brake booster VAZ 2106, replacement, how to check
The VAZ 2106 was one of the most popular rear-wheel drive representatives of the domestic automotive industry. He ended his life on the assembly line only in 2006. Over time, many changes were made to the design, including the brake system.
The VAZ 2106 became one of the first production vehicles to receive a vacuum brake booster (not immediately, but still). This node turned out to be a kind of long-liver - it existed without changes for many years. The design of the brake booster has certain differences compared to its front-wheel drive counterparts.
Application and purpose
The brake booster performs several important functions in the design of the braking system in ensuring vehicle control and driving safety:
- Correct vehicle control on any road surface. When braking, a multi-circuit brake system is activated, and the brake booster enhances the effect of the master cylinder by pumping air mass. When the booster operates optimally, the driver correctly calculates the force on the brake pedal (the pedal stroke is an order of magnitude easier than with no booster). This effect allows the driver to evenly distribute pedal effort and drive the car with greater safety;
- Braking efficiency when driving on any type of surface . The booster not only allows you to effectively control the braking force, but also significantly reduces the braking distance. Indicators with and without the amplifier vary significantly, and although tests have not been officially carried out on the VAZ 2106, in practice it is known that, as a general rule, the braking distance can be reduced by an average of 35-45% for this model using the amplifier.
Checking the vacuum brake booster of the VAZ 2106 Zhiguli
| EXECUTION ORDER |
| The vacuum brake booster is of a non-separable design, so if it fails, it is replaced as an assembly. The performance of the amplifier can be checked as follows: in a car with the engine turned off, press the brake pedal 4-5 times. Keeping the pedal pressed, we start the engine. If the booster is working properly, when the engine starts running, the pedal should “fall” slightly. The check valve, which is located at the tip of the vacuum hose, is designed to allow the car to be braked with sufficient efficiency when the engine suddenly stalls. You can check its condition by creating pressure in the hose using a suitable rubber bulb. A leaking valve must be replaced. |
Repairing auto parts yourself is a responsible task that should be taken as seriously as possible. Sometimes a faulty spare part takes the driver by surprise, forcing him to spend a lot of time and money searching for a good service station, but there is an alternative solution to the problem; this requires a small amount of knowledge and a set of tools.
When checking the vacuum brake booster of a VAZ 2106 Zhiguli, you need to be extremely careful and not neglect the little things. To get acquainted with the issue, car enthusiasts often use various Internet portals dedicated to auto parts. Some of them use narrowly focused forums.
But, as a rule, only generalized information is provided there, which is known initially. Where can you find a reliable source that offers really useful things? Our portal is open for this 24 hours a day. Online mode allows us to help clients at any time convenient for them.
Moreover, a mobile version has been developed that is available to everyone.
A detailed description of such a unit as checking the vacuum brake booster of the VAZ 2106 Zhiguli has a good structure with thematic headings. In addition, there is always the opportunity to familiarize yourself with the intricacies of installation.
There are often situations when a driver is confident in his abilities, but when he gets down to work, questions begin to arise. Thanks to our portal, such moments can be easily avoided. The site is a database that is updated regularly.
By using it as a support during repair work, the car enthusiast receives a serious advantage. Each of the articles has reliable support, tested in practice.
In addition to the repair manual, the owner of a personal car will be able to prevent a lot of breakdowns that occur due to the human factor, thanks to the information located on the site. Users are presented with a lot of useful recommendations for proper operation, which will help significantly extend the life of the unit and avoid many negative consequences.
Online support is an excellent and most convenient way to obtain the necessary information. Another significant plus is that articles are written for people. We understand that the reader will do everything with his own hands, and we try to make it as convenient and efficient as possible. Use the resource at any time of the day and find the answer to any question you may have regarding cars.
Source: https://avtorom.ru/vaz-2106-proverka-vakuumnogo-usilitelya-tormozov/
Its repair and replacement
In the event of a failure of the VUT, it is necessary to immediately take measures to restore its functionality.
You can replace the vacuum hose yourself. It is also possible to replace the vacuum pump in cars with diesel engines.
More complex repair work related to restoring the tightness of VUT chambers, the serviceability of the diaphragm, valves, and other structural elements is best entrusted to professionals at a certified service station. It should be remembered that serviceable brakes are the basis of safety; you should not skimp on this.
After repair, it is necessary to check the synchronization of wheel braking and diagnose the ABS and ESP systems. This should be done on special stands and appropriate diagnostic equipment.
In most cases, repairing a vacuum booster can cost much more than buying it or replacing a VUT with a used one in good condition. There is a reason to look for an amplifier at a disassembly site. Moreover, they are unified: one model can be used on different brands of cars.
Video - replacing VUT on a GAZelle car:
May be of interest:
Choose a DVR: an indispensable gadget for the driver
Scanner for self-diagnosis of a car
Select any auto chemicals for your car
Some drivers prefer a DVR in the form of a mirror
Product added to bookmarks!
- Description
- Reviews
The universal reinforced silicone hose “SAMCO SPORT” has a length of 1 meter and an internal diameter of 12 mm.
The hose is 3-layer, wall thickness 4.5 mm.
Not suitable for fuel and oil systems!
Designed for cooling and heating systems, holds antifreeze and antifreeze perfectly.
Can be used for car vacuum system.
Installed on all VAZ models. Mainly used in place of the brake booster hose.
The SAMCO SPORT silicone hose has a number of advantages:
- resistant to wear and prevents the appearance of microcracks;
— tensile strength and other impacts are many times higher compared to a rubber hose;
— retains elasticity at low temperatures and can be used at high temperatures.
Reinforced silicone hose “SAMCO SPORT”
specially designed for sports cars.
Quality and reliability of the SAMCO SPORT
allow them to withstand higher loads in temperature and pressure compared to a rubber hose. Such indicators are necessary for forced engines.
When using the SAMCO SPORT
you will radically change the appearance of the engine compartment of your car.
"SAMCO SPORT"
guarantees the best quality silicone pipes and high performance.
What kind of brake booster can be installed on a VAZ 2106
The brakes of the “six” are less informative compared to more modern VAZ models. For confident braking, you have to apply force to the brake pedal even with a working vacuum booster. Therefore, many owners of classic Zhiguli cars install products from VAZ 21214, VAZ 2110 and even VAZ 2108 on their cars instead of the standard VUT.
Equipping the car with such a device makes the pedal softer and braking more effective. To install the mechanism on the VAZ 2106, some modifications will be required. They usually come down to the manufacture of a metal bracket, which is attached with one side to the engine shield and the other to the vacuum chamber.
If problems arise with the brake booster, repairing or replacing it may seem like a difficult procedure. In fact, the design of the mechanism is simple, as are repair work with it. After preparing a minimum list of tools and familiarizing yourself with the step-by-step instructions, restoring the operation of the unit will not be difficult.
Replacing the vacuum brake booster on a VAZ 2106
Replacing VUT on a VAZ 2106
Hi all! We, as always and without unnecessary “water”, will tell you how to easily, quickly and, most importantly, correctly replace the vacuum brake booster on your six!
If the vacuum brake booster (VUT) malfunctions (the pedal began to be pressed tightly, much like on a VAZ 2101, the VUT began to leak air, the engine began to shake...), it needs to be replaced, because As a rule, it cannot be repaired.
We will need a set of keys (8, 13). It is more convenient to unscrew the fastening bolts from the interior using a spanner.
It is also advisable to bleed the brakes after replacement. Read how to do this here .
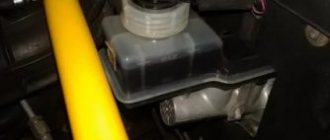
To begin with, use a bulb or syringe to pump out the brake fluid from the expansion tank, or simply drain it.
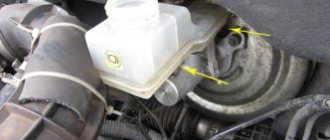
Then we disconnect the brake pipes and hoses from the master cylinder (GTC)
We remove everything that may interfere with removal. The GTZ is attached to the VUT with two bolts. Unscrew and remove the GTZ.
To avoid airing the system, carefully bend the rigid tubes. Brake fluid will not flow out of them (unless you press the brake).
We inspect it, if there is a brake fluid leak in the VUT, then the GTZ must be replaced, otherwise the brake fluid will corrode the membrane of the new VUT and it can be thrown out.
We tear off the sound insulation from under the pedals to get to the VUT mount
There we see 4 bolts. It is most convenient to unscrew them with a cap ratchet.
We also unscrew the fastening to the brake pedal.
The installation process is in reverse order.
Don't forget to screw the VUT back to the brake pedal.
Advice: After installing the VUT and GTZ, loosely thread all brake hoses into place
- and start pouring brake fluid into the barrel until it flows out from under the connections.
- That's all.
- Have an easy repair and good luck on the roads!
Source: https://tuning-avtovaz.ru/zamena-vakuumnogo-usilitelya-tormozov-na-vaz-2106/
Bleeding the system
After carrying out any work related to the replacement or repair of brake system parts, the brakes should be bled. This will remove air from the line and equalize the pressure.
Tools and tools:
- jack and wheel wrench;
- key to "8";
- rubber or silicone hose with a diameter of 6 mm;
- a small, clean, dry container (preferably transparent);
- brake fluid (to top up).
In addition to all this, you will definitely need an assistant to bleed the system.
Work order:
- Place the car on a horizontally flat surface. Loosen the nuts securing the front right wheel.
- Raise the car body with a jack. Unscrew the nuts completely and remove the wheel.
- Remove the cap from the fitting of the working brake cylinder.
The bleeder fitting is closed with a cap. - We put one end of the hose on the fitting. We insert the second end into the container.
- We give the command to the assistant to sit in the passenger compartment and depress the brake pedal 4–6 times, and then hold it in the depressed position.
- When the pedal is depressed after a series of pressures, use a key set to “8” (in some modifications to “10”) and unscrew the fitting three-quarters of a turn. At this time, liquid will flow from the fitting into the hose and further into the container, and the brake pedal will lower. After the pedal hits the floor, you need to tighten the fitting and ask an assistant to release the pedal.
Pumping must be continued until liquid flows from the hose without air. - We pump until brake fluid without air begins to flow from the system. Then you can tighten the fitting, put the cap on it and install the wheel in place.
- By analogy, we bleed the brakes for the front left wheel.
- We pump the rear brakes according to the same scheme: first the right one, then the left one.
- Upon completion of pumping, add brake fluid to the level in the reservoir and check the brakes on a section of the road with low traffic.
Video: bleeding the brakes
At first glance, the process of replacing or repairing a vacuum brake booster may seem somewhat complicated. In fact, you just have to understand everything in detail, and you won’t need the services of specialists.
How to replace the vacuum brake booster on a VAZ 2108-VAZ 21099?
Note! If suddenly your vacuum brake booster fails, then proceed to replace it and buy a new one; we categorically do not recommend repairing your original one, because it is unlikely that anything good will come of it, especially since you will have to buy an additional repair kit anyway, but This is also wasted money and it is not yet known whether you will be able to correctly replace all the worn parts in it or not, then you will have to assemble the vacuum unit in such a way that the air does not bleed out of it and it works perfectly!
( 1 rating, average 5 out of 5 )