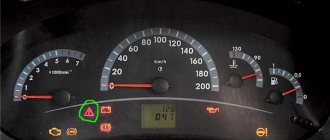
The dashboards of classic domestic cars are not highly informative. There is nothing superfluous on them, except for indicators of the operation of the main engine systems, but they are quite enough so that the driver is informed in time about possible malfunctions of the car. However, it happens that some device fails, and then it becomes impossible to determine the failure at its initial stage.
In this article we will talk about the case when the battery charging light is constantly on, using the example of the popular classic cars VAZ 2106 and 2107. We will look at the main reasons for this phenomenon, and also try to diagnose and eliminate possible faults.
Why do you need a battery charging warning light?
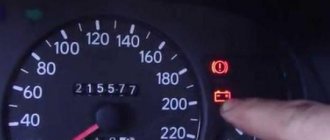
In order for the driver to monitor the charging status of the battery, there is a voltmeter with a scale on the instrument panel, as well as a small red window under which a warning light is installed. When we insert the ignition key and turn it in the lock one turn, this lamp turns on and lights up red. The voltmeter needle is in the zero position. This means that the generator is at rest and does not charge the battery. When the engine starts, the lamp should go out and the instrument needle should move to the right, indicating the amount of voltage supplied to the battery. This happens when the machine’s power supply system is fully operational. But if the VAZ 2107 or 2106 battery charging light is on even after the engine is started, most likely there is a failure somewhere. And our task is to find its cause and eliminate it.
The battery does not hold a charge
If the voltage at the terminals is less than 12.5 Volts, remove the battery for charging. After charging the battery to 12.7 V, leave it unused for 12-24 hours. Then check the voltage at the terminals or the density of the electrolyte. A working battery will not be discharged during such a period. The cause of the discharge could lie in overloading of power supplies by consumers, frequent short trips, or frost. There is a possibility that the generator is malfunctioning.
Find out the charging time of your battery
Buying a new battery before you are sure that the old one is unsuitable is irrational. But if you have a spare one and the ability to use a battery from another car, you can install it in place of yours while it is charging, and try to start the car and drive it for several kilometers.
If the light on the VAZ panel no longer lights up, the problem was a discharged battery. We are waiting for ours to charge. If it does not hold a charge, we buy a new one or, if we have the time, desire, and abilities, we restore the old one.
Attention! When experimenting with a battery from another car, make sure that it has a comparable capacity to yours. When installing a battery with a smaller capacity, you risk boiling it. If the capacity, on the contrary, is significantly greater (the difference is over 10-15Ah), the battery must be fully charged, since your generator will not be able to recharge it to the required level. Do not leave the ignition on without the engine running!
What can a constantly burning battery charging lamp indicate?
If the battery charging light is on in a VAZ 2107 or VAZ 2106, there can be only one reason - the battery is not receiving voltage from the generator, or is receiving it, but its value is insufficient. There may be several malfunctions that lead to this:
- violation of normal contact at the battery terminals;
- loose tension or damage to the alternator belt;
- lack of contact of its “negative” terminal with “ground”;
- break in the rotor excitation circuit or wear of the generator brushes;
- diode bridge malfunction.
- defective fuse;
- failure of the relay regulator.
Where to look for a problem and how to fix it
As we have already found out, a burning battery charging light on the battery charge indicator indicates that the generator has broken down and is no longer charging the battery. However, there is a situation when the charging light on a VAZ 2106 car is on and does not go out, but the battery is still charging. The reason for this is also the incorrect operation of the generator or a breakdown in its connection circuit.
Most often, this situation occurs due to the fact that the voltage to the generator is less than normal. So, the nominal battery voltage is 12 V, and charging requires a voltage from 13.5 to 14.4 V.
Broken contacts on battery terminals
If the battery terminals are oxidized, their resistance increases, so the charging current decreases. Often in this case the indicator light lights up dimly.
Cleaning the battery is carried out in the following order:
- disconnect the wires from the battery. First, unscrew the black wires going to the negative contact. Then you can disconnect the cables from the positive terminal, they are red;
- wipe the battery with a damp cloth;
- to prepare the cleaning liquid, dissolve 30 grams of soda in 500 ml of water;
- dip an old toothbrush into the prepared solution and clean around the terminals with it, especially carefully in places where oxides form;
- remove the cleaning liquid from the terminals and wipe all treated areas with a dry cloth;
- screw the cables into place.
Alternator belt tension is loose
During prolonged operation, the belt may stretch, its tension will weaken and it will begin to “slip.” In this case, it needs to be tightened or replaced. To tighten the belt you need:
- using a 17mm wrench, loosen the nut securing the position of the generator to the bracket;
- Using a 19mm wrench, loosen the generator rod nut;
- tighten the belt. If you can't do it manually, you can use a mount;
- tighten the nut securing the generator to the adjusting bracket;
After everything is done, you need to check the belt tension. To do this, press the belt branch with a large screwdriver. The deflection between the engine crankshaft and the pump should be in the range from 12 to 17 millimeters, and between the electric generator and the pump - from 10 to 17 millimeters. If the belt tension is too high, bearing wear will increase and the belt may break.
Video “How to replace an alternator belt”:
Frequently occurring faults
Poor contact of the generator output with ground
To diagnose this malfunction, you need to check all contacts connecting the generator housing to ground. The breakdown can be repaired in the same way as in the case described above with oxidation of the battery terminals.
The indicator lamp relay has failed
The reason why the indicator lamp may light up may be a broken relay. In this case, the voltage at the battery terminals required for charging will be present when the engine is running, but the light will still be on. In this case, you need to remove the relay, disassemble it and clean the contacts. If cleaning does not help, replace the relay.
Before starting diagnostics
An important point in deciding why the VAZ 2107 or 2106 battery charging light is on is the very fact that voltage is supplied to the battery from the generator. In other words, if it does not reach the battery at all, there is nothing to be surprised about. The lamp must light in such a situation. But if the battery charging light is on, but there is charging, it will be a little more difficult to solve this problem.
Our first priority is to determine whether voltage is supplied to the battery. This is not at all difficult to do, especially since this requires only one device - a voltmeter or multimeter turned on in its mode. We start the car engine, raise the hood and measure the voltage at the battery terminals with the generator running. If all elements of the system are working properly, the voltmeter should produce 13.6-14.2 V, and no less. This is a working indicator for normal battery charging. If the voltage is below these values, then there is some kind of malfunction.
Reasons why the battery charging light is on
In fact, there are many reasons why the battery light comes on and does not go out. These include:
- Loosening of the belt tension on the generator, its wear or damage; fuse blown or deterioration of contact quality in the connectors of the mounting block;
- breakdown of the relay regulator, diode bridge, additional diodes;
- the appearance of a break in the generator excitation circuit;
- decreased quality of contact at the battery terminals or generator output;
- generator brush wear;
- lack of high-quality contact of the ground wire.
What to do if the battery charging light is on?
First of all, get out of the car and, with the engine running, measure the voltage at the battery terminals (do not remove the clamps under any circumstances).
If charging is in progress, the voltage should be at 13.6-14.2 Volts. In the absence of charge, the voltage level will be much lower - about 12 Volts.
To fix the problem, prepare the following tools:
- twelve volt indicator light,
- two screwdrivers (flat and Phillips),
- multimeter,
- pliers,
- knife,
- Use sandpaper to clean contacts.
So let's get started:
- The readings of the on-board voltmeter indicate the presence of a charge, the charge signal lamp on the dashboard does not light up, there are about 12 volts at the battery terminals, and the battery itself is almost discharged.
In such a situation, clean the wire connections on the power source itself. If these measures are useless, measure the voltage level at terminal “30” of the generator itself.
Place one multimeter probe on this terminal, and the other on ground. If the voltage here is much higher than at the battery, then strip the thirtieth terminal. If necessary, replace the wire from the generator to the battery.
- The voltmeter on the dashboard and the lamp show the presence of a charge, but the battery is discharged.
The voltage on the battery is normal (about 14 Volts). Turning on a load (for example, headlights) causes the charge arrow to shift to the extreme left position.
The main reason is weak belt tension on the generator pulley (tighten the belt, and if it is damaged, replace it).
This problem can also be caused by a breakdown of one of the diodes, as well as a break in the stator phase winding. Turn off the ignition and check the diodes with a multimeter. In case of breakdown, replace them.
Check the generator brushes. To do this, take them out and measure the length. If it is less than five millimeters, then it is better to replace the brushes.
- When you turn the key in the ignition, the charge warning lamp does not light up, the charge sensor does not work, and there is no charge on the battery. The reason is a blown fuse.
Its designation is F10, rating is 10 Amperes. If installing a new fuse does not produce results, then the reason must be sought in the ignition relay or the lock itself.
- After turning on the ignition, there is no charge, all devices work, the warning light does not light up.
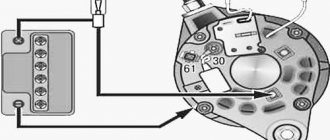
The check is simple - remove the wiring from terminal “sixty-one” of the generator and connect it directly to the “minus” (car body). If the light comes on, then the cause of the problem is the generator field winding.
The second option is bad contact in the connector. If after cleaning there is no result, then there is a risk of the lamp itself burning out.
- When you turn the key in the ignition, the charge lamp lights up, and after starting it continues to light up. In this case, there is no charging or appears periodically. The reason is insufficient contact of the wire at the connector with the dashboard (it may oxidize).
Finally, check the relay regulator. To do this, apply voltage from the battery to its contacts. If there is 12 volts on the brushes, then the relay is working properly. If not, the device must be replaced.
If you have problems charging the battery (the warning light does not go out or does not light up at all), then check all versions.
But, as a rule, the problem is always on the surface, and the cause is poor contact, a burnt out light bulb or a faulty relay regulator. Good luck on the roads and of course no breakdowns.
Didn't find the information you are looking for? on our forum.
Lost contact at battery terminals
At this diagnostic stage, you need to check the condition of the wire terminals and battery contact terminals. Often they oxidize, as a result of which the contact between them weakens. In the case when the battery light is on, but there is charging, this malfunction is most often the cause.
The generator operates normally, voltage is supplied to the terminals, but is lost due to poor contact. So it turns out that charging is in progress, but the battery charging light is on. Moreover, in most cases it burns with a dim light. This type of malfunction can be eliminated by cleaning the terminals and contact terminals of the battery, as well as treating them with a water-repellent liquid.
Loose or damaged alternator belt
During diagnostics, it is imperative to check the condition of the alternator belt. Sometimes it happens that due to its long-term operation or under the influence of other factors, it becomes deformed, as a result of which the generator drive misfires. Pay attention to the belt tension. Its weakening leads to the same effect.
If the belt is not deformed and has no visible damage, it can simply be tightened. Otherwise, it must be replaced. The normal belt tension is such that it can be rotated around the horizontal axis by 85-90 degrees.
Generator faults
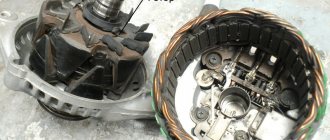
If the battery charging light is on, but there is charging (VAZ 2106, 2107), the generator must be checked. The most common problems in terms of our malfunction are a break in the rotor excitation circuit or wear (damage) of the brushes.
First of all, the generator must be dismantled and disassembled. To check the rotor winding, we use the same multimeter turned on in ohmmeter mode. We connect its probes to the terminals of the winding and measure its resistance. For a working rotor it should not be less than 4.5 ohms. If the resistance does not reach this value, most likely an interturn short circuit has occurred somewhere. If it is not detected at all, the winding may break.
Let's move on to the brushes. We take them out of their seats and inspect them for wear. If the length of the brushes does not exceed 7 millimeters or they show signs of damage, we change them. Pay attention also to the condition of the brush commutator. If defects are detected in its copper plates, we change the rotor.
A little theory: scheme of work
To solve the existing problem, you must understand the essence of the interaction between the vehicle generator and the power source (battery).
While driving, the battery is in constant charging mode with a voltage of 13.6-14.2 Volts. As engine speed increases, the voltage at the generator output increases. But this is unacceptable.
To limit the voltage, a small relay regulator is inserted into the rotor excitation circuit. Its task is to reduce the current to a normal level (even with a significant increase in the speed).
- The battery is lit on the dashboard of the Priora
The result is maintaining the battery charge voltage at a stable level. If the battery light is on, this indicates a lack of charging from the generator.
How does the scheme work? After turning on the ignition, voltage through fuse No. 10 (for VAZ-2107) is supplied to the battery charge indicator lamp.
Next, the “+12V” voltage passes through the diode, the built-in relay-regulator (we mentioned it above), the brush, the slip ring and the winding.
As soon as the rotor speed increases, the phase voltage also increases. As a result, the voltage at the terminals of the battery warning light is equalized and it goes out. At the same time, the battery is charging.
Diode bridge
The diode bridge is used to convert alternating voltage to direct voltage. If at least one of the diodes breaks down, the device stops coping with its tasks, which is why a voltage that does not correspond to its parameters begins to flow into the on-board circuit of the machine. That is why the rectifying bridge must be checked in the case when the battery charging light is on, but there is charging (VAZ 2107, 2106).
You can also determine the health of the diodes using a multimeter in the appropriate mode. Turn on the tester and connect the red probe to the positive terminal of the bridge, and the black probe to one of the contacts marked “AC”. The threshold (pass) voltage for silicon diodes ranges from 400 to 1000 mV. If the device shows you a value that does not fit within the specified range, the bridge must be replaced. It is impossible to repair it.
Let's look at different situations in which the battery light comes on.
- Situation one - the on-board voltmeter shows the charge, the battery light does not light up, the multimeter shows 12V at the battery terminals, while the battery itself is completely discharged.
Treatment: We strip the high voltage terminals and wires, after which we measure the voltage again. If this does not lead to anything, check the voltage at the “30” terminal of the generator. Connect one electrode of the multimeter to the generator terminal, the second to ground. If in this case the voltage is slightly higher than on the battery, “stripping” the “30” terminal. If necessary, change the wire that goes from the generator to the battery.
- Situation two - the light and the light indicate charging, but the battery is discharged. The voltage on the battery is normal (
14V), but when there is a load (signal, headlights, etc.), the charging arrow jerks to the extreme left position. The reason is poor tension of the generator belt, or a problem with the pulley or bearing itself.
- In addition, the cause of the above situation may be a breakdown of one of the diodes or a break in the stator winding. Do the following - turn off the ignition, then check the diodes with a multimeter; if a breakdown is detected, replace them.
- It would be a good idea to check the generator brushes. To do this, simply remove the brushes and check their length, if the length is less than five mm. I recommend replacing the generator brushes.
- Situation three - after turning the key in the ignition, the battery lamp does not light up, while the charge sensor does not work, and the battery does not charge. The most likely cause is a blown fuse. It is designated “F10”, its rating is 10 Amp. If after replacing a new fuse you do not see any result, the reason may lie in the lock itself or the ignition relay.
- Situation four - after turning the key there is no charging, but all devices are functioning, the battery light does not light up.
Treatment: Remove the wiring from terminal “61” of the generator, and then connect it directly to the negative (that is, to the body). If after this the lamp lights up, the reason is in the excitation winding of the generator.
- The reason may also be poor contact in the connector. It is necessary to clean everything properly and check the result; if it is not there, it is very possible that the lamp has burned out. If the problem is not in the light bulb (it burns dimly or intermittently), then other indicators will also light dimly or intermittently; if this only happens with the battery indicator, then perhaps the reason is in the light bulb itself.
- Situation five - after turning on the ignition, the battery light comes on, and after starting the engine it does not go out, while charging is either intermittent or does not exist at all. The reason for this behavior may be poor contact of the wire with the connector on the dashboard.
Fuse failure
The electrical charging circuit of the battery, like any other, is protected by a fuse. It is located in the mounting block under the hood of the car. In “sixes” and “sevens” this fuse is usually designated as F10, but, in any case, it is better to look through the user manual before checking. Most often, when it malfunctions, no voltage is supplied to the battery at all, but it also happens that it is the reason why the battery charging light is on, but there is charging.
The fuse is checked with a tester after it is removed from the socket. If the device shows that the part has become unusable, simply replace it.
Malfunction of the relay regulator
Another reason that the battery charging light is on, but there is charging, may be a failure of the relay regulator. It, in fact, is responsible for the timely switching on and off of this lamp. In VAZ 2106, 2107 cars, the relay is installed in the engine compartment on the upper part of the wheel mudguard on the right side. The principle of its operation is as follows. When the ignition is turned on (with the engine off), current from the battery flows through its closed contacts and powers the warning lamp.
When we start the engine, the generator turns on, supplying the relay with already rectified voltage. Under its influence, the armature of the device is attracted to the core, opening the contacts. The lamp should go out.
It is not difficult to check the relay yourself. To do this, just disconnect both wires from it and short them together. We start the engine and look at the warning light. If it does not light, we replace the relay.
Some useful tips
To avoid problems associated with a faulty battery charging circuit, use the following tips.
- Pay more attention to your car's dashboard. This way you will know not only about the charging status of the battery, but also about the operation of other systems and mechanisms.
- Check the alternator belt regularly. The correct operation of the entire on-board network when the engine is running depends on its condition and tension. If you find the slightest defect in the belt, do not delay replacing it.
- Don’t be lazy at least once a month to check the voltage supplied by the generator to the battery terminals. If any discrepancies with the recommended values are detected, perform a full diagnostic of the on-board network.
- Periodically conduct a visual inspection of the condition of the battery terminals and generator terminals. Having discovered their oxidation, clean them with fine sandpaper and treat them with a liquid like VD-40.
- Do not allow water to get on the generator, battery and relay regulator. It can cause a short circuit in the electrical circuit. It is better to entrust engine washing to specialists.
- When repairing the battery charging circuit, avoid using spare parts that raise doubts about their quality.
