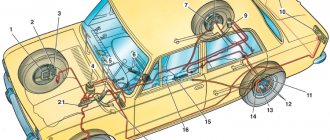
Depending on the type and type, ABS is classified into:
- One scheme of operation of the ABS system is when all the devices that make up the ABS are located in one unit. That is, the hydraulic valve block, hydraulic accumulator and pump are located in one unit.
- The second ABS scheme is when the component devices (hydraulic valve block, hydraulic accumulator and pump) are located in different places. In this type of braking system, in addition to the ABS module, there is also an ESP module and an SBC module.
Whether you can bleed the brake system yourself depends on what type of brake system is in your car.
If the car has a system of the first type, then it is easy to properly pump the ABS.
If the car has a system of the second type, then one cannot cope without a scanner; it needs to be pumped to a service center for maintenance.
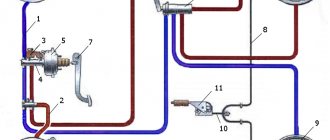
The ABS system consists of:
- Sensors (installed on the hubs). When replacing rear wheel hubs, as well as some front ones, you may notice special recesses for sensors. They are engaged in transmitting data about the speed of movement.
- Control valves (installed in the brake system). Serve to change the pressure in the system.
- The electronic unit. Receives speed information from sensors and adjusts control valves.
Brake fluid for Lada Priora: selection, replacement - AutoExpert
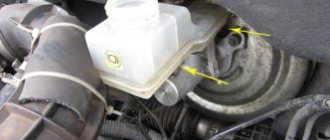
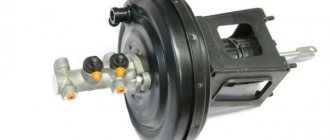
On the engine front shield there is a reservoir into which the brake fluid is poured, it is very easy to find it in any front-wheel drive car, and on a classic it is essentially located in the same place, for clarity, what this reservoir looks like and what sticker is attached to it, you You can see the photo below, but only there is the tank of a VAZ 2109, on Priors it has a slightly different shape, but the sticker on it is exactly the same. In this episode of Technical Environment, its host Gennady Emelkin will talk about how to independently replace...
Take precautions when working with brake fluid: it is toxic. If brake fluid comes into contact with wires, plastic or painted body parts, they may be damaged. Therefore, when pouring, always use clean rags. If liquid gets on parts, wipe them immediately with a clean cloth. Replacing brake fluid on Grant.
The next stage is pumping out the brake fluid already in the system.
To do this, remove the rubber cap from the right rear fitting of the valve, having previously cleaned the latter from dust, dirt and carbon deposits, and instead of the cap we put on a transparent tube, which we lower into a container for working out.
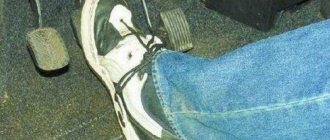
Here you will need outside help, since it will not be possible to pump the brake pedal and work under the car at the same time. Replacing brake fluid and bleeding the brakes of a VAZ 2108 2110 2114 Priora in the cold with your own hands, dismantling, washing...
Ask your partner to press the brake pedal several times, and then, pressing it all the way, hold it in this state until the desired moment. At this time, another person is under the car and, using an eight key, unscrews the air release valve.
But you don’t need to unscrew it completely, just make a few turns until the used brake fluid flows out of the container. As soon as this happens, the brake pedal will fail.
The car owner should quickly tighten the valve as soon as all the old fluid is gone.
At the same time, you should inspect the entire system responsible for the brakes, since if the brake fluid leaks, this may indicate problems or the need to replace the master cylinder gasket. Brake fluid tester Proven Auto Parts (swelling, foreign car) CAR Mysteries…
In order for the brake system in a Lada Priora to function correctly, it must contain the working fluid at the proper level. What volume is required for the correct functioning of the brake system can be found in the service book attached to the machine. Replacing brake fluid on a LANCER X in 20 minutes - by two amateurs. THE BEST CHOICE was to replace the brake...
Periodically check the level of brake fluid in the reservoir and add it if necessary, otherwise air will enter the brake system. Guys, try not to add brake fluid to the brake fluid reservoir. Keep it at minimum...
Brake fluid for Lada Kalina
A car manufacturing plant always recommends the use of fuels and lubricants of certain brands. As for gasoline, Kalina-2 owners are advised to refuel their cars with the following brand of fuel: “Premium Euro-95” (GOST R-51866).
In fact, any gasoline with an octane rating of 95 will do, but the instructions state that the fuel must not contain metal additives (lead, iron, manganese). Such additives are the basis of anti-knock mixtures.
All motor oils recommended for use
Engine oil is usually replaced along with a paper filter. This consumes 2900 ml of fluid (for versions with automatic transmission – 4100 ml). The intervals between replacements are indicated in the service book. Recommended materials for use:
BrandViscosity SAEQuality
| Lukoil LUX | 15W40 | SL/CF (B5/D3) |
| Lukoil LUX semi-synthetics | 5W30, 5W40, 10W40 | SL/CF (B5/D3) |
| Lukoil LUX synthetic | 5W30, 5W40 | SN/CF (B6/D3) |
| Rosneft MAXIMUM (Angarsk, Novokuibyshevsk) | 5W40, 10W40 | SL/CF (B5/D3) |
| Rosneft PREMIUM (Angarsk) | 5W40 | SM/CF (B6/D3) |
| TNK MAGNUM SUPER | 5W30, 5W40, 10W40, 15W40, 15W50 | SL/SJ/CF (B5/D3) |
| Gazpromneft PREMIUM | 10W40 | SL/CF (B5/D3) |
| G-ENERGY S SYNTH, F SYNTH | 5W40, 10W40 | SL/CF (B5/D3) |
| G-ENERGY EXPERT L | 5W30, 5W40, 10W40 | SL/CF (B5/D3) |
| GT TURBO SM (Hanval INC) | 10W40 | SM (B5) |
| ESSO ULTRA | 10W40 | SL/SJ/CF (B5/D3) |
| MOBIL 1 ESP FORMULA | 5W30 | SN/SM/CF (B6/D3) |
| MOBIL 1 NEW LIFE, PEAK LIFE, SUPER 3000 X1 | 0W40, 5W40, 10W40, 5W50 | SN/SM/SL/SJ/CF (B6/D3) |
| MOBIL SUPER 2000 X1 | 0W40, 5W40, 10W40, 5W50 | SL/SJ/CF (B5/D3) |
| SHELL HELIX PLUS | 5W40, 10W40 | SL/CF (B5/D3) |
| SHELL HELIX ULTRA, HX7, HX8, PLUS EXTRA | 5W40, 10W40 | SM/CF (B6/D3) |
| ZIC A PLUS | 5W30, 10W30, 10W40 | SL (B5) |
To narrow the range of choices, be guided by the climatic conditions in which the car will be used. It is recommended to determine the viscosity class based on air temperature:
Lower limitViscosity gradeUpper limit
| –35 and below | 0W40 | +30 |
| –30 | 5W30 | +25 |
| –30 | 5W40 | +35 |
| –25 | 10W30 | +25 |
| –25 | 10W40 | +35 |
| –20 | 15W40 | +45 |
| –20 | 20W50 | 45 and above |
Is it possible to paint wheels with powder paint?
It is recommended to change the oil at a service station (service station). , however, the owner himself can add liquid to the tank.
The oil level is controlled as follows: when the engine is turned off, unscrew the diagnostic dipstick located near the cylinder head cover between the third and second cylinders. A secondary check is carried out no earlier than after 3–5 minutes. after topping up.
Remember that motor oils of different brands cannot be mixed. The same applies to materials made on different bases (synthetic/semi-synthetic). Be careful when choosing.
The factory usually fills it with semi-synthetic material with a viscosity of 5W30 produced by Rosneft OJSC. Check the information by opening the service book.
Manual transmission oil
Transmission oils, just like motor oils, are classified according to quality level. According to API designations, all performance properties are characterized by one number (from 1 to 6). The following consumables are suitable for the manual transmission of Kalina-2 cars:
Do-it-yourself bleeding of the brake system
Each wheel has a special drain fitting to remove air from the brake system. It is through this that you need to remove air and old liquid.
A rubber hose prepared by us is put on the fitting and lowered into a container to drain the old liquid. In this case, the hose in the dish must also be in the liquid so that there is no air leakage.
Using a brake wrench, unscrew the fittings on each wheel sequentially and pump the old fluid out of the system until it is clean. You will need an assistant who will pump the brake pedal; your task is to drain the old fluid.
That is, the assistant pumps the brake pedal 5-10 times and presses it. You unscrew the fitting a little and drain the liquid. The assistant pumps the pedal again, then presses it and drains the liquid again. And this must be done with each wheel.
When bleeding the brakes, keep an eye on the fluid level in the reservoir; it should not be empty.
After bleeding, make sure that the brake fluid in the reservoir is between MIN and MAX. This completes the replacement of brake fluid on the Lada Priora.
Do-it-yourself replacement of brake fluid on a Lada Priora
To replace you will need:
- The brake fluid itself
- To remove old fluid syringe
- dry rag
- container for old liquid
- rubber hose, the diameter of which should be suitable for the bleed fittings on the wheels
- Special brake wrench 8 by 10 mm
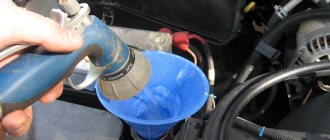
First, we need to pump out the old brake fluid using a syringe, while leaving a small layer of it in the reservoir so that air does not get into the system.
Now fill the new brake fluid into the reservoir to the max level.
Now you need to completely remove the old fluid from the system by pumping it and filling it with new fluid.
Sequence of pumping brakes on Priora
- Rear right caliper
- Rear left caliper
- Front right caliper
- Front left caliper
This is the order in which you should bleed the brake system.
Changing the fluid in the hydraulic brakes of Lada Priora
The manufacturer recommends replacing brake fluid on a Lada Priora car every three years of operation or every 45 thousand kilometers.
We carry out the work on an inspection ditch or overpass. Unscrew the filler cap of the tank.
We pump out the old liquid from the tank with a syringe or rubber bulb.
Fill the reservoir with new brake fluid.
Attention! If brake fluid gets on your car's paintwork, plastic parts, or wiring, it can cause damage. Remove it immediately with a clean cloth.
If on a car not equipped with ABS, the rear wheels are suspended, insert a screwdriver between the lever and the plate spring of the pressure regulator in the hydraulic drive of the rear wheel brakes, fixing the regulator piston in the recessed position.
It is necessary to bleed the brake system hydraulic drive until new fluid (lighter than the old one) begins to come out of the bleeder fittings of all working cylinders.
We carry out pumping to replace the fluid with the engine not running, first on one circuit, and then on the other in the following sequence:
- right rear wheel brake;
- left front wheel brake mechanism;
- left rear wheel brake;
- brake mechanism of the right front wheel.
Before pumping, check the level of working fluid in the hydraulic brake reservoir. If necessary, add liquid. We bleed the brakes with an assistant. We clean the bleeder fitting of the brake mechanism of the right rear wheel from dirt.
Remove the protective cap from the cylinder fitting of the rear right wheel.
We put a hose on the fitting, and immerse its free end in a container partially filled with working fluid.
An assistant must vigorously press the brake pedal all the way 1-2 times and keep it pressed.
Using the “8” wrench, unscrew the bleeder fitting 1/2-3/4 turn.
In this case, liquid will flow out of the hose. As soon as the liquid stops flowing from the hose, tighten the fitting, and only after that can the assistant release the pedal. We repeat this operation until new brake fluid (lighter than the old one) comes out of the fitting. We remove the hose, wipe the bleeder fitting dry and put a protective cap on it. Remove the protective cap from the brake bleeder fitting of the left front wheel. We put a hose on the fitting, and immerse its free end in a container partially filled with working fluid.
We bleed, as described above, the brake mechanism of the left front wheel, unscrewing the bleeding fitting with a “8” key.
Similarly, we bleed the brake mechanisms of the other circuit.
ABS device
The design of the anti-lock braking system of car wheels implies the presence of the following parts and components:
- Speed sensor, acceleration/deceleration.
- Control valve. due to the difference in the density of air and brake fluid, with ABS Lada Priora with abs. This element is located in the brake system line. The control valve is an integral part of the pressure module.
- Anti-lock braking system ECU. The main task of the electrical control unit for the ABS system is to receive signals from the sensors listed above and control the operation of the valves.
In this case, liquid will flow out of the hose. As soon as the liquid stops flowing from the hose, tighten the fitting, and only after that can the assistant release the pedal. We repeat this operation until new brake fluid (lighter than the old one) comes out of the fitting. We remove the hose, wipe the bleeder fitting dry and put a protective cap on it. Remove the protective cap from the brake bleeder fitting of the left front wheel. We put a hose on the fitting, and immerse its free end in a container partially filled with working fluid.
Similarly, we bleed the brake mechanisms of the other circuit.
When pumping, you need to monitor the fluid level in the tank and add fluid if necessary.
After bleeding the hydraulic brakes, bring the fluid level in the reservoir to normal.
How to replace Priora brake fluid?
- What color is the brake fluid for Lada Priora? – 1 answer
To change the brake fluid you need:
1) Unscrew the cap of the brake master cylinder reservoir and carefully wipe the float.
2) Unlock the pressure regulator of the rear brake mechanisms (if the rear wheels are suspended) by placing a screwdriver between the piston and the plate. After replacing the TJ, remove the screwdriver .
3) Clean the rear right brake air release valve from dust. mechanism and unscrew the cap from the valve.
4) Install a hose (preferably transparent) onto the valve fitting, lower the other end into a clean, empty container.
5) An assistant should sharply press the brake pedal 4-5 times, fixing it at the last press.
6) Unscrew the air outlet valve so that the old fluid flows out. When it stops draining, tighten the valve.
7) Make sure that the brake fluid in the reservoir does not fall below the minimum mark , top up as necessary.
 Do this until clean brake fluid runs, then do the same procedure on the left front brake. mechanism, then in the left rear and then in the right front.
9) Check the brake pedal travel. If there are dips and sinkages, air has entered the system and it needs to be pumped.
10) Reinstall the protective caps and add brake fluid to about.
After servicing or repairing the brake system of a Lada Priora, it is necessary to bleed the hydraulic brakes to remove excess air. I don’t think it’s worth talking about what the consequences may be if you ignore this procedure.
Signs of air getting into the brake system hydraulic drive:
– when you press the pedal once – increased pedal travel, its “softness”;
– with repeated pressing of the pedal - a gradual decrease in the pedal stroke with a simultaneous increase in its “hardness”.
Before bleeding the hydraulic drive, it is necessary to identify and eliminate the cause of depressurization.
Helpful advice.
If pumping a hydraulic drive is associated with the repair of one circuit and the serviceability of another circuit is known, then pumping only the circuit being repaired is permissible.
Sequence of bleeding the brakes:
You will need:
"8" wrench, rubber hose, container for collecting brake fluid.
Self-bleeding brakes on Lada Priora
1. Check the level and, if necessary, add brake fluid to the master cylinder reservoir to the “MAX” mark.
Attention.
Only add brake fluid of the same grade as that used in the system.
Please note that on our website there is already a publication about bleeding the brake system of a VAZ 21099 with your own hands.
2. Place the vehicle on an inspection pit or lift.
3. If the rear wheels are suspended, first unlock the rear brake pressure regulator by inserting a screwdriver between the plate and the piston. Don't forget to remove it when finished.
4. Clean the air release valve on the brake mechanism from which air is supposed to be removed from dirt and dust.
5. Remove the protective cap from the air release valve.
6. Place the rubber hose over the valve head and immerse the end in a clean, transparent container partially filled with brake fluid (the end of the hose should be immersed in the fluid).
7. An assistant must sharply press the brake pedal 4–5 times (with an interval of 1–2 s between presses). After the last swing, you need to keep the pedal pressed.
8. Unscrew the air release valve 1/2 to 3/4 turn. Air bubbles will be visible in the liquid flowing from the hose. When the fluid stops flowing from the hose, close the air release valve completely, after which the assistant should release the brake pedal.
9. Repeat steps 7 and 8 until there are no air bubbles in the flowing liquid. At the same time, monitor the brake fluid level in the reservoir and, if necessary, add fluid, not allowing the level to drop below the “MIN” mark.
10. Remove the hose, wipe the air release valve fitting dry and put the protective cap on it. Bleed the brakes of the remaining wheels if necessary.
Notes.
Do not reuse brake fluid that was drained when bleeding. If the brake system hydraulic drive is not pumped thoroughly enough, then when you press the pedal at the end of its stroke, you will feel an increased “softness” of the pedal.
Recommendation.
There are two ways to bleed the hydraulic brake system without an assistant. The first is the most reliable: order a turner an aluminum or bronze cover for the main brake cylinder, screw the valve from the camera into it and connect it to the spare wheel with an additional hose; air pressure should not exceed 0.05–0.07 MPa (0.5–0.7 kgf/cm2). The second is not very reliable, but acceptable: connect the rubber bulb to the wheel cylinder fitting - the connection should be very tight. Squeeze the bulb, unscrew the fitting; When the bulb is half full, tighten the fitting. Repeat the procedure three to four times. During test braking, check the operation of the brakes.
Do-it-yourself brake bleeding on the Lada Priora has been successfully completed. Let us remember that the previous article was about replacing the wheel bearing on a Lada Priora.
Replacing the working fluid in the brake system of Lada Priora
Replace the brake fluid in the hydraulic brake drive every 45 thousand km or 3 years of operation (whichever comes first).
To fill the system, use glycol brake fluids with parameters according to FMVSS 116 not lower than DOT-3.
Before replacing the brake fluid, check the tightness of the hydraulic drive (see “Checking the tightness of the hydraulic brake drive”) and eliminate the faults.
You will need: an “8” wrench, brake fluid, a flexible tube, a container for collecting brake fluid, a clean rag.
1. Take precautions when working with brake fluid: it is toxic. If brake fluid comes into contact with wires, plastic or painted body parts, they may be damaged. Therefore, when pouring, always use clean rags. If liquid gets on parts, wipe them immediately with a clean cloth.
2. Use only brake fluid recommended by the manufacturer.
3. Do not reuse the fluid drained from the system: it is contaminated, saturated with air and moisture. Always add only new fluid to the system of the brand that was filled before.
4. Brake fluid is hygroscopic (absorbs moisture from the surrounding air), so it cannot be stored in open containers.
1. Unscrew the master cylinder reservoir cap and wipe the float with a clean cloth. Be careful: brake fluid may drip from the float.
2. If the rear wheels are suspended, first unlock the rear brake pressure regulator by inserting a screwdriver between the plate and the piston. Don't forget to remove it when finished.
3. Clean the air release valve of the right rear brake mechanism from dirt. Remove the rubber protective cap from the valve.
4. Place a rubber hose (it is recommended to use a transparent hose to see the condition of the leaking fluid) onto the valve fitting and immerse the end of the hose in a clean transparent container.
5. An assistant should sharply press the brake pedal 4–5 times (with an interval of 1–2 s between presses). After the last swing you need to keep the pedal pressed.
6. Unscrew the air release valve 1/2 to 3/4 turn. Old (dirty) brake fluid will begin to flow out of the hose. In this case, the brake pedal should smoothly reach the stop. As soon as the fluid stops flowing, close the air release valve.
7. Constantly monitor the fluid level in the reservoir, not allowing it to drop below the “MIN” mark, and if necessary, add new brake fluid. Repeat steps 5 and 6 until new (clean) brake fluid begins to flow out of the hose.
8. In the same way, replace the brake fluid in the left front brake mechanism, and then in the second circuit (first in the left rear brake mechanism, then in the right front).
9. Press the brake pedal several times. The pedal travel and resistance should be constant with each press. If these conditions are not met, it means that air has entered the brake system and it needs to be bled (see “Bleeding the brake system hydraulic drive”).
Volume of brake fluid in the car
When a brake system repair is planned or a planned replacement of brake fluid is planned, the car owner thinks about how much brake fluid needs to be purchased to replace and completely fill the brake system. In a classic passenger car that is not equipped with ABS, TJ usually contains from 550 ml to 1 liter.
Information about what kind of liquid needs to be filled in, in the vast majority of cases (on Priora, Grant and other models popular in our country) can be found either on the body of the expansion tank or on its cap.
Reasons for replacement
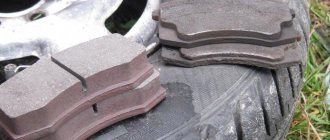
AvtoVAZ recommends changing the front pads every 30-50 thousand kilometers. But you don’t always need to strive for the indicated numbers, since different cars are used in different modes.
There are drivers who constantly use the car on the highway, and there are also those who only drive around the city. When in city traffic jams you have to brake more often.
Regardless of operating conditions, it is important to inspect the pads monthly. If they wear too much, the brake disc is damaged. And this puts the driver of the vehicle at risk.
Parameters under which the pads need to be changed:
- overlay thickness less than 1.5 millimeters;
- the lining is unevenly worn or does not contact the brake disc tightly;
- the pressure spring is faulty;
- The lining is damaged, there are cuts and deformations.
Depending on the manufacturer, the cost of the pads varies from 500 to 2000 rubles.
How much brake fluid do you need to replace a Priora?
Replace brake fluid
In modern cars it is known that the brake system is equipped with a hydraulic drive. This helps make him more sensitive. However, the working chemical elixir ages with use. Therefore, it is necessary to replace the brake fluid. To understand why this is so necessary, we will simply list what happens to an obsolete chemical.
- It is filled with dirt particles from friction.
- Absorbs air inflows.
- The components absorb moisture through compensation holes, the composition is replenished with water, which significantly deteriorates its quality.
- Additives lose their chemical properties.
All this leads to a sharp decrease in braking efficiency.
We will then look at some important issues related to the hydraulic drives of these systems. Namely, we will understand how often to replace brake fluid. We'll also look at the process of replacing it with a car.
As for the period after which it is necessary to update the working environment, its average value ranges from 40 to 60 thousand km. In general, it depends on the make of the car. However, in many cases, manufacturers designate this replacement brake
fluids should be produced after two years. if this time has passed the previously specified run.
Now let's talk about how to replace brake fluid with your own hands. For example, take several different brands. First we will turn to VAZ cars, and then to foreign cars.
Our brand
General recommendations for all cases of work when replacing fluid in a car with your own hands:
- Avoid getting chemicals into your hands, body, wires, paints and varnishes;
- it is necessary to use this chemical specified by the manufacturer of the machine brand;
- Keep leftovers tightly closed.
So, let's analyze, for example, the operation of replacing brake fluid in a VAZ 2110 car. What you need to have on hand. will be described below:
How much fluid we need is indicated in the car's passport. For VAZ 2110 it is 0.55 liters. We continue.
- Open the system tank.
- Raise the rear of the car and release the rear brake pressure regulator. Insert a screwdriver between the piston and the plate.
- We insert the exhaust ventilation valve of the right rear brake, which we release from the rubber cap, into a hose, the end of which is connected to the tank.
- The partner must press the pedal sharply 5 times and keep it pressed for the last time.
- Unscrew the valve using the key. To make three quarters of a turn, the waste medium must begin to flow. Once the leak is fixed, tighten the valve and the partner should not release the pedal until the connection is tightened.
- New media should be added as soon as the tank reaches its low point. When clear liquid flows, the operation stops.
- We repeat everything completely on the left front brake.
- Then repeat the manipulations for the second circuit again. First shift to the left rear gear at the end. right in front
- We open the covers, remove the screwdriver from the pressure regulator, and check the functionality of the system.
Therefore, the brake fluid is replaced with VAZ 2110. The division of the system into two independent circuits for greater safety should not come as a surprise. just remember your driving school lessons.
Replacing the VAZ 2114 is completely similar. If we talk about Lada Kalina, then there are no differences. The fluid in viburnum is replaced according to the same instructions. The only thing worth paying attention to is how much viburnum brake fluid is needed for a complete replacement. Volume 0.45 l.
Replacing brake fluid and bleeding VAZ 2108 2110 2114 Priora
Replacing brake fluid
and brake pumps VAZ 2108 2110 2114
make frost in frost a priority
Replace brake fluid
In this issue of Technical Environment, its host Gennady Emelkin will talk about how to replace it yourself.
At Lada Priora we do the same. Replacing the Priora is also not particularly difficult. The volume of the new medium is also 0.45 l. All these cars are recommended for use with DOT 3. Frequency of replacement of VAZ rear wheels. from 2 to 3 years or from 50 to 60 thousand km. run.
Not our brand
Now let's move on to foreign cars. To change brake fluid on a Ford Focus 2, prepare the following:
- a set of keys;
- rubber hose;
- capacity.
See also why oil appears in the air filter of the VAZ 2109 and the oil pressure lamp of the VAZ 2114 is on.
We do the following.
- Unscrew the tank cap.
- Remove the cover from the right rear camshaft. Put on the hose. The end of the hose is connected to the container.
- Then the assistant presses the pedal 5 times, holding it down for 5 times. In this case, unscrew the valve. three quarters of a turn is enough. The spent medium begins to flow out of the hose. Turn off the valve immediately after the leak stops.
- The reservoir is added as soon as the old chemical reaches the lower mark.
- Continue running until clean new agent comes out of the valve.
- Repeat the manipulations with the left front wheel, as well as with the second circuit, as described earlier.
Then let's see how to replace the Skoda Octavia a5. However, here, as in the previous case, the manufacturer recommends the following period. 2 years or 30 thousand kilometers. The same things are used to complete the procedure. keys, hose and container.
The instructions in this car are exactly the same as the previous instructions. Therefore, we will not dwell on this.
Let's turn right at another popular foreign car. For Logan Logan owners, the manufacturer allows you to not update the brake operating environment for a long time. The period here is 90 thousand kilometers or 6 years. Replacing brake fluid for Renault Logan is done in the same way using the same tools. We'll just add a little more to it.
VAZ 2170 | Brake fluids
14.38. Brake fluids
| GENERAL INFORMATION |
What the consumer needs to know
The purpose of brake fluids is to transmit force from the master brake cylinder to the wheels. The task, although narrow, is extremely important: the braking system has no right to failure under any circumstances. It is this condition that determines the requirements for the properties of brake fluids. They consist of the following.
Boiling temperature. Experience shows that the operating temperature of brake fluid at the hottest points in the system is approximately 60° C when driving on the highway, 100° C in the city and 120° C in the mountains. But this is on average, and in intense efforts it often reaches 150 ° C and even more, since, for example, the brake pad heats up to 600 ° C during several emergency braking. Therefore, the liquid in an unfavorable situation can boil, and this threatens disaster: the volume of the main the cylinder is small (only 5–15 ml), and as soon as the volume of vapor bubbles in the system exceeds this value, the brakes will completely fail. But even before this, with small vapor locks, the effectiveness of the brakes already noticeably drops.
Modern brake fluids have a boiling point much higher than the critical one (that is, 150 ° C), but one should not be deluded by this. The substances that make up them are, for the most part, very hygroscopic, that is, they easily absorb moisture from the air, and rubber cuffs serve as a poor barrier to this process. The boiling point of a “wet” liquid compared to a “dry” one is much lower; it easily drops to a critical value and even further. Therefore, the passport data always indicates two boiling point values: without moisture and with a content of 3.5% water. If the latter is small, then such fluid should not be used in a system with disc brakes.
Frost resistance. Obviously, the liquid used to transmit pressure must maintain acceptable fluidity even in extreme cold. It is accepted that its viscosity should not exceed 1800 mm2/s at -40° C for the regular version and 1500 mm2/s at -55° C for the special northern one. When choosing a product for use in harsh winter conditions, you need to pay attention to this.
Seal compatibility. Substances contained in brake fluids inevitably cause swelling of the rubber seals, but this effect is limited by current technical standards.
Anti-corrosion and lubricating properties. For moving parts of the brake system, the working fluid is designed to serve as a natural lubricant, since there are no other antifriction products in their friction zone. All these requirements are met by the use of special additives and additives in commercial products.
“Neva” is the first-born of the modern series, now quite outdated and discontinued from mass production (small-scale production has been preserved in some places). The main components are glycol ether and polyester with the addition of an anti-corrosion additive. The boiling point is 195°C without moisture and 138°C with 3.5% water. The frost resistance standard has been met. "Neva" has a color from light yellow to yellow. The main disadvantage is increased hygroscopicity, as a result of which after just a year of operation the boiling point approaches critical. Only taking this circumstance into account can you use Neva, which has no other restrictions for use on cars of any brand.
"Tom" was developed to replace the "Neva" fluid for widespread use. Color ranges from light yellow to yellow, like the Neva. Tomi contains concentrated glycol ether, polyester, borates, and targeted additives. The temperature properties of the product have been improved: boiling point in the “dry” form is 220° C, in the “moistened” form – 155° C, viscosity at -40° C is no more than 1500 mm2/s. Moisture saturation close to critical occurs with this liquid after about two years of operation. In general, in terms of operational qualities, “Tom”, according to the generally accepted international classification, satisfies modern standards DOT-3 - this is a mass, “consumer” class without any special restrictions on use.
"Rosa" is a product belonging to the most advanced type. The main component is boron-containing polyester along with special-purpose additives. Color – from light yellow to light brown. The boiling indicators are as follows: in a “dry” form – 260° C, in a “moistened” form – 165° C, while the critical indicator (150° C) is reached only after three years of fluid being in the hydraulic drive of the brake system. According to the international classification, Rosa meets all DOT-4 class standards, which is the highest level of performance today. "Rosa" is suitable for use in modern domestic and foreign cars without restrictions.
Foreign products. Today in our market you can find many imported brake fluids (Brake Fluid). If such a fluid is recommended by the manufacturer for any car and is marked DOT-3 or DOT-4, then it can be used equally in foreign and domestic cars. As for performance, when compared in the corresponding class (DOT-3 or DOT-4), imported liquids are approximately identical to our Tomi or Rosa and do not have any special differences from them.
Required Tools
To complete the work you will need the following tools:
- Jack for lifting and fixing the machine.
- Wrenches for 13 and 17.
- Screwdriver.
- A tool for unscrewing the bolts that secure the wheel.
- Pliers.
- Metal brush.
Additional materials must include special lubricant and rags.
Adding fluid or replacing it completely
If the car has covered 50-60 thousand kilometers or has been in use for 2-3 years, experts recommend completely updating the brake fluid, since the old one has already absorbed a lot of water and has partially lost its properties. Topping up the fluid may be necessary if the car has been idle for a long time or, conversely, is used too intensively and travels, for example, 80-100 thousand kilometers per year.
Much depends on the type of fluid, as well as driving style. Thus, an aggressive, sporty style may require more frequent brake replacement. As for its specifications, everything depends on the manufacturer’s recommendations. Thus, one of the most popular brands of Dot 4 is advised to be updated every 50-60 thousand mileage or after repair of the braking system.
When and what liquid to pour?
As you can see from the table, AvtoVAZ recommends filling in several types of oils and liquids. So let's figure out what liquid to fill and when.
Engine lubrication system
It is recommended to fill the Lada Priora engine with several types of automotive oils according to the SAE (American Association of Engineers) classification. In order to determine what kind of oil to pour into the engine, it is necessary to rely on the air temperature at which the car will be operated. The table below shows the temperature and oil used at a certain temperature.
Oil table depending on air temperature
| Outdoor temperature | SAE oil classification |
| -25 to +35℃ | 5W-40 |
| -25 to +20℃ | 5W-30 |
| -20 to +35℃ | 10W-40 |
| -20 to +30℃ | 10W-30 |
| -15 to +45℃ | 15W-40 |
Based on this table, it is necessary to select the required oil in the Lada Priora according to the degree of viscosity. The manufacturer recommends changing the engine oil no later than 15 thousand km, but it is better to change it at 10 thousand km.
Gear box
The choice of oil for the Lada Priora gearbox is based in the same way as the choice of engine oil on the ambient temperature in which the car will be operated.
Below is a table of transmission oil depending on air temperature.
Table of dependence of transmission oil on air temperature
| Outdoor temperature | SAE oil classification |
| From -26 to +45℃ | 80W-85 |
| -40 to +40℃ | 75W-90 |
AvtoVAZ recommends changing the oil in the gearbox no later than 75 thousand km, but in practice it is better to change the oil after 50 thousand km.
Engine cooling system
The manufacturer recommends adding antifreeze or antifreeze to the engine cooling system. The volume of Priora coolant is 7.9 liters. It should be noted that antifreeze is filled at the Priora plant. Under no circumstances should you ever use water as a coolant, since when the air temperature drops, the cylinder head may defrost with dire consequences and costly repairs.
Fuel tank
The Priora's fuel tank capacity is 43 liters, which is quite enough for an engine capacity of 1.6 liters. AvtoVAZ recommends using only high-octane gasoline, namely AI-95. It should be noted that on a full tank the Priora can travel from 400 to 600 km, depending on driving style.
Hydraulic Brake System
Priora is equipped with a system with hydraulic brakes and ABS. The volume of Priora brake fluid is 1 liter. DOT-4 brake fluid. It is recommended to replace brake fluid every 2-3 years, as brake fluid tends to age.
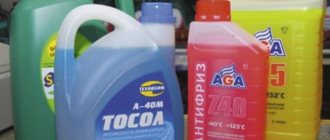
Which brake fluid to choose for Priora
The manufacturer fills it with DOT 4. The most popular brake fluids among buyers are ROSDOT 4 and NEVA-M. The first option is more expensive, the second is cheaper. For cars with and without ABS, it is recommended to use different types of fluids.
- DOT-4 plus – for vehicles without ABS
- DOT-4 class 6 – designed for modern braking systems (ABS, ESP, VSA)
Depending on the capacity, the cost of the brake fluid indicated above is from 50 to 150 rubles.
You can also add DOT 5.1 fluid. It has a lower viscosity than the above samples, as well as a higher boiling point and, according to manufacturers, changes once every five years.
It is prohibited to mix liquids of different types with each other!