Payment for goods and downloading of the book in electronic form (PDF format) is made on the website.
To do this, you need to find the book you are interested in and click on the “Buy” button. The price of the book is indicated on the button.
For convenience, the price on the website for residents of Russia, Belarus and Kazakhstan is presented in rubles.
For residents of Ukraine in hryvnias, and for all other countries - dollars.
After clicking on the “BUY” button, a payment window will open where you can select a payment system with which you can pay for the selected book using any bank card (Visa, MasterCard, MIR, etc.)
When you click on the “Pay by bank card” button, the Portmone payment system will open, which is the easiest way to make a payment.
In addition, the website offers four payment systems for payment:
- Yandex (payment from any bank cards, Yandex Money account, QIWI Wallet, terminals, etc.);
- Portmone (payment from any bank cards, Portmone account);
- PayPal (payment from any bank cards, PayPal account);
- WebMoney (payment from any bank cards, payment from WebMoney wallets).
Payment via Yandex Cashier
After selecting payment via Yandex, the Yandex Cashier payment system will launch, where you need to select a convenient payment method (bank card, QIWI, Yandex Money account, etc.)
After specifying payment details and confirming payment, payment for the goods will occur.
If you have a bank card in a currency other than the ruble, then the money will be debited from the card at the rate of the Central Bank of Russia at the time of the purchase.
This payment method is optimal for residents of Russia, Kazakhstan and Belarus.
Official website of the Yandex Kassa payment system https://kassa.yandex.ru
Interior tuning
It all started with a trip to the city's car wrecking yards. What I was looking for, I found already on the first one, unfortunately - there was a shortage, only a torpedo and instruments. With the idea that I would put a shelf instead of a curb, and pick out a beard separately, I bought it for 200 UAH.
Torpedo being disassembled and after cleaning
After some cleaning, I took it to bumper repair. There was one crack and two very rough dents, I would say a dent. Painting and straightening out dents cost me only 60 UAH. The previously visible crack was no longer visible at all.
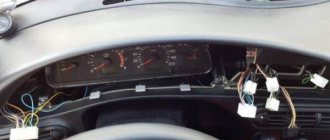
The next question is how to connect the instrument panel to a BMW. After the refusal of several electricians, an alternative option was found - to replace the BMW instruments with instruments from the VAZ 2106. It just so happened that they are interchangeable in size...
BMW dashboard interior
We inserted instruments from the “six” into the Boomer dashboard. Everything fit together. You will have to trim a little under the water and oil sensor. Its complete disassembly was what I did completely.
Shield for VAZ 2101
A question arose that eventually became an issue. On the six's instruments, all the lights are arranged in a panel: emergency lights, turn signal lights, etc. What to do and how to deal with this still hasn’t occurred to you? To be honest, I didn’t want to lose such beauty. The solution was simple - parallelize. I decided not to throw away the remaining and currently unnecessary textolite on the Boomer board.
I decided to leave the standard connectors to the shield, I also decided not to touch the wiring, although I don’t really have it and needs to be replaced, but replacing it later will be in the future. I began to think and figure out how to make adapters for the VAZ 2101 shield connectors to the VAZ 2106. Due to a broken digital camera, which at that time was being repaired in the workshop, the photo had to be taken on a mobile phone, since the work was not stagnant.
Illumination of the shield
My first purchase was 30 dads and 30 moms, that is, I bought 30 brushes for connectors. Taking into account the productive defects, this turned out to be enough, and I spent 8 UAH on all this. They break as usual... I also had to spend money on clamps and connectors, paying another +10 UAH for this, the pictures clearly show which ones: receiving (two for 6 brushes) and incoming (one for 4, two for 6 and one for 8 brushes) . It's time to think about how to connect it all... I was saved by an old instrument panel lying in the barn, because when I opened the electrical diagram of the VAZ 2101, I was completely confused. After I broke it down and took out the textolite, I began to figure out what to connect and where along the tracks.
Let's calculate the costs for now:
| What was spent on: | Sum |
| Torpedo restoration | 60.00 UAH |
| Torpedo | 200.00 UAH. |
| 60 brushes | 8.00 UAH |
| Connectors + clamps | 10.00 UAH |
| TOTAL: | 278.00 UAH. |
| TOTAL: | 278.00 UAH. |
Dollar exchange rate at the time of purchase: approximately 5 UAH. for 1 USD
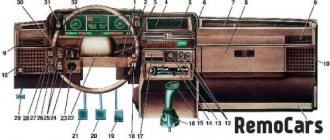
Instrument panel VAZ 2101 (rear view)
| 1 | Fuel reserve light | 7 | Mass 1 |
| 2 | Oil pressure light | 8 | Illumination of the shield |
| 3 | Battery charge lamp | 9 | Turn signal light |
| 4 | Handbrake light | 10 | Mass 2 |
| 5 | water arrow | 11 | Light bulb |
| 6 | Gasoline arrow | 12 | Dimensions lamp |
We got to the instruments of the six. There was no need to disassemble anything there.
Tachometer connector 2106
| 1 | Tachometer | 2 | Battery charge lamp |
| 3 | Device backlight | 4 | Mass 2 |
| 5 | Not in use | 6 | Mass 1 |
| 7 | Handbrake light | 8 | Not in use |
Liquid temperature connector VAZ 2106
| 1 | Liquid arrow No. 1 | 2 | Mass 1 |
| 3 | Device backlight | 4 | Mass 2 |
Speedometer connector VAZ 2106
| 1 | Not in use | 4 | Turn signal light |
| 2 | Light bulb | 5 | Dimensions lamp |
| 3 | Weight | 6 | Device backlight |
Gasoline level connector VAZ 2106
| 1 | Fuel level arrow | 4 | Device backlight |
| 2 | Mass 1 | 5 | Not in use |
| 3 | Mass 2 | 6 | Fuel reserve light |
An attempt to make my own adapter diagram “VAZ 2101 - VAZ 2106 devices”...
We see that we have 2 unused contacts (No. 1 on the tachometer of the VAZ 2106 and No. 2 on the dashboard of the VAZ 2101). No. 1, which is located on the tachometer of the VAZ 2106, is out of the question, since this is the tachometer wire itself, to which in the future you will need to extend the wire from the ignition coil. No. 2 was a concern at first, but as it later turned out, it was the oil pressure. If you strain your memory, then on the six there is a separate sensor with an arrow, but on our six there is only a light bulb... this problem needs to be solved. It has already been mentioned that all the information lights are built into the BMW dashboard itself, oh, how I didn’t want to lose them, let’s see what can be done.
OILSERVISE INSPECTION? I wonder how it works. Let's sort it out. 9 LEDs and 2 light bulbs, a huge pile of wires and endless burning of these same LEDs. I decided to use the light bulbs as if under oil pressure, but I decided not to connect the LEDs. The question arose, how to do all this? It is possible that you just need to stretch the wire from No. 2 of panel 2101 to these light bulbs. Let's try to assemble an adapter "VAZ 2101 - VAZ 2106 devices" according to my scheme... As always, a friend will need a car - this is already like a pattern.... No matter how I twisted it, I had to give back the instruments from the six (06). You will have to buy new ones. On the market, prices turned out to be quite shocking: tachometer - 80 UAH, speedometer - 90 UAH, and small sensors - 30 UAH each. Having added up the money spent, we get: 80+90+30+30=230 UAH. From a financial perspective, this is not a small expense. It is also necessary to do a major overhaul of the engine, the body, and then also paint the car...... We will again head to the car disassembly... That's how the summer passed... During that time I managed to do a major overhaul of the engine, now I'm saving up for the body. Having somehow forgotten about all this, around the end of summer, or to be more precise, at the beginning of August, I accidentally came across an advertisement for the sale of an instrument panel from a VAZ 2106 for 50 UAH, this joyful newspaper was the newspaper “From Hand to Hand” . My joy knew no bounds, without thinking twice I called the ad, bought it and took it apart... I decided to install beautiful instrument scales and paint the arrows with varnish... To celebrate, I did not have time to photograph the original appearance of the instrument scale.... everything was dismantled at once
I quickly came up with new instrument scales and in two hours I twisted the counter on the speedometer so that it showed the required kilometers, all this was done so that later I would not have to think for a long time about when to adjust the valves and change the oil. I got to work and started collecting. Based on the results obtained, I can say that even with my clumsy hands I can do everything quite well, if I don’t get too nervous and, of course, don’t drink a lot of beer J. After an hour of intensive work, everything began to become, as they say, “at ease” and clear up. After a certain period of time, I decided not to open the tachometer and speedometer arrows with varnish, so that in a year I would not have to think again about how to fix the problem with peeling varnish on the arrows...
When I tried to install all this, it turned out that the backlight on two sensors and half of the indicators did not work. I got upset, gave up on work and went to watch TV. After watching it for a couple of minutes, an idea came to my mind: what if the light bulbs themselves are not working? After all, this is also not excluded. The devices themselves were not tested at the time of purchase either. That's exactly how it happened. A total of 4 light bulbs did not work, I pulled out one penny from the original instrument panel, and cleaned three.
This whole process was completed completely unexpectedly even for me. As always on Saturdays, and today was Saturday, I went to the car market. As a result of this trip I bought a new muffler, resonator and a bunch of small spare parts. After arriving home, I immediately began replacing the right inner caliper and exhaust system. My next action was to remove the dashboard and arrange the wires with new clamps I had recently bought at the market. I tore out all the wires connected to the FM and the antenna, since I’m not a radio fan... I decided to try on a torpedo from a BMW, the fitting went well... I liked it J
Let's dispel a few myths about installing a BMW E30 torpedo:
- There will be noticeably less space for Stupidity in the cabin. Everything turned out quite the opposite.
- You will have to bend the gearshift lever because... it will rest against the console. Why? See photo. When you turn on the closest gear No. 3, there is 5-8 cm left to the console.
- The torpedo from the BMW E30 is slightly wider . Yes. A couple of millimeters. As a result, no problems with “pushing” were noticed...
- Without the glove box, a bunch of wires will be visible from under the dashboard . See photo. For some reason I didn't notice them...
Since the torpedo is from a radically different car, there are some very peculiar features...
Peculiarities:
No. 1: Window lifter handles
On the left side, where the driver's doors are located, it is impossible to open the window, although the reason is not observed on the passenger side, the reason for all this is that the handle rests on the dashboard. The only joy in this problem was that it all happened from the driver’s door, and no passenger would injure himself by making enormous efforts when using the window regulator and, most importantly (for me), would not tear out a piece of the dashboard.
No. 2: Fastening
It was attached to the dashboard using small self-tapping screws. As for the corner, it was torn out from the original penny torpedo.
No. 3: Steering column cover
The casing had to be trimmed a little. I ignored the advice about cutting the torpedo itself, cut the casing - and in my opinion, this is much easier to do. But what I did very carelessly is another question...
Installation of a torpedo with a BMW E30 in Zhiguli is discussed on our forum
Payment via Portmone
After selecting payment through Portmone, the payment system will launch, where you need to select the payment method: bank card or Portmone account.
The price in the Portmone payment system is converted into dollars at the exchange rate of the Central Bank of the country where you are located.
If you have a bank card in a currency other than the dollar, then the money will be debited from the card at the rate of the Central Bank of your country at the time of the purchase.
After specifying payment details and confirming payment, payment for the goods will occur.
Official website of the Portmone payment system https://www.portmone.com
Tuning the instrument panel of the VAZ-2106
Not the least place in modernizing a torpedo is tuning the vehicle’s instruments. Domestic UAZ cars are distinguished by an unpresentable dashboard. Tuning the VAZ-2106 dashboard can be done in several directions. Firstly, the instrument panel is subject to tuning, and secondly, modernization is also necessary for the car’s instruments themselves.
To improve the appearance of the tidy, you can use a special trim, to install which you need to dismantle the part of the dashboard where the instrument panel is located. Next, it is important to degrease the tidy and treat it with sandpaper. The special overlay is processed similarly. Then the surfaces that need to be fastened are treated with glue and connected. After complete drying, the updated tuning panel can be installed in place if you do not transform the instruments and sensors. If the devices will also be subject to tuning, then assembly should be postponed until the tuning elements are completely ready.
Tuning the instrument panel of the VAZ-2106 includes not only the aesthetic side of the transformation, but also the practical one. The VAZ-2106 has a dim instrument panel, which can be unsafe at night. To improve the appearance and increase safety, LED tuning of the VAZ-2106 tidy is often used. At the same time, using self-adhesive film, markers and paint for the arrows, the appearance of the instruments is updated and contrast is added to them. If the scales on the devices have already lost their appearance, they can also be replaced by printing new ones from the Internet. To improve the appearance of devices and sensors, you can add LED elements to them, which will improve the visibility of devices at night.
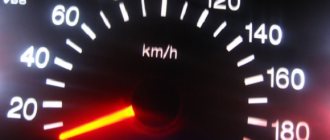
When upgrading, it is important to pay special attention to the speedometer of the VAZ-2106. On the dashboard there are a speedometer and a tachometer nearby, which show the speed of the car and the number of engine revolutions. Removing the speedometer is a little more difficult than other elements. In order to pull out the speedometer, first the dashboard clamps are pressed out and the tidy is pushed slightly towards itself. Next you need to unscrew the speedometer cable attached to the back of the product. After the fastenings are disconnected, the cable of the daily mileage mechanism is carefully removed.
Speedometer tuning can be done in the same way as all instruments using LEDs, updating scales and arrows. If necessary, you can replace the speedometer cable and drive with new products. Replacement is carried out on a lift or pit. And also, some car owners replace the speedometer with an electronic version, then the speedometer cable will be redundant and will need to be removed. To install an electronic speedometer, you will need an additional impulse sensor with wires and an M18 thread. According to the connection diagram of the new product, additional soldering is carried out. During installation, it is important to connect the plus of the tachometer and speedometer together so that they show synchronous results.
After transforming all the sensors and instruments, as well as updating the dashboard, all elements are installed in their places.
Payment via PayPal
After selecting payment via PayPal, the PayPal payment system will launch, where you need to select the payment method: bank card or PayPal account.
If you already have a PayPal account, then you need to log into it and make a payment.
If you do not have a PayPal account and you want to pay using a bank card via PayPal, you need to click on the “Create an Account” button - shown with an arrow in the picture.
PayPal will then prompt you to select your country and provide your credit card information.
After specifying the information required to make the payment, you must click on the “Pay Now” button.
Official website of the PayPal payment system https://www.paypal.com
Payment via WebMoney
After selecting payment via WebMoney, the payment system will launch, where you need to select the payment method: bank card or WebMoney wallet.
If you already have a WebMoney wallet, then you need to log into it and make a payment.
If you do not have a WebMoney wallet and you want to pay in another way, you need to select any of the methods that WebMoney offers and make the payment
After specifying payment details and confirming payment, payment for the goods will occur.
Official website of the WebMoney payment system https://www.webmoney.ru/
Downloading a book
After successfully completing the payment (by any method) and returning to the KrutilVertel store from the payment system website, you will be taken to the successful payment page:
On this page you need to indicate your e-mail, where access to download the book will be sent.
If you are already registered on our website, then simply follow the link to your personal account.
The book you purchased will be in your personal account, from where you can always download it.
Please note that after making the payment, you need to return back from the payment system website to the KrutilVertel website.
If for some reason you did not return back to the site and closed the payment system tab with a message about the successful completion of the payment, please let us know - we will send you a letter indicating access to download the book.
Step-by-step instructions for installing the dashboard trim
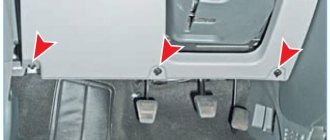
There is a fourth modernization option: installing a trim on the torpedo. Let's take a closer look at how to do this yourself. The special trim performs not only decorative, but also protective functions for the torpedo. To perform this work better and more efficiently, first dismantle the torpedo by unscrewing the mounting bolts.
Then proceed according to the instructions.
- Wash the part thoroughly using a soft sponge to avoid scratching the surface.
- After drying, apply a degreasing compound to the mating surfaces.
- For greater adhesion of the glue to the surfaces, sand them with fine-grained sandpaper.
- An excellent result will also be ensured by priming the mating surface of the lining with a uniform thin layer using compounds for plastic.
- Apply glue and connect the trim to the torpedo. Allow time for the glue to dry completely and set.
For more reliable fastening in inconspicuous areas, use self-tapping screws, since with weak contact the pad may make squeaks when driving. This is a fairly durable tuning, but it is also imperfect: under the influence of high temperatures, the lining may become slightly deformed over time.
Problems when paying with bank cards
Sometimes difficulties may arise when paying with Visa/MasterCard bank cards. The most common of them:
- There is a restriction on the card for paying for online purchases
- A plastic card is not intended for making payments online.
- The plastic card is not activated for making payments online.
- There are not enough funds on the plastic card.
In order to solve these problems, you need to call or write to the technical support of the bank where you are served. Bank specialists will help you resolve them and make payments.
That's basically it. The entire process of paying for a book in PDF format on car repair on our website takes 1-2 minutes.
If you still have any questions, you can ask them using the feedback form, or write us an email at [email protected]
Improving the appearance of the “six” torpedo
A torpedo is available in the interior of any car and consists of a dashboard, stove, and regulators. This element of the VAZ 2106 interior has a rather unattractive appearance, so car owners are trying to improve it. This is not difficult to do, but it is important, since tuning the dashboard can not only change the appearance of the interior, but also make the operation of the car more comfortable.
In order to upgrade a torpedo, you can use several methods.
| Way | Sequencing |
| Option No. 1. Replacing the standard panel with a modern design. | The latest generation panels look impressive, but have a number of disadvantages, namely: they are less safe than the classic VAZ 2106 torpedoes, they have a low degree of reliability and high cost. |
| Option No. 2. Upholstery of the structure with artificial leather. | A less expensive method of modernization, but performing the procedure yourself beautifully and correctly is quite difficult. |
| Option number 3. Painting. | A cheaper upgrade that's easy to do yourself. To do this you need to take the following steps. Remove the torpedo. Wash, wipe dry with a soft cloth and dry. Using a rubber spatula, apply a layer of plastic putty to the part. Sand the surface with fine-grained sandpaper. After the putty has dried, apply primer and paint. |
The painting option has only one drawback - a short service life.