From time to time, drivers encounter an unpleasant and dangerous moment - a light curtain. A wide, high beam from the vehicle's lighting illuminates the space in front of the car. This situation causes 30% of road accidents.
This is easy to avoid: it is important to systematically check and adjust the position of the lighting equipment on the car. This is not the most difficult task, and can be done independently without the involvement of specialists. The algorithm is universal for all machines. As an example, let's look at how the Kalina Lada headlights are adjusted.
Principle of operation
Before you do it yourself and install the purchased PTF kit on your car, you should understand the principles of operation of fog lights, and also find out what the car manufacturer recommends on this issue.
Technical requirements
Current rules stipulate that fog lights should only work with side lights or low beam headlights (see also the article VAZ 21099 wiring diagram: carburetor with “Euro” panel). This is primarily due to current road safety requirements.
The second point that you should pay attention to is the installation location, determined by the provisions of GOST 8769-75:
- From the road - not lower than 250 mm;
- From external dimensions - no closer than 400 mm.
According to the requirements of GOST 8769-75, PTF must fit into the specified dimensions
Technical features
Currently, there are two main types of PTF used on Lada Kalina, in which:
- The formation of a light spot is carried out on the headlight glass due to the marks applied to it. Such PTFs are considered classic and are commonly called a headlight with a reflector;
- The light spot is formed in a convex (parabolic) lens installed instead of glass. It is considered more progressive because it is equipped with halogen or xenon lamps. In everyday life they are called lensed.
Lensed fog lights for Kalina
Question and answer: what should not be allowed under any circumstances
Q: What happens if you buy lamps with a base other than “H7”?
A: It will not be possible to install lamps in a standard headlight.
Q: If I use more than 55 watts of power, will this cause overheating?
A: Excessive power leads to the fact that the fuse in the low beam lamp circuit burns out. A separate fuse is used for each of the lamps, so it will not be possible to “deceive” the automation.
Q: Are halogens afraid of power surges?
A: For incandescent lamps, excess voltage is a harmful factor. In the case of using halogen lamps, there will be two harmful factors: overheating, underheating. Actually, this is why MTBF can be considered a relative rather than an absolute value. This value depends, and depends strongly, on the stability of the voltage.
Notes
Replacing the support bearing of a Lada Kalina with your own hands
Adjusting the position of the headlights must be done every 20 thousand kilometers or as necessary. On the Lada Kalina, this adjustment operation is not carried out often, since deviations from the norm rarely occur (in most cases, due to road accidents).
Checking and adjusting the headlights of the Lada Kalina VAZ 1118 is carried out with a fully filled fuel tank, a set of tools and a spare wheel.
1. First check the air pressure on all tires of the car with a pressure gauge. If necessary, bring it to normal.
2. Place the Lada Kalina car perpendicular to a smooth wall (for example, a garage) at a distance of 5 m. Place an additional weight weighing 75 kg on the driver’s seat.
3. Mark the screen on the wall as shown in the headlight adjustment diagram.
4. Draw a vertical center line O on the screen, lying in the plane of symmetry of the car (the distance from it to the center of the left and right headlights should be equal). To the left and right of it, draw two more symmetrical lines A and B, which should coincide with the centers of the left and right headlights.
5. At a height h corresponding to the distance of the centers of the headlights from the ground, draw a horizontal line 1, and 75 mm below it - line 2.
6. Turn on the low beam headlights on the Lada Kalina car by turning the headlight range control of the Lada Kalina 1118 to position “0” (this position corresponds to the load of the Lada Kalina car with one driver).
7. Closing each headlight in turn, check that the light limit corresponds to the adjustment diagram previously marked on the screen. The boundary must follow line 2. The inclined segments must begin at the intersection points.
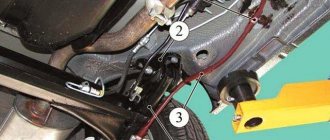
8. Insert the “6” hexagon into the regulator socket through the hole in the upper cross member of the radiator frame.
9. By turning adjuster 1, located closer to the wing, with a hexagon, adjust the position of the headlight beam in the horizontal plane.
10. By turning regulator 2, located closer to the radiator, adjust the position of the light beam in the vertical plane. Make sure that the upper boundary of the light beam coincides with the lower horizontal line, and the break point of the beam (the point of intersection of the horizontal and inclined sections of the light flux) with the vertical line corresponding to the center of the headlight.
11. Similarly, adjust the direction of the light beam of the other headlight.
Note:
Adjust the direction of the light spot for each headlight separately. During adjustment, cover the second headlight with opaque material or disconnect the connector with wires from it.
Scheme for adjusting headlights on a Lada Kalina VAZ 1118 car:
- 1 — horizontal line corresponding to the centers of the headlights;
- 2 - line passing through the centers of light spots;
- A, B - vertical lines corresponding to the centers of the headlights;
- O - center line;
- h is the distance from the centers of the headlights to the floor;
- d is the distance between the centers of the headlight lamps.
Video of adjusting the headlights of passenger cars:
The article is missing:
- High-quality photos of repairs
- Photo of the instrument
- Photos of parts and consumables
From time to time, drivers encounter an unpleasant and dangerous moment - a light curtain. A wide, high beam from the vehicle's lighting illuminates the space in front of the car. This situation causes 30% of road accidents.
This is easy to avoid: it is important to systematically check and adjust the position of the lighting equipment on the car. This is not the most difficult task; it can be done independently without the involvement of specialists.
The algorithm is universal for all machines. As an example, let's look at how the Kalina Lada headlights are adjusted.
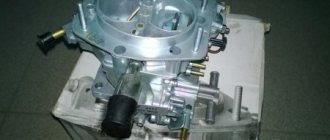
The procedure for dismantling the lights
You should know that the Lada Kalina 1118 flashlight system consists of:
- housings;
- glass (polycarbonate);
- lamps;
- reflector;
- wiring;
- lamp plugs;
- decorative inserts (masks).
As for the ease of removal and subsequent replacement of the lamp on the 1118 model, the process usually involves removing the front bumper. After this, the screws on the top and bottom of the lighting fasteners become accessible. After dismantling them, you can immediately remove the headlight unit, not forgetting to first remove the blocks with wires.
Removing the front optics
However, not all car enthusiasts have a lot of time to replace the lighting system or experience in removing the bumper. For this reason, a more popular method is to change the Kalina headlight without removing the bumper.
To do this you will need to use:
- key for 8 and 10;
- a set of screwdrivers (flat and Phillips);
- new lighting system component.
A set of tools
in order to adjust the block lighting on the Lada. You will need to complete the following steps:
- Remove the air filter housing, as well as the coolant unit.
- Remove the PTF plug using a screwdriver.
- Unscrew the bolt on the lower fastener of the lighting component using a 10mm wrench. Insert your hand into the PTF hole.
- Remove the bolts located on the upper fastener of the light block component. They are located closer to the radiator. Use the key at 8.
- Unscrew the screw securing the product to the car fender using a large Phillips screwdriver.
- Expand the Lada Kalina headlamp so as to move the part closest to the radiator closer to the car engine. This measure will allow you to remove the lower fasteners from the seat.
- Remove the lower iron fasteners of the headlight. To do this, you will need to remove a couple of bolts with a short head.
Removing the headlight on Kalina
- Remove the car light by moving towards you. At the same time, try not to damage the paint layer, since during dismantling the lamp will be located as close as possible to the bumper and fender.
After this, you can install a similar device in reverse order.
Self-installation of fog lights on a Lada Kalina car
Do-it-yourself valve adjustment on a VAZ 2107
On the Lada Kalina, there are protective plugs in the places where the foglights are installed, so you don’t have to make holes in the bumper; just remove them.
- First you need to remove the bumper, for which you should unscrew the bolts and screws from the bottom of the bumper and under the grilles, you should also unscrew the screws in the wheel arches, with which the edges of the bumper are secured. Then you should remove the sides of the bumper from under the wheel arches and completely remove it.
- Then you should remove the plugs (you can use a flat screwdriver to bend the latches) and screw the PTF onto the self-tapping screws (three for each headlight).
- Inside the car, above the clutch pedal, you need to find the place where the bundle of wires goes, push out the seal, and then, using steel wire, pull the wires from the foglights next to the main wires.
- Afterwards, you need to connect the fog light wires to the main wires and tighten the entire bundle with ties (plastic clamps).
- Opposite the fog lights, you should leave wires of sufficient length with connectors, screw the negative terminals to the screws on the car body, and secure the wires with zip ties.
- Since the total power consumed by the PTF is 110 W, they must be connected via a relay, which is controlled by a button. The button is installed inside the car, on the dashboard. Power for the headlights can be obtained by connecting to the pink wire in the fuse box (it goes to relay K7, which turns on the high beams). You can also power the PTF from the blue-black wire that comes from the ignition switch.
- The PTF must be connected through a 15 A fuse. To do this, you need to connect the power contacts of relays 87 and 30 to the wires to the fog lights and the fuse, respectively.
- After all the connections have been made, you need to check again that the connection is correct and then connect the battery terminal, and then make sure that the fog lights turn on when you press the button.
- Then reassemble the bumper in reverse order. Of course, after assembly there should be no extra screws left.
PTF adjustment
After installing fog lights on a Lada Kalina car, it is necessary to adjust the direction of their luminous flux, for which you should place the car on a flat surface at a distance of five meters from the wall. Then you should cover one headlight (for example, with cardboard), and then, by rotating the adjusting screw, set the light flow limit 0.5 m below the level of the headlights.
You can more accurately adjust the fog lights at a service station using a regloscope. After carrying out all the above procedures, the PTFs are completely ready for use on the road.
How to adjust the light output
Adjusting the direction of the headlight beams of a Lada Priora car
After installing new headlights or removing the front bumper, the car owner needs to adjust the light output.
The luminous flux for each headlight is set separately
The fact is that fog lights have a completely different principle of illuminating the road surface:
- PTFs have a clear upper boundary (cut);
- This is due to the physical properties of fog.
The best solution to the problem would be to visit service stations that have special adjustment stands designed for any car model. But if this is not possible, or the fog light on Kalina was replaced and removed from its original location, then you can do this operation yourself.
The algorithm will be as follows:
- Place the car 3 meters from a blank wall (residential building, garage);
- Check the tire pressure and bring it to factory settings;
- Using chalk and a ruler, mark two vertical lines on the wall opposite each wheel;
- Measure the distance from the ground to your car's headlights. This will be the parameter – h;
- Draw a horizontal line on the wall at the calculated height;
- Turn on the fog lights and cover one of them with a cloth or newspaper;
- Use the adjusting screw to set the luminous flux;
- Repeat the operation for the other headlight.
https://youtube.com/watch?v=THTdZcFdVzU
That's it, the work is finished, and the best part is that the price of the work is minimal.
Adjusting the optics of Kalina in the hatchback body version
For this type of LADA Kalina body, the head lighting equipment has a similar design as that of the sedan. These devices are distinguished by the fact that adjusting the headlights is simple and accessible. The adjustment procedure is carried out to achieve optimal illumination of the section of road ahead, and the risk of dazzling drivers of oncoming cars must be completely eliminated.
To conveniently carry out the adjustment process, the owner will need a chalk and a tape measure. You should first ensure that at the time of adjustment there is 50% fuel volume in the tank. Mechanics advise hiring an assistant who will be present in the driver’s seat during the procedure. How to adjust headlights step by step:
Adjusting headlights on Ford Focus 2 restyling with your own hands video (video)
- The car is placed on a similar flat area close to the wall, on which the center of the car and the centers of the headlights are marked with chalk.
- Next, using a tape measure, we measure a distance of 7.5 meters, where we place a mark.
- We drive the LADA Kalina car exactly to this mark.
- We connect the marked centers of the optical devices with a straight line drawn with chalk. We also draw vertical lines through these centers.
- Next, we retreat 75 mm from the horizontally drawn line and draw a straight line parallel to it. To be more correct, we first measure this distance in several places.
- We adjust the headlights while they are on and one at a time. At the moment the process is performed on the first optical device, we cover the second with the indicated cardboard sheet.
- We achieve the correct position of the reflector by rotating the screws. Here it is necessary to achieve such a position of the light beam at which the top of the corner of the light spot on the wall intersects the vertical straight line previously drawn through the central point of the headlight.
We combine the section of the upper border of the beam with the lower line.
We carry out similar manipulations for the second headlight.
Reasons for adjusting headlights
Headlight position during final adjustment
Many car enthusiasts do not understand why and how to adjust headlights. According to regulation No. 699 of the “International Automobile Convention” of December 12, 1999, there are basic rules for the use of light at night. It states that car light must fall at a certain angle, offset to the right for left-hand drive cars, and to the left for right-hand drive cars.
Another reason is the load on the car, the curb weight, as well as the number of passengers who regularly drive the car.
The process of adjusting headlights on Kalina
The headlights should only be adjusted with low beam, the PTF should be turned off. If you do not have fog lights, then read the material on how to install them.
Before proceeding directly to the adjustment process, you need to refuel the car to a full tank, put on a spare tire, and also call an assistant. Place a helper behind the wheel.
Garage door adjustment process
Thus, it turns out that the car is fully equipped. Ideally, have a standard adjustment marking for headlights on the wall of the garage, but if this is not available, you can use a regular wall.
Markings on the wall when adjusting headlights
Let's look at how to adjust the headlights on a Lada Kalina:
- We check and adjust tire pressure to normal.
- The distance between the wall and the car should be 5 meters.
- We apply markings as in the figure above.
- Open the hood and unscrew the top headlight mount.
- For each headlamp, we adjust the light beam separately.
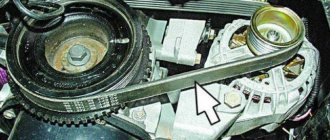
Adjustment of headlights through special holes in the front panel. 1 - in the horizontal plane), and 2 - in the vertical plane.
Replacing head lamps
Each lamp has its own resource, the value of which depends on many factors. Over time, devices break down and require replacement. And then the question arises: how to disassemble the headlight?
Dimensions Kalina
Fog lights Kalina
Wiper size for Kalina
The replacement procedure is simple, but before that you need to choose the right lighting devices from the mass of products offered on today's market. Although sometimes all you need is to replace the headlight glass.
So, if the headlights are purchased, then we change:
- Remove the protective cover from the headlight housing. It's rubber, so it's easy to pull off if you pull on one of the three tags.
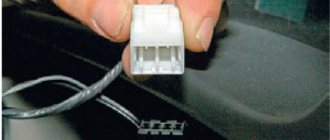
- Disconnect the power connector.
- Release the spring clip.
- How to remove the headlight? We take out the lamp and install a new element in its place.
Attention! When replacing a halogen lamp, avoid touching the bulb with your hands. This may damage the device. Over time, greasy fingerprints will cause the glass to darken, causing the lamp to overheat and eventually burn out.
- If contact occurs, it is necessary to wipe the surface of the flask with a cloth moistened with alcohol.
- Changing side lamps
- We also remove the cover and disconnect the corresponding cartridge from the on-board network.
- We remove the lamp and install a new one in its place.
Step-by-step replacement instructions
Each H7 standard bulb has an iron base, which is pressed to the headlamp with a wire clamp. To bend this bracket, just get close to the plane of the headlight from behind. Let's open the hood and see what exactly will bother us.
Engine compartment of Kalina-2 (VAZ-2192, 2194)
Behind the headlight on the right is a washer reservoir. It is dismantled like this: disconnect the electric motor terminals, tighten the plug harder, find one nut and one fastening bolt. The fastening elements are unscrewed with a 10mm wrench, then the tank is placed on the engine. Next we could look at how to remove the headlight on Kalina-2, but in this case this is not required.
Before performing any manipulations with electrical equipment, always disconnect the negative terminal of the battery. It is better to connect this terminal last (before closing the hood). Be careful.
Replacement sequence:
- Remove the rubber cover covering the low beam lamp compartment;
- Disconnect both terminals from the lamp contacts;
- The fastening bracket is removed from the grooves by first pressing on it, then the bracket is moved to the side;
- They take out the lamp, install a new one in its place, and return the bracket to its place.