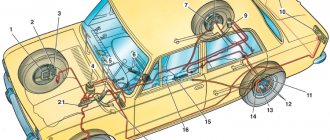
Chevrolet Niva brake system
The machine has two independent brake systems - a hydraulic working system and a mechanical parking system.
The parking brake is applied when stopping to keep the vehicle in place. It uses brake pads only on the rear wheels and is operated by a lever located in the cabin. When the lever is placed in the upper position, the brake pads move apart and are pressed tightly against the inner surface of the brake drums, firmly fixing their position. The movement of the pads is ensured by a cable and drive levers.
- “right front-left rear” contour;
- “left front-right rear” contour;
- master cylinder reservoir;
- hydraulic brake master cylinder;
- vacuum booster;
- brake pedal;
- rear brake pressure regulator;
- parking brake cable;
- rear wheel brake;
- parking brake adjusting tip;
- parking brake lever;
- front wheel brake
Cause of malfunction - Remedy method
Creaking, squealing when braking
Brake lining wear limit - Replace the brake pads (preferably all on one axis at the same time)
Introduction of foreign particles (sand) into the pad material - As a rule, does not require intervention (the pads can be cleaned with a wire brush)
Poor quality of the lining material - Replace the pad (it’s better to have everything on the same axis at the same time)
Severe corrosion of the brake disc (due to poor quality material of the disc and/or lining) - Grind (grind) or replace the disc
The brake pad lining has peeled off from the base - Replace the pad (preferably all on one axis at the same time)
Rear brake pad tension spring is loose or broken - Replace spring
Braking with wheel locking - Do not over-brake, use tires appropriate for the driving conditions
Increased brake pedal travel (the pedal is “soft” or “falls through”)
Air in the brake system, leakage of brake fluid through leaks in hydraulic drive connections, damage to the cuffs in the master brake cylinder, pressure regulator, damage to brake pipes and hoses - Inspect all lines, their threaded connections and cylinders, eliminate leaks.
Restore the normal fluid level in the brake reservoir and bleed the system.
If damage to the brake hoses is detected (cracks, swelling or traces of brake fluid), replace the hoses.
If you suspect defects in the master brake cylinder, replace it with a known good one.
The rubber cuffs of the cylinders are swollen due to oil, gasoline, etc. getting into the brake fluid. — Replace the cylinders, hoses, completely drain the brake fluid, flush the system with fresh fluid and bleed
Brake overheating - Allow the brakes to cool. Check the thickness of the linings and brake discs.
Use only brake fluids recommended by the manufacturer in the system. Replace brake fluid promptly
The gap between the pads and the drum has increased (the automatic gap adjustment device does not work) - Replace the wheel cylinder, bleed the system
Increased (more than 0.25 mm at the edge) runout of the brake disc - Replace the disc
One of the circuits of the service brake system does not work - Eliminate fluid leakage from the brake system, bleed the system How to bleed the hydraulic brakes of a VAZ-2121
The brake pedal travel is within normal limits (the pedal is “hard”), but the car brakes poorly
Oiling of brake discs, drums, linings - Clean oily discs and drums, replace the pads (as a last resort, sand them down).
It is strictly forbidden to clean the pads with solvents! Eliminate the cause of oiling (replace the axle shaft seal)
An ice or salt crust has formed on the surface of the linings (in winter); the linings are wet - Check the brakes at low speed when starting to drive. In the rain and after driving through deep puddles, dry the brakes by lightly pressing the pedal
Poor quality of the lining material - Replace the pads (it’s better to have them all on the same axis at the same time)
Blocked brake lines: tubes (due to dents) or hoses (due to swelling or delamination of rubber) - Replace damaged tubes and hoses
Jamming of the piston in the cylinder, pads in the caliper - Replace the cylinder, clean the contacting surfaces of the pads and caliper, lubricate them with CV joint-4 before installation
Complete wear of the brake linings (brake grinding) - Replace the brake pads (preferably all on one axis at the same time)
The brake pad lining has peeled off from the base - Replace the pad (preferably all on one axis at the same time)
The pressure regulator drive is not adjusted correctly - Adjust the drive
Pressure regulator faulty - Replace regulator
The vacuum booster is faulty or the hose connecting the booster to the inlet pipe is leaking - Check the integrity of the hose, its fit on the fittings, and the tightness of the clamps.
To check the amplifier, turn off the engine, press the brake pedal 5–8 times and, while holding the pedal pressed, start the engine.
If the amplifier is working properly, after starting the engine the pedal should noticeably “move” forward. Replace faulty amplifier
Incomplete release of all wheels
Incorrect position of the adjusting bolt relative to the vacuum booster cover - The end of the bolt should protrude relative to the end of the cover by 1.25–0.2 mm
The rubber cuffs of the cylinders are swollen due to oil, gasoline, etc. getting into the brake fluid. — Replace the cylinders, hoses, completely drain the brake fluid, flush the system with fresh fluid and bleed
Master cylinder piston jamming (due to corrosion, broken return springs, mechanical impurities entering the fluid) - Replace the master cylinder, bleed the system
The brake pedal is stuck: the return spring is broken or stretched, the pedal bushings are heavily worn, not lubricated, axle corrosion - Replace the defective spring, bushings, put fresh Litol-24 lubricant in them
Braking one of the wheels when the brake pedal is released
Wheel cylinder piston jammed - Replace cylinder
The rubber cuffs of the cylinders are swollen due to oil, gasoline, etc. getting into the brake fluid. — Replace the cylinders, hoses, completely drain the brake fluid, flush the system with fresh fluid and bleed
Blocked brake lines: tubes (due to dents) or hoses (due to swelling or delamination of rubber) - Replace damaged tubes and hoses
Detachment of the rear brake pad lining - Replace the pad (preferably all on one axis at the same time)
Rear brake pad tension spring is loose or broken - Replace spring
Deformation of the spacer bar, misalignment of the pads due to deformation of the brake shields - Straighten or replace the spacer bar, brake shields
The parking brake is too tight, the cables are jammed in the sheaths - Adjust the tension of the cables, lubricate them with engine oil, if the sheath is damaged or the cable wires are frayed, as well as if there is severe corrosion, replace them
The parking brake doesn't hold well
Incorrect drive adjustment - Adjust drive
The drive cables are stuck in the sheaths - Lubricate the cables with engine oil; if the sheath is damaged or the cable wires are frayed, as well as if there is severe corrosion, replace them
The brake drums and linings are oily - Clean the oily drums, replace the pads (in extreme cases, sand them down).
It is strictly forbidden to clean the pads with solvents! Eliminate the cause of oiling (replace the axle shaft seal)
An ice or salt crust has formed on the surface of the linings (in winter); the linings are wet - Check the brakes at low speed when starting to drive. In the rain and after driving through deep puddles, dry the brakes by lightly pressing the brake pedal
Complete wear of the brake linings (brake grinding) - Replace the brake pads (preferably all on one axis at the same time)
When the parking brake lever is released, the wheels do not release the brakes.
After the car has been parked for a long time, the pads are stuck (or frozen) to the drum - While pulling the parking brake lever or cables, try to carefully (so as not to tear off the brake linings) turn the wheel.
Check the ease of movement of the cables in the shells, the pistons in the wheel cylinders, the rigidity of the cable return springs and the pad tension springs.
When parking the car, if possible, do not tighten the brake, but engage the gear
Incorrect drive adjustment - Adjust drive
The drive cables are stuck in the sheaths - Lubricate the cables with engine oil; if the sheath is damaged or the cable wires are frayed, as well as if there is severe corrosion, replace them
Steering the vehicle away from straight-line motion (on a flat road)
Different tire pressures - Set normal tire pressure
Violation of the longitudinal inclination of the steering axis and/or camber of the front wheels - Adjust the angles of inclination of the steering axis and/or camber of the front wheels
Significant difference in tire wear - Replace the worn tire
Uneven settlement or broken suspension springs - Replace both springs
Suspension and/or body parts are warped - Straighten or replace warped parts and body panels
Displacement of the rear axle due to breakage of the rods or their mounting brackets - Replace the rods, weld the brackets
Wheel braking due to jamming of the wheel cylinder piston - Replace the cylinder
Rear wheel braking due to weakening or breakage of the rear brake pad tension spring - Replace the spring
Blocked brake lines: tubes (due to dents) or hoses (due to swelling or delamination of rubber) - Replace damaged tubes and hoses
Car pulls or skids when braking
Wheel cylinder piston jammed - Replace cylinder
Blocked brake lines: tubes (due to dents) or hoses (due to swelling or delamination of rubber) - Replace damaged tubes and hoses
Wheel jamming due to separation of the lining from the base of the brake pad - Replace the pad (preferably all on one axis at the same time)
Oiling of brake discs, drums, linings - Clean oily discs and drums, replace the pads (as a last resort, sand them down).
It is strictly forbidden to clean the pads with solvents! Eliminate the cause of oiling (replace the axle shaft seal)
An ice or salt crust has formed on the surface of the linings (in winter); the linings are wet - Check the brakes at low speed when starting to drive. In the rain and after driving through deep puddles, dry the brakes by lightly pressing the brake pedal
Different pressure in the tires of the left and right wheels - Set the normal pressure
Significant difference in tire wear - Replace the worn tire
Brake disc deformation - Replace the disc (preferably as a pair)
Brake drum out of place - Grind or replace drum
Design of the working hydraulic system
In order to increase the reliability and safety of control, the hydraulic brake system of the Chevrolet Niva is built according to a dual-circuit diagonal design. The first hydraulic drive circuit drives the front right and rear left wheels, and the second drive drives the front left and rear right wheels. Thus, controllability is maintained in the event of failure of one of the hydraulic drive circuits. The hydraulic braking system includes:
- brake pedal located in the cabin under the driver’s right foot;
- vacuum pedal pressure booster;
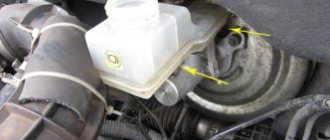
- master cylinder with reservoir for filling brake fluid;
- dual-circuit hydraulic drive pipeline;
- working brake cylinders of the rear and front wheels;
- pressure regulator with actuating lever.
Diagram of the Niva brake system (VAZ 2121 and 2131)
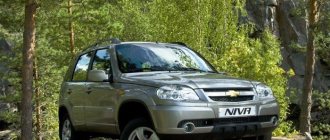
Cars of the Chevrolet Niva family represent a further development of the concept of domestic comfortable SUVs, which began with the VAZ-2121 Niva car. They differ from their predecessors in modern design, increased comfort and more advanced design.
VAZ-2123 (Chevrolet Niva) and its modifications are all-terrain passenger cars with a monocoque station wagon body, produced by the GM-AVTOVAZ joint venture. The number of doors is five, the number of seats is five for the L and GLS modifications or four for the LX and GLX modifications.
Also interesting: How to bleed the brakes on a Niva yourself?
The engine is located longitudinally in front. The transmission is made according to the scheme of permanent all-wheel drive with a locking center differential and a range of multipliers. The front suspension is independent lever-spring, the rear suspension is dependent spring.
The front wheel brakes are disc, the rear wheels are drum brakes, and the LX and GLX versions are equipped with an anti-lock braking system (ABS). The ZF power steering is equipped with a steering column position adjustment device.
Chevrolet Niva cars of the 2005 model year are available in the following trim levels.
25 January 2021 LadaOnline 55 777
The Niva 4x4 SUV has a hydraulic, dual-circuit braking system. One circuit is connected to the brake cylinders of the front and rear wheels, and the other only to the front ones. This scheme allows you to maintain vehicle braking even if one of the circuits fails.
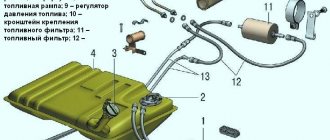
1 – master cylinder reservoir; 2 – main cylinder; 3 – front brake circuit pipeline; 4 – front and rear brake circuit pipeline; 5 – front wheel brake mechanism; 6 – vacuum booster; 7 – parking brake lever; 8 – brake pedal; 9 – front parking brake cable;
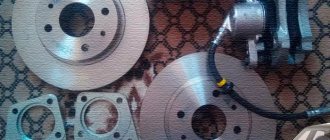
The front brakes of the Niva 4x4 are disc brakes with a three-piston floating caliper. The upper piston operates from one circuit (together with the rear wheels), the two lower ones - from another. Brake discs are cast iron. The minimum permissible thickness of discs is 9.5 mm, pads - 1.5 mm.
The rear brakes are drum brakes (aluminum, with cast iron rings), with two piston cylinders. The nominal inner diameter of the drum is 250 mm, the permissible diameter is 251 mm.
The brake pedal is fixed on the same axis with the clutch pedal, rotates on two plastic bushings, and is equipped with a return spring. When you press the brake pedal, the brake light switch located above it closes. The free play of the brake pedal should be 3-5 mm.
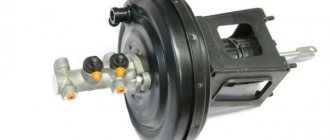
The vacuum booster (VUT) is designed to reduce the effort on the brake pedal and is located on the front panel in the engine compartment. To check the VUT, keep the brake pedal depressed and then start the engine. If the VUT is working properly, the brake pedal should move forward.
The brake master cylinder (MBC) is attached to the VUT. The brake pipe fittings for the front wheels are screwed into the front holes of the GTZ, and the brake pipes for all wheels are screwed into the rear holes.
The pressure regulator is located in the right rear part of the body. Serves to limit pressure in the rear brake mechanisms. As the load on the rear axle increases, the regulator provides more pressure in the cylinders. As it decreases, the load drops.
Handbrake (parking) - mechanical, cable, on the rear wheels. After correctly adjusting the handbrake, the full stroke of the lever should be 4-5 teeth per sector.
Let us remind you that instructions for repair and operation of the Niva 4x4 SUV are in this category or in the content.
Key words: Niva brakes
Found an error? Select it and press Ctrl Enter..
Purpose and operation of the pressure regulator
The pressure regulator (“sorcerer”) is designed to prevent the car from skidding during sudden braking. This is achieved due to the fact that the rear wheels begin to brake after the front ones. The time delay is provided by the regulator lever, which, when the car brakes sharply (the nose drops and the rear rises), pulls the piston in the regulator cylinder and closes the fluid supply channel to the working cylinders of the rear wheels.
In this case, the rear brakes do not work and the wheels spin until the rear of the car drops back. Thus, the “sorcerer” automatically regulates the fluid pressure in the rear cylinder path in inverse proportion to the load on the rear axle. In addition, it increases the braking efficiency of an empty vehicle when the load on the front axle is higher than on the rear.
If the car does not brake effectively, skids or is pulled to the side, then this is a reason to check and adjust the regulator.
This work must be carried out at every maintenance and after repair of the rear suspension.
The device of the Chevy Niva traction control system. Possible faults
The Chevrolet Niva braking system, as a product of joint production of two global companies, is well adapted to Russian roads and has a minimum braking distance when driving in the city. What are the features of this system?
The machine has two independent brake systems - a hydraulic working system and a mechanical parking system.
The parking brake is applied when stopping to keep the vehicle in place. It uses brake pads only on the rear wheels and is operated by a lever located in the cabin.
When the lever is placed in the upper position, the brake pads move apart and are pressed tightly against the inner surface of the brake drums, firmly fixing their position.
The movement of the pads is ensured by a cable and drive levers.
- “right front-left rear” contour;
- “left front-right rear” contour;
- master cylinder reservoir;
- hydraulic brake master cylinder;
- vacuum booster;
- brake pedal;
- rear brake pressure regulator;
- parking brake cable;
- rear wheel brake;
- parking brake adjusting tip;
- parking brake lever;
- front wheel brake
In order to increase the reliability and safety of control, the hydraulic brake system of the Chevrolet Niva is built according to a dual-circuit diagonal design.
The first hydraulic drive circuit drives the front right and rear left wheels, and the second drive drives the front left and rear right wheels.
Thus, controllability is maintained in the event of failure of one of the hydraulic drive circuits. The hydraulic braking system includes:
- brake pedal located in the cabin under the driver’s right foot;
- vacuum pedal pressure booster;
- master cylinder with reservoir for filling brake fluid;
- dual-circuit hydraulic drive pipeline;
- working brake cylinders of the rear and front wheels;
- pressure regulator with actuating lever.
Electrical equipment of Chevrolet Niva (electronics)
The pressure of the driver's foot on the brake pedal is increased by a vacuum booster and transmitted to the piston of the master cylinder, which, moving, compresses the brake fluid.
The fluid pressure increases and is transmitted through pipelines to the working cylinders of the front wheels and the brake pressure regulator of the rear wheels.
The pistons of the front calipers and rear working cylinders, under pressure from the brake fluid, extend and press the Chevrolet Nivak brake pads onto the surfaces of the discs and drums, slowing down their rotation.
The pressure regulator (“sorcerer”) is designed to prevent the car from skidding during sudden braking. This is achieved due to the fact that the rear wheels begin to brake after the front ones. The time delay is provided by the regulator lever, which, when the car brakes sharply (the nose drops and the rear rises), pulls the piston in the regulator cylinder and closes the fluid supply channel to the working cylinders of the rear wheels.
In this case, the rear brakes do not work and the wheels spin until the rear of the car drops back. Thus, the “sorcerer” automatically regulates the fluid pressure in the rear cylinder path in inverse proportion to the load on the rear axle. In addition, it increases the braking efficiency of an empty vehicle when the load on the front axle is higher than on the rear.
If the car does not brake effectively, skids or is pulled to the side, then this is a reason to check and adjust the regulator.
Also interesting: Purpose, diagram, design of the unequal angular velocity joint
This work must be carried out at every maintenance and after repair of the rear suspension.
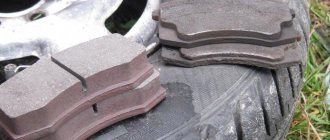
The front wheels of the Niva Chevrolet use disc brakes, and the rear wheels use drum brakes. Accordingly, the pads on them are different. Pads are the main working part of the brakes, which carry the most load and wear out the fastest. If the car is used intensively, the condition of the pads should be checked at least once every six months. Today there are many different domestic and foreign manufacturers of pads for Niva-Chevrolet cars.
Chevrolet Niva tow bar. What is it and how to install it?
They differ in price, material, service life. The so-called “Kevlar” pads from the Japanese company NIBK are considered the most effective and “cool”. They are made using modern nanotechnology from a compound that is equally effective in various operating modes. The advantages of this pad model include:
- low heating temperature during braking;
- do not require heating in winter;
- they do not creak or squeal even during sudden braking;
- have a longer service life compared to other models.
The only disadvantage of these pads is the high cost, but the price corresponds to the quality.
If you need information about replacing front pads, this is the place for you.
Reviews from car enthusiasts about the brake system on the Chevrolet Niva show that it is generally quite reliable and effective, fully consistent with the class of SUV cars.
The advantage is ease of control, ease of maintenance, adjustment and replacement of parts.
The disadvantages are due to the use of a pressure regulator, the operation of which in some cases can manifest itself in the form of uneven braking, the appearance of vibration when braking at certain speeds, and an increase in braking distance.
Effective brakes on the Chevrolet Niva, as the main condition for the safety and controllability of the car, help maintain the high popularity of this model for many years.
Finally, it has happened; from now on, the Chevrolet Niva includes a safety package - front airbags and ABS.
On the one hand, this won’t surprise anyone now, but for a domestic car, which the Chevy Niva essentially is, this is already something. Well, now it's up to the engine.
The main thing is that this does not greatly affect the price, because even now it is no longer small...
General information
The automatic brake release system (ABS system) is designed to increase vehicle stability under heavy braking conditions or when driving in poor road conditions. This is ensured by the fact that the pressure in the brake circuit is regulated depending on the wheel speed recorded by the sensors.
System composition:
- Actuator
- Front speed sensors
- Diagnostic connector (DLC1)
- Control block
- ABS system service indicator lamp
- Speed sensor rotors
- Rear speed sensors
- Diagnostic connector (DLC1)
- Brake light switch
- ABS motor relay
- Solenoid valve traction relay
October 10, 2012
Our cheat sheet is addressed to such “crazy people”
The cost of a set of front pads is 370–950 rubles, rear pads are 650–1200 rubles. The cost of a set of front pads is 370–950 rubles, rear pads are 650–1200 rubles. The cost of a set of front pads is 370–950 rubles, rear pads are 650–1200 rubles.
We hang and remove the front wheel. It is advisable to clean the surfaces and treat the joints of the axle and cotter pin with a penetrating lubricant such as WD-40.
Using pliers, remove the cotter pin of the lower clamping lever axis. Using pliers, remove the cotter pin of the lower clamping lever axis. Using pliers, remove the cotter pin of the lower clamping lever axis. Using a drift, we touch the axis of the clamping lever... Using a drift, we touch the axis of the clamping lever... Using a drift, we touch the axis of the clamping lever... ...and, holding the lever, we take out the axis with pliers.
...and, holding the lever, use pliers to remove the axle...and, holding the lever, use pliers to remove the axle. We remove the clamping lever. We remove the two clamping lever springs from the shoe guide so as not to lose them. We remove the two clamping lever springs from the shoe guide so as not to lose them. We remove the two clamping lever springs from the shoe guide so as not to lose them.
Using a screwdriver, we lift the brake caliper... Using a screwdriver, we lift the brake caliper... Using a screwdriver, we lift the brake caliper... ...and place it with the cylinder block on the steering knuckle....and place it with the cylinder block on the steering knuckle....and place it with the cylinder block on the steering knuckle.
Remove the brake pads from the guide. Before installing new ones, it is necessary to move the pistons as far inside the cylinders as possible. We remove the brake pads from the guide. Before installing new ones, it is necessary to move the pistons as far inside the cylinders as possible. We remove the brake pads from the guide.
Before installing new ones, it is necessary to move the pistons as far inside the cylinders as possible. Using sliding pliers (or a pipe wrench), press the pistons into the cylinders. You can recess the pistons into the cylinders in another way. To do this, we insert the outer block into the guide and, having installed the caliper in place... Using sliding pliers (or a pipe wrench), we press the pistons into the cylinders.
You can recess the pistons into the cylinders in another way. To do this, we insert the outer block into the guide and, having installed the caliper in place... Using sliding pliers (or a pipe wrench), we press the pistons into the cylinders. You can recess the pistons into the cylinders in another way. To do this, insert the outer block into the guide and, having installed the caliper in place... ...using a mounting spatula, press the pistons into the cylinders.
We carry out further assembly of the unit in the reverse order. To make it easier to install the axis of the pressure lever, use a file......using a mounting blade, press the pistons into the cylinders. We carry out further assembly of the unit in the reverse order. To make it easier to install the axis of the pressure lever, use a file......using a mounting blade, press the pistons into the cylinders.
We carry out further assembly of the unit in the reverse order. To make it easier to install the clamping lever axis, use a file... ...or sand the end of the axle like this......or use sandpaper to grind the end of the axle like this......or use sandpaper to grind the end of the axle so... ...to form a cone. Before installation, lubricate the axis of the clamping lever with graphite grease.
...to make a cone. Before installation, lubricate the axis of the clamping lever with graphite grease...to form a cone. Before installation, lubricate the axis of the clamping lever with graphite grease. Pressing the lever, insert the axle. After installing the brake pads, you must press the brake pedal several times so that the cylinder pistons move the pads to the brake disc.
And also interesting: Sax clutch, how to distinguish the original from the fake -
Pressing the lever, insert the axle. After installing the brake pads, you must press the brake pedal several times so that the cylinder pistons move the pads to the brake disc. Press the lever and insert the axle. After installing the brake pads, you must press the brake pedal several times so that the cylinder pistons move the pads to the brake disc.
Brake pads for Chevrolet Niva
The front wheels of the Niva Chevrolet use disc brakes, and the rear wheels use drum brakes. Accordingly, the pads on them are different. Pads are the main working part of the brakes, which carry the most load and wear out the fastest. If the car is used intensively, the condition of the pads should be checked at least once every six months. Today there are many different domestic and foreign manufacturers of pads for Niva-Chevrolet cars.
Advantages and disadvantages of the braking system
Reviews from car enthusiasts about the brake system on the Chevrolet Niva show that it is generally quite reliable and effective, fully consistent with the class of SUV cars. The advantage is ease of control, ease of maintenance, adjustment and replacement of parts. The disadvantages are due to the use of a pressure regulator, the operation of which in some cases can manifest itself in the form of uneven braking, the appearance of vibration when braking at certain speeds, and an increase in braking distance.
Effective brakes on the Chevrolet Niva, as the main condition for the safety and controllability of the car, help maintain the high popularity of this model for many years.