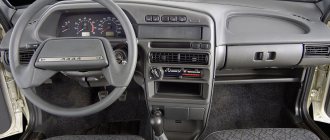
Description of the VAZ 2109 instrument panel (High panel): 1. Ignition switch, 2. Hazard warning switch, 3. Windshield wiper and washer switch lever, 4. Radio socket, 5. Central nozzles of the interior ventilation and heating system, 6. On-board computer ( installed as part of the package), 7. Instrument panel, 8. Glove box lid, 9. Side nozzles of the interior ventilation and heating system, 10. Loudspeaker trim, 11. Shelf, 12. Power window switches (installed as part of the package), 13. Cigarette lighter, 14 . Control panel for the interior ventilation and heating system, 15. Gear shift lever, 16. Parking brake lever, 17. Ashtray, 18. Carburetor choke handle, 19. Accelerator pedal, 20. Brake pedal, 21. Clutch pedal, 22. Horn switch, 23. Instrument lighting switch, 24. Hydraulic headlight leveler, 25. Front seat heating switch (installed as standard), 26. Rear fog lamp switch, 27. Fog lamp switch (installed as standard), 28. Heated glass switch tailgate, 29. Hood lock drive lever, 30. Turn signal and headlight switch lever, 31. External lighting switch, 32. Instrument cluster.
More information about the instrument cluster for the high panel (torpedo) VAZ 2109
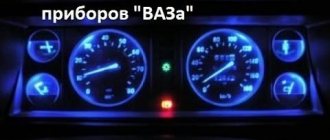
1. Speedometer, 2. Trip counter reset handle, 3. Trip counter, 4. Total mileage counter, 5. Fuel level indicator, 6. On-board control system light panel, 7. “TEST” display, 8. “Test” display STOP”, 9. Indicator lamp for failure of brake lamps and side lights, 10. Indicator lamp for low brake fluid level, 11. Indicator lamp for low coolant level, 12. Indicator lamp for front brake pad wear, 13. Indicator lamp for low level level in the washer reservoir, 14. Indicator lamp for low oil level in the engine crankcase, 15. Coolant temperature indicator, 16. Tachometer, 17. Indicator lamp for engaging the parking brake, 18. Indicator lamp “CHECK ENGINE” system injection, 19. Indicator lamp for closing the carburetor air damper, 20. Indicator lamp for reserve fuel remaining, 21. Indicator lamp for emergency oil pressure in the engine lubrication system, 22. Indicator lamp for turning on the right turn indicators, 23. Indicator lamp for battery charge, 24. Left turn indicator warning light, 25. Seat belt warning light, 26. Doors not closed warning light, 27. Side lights warning light, 28. High beam headlight warning light, 29. “CHECK ENGINE” warning light. engine”) toxicity reduction systems.
Step-by-step tuning steps
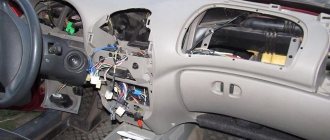
Before dismantling the VAZ 21099 panel, you will need to remove the terminals from the power supply by hand. Then the decorative steering wheel trim is removed. The nut should be unscrewed so that its end is flush with the similar element of the steering column shaft. You can’t turn it away right away. Then tuning the VAZ 21099 panel involves removing the steering wheel.
After unscrewing the 6 screws that secure the lower casing, you will need to remove it. The ignition switch trim is removed. The next step involves loosening the bolt that secures the base of the switches. The last element is removed from the shaft, and 2 blocks with the corresponding wires are disconnected.
In this case, you will need to label the washer and wiper switches. The block with wires is disconnected from the corresponding levers and direction indicators. The choke should be pulled out so that a draft occurs. At the same time, the handle of the first unit is pulled towards itself. Then the bolts securing the console trim are removed from the panel and the trim itself is removed.
The cigarette lighter cartridge and ashtray are pulled out of the socket. The VAZ torpedo is equipped with a heater fan that will need to be removed. To do this, it is recommended to use a screwdriver. The block and two wires are disconnected from the fan switch. They illuminate the europanel.
Tuning instrument panel
How to remove a high instrument panel VAZ - 2108, 09, 099 - Yakovlev Dmitry
Complete removal of the VAZ 2109 panel. Preparation for gluing. Part 1
You also need to disconnect the handles for the hydraulic headlight adjustment and the light switch. After unscrewing the nuts, the corresponding switch is pushed inside the panel. The side nozzles are removed with a screwdriver. The high panel provides for turning away the bolts for fixing the linings. The last elements are located on both sides of the torpedo.
Subsequent tuning is carried out taking into account the removal of the radio socket. Existing audio equipment is pre-dismantled. Then, using a screwdriver, the latches are removed and the cover is raised. The block and wires are disconnected from the cigarette lighter. A similar step is carried out in relation to the backlight and alarm switch.
Tuning VAZ 2109
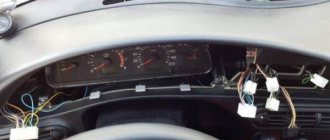
Sometimes there is a need to remove only one visor on the high instrument panel of a VAZ 2109 without removing the entire panel. Often this point is not described in the manuals; the emphasis is on dismantling the entire dashboard and disconnecting it from the car body. At the same time, to access the instrument cluster, for example, to install LEDs for dial illumination instead of standard lamps or install another instrument combination, there is no need to dismantle the entire instrument panel; it is enough to remove only one visor.
In this article we will look at how you can do this yourself.
Before starting any work on the vehicle's electrical wiring, it is necessary to disconnect the negative terminal from the battery to avoid possible short circuits in the wires.
Helpful: New wltp and rde tests for fuel and emissions savings
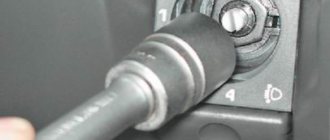
Remove the headlight/low beam switch button from the panel using a screwdriver. The button is tight, you need to be careful not to damage it.
Disconnect its connector from the button.
In the same way, remove the emergency button. It will be more difficult to pull it out, we also need to be careful.
Disconnect its connector.
Using a Phillips screwdriver, unscrew the two screws securing the tidy console trim, also called the “beard.”
Having unscrewed the screws, we bend the beard down, holding it from below with another self-tapping screw.
We take out the radio and disconnect all its connectors, or the standard plug if you do not have a radio in your car.
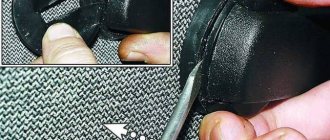
There are 3 metal latches (2) on the top of the visor, and 2 plastic tabs (1) on the bottom edges. To remove the visor, you need to press them out one by one and release the instrument panel visor.
We start with the two top latches, use a screwdriver to press them through the niche for the radio, and slide the visor towards you. Caution is also necessary here as the latches are fragile and can come off.
Next, use a screwdriver to press out the two lower plastic fasteners of the visor and lift the visor up.
Raising the visor, unhook the third upper mounting bracket, located on the left. Well, having disconnected the electrical connectors of the cigarette lighter, its illumination and the emergency signal lamp, we release the visor.
That’s it, access to the instrument cluster is free, just don’t forget that the connectors and speedometer cable are holding it at the back. If you need to remove the instrument panel combination, for example, in order to illuminate the instrument scales from the inside, do not forget to turn off the whole thing.
How to remove the instrument panel from a VAZ-2114
Before you finally remove the dashboard on the VAZ-2114, you need to understand the specific components that will have to be dismantled:
- a key component on which the BC is attached, a block of various devices, as well as all kinds of keys, switches and other components;
- a trim that is installed on the VAZ-2114 mainly for beauty, but also has air duct outlets;
- plugs;
- brackets;
- ashtray body;
- crossbars;
- shield;
- central bracket;
- console screens.
If you are going to remove the instrument panel from a VAZ-2114, you will have to remove all these elements separately. Moreover, each of them has its own fastening features and you will need to use different tools, since you will need to remove the shield and, for example, the brackets in different ways.
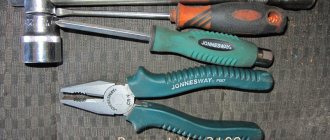
Tools and materials
To remove all the necessary elements, it is not at all necessary to have any expensive tools or special equipment. It is enough that the garage has a standard set of screwdrivers, as well as instructions for working with the VAZ-2114.
Sequence of operations when removing a torpedo from a VAZ-2114
In order to remove the instrument panel from a VAZ-2114, it is enough to do everything in accordance with the simple instructions given below:
- Using a Phillips screwdriver, remove the 3 screws securing the left console screen to the dashboard. It is recommended to get a short tool, as it is much more convenient.
- Carefully remove the lower part of the trim from the body bracket, removing the screen.
- Remove all screws securing the console screen to the panel. At the same time, do not forget to constantly belay the pad with your hand.
- Remove the screen. At the same time, be sure to ensure that it does not cling to any kind of cords.
- Disconnect the connectors to disconnect ground from the battery. If a radio is used in transport, then in this case it should also be separated from the main wires by removing the connecting block. If it is not in the car, it will be enough to remove the wires from the dashboard, making sure that they have a plug. Be sure to turn off the cigarette lighter and also remove the socket with the light bulb that illuminates the ashtray.
- Remove the handles from all levers that control the heating dampers. It is recommended to pry them off with a flathead screwdriver to make the procedure easier. There is a special protrusion on the lever, and when the handle is installed, it is combined with the lever through a special hole. That is why, when removing it, you should use a thin screwdriver to pick it up and lift it, freeing it from this protrusion.
- Remove the electric fan toggle switch (you just need to pull it out of the connector).
- Unscrew all the screws securing the VAZ-2114 dashboard to the brackets on both sides.
- Release the shield and trim by removing two self-tapping screws located in the window near the instrument unit;
- Take out the plug and remove the screw located behind it.
- Remove the two screws that hold the trim in place at the bottom, then pull it out.
- Label the wires to identify which switches they go to, then unplug them.
- Remove all bolts from the steering bracket.
- Unscrew the screws holding the lower bracket mount.
- Remove the light guide.
- Remove the element securing the heating control unit, and then remove the cartridges that are located behind it.
- Remove the decorative insert, removing any external components.
- Remove the hydraulic corrector lighting.
- Loosen all the fasteners of the panel, then remove the bolt with which it is secured to the crossbar, located on the left side.
- It remains to remove the VAZ-2114 torpedo.
How to change the mileage on a VAZ 21099
What prompted us to write this note was the question of how the mileage that cars travel on Russian “motorways” is actually displayed on the odometer. Agree, believing what the speedometer indicates, taking into account how widespread it is, when buying a car, will only occur to a completely gullible person.
Why is it necessary to wind the speedometer (mileage)? How to wind up a speedometer?
, like in no other country in the world, checking mileage is a more widespread procedure. Well, it’s not customary for us to demonstrate the actual mileage that a car has covered. The most fascinating thing is that winding up the speedometer, by hook or by crook, has a real reason. Practically, impartial reality forced us to the widespread dissemination of the “rewind the speedometer” procedure.
In the ancient times of the existence of such a country as the Russian Alliance, and even more so - the times of perestroika and post-perestroika collapse, Russian monsters of the automobile industry produced the “most modern”, “ultra-reliable” cars “Volga” and “Zhiguli”, assembled with the latest technology. Oh, yes - and also Moskvich.
Naturally, there were also “Cossacks,” but this magic of technology deserves another review: for example, “how to hand over scrap metal.” The quality of the products left us wanting not just the best, but a lot of the best. There was virtually no talk about a sufficient supply of spare parts.
We had to travel around towns and villages in search of the necessary parts.
It’s worth remembering, but for those who can’t, just take into account that these iron monsters have already achieved almost half a year of repairs after 120 thousand km. Standard problems that arise after such a run: a clutch that requires replacement, problems with the chassis, lost compression, an engine whose properties beg for a complete overhaul, etc.
So, if you don’t improve the mileage on a VAZ, it will be very difficult to sell such a car. Or for means that didn’t make much sense. But you still need to sell. Naturally, this bright idea first came to the owner of the car: HOW to twist the VAZ speedometer? An easy procedure - and the trusting client is sure that he will still travel a couple of 10 thousand km. This, in fact, is where the legs of the uncontrollable passion of our car enthusiasts grow from to wind up the speedometer at any cost.
How to change the mileage on a VAZ 21099
If checking the mileage on a VAZ is quite simple even for an inexperienced mechanic, then on modern cars ordinary mechanical odometers have begun to be replaced with increasingly complex devices. But it is unrealistic to suspend our person if he really needs to rewind his mileage. Now you can check the mileage on any car.
Yes, every day, with the development of technical thought, the procedure for winding the speedometer becomes more and more difficult.
The kilometers traveled by the car are now stored not only in the chip of the speedometer itself, but are also duplicated in completely different modules. Data can also be stored in the ignition module. And in the key, in the immobilizer, in the light module, in the interior and brake control units, in the engine control module - anywhere! The microcircuits into which data is recorded are conventionally dubbed “dots”. Depending on the car manufacturer, there can be from one to 4 such points!
Speedometer winding has become available only to highly qualified specialists with the most modern equipment. Although the development of the process itself did not undergo any special changes.
- The first method to change the speedometer is to reprogram the memory with data by connecting a programmer directly to it.
- The second method for checking mileage is programming the memory by connecting the programmer to the connector on the composition of devices in the car.
- The 3rd method of winding the speedometer is programming the memory with data by connecting the programmer to the car diagnostic connector.
THIS IS INTERESTING: Replacing the faucet of the VAZ 2109 stove
The 1st method requires a huge amount of time and labor, but the 2nd method is much more science-intensive. He asks the mechanic to figure out both the memory encryption and what protocols are used to access it.
The 3rd method of winding up mileage will become virtually impossible in the near future. Manufacturers do their best to deny access to non-certified mechanics and electricians to programming car microprocessors. In other words, the newer the car, the more difficult it is to check the mileage on it, and the less likely it is to check the speedometer through the diagnostic connector.
Well, such a thing as storing data at several points significantly increases the financial costs of those who want to change the speedometer.
Let's summarize: winding up the speedometer of a new foreign car is an expensive pleasure, but checking the mileage on a VAZ is completely time-consuming and affordable.
Source: https://vivauto.ru/kak-smotat-probeg-na-vaz-21099/
The final stage of work
The high panel of the VAZ is dismantled carefully, since there are latches on the left that quickly break. After disconnecting the block from other elements, the entire instrument cluster is dismantled. The final step involves disconnecting the cable from the speedometer. If the Europanel is equipped with additional equipment, then you need to be even more careful. Tuning a torpedo involves disconnecting the block from the following units:
- on-board control system;
- ignition relay;
- remaining panel instruments;
- backlight lamps.
You will need to unscrew the screws for the lower fixation of the torpedo on both sides. Using a screwdriver, pull out the plug and unscrew the screws for the side fixation of the torpedo. The europanel is removed at the final stage. Installation of a new structure of this type is carried out in the reverse order. Upon completion of this procedure, the operation of the switches is checked.
Often, tuning a VAZ torpedo involves dismantling the plastic and removing the panel board. On the steering rack in How to remove and clean injectors on a VAZ 2110; How to check on a VAZ 2109. remove the golf dashboard 2 panel, when you remove about 2-3. In this case, you will need the following tools and materials:
- soldering iron;
- europanel or insert;
- ultraviolet light bulb;
- wires;
- light bulbs;
- cartridges;
- glue;
- marker.
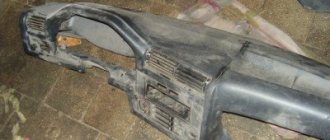
Initially you will need to remove
old europanel, remove glass and existing trim. The insert and arrows are carefully pulled out. Particular attention should be paid to the new insert. It is recommended to make holes with some margin. This will prevent the arrows from sticking.
Further tuning is based on dismantling the standard backlight. This may break the plastic. Initially, the board is dismantled. Experts advise first drawing on paper the existing connection diagram and connections.
The standard lighting is replaced with neon lamps. Neon is glued to the panel. A plastic protection is fixed on top. In this case, you need to check whether this structure is securely held. How to properly remove a torpedo on a VAZ-2110 without damaging it: step-by-step instructions. The block with which the neon lighting is controlled should be glued to the europanel. To do this, you can use glue or double-sided tape.
Such tuning is easy to do with your own hands. An important point is the installation of the panel and the correct connection of its devices to the network. A detailed article with a video on how to replace the daytime running lights (DRL) lamp on a Lada Granta with your own hands, photos and videos, article numbers. For this, auto mechanics recommend using books on repair and operation of the VAZ 21099.
VAZ 21099 instrument panel does not work reason
- Tips for motorists
- The instrument panel on the VAZ 2109 does not light up: do-it-yourself repairs, popular faults Types of panels
- Why doesn't it light up?
- Popular faults
- 1 Topic by Andrey08 2009-12-16 13:01:12 Topic: Not Working: All Tidy, Wipers, Fern Guard on VAZ 21099
- Re: Not working: All tidy, wipers, fern on VAZ 21099
- Re: Not working: All tidy, wipers, fern on VAZ 21099
- Re: Not working: All tidy, wipers, fern on VAZ 21099
- Re: Not working: All tidy, wipers, fern on VAZ 21099
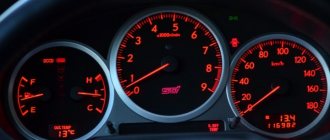
There can be at least three options for instrument panels installed on a VAZ 2109 car. The first combination of the instrument panel is placed on those “nines” where there is a low front panel. The second instrument panel combination is installed on “nines” with a high front panel. And the last third instrument panel combination, which is already electronic, is installed on “nines” with a “European panel”.
On instrument panels that are placed on a low panel in VAZ-2109 cars, there will most likely not be an option with a complete failure of the entire instrument panel. Since on these panels, the speedometer and econometer are mechanically driven, and the likelihood that they will fail together with electrical devices and warning lamps is very small. There is no econometer on the high-panel instrument panel, but the speedometer also has a mechanical cable drive.
If all electrical devices and warning lamps on all three versions of the dashboards stop working, then first of all you need to open the hood, then unfasten the cover of the mounting block and see if the fuse through which power is supplied to the instrument panel is intact. The fuse markings are located on the inside of the mounting block cover. Depending on the year of manufacture of the car and what combination of instruments is on it, you need to check the fuse designated as F5 or F16.
If the fuse is intact and its contacts are not oxidized, then next you need to see if power is supplied to the instrument panel . This can be done using a control lamp with the ignition on. Disconnect connector X4 on the mounting block and check whether there is voltage at pin No. 3.
The fact is that the mounting block on the nines will always be wet during rain, it’s not for nothing that drivers call this place a swamp, and because of this, oxidation of the contacts in the pads often occurs, which leads to electrical failures. Sometimes not only the contacts, but also the circuit board of the mounting block oxidize.
If the driver was unable to find a fault in the above mentioned places, he will have to remove the instrument panel and check the condition of the contacts in the two blocks, as well as the reliability of the connection of the ground wire, but this is already more painstaking work.
The instrument panel on the VAZ 2109 does not light up: do-it-yourself repairs, popular faults
- Types of panels
- Why doesn't it light up?
- Popular faults
When the instrument panel on a VAZ 2109 does not light up, this is one of the common malfunctions of this unit. To fix a problem, you first have to find the cause of its occurrence.
THIS IS INTERESTING: Replacing the valve cover gasket for Daewoo Nexia 16 valves
Tidying up nine
How to do easy tuning of the VAZ-2109 dashboard with your own hands
During the modernization of the interior of the domestic “nine”, tuning its “tidy” becomes a truly indispensable element. Beautiful modifications can be done with your own hands. To do this, you will need to make a new dial on a computer using special design programs and printing the picture on a printer.
However, first you need to clearly think through the appearance of the dials for the car's tachometer and speedometer, as well as for all the sensors that remain. Once the dials are printed, they need to be laminated, and then you can start removing the instrument panel.
To dismantle it correctly, you must first remove the steering wheel pads and also mark the steering position relative to the shaft. Then carefully unscrew the fastening nut.
Next, you can remove the steering wheel and unscrew the screws that are located in the area of the car lower casing. After this, you will have to disassemble the steering column. When the instrument panel is removed, you should unscrew the arrows from the old speedometer and tachometer. Subsequently, they will be attached to the updated dials.
When tuning a VAZ 2109 with your own hands, you can also repaint the dials and hands in bright colors. Regular spray paint cans are suitable for this. At the same time, it is better to make the dial a rich black color.
You can make it matte using special products. In this case, the arrows need to be painted in bright pink or original red-burgundy tones. After the painted plates of the machine dial have dried, they are completed with an old or pre-prepared scale and removed hands.
In a situation where the owner wants to modernize the instrument panel in a more modern way, he should also use a special (original, as in the video) backlight. You can add an original touch using a fluorescent marker, but more on that below.
How to remove a torpedo on a VAZ 2109 low
- Remove the three heater control knobs.
- Remove the heater fan switch handle by pulling it toward you.
- Remove two screws securing the instrument panel console trim on both sides of the console.
- Slide the cover towards you.
- Disconnect the block with wires from the rear fog lamp switch.
- Disconnect two connectors with wires and one wire from the heated rear window switch.
- Disconnect the block with wires from the hazard warning switch.
- Remove the wiring harness from the exterior light switch.
- Disconnect the connector with the cigarette lighter illumination wires.
- Disconnect the connector with the cigarette lighter wires and remove the console trim.
- Remove the four screws securing the heater control panel.
- Remove the two screws securing the instrument cluster visor.
- Remove the instrument cluster visor.
- Compress the spring clips.
- Remove the instrument cluster housing from the panel.
- Unscrew the fastening nut and disconnect the cable from the speedometer.
- Disconnect the white block with wires from the instrument cluster.
- Remove the hose from the econometric fitting.
- Remove the cotter pin.
- Disconnect the trip odometer reset cable from the speedometer.
- Disconnect the red connector from the instrument cluster.
- Remove the handles for the headlight hydraulic adjustment and the instrument cluster lighting switch by pulling them towards you.
- Unscrew the nut securing the instrument cluster lighting switch.
- Unscrew the nut securing the headlight hydraulic corrector socket.
- Remove the steering wheel and steering column switches.
- Turn the ignition key to position “1” to turn off the anti-theft device, and disconnect the ignition switch wiring harness.
- Remove the two bolts and two nuts securing the steering column pipe.
- Remove the steering column pipe along with the ignition switch.
- Pull the carburetor choke handle towards you until a draft appears, and remove the handle from the rod.
- Remove the two screws securing the air damper guide rod to the instrument panel.
- Remove the screw that secures the instrument panel on the left side.
- Unscrew the screw of the lower fastening of the instrument panel on the left side.
- Remove the screw on the side securing the instrument panel on the right side.
- Unscrew the screw of the lower fastening of the instrument panel on the right side.
- Unscrew the screw securing the instrument panel in the glove box.
- Unscrew one screw securing the instrument panel console on both sides and remove the instrument panel.
Installing a low torpedo on a VAZ 2109 is carried out in the reverse order of removal.
If your car has a low dashboard, we recommend installing overlays on the VAZ 2109 panel, they will give the car interior a more modern look and ease of use of the dashboard as a whole.
Fuel consumption of VAZ 2114 at idle speed
How to reduce fuel consumption on a VAZ 2114 is a question many car owners ask. What the gasoline consumption of a VAZ 2114 should be is usually indicated in the factory documentation. It ranges from eight to 9 liters. per 100 km.
This spread depends on the driving style and its mode (city, highway, mixed). If the characteristics of your steel “favorite” fit into these frameworks, then most likely no intervention will reduce them.
But if your VAZ 2114 has high fuel consumption, then this is already a reason to carry out diagnostics and most likely repair the systems of your car.
If you yourself do not have sufficient knowledge or skills, then it is better for you to contact a special workshop where they will accurately answer the question: why the fuel consumption of the VAZ 2114 has increased.
Here we will talk about possible causes and methods for eliminating them.
Prerequisites for the huge fuel consumption of the VAZ 2114
Possible reasons
Increased fuel consumption of the VAZ 2114 may be caused by the following reasons:
- Clogged air supply filter;
- Inadequate tire pressure;
- The fuel filter is dirty;
- Unusual wheel radius;
- Malfunction of the oxygen supply sensor;
- DSA is out of order;
- Incorrect DPRV readings;
- Low fuel pressure;
- Low compression.
First, let's look at the simplest reasons for high fuel consumption.
Gasoline consumption on a VAZ 2114 may increase due to a dirty fuel filter; check it for debris and replace it if necessary. Dirt packed into the air filter can increase the gasoline consumption of a VAZ 2114 by about three liters. Despite the fact that its cost is about 100 20 rubles. Very low tire pressure also has a negative impact, as does an unusual wheel radius. It’s clear: in order to turn a larger wheel, more force is required.
Next, let's find out which sensors affect fuel consumption
The lambda probe assesses the state of the exhaust (the presence of oxygen in the exhaust gases). In other words, based on the volume of oxygen in the exhaust, it provides regulation of the working consistency. It is installed in the exhaust system; it must be emphasized that it is the only one located on the “pipe”, so you can’t go wrong. An oxygen sensor error can be seen either with the help of an on-board vehicle, or when passing diagnostics at 100. Here are some prerequisites for its “death”:
- Poor quality gasoline;
- Stiff valves;
- Incorrect mixture;
- Oil scraper rings allow oil to flow into the mixture;
- The advance angle is set incorrectly.
THIS IS INTERESTING: Replacing brake discs on a Hyundai Solaris
Lambda probe VAZ 2114
If the fuel consumption of the VAZ 2114 has increased, then you should also check the speed sensor. It transmits data about the current speed of the car to the control unit, and it monitors the operation of the engine in idle mode and controls the air supply, bypassing the throttle valve. It is diagnosed in the same way as the previous one. This device is located on the top of the box. Some signs of its malfunction:
- The engine stalls at idle;
- Interruptions in the operation of the speedometer, or its complete failure;
- Idle speed “floats”;
- High fuel consumption;
- Loss of engine traction.
Fuel consumption of VAZ 2114 at idle speed
Speed sensor VAZ 2114
Next comes the camshaft position sensor or, as it is also called, the phase sensor. It works in a phased injection system, determining the engine operating cycle and generating a pulse signal. It should be clarified that it is not installed on all VAZ models. A malfunction is indicated by a “check” light on the dashboard. The functionality check is also determined at 100, or when reading error data on the BC. How to “identify” that he is acting up:
- Engine dynamics drop;
- Gasoline consumption increases;
- The self-diagnosis mode fails.
The average fuel consumption of the VAZ 2114 also depends on the working condition of the fuel pump. On this VAZ model it is electronic, and wear of its parts leads to a drop in pressure in the fuel supply system, which certainly does not have the best effect on consumption. You can find out this parameter by measuring it using a pressure gauge on the fuel frame of the engine. Here are the symptoms that should alert you to the pump:
- The engine is shaking;
- Power drops;
- Consumption increases;
- The engine stalls at idle;
- CO is overestimated.
Frozen pressure in the fuel rail of VAZ 2114
The condition of the injectors is also important. At times, during engine operation, they become clogged and need to be cleaned. There are various options for this procedure: turn to specialists, clean it yourself (if you know how to do it), use additives and consistencies specially created for these purposes, or connect the car to a special stand. The choice is up to you. Reasons for injector inspection:
- Excessive consumption of fuel;
- Increased exhaust toxicity;
- Unsatisfactory engine dynamics;
- When accelerating, dips are felt.
Injectors VAZ 2114
Increased consumption in idle mode
Does the VAZ 2114 have higher fuel consumption at idle than normal? There are sensors watching everything here too! Typical consumption, with the electronic load completely turned off, is 0.8-1 liters per hour. If this indicator is very much exceeded on your car, then we check the sensors described below.
Idle speed sensor (ISR). Its purpose is to automatically adjust idle speed. It is located on the throttle assembly, or rather secured with a pair of screws on its cover. This sensor does not have an electrical diagnostic system and therefore its condition can only be judged by these signs:
- When starting a cool engine, high speeds are not observed;
- The engine stalls at idle;
- Idle speed “floats”;
- When you turn off the speed while driving, the gearbox stalls.
Idle speed regulator VAZ 2114
TPDZ. A device for a clear dose of consistency or, more simply, a throttle valve location sensor. By its name you understand that its function is to “show” to the controller what position the throttle valve is currently in. It is part of the throttle assembly and is attached to its body. The malfunctions of this device are very identical to the symptoms of DXX, but it is connected to an electrical diagnostic system and if it breaks down, the “check” light will notify you about it.
In addition to all the circumstances listed above, there are some more: insufficient compression in the engine, incorrectly set ignition timing, the gas distribution system is not adjusted, lack of spark plugs, breakdown of high-voltage wires. These prerequisites can also have a negative impact on the average fuel consumption of the VAZ 2114.
If you feel the strength within yourself to remove them, then go ahead! If you have doubts about this, it is better to contact a special service center, this will help to avoid unnecessary costs.
Source: https://avto-melvin.ru/rashod-topliva-vaz-2114-na-holostom-hodu/