Work progress
- Using a thin screwdriver, press the trim of the window handle away from the socket and move it so that the protrusion on it disengages from the socket. Remove the trim and window handle.
- Remove the socket.
- Using a screwdriver, carefully press out the lock of the plug and remove it from the inner handle of the armrest.
- Remove the two screws securing the inner armrest handle.
- After pressing the inner lock handle, turn the armrest handle up and remove it, moving the lock handle out of the armrest handle hole.
- Unscrew the lock button.
- Unscrew the screw securing the outside rear view mirror control mechanism handle and remove it from the lever.
- Remove the triangular trim by removing the two pistons that secure it from the door holes.
- On the rear door, unscrew the three fastening screws and remove the trim.
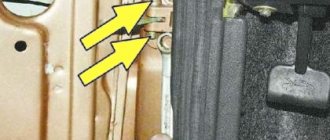
- The upholstery is secured with eight pistons, the location of which is shown by arrows on the front door and...
- ...on the back door. To remove the upholstery...
- ...using a screwdriver, press the upholstery so that the fastening pins come out of the holes in the door. Insert the screwdriver as close to the pistons as possible, otherwise you may tear the pistons holders away from the upholstery.
- Remove the spacer sleeve from the window lifter shaft.
- Replace damaged door trim fastening pins. To replace the piston, cut it off, then insert the protrusion of the new piston into the hole in the holder and, pressing the piston, turn it until it is fixed in the holder.
- Install the upholstery in the reverse order of removal. In this case, the threaded end of the lock lock rod should fit into the hole in the upholstery.
- Secure the pistons in the door with gentle blows of your fist.
- If the edge of the seal gets under the upholstery, carefully pull it out.
- If it is necessary to remove the front door pocket, unscrew the three lower and one upper screws (the upper screw is short) securing it and remove the pocket from the door. Install the pocket in the reverse order of removal.
Removing the tailgate of VAZ-2111 and VAZ-2112 cars
Replacing glass on VAZ-2110, 21102, 2112
This is interesting: How to replace the front brake pads of a VAZ 2110
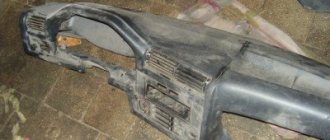
Radiator frame
This body part of the “tens” is called a TV. The element is replaced in the event of a strong front impact, when the “original” part is easier to replace than to repair.
As a rule, in an accident during a frontal impact, the upper frame and the beam, which serves as a reinforcement for the bumper, are most deformed. But the TV is changing completely in any case.
According to experts, replacing a TV on a “ten” is much easier than on a “nine” or other models released by AvtoVAZ earlier. This is explained by the simplicity of the design of the “Desyatovskaya” radiator frame.
Note. In some cases, you can find the upper frame and lower beam separately for sale.
The TV is mounted to the body using welding points. They are located in 4 places - the radiator frame is attached in the places where it connects to the wing reinforcements (“booms”) and to the side members. To dismantle the TV, it will be enough to drill out the points in these places and then cut them off with a sharp chisel.
Advice. In the process of removing the TV, it is possible to dismantle the radiator itself, only in this case you must remember to disconnect the radiator pipes.
After the new radiator frame is put in place, the welding areas will need to be thoroughly cleaned with an emery wheel and puttied. In places where the frame touches the body, sealant must be applied.
Replacement options
Drivers have several options for replacing door trim, each of which has its own advantages and is chosen based on taste:
- Eurocard;
- European cladding;
- panels from the manufacturer;
- independent re-upholstery.
Factory trims from AvtoVAZ are replacement kits for the original trim. They are made of plastic and additionally covered with decorative inserts. The advantages are the exact overall dimensions, ease of installation of clips, and compliance with the door dimensions. Frequently used sheathing kits Lux 1 or Lux 2.
With European cladding, the door lining is made of high-strength polymers and comes in a variety of colors. Manufacturers are small companies specializing in car tuning.
Self-upholstery does not require large investments and is within the capabilities of every driver. The material you can use is textiles, natural, artificial leather, velor, etc.
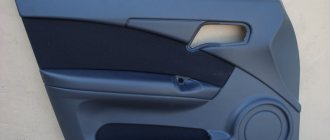
How to remove the door trim of a VAZ 2110
Very often situations arise when you need to remove the door trim of a VAZ 2110. Either in order to install sound insulation, or to see why the window regulator does not work, or to install a speaker in the car door. So, in this article I want to show you how to do this quickly and without much difficulty.
I’ll say right away that performing this action is very simple, and you won’t need mountains of tools. Prepare only a knife (or flat-head screwdriver) and a Phillips screwdriver. I would like to warn you right away that it is advisable to buy new clips for the door trim, as they may break when removing the trim. Moreover, if you have already decided to remove the door cards, it would be a good idea to work on eliminating their creaking. You can read how to do this here.
Tools and materials
To reupholster yourself you will need to prepare:
- Sheathing material.
Experienced drivers recommend using vinyl, but keep in mind that the material shrinks significantly. Before purchasing, you must take measurements and leave at least 10 cm for allowances and internal bends. If genuine leather or suede is used, allow up to 5 cm for allowances.
- Scissors with a long blade.
- Glue. For repairs they use Moment, Master, Titan.
- A construction knife with a small blade and a sharp end.
- Construction or household hair dryer. It is not recommended to use a heating lamp as it may deform the material.
- Glue brushes: thin, wide.
- Set of clips.
For the VAZ 2110 they produce special sets of fasteners, the cost of a set of 10 clips is 30 rubles. Each door will require 8 clips. It is recommended to buy latches with a reserve. During installation, several clips often break, since the fasteners are consumer goods and the quality of the fasteners is not regulated.
- Self-tapping screws. If you use independent re-upholstery of the cladding on the old casing, then use standard short self-tapping screws; when installing factory casing or Eurocard, purchase a set of long self-tapping screws.
- Crosshead screwdriver.
- A thin screwdriver with a wide blade.
Lux 2 panels and Euro casings have standard places for speakers with a diameter of 17 cm. If the standard Lada audio system has smaller speakers, then you will need to select it to fit the size of the hole or add a rubber or plastic insert to the part to fit the speaker tightly to the mesh.
Dismantling
At a service station, a mechanic spends no more than 15 minutes to disassemble door panels. Self-replacement will go quickly if you adhere to the order of work and do not change the sequence.
Front doors
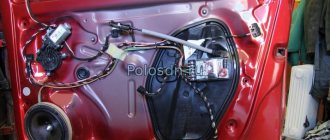
The work algorithm for the front and rear doors of the VAZ 2110 is slightly different. Before work, you must disconnect the negative terminal from the battery. If the standard trim is reinstalled on the Euro trim, then it is necessary to remove the window lifter lever.
How to remove the front door trim of a VAZ 2110 step by step:
- Wrap the screwdriver in a rag or cover the tip with electrical tape.
- Using a screwdriver, press the trim of the window handle away from its socket.
- Guide the screwdriver so that the panel comes out of the grooves.
- Dismantle the cladding and remove the socket.
- Using a screwdriver, press out the lock of the driver's door armrest plug.
- Remove the clamp.
- Unscrew the two screws that hold the handle.
- Press the inner handle of the armrest, turn it up, and remove the part.
- Unscrew the screw that holds the mirror mechanism and remove it from the lever.
- Remove the two fastening clips from their seat and remove the triangular trim.
- Carefully slide the screwdriver under the panel and unfasten the 6 clips.
If the driver's or front passenger's door is equipped with a power window, then after removing the handle lock, you need to disconnect the plug.
Rear doors
The differences in work when removing the door trim are based on the fact that power windows are rarely installed for rear row passengers. Removal of the rear door trim is carried out in the following steps:
- Use a thin screwdriver to pry the trim on the door handle and remove the part from the grooves.
- Unscrew the two bolts located under the trim.
- Carefully move the handle to the side, remove it from its seat, and pull it out.
- Unscrew the three screws securing the lower rear door trim panel.
- Remove the bottom panel.
- Unscrew the latch blocking the door from the inside.
- Pry off the cladding panel with a screwdriver; you can use a wooden wedge, bend it back and snap off the fastener clips.
The plastic clips must be reinstalled with new ones when assembling the updated door card.
This is interesting: What is the purpose of a turbine in a car?
Photo report on the dismantling and installation of the casing
Now you can proceed directly to the work itself. So, open the car door on which all this needs to be done and unscrew the three screws securing the lower door pocket. Look clearly at the photo below:
Then you need to do the following:
- push the bottom part back slightly
- carefully move the pocket down, thereby removing it from the grooves in the casing itself
If you have front speakers installed in the doors on a VAZ 2110-2112, then you need to unscrew the 4 bolts securing them along the entire diameter:
Then we perform the following procedure:
- carefully push the speaker back to pull it out of its seat
- disconnect the power wires from the contacts on the inside
Now you can proceed further. We take a thin screwdriver or knife and carefully pry up the trim on the door closing handle, after which we simply remove it by hand.
As you can see, under it there are two more bolts that also need to be unscrewed:
Then you can remove the handle, since nothing else holds it:
- turn it up slightly
- and disengage with the door opening handle
Almost everything is done. There are several points left, one of which is unscrewing the latch locking the front door of the VAZ 2110.
Now, carefully, starting from the bottom corner, we pry up the casing and also carefully try to tear it off the latches (plastic clips) that secure it to the metal part of the frame:
And then we move in small sections in a circle, but we must act carefully so as not to damage or break the upholstery itself. At the last step, we lift it slightly up to free it from the door lock control rod (on which the latch, which we have already unscrewed, is screwed on):
This repair procedure can be considered complete. Then we carry out those actions for the sake of which all this was started; for everyone here there will be their own goals. After completing the repair, install in the reverse order.
Self-upholstery
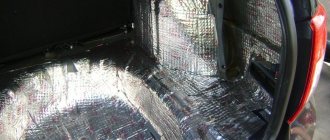
Before directly reupholstering, it is recommended to check the condition of the inner door panel, remove pockets of corrosion, check or replace sound insulation, replace rubber seals, so the doors will open better. For VAZ 2110, the service life of door seals is up to 3 years. The process of re-covering a door part yourself step by step:
- Clean the outside of the card. You can sand it with fine-grain emery for better adhesion of glue and leather.
- Attach the door card to the material, cut around the perimeter, leaving at least 7 cm around the edges.
- Treat the outer surface with glue and the inside of the future cladding with glue. Apply glue according to the manufacturer's recommendations. If an adhesive composition is used, then after coating you need to wait up to 10 minutes.
- Place the vinyl on the door card, constantly heating the material with a hairdryer, and level the surface so that the leatherette fills all the curves of the part: the space for the speaker, for the central panel, the recesses for the handles.
- Cut out all the holes that are covered with vinyl in the door card from the center and not reaching the perimeter, carefully wrap it on the wrong side, making sure that the edges of the fold do not exceed 2-3 cm. Trim off the remaining vinyl.
- After gluing the card, trim off the remaining vinyl, leaving at least 3-5 cm on the inside of the card perimeter.
After the glue has completely dried, install the door card on the car in the reverse order, having first changed all the clips.
Repair and replacement of doors for VAZ (lada) 2110/2111/2112
After finishing removal, clean the cards from dust using a vacuum cleaner, and begin tuning yourself.
First of all, measure and cut the necessary “patterns” for all door cards, taking into account an allowance of 5 or even 7 centimeters for each side.
This is so that during the process of gluing the sheathing material you do not have to install patches or redo everything all over again.
The glue must be applied to the cards with brushes one at a time so that it has time to dry a little, but not dry out. Having coated the doors with glue, we proceed to the cut piece of vinyl or fabric, which we also coat with glue on the back side, and set aside for 10-15 minutes.
After this time, we proceed directly to gluing the upholstery to the door cards. Vinyl stretches well, filling door “cavities”, but for this it needs to be heated with a hair dryer and smoothed over each cavity and bulge with your hands, preferably with gloves. The edges need to be carefully folded inside out and trimmed.
We subject the remaining doors to the same procedure. In addition, it is advisable to paste the same material over other parts of the interior so that it is in the same style.
These include door handle inlays, the glove compartment lid (if you want to highlight it), triangles at the mirrors, and the top cover of the steering casing. In places of various fastenings, you need to cut small holes using a stationery knife.
When reinstalling, do not forget to replace damaged pistons.
Sometimes this item may need to be replaced due to damage. Also, the upholstery may wear out or deteriorate during use. At the same time, the appearance of the car inside the cabin also deteriorates. Therefore, the upholstery needs to be replaced with new one.
To work you will need :
- Screwdriver.
- Pistons.
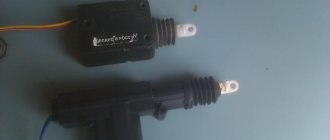
On the left are the herringbone clips, on the right are the Euro-type clips - they hold better.
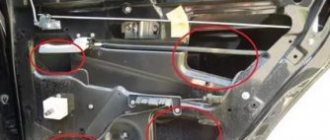
Fastening places
Almost all trims in cars, including the VAZ-2110, are fastened using pistons . Sometimes in certain places the casing can be held on by screws. The fastenings of the front and rear trim may differ in some places, but the principle of removal is the same.
It is worth noting that the front trim is easier to remove than the rear, since the front has electric windows, and therefore you do not have to additionally remove the handle to lower the windows.
The pistons are located around the perimeter of the upholstery. The screws can also be located in the middle.
Removing the door trim on a VAZ-2110
The process is done like this:
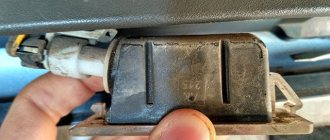
- Remove the door lock button. It can be unscrewed by hand or with a screwdriver.
Remove the door lock button.
In the photo, arrows show the locations of the pistons.
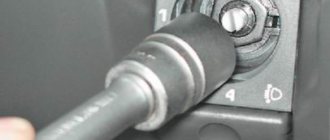
Important! Sometimes the decorative trim of the rear view mirror can get in the way. It also needs to be removed. To do this, unscrew the screw located in the mirror adjustment knob.
Installation back
Work on installing new casing is carried out in the reverse order. Before this, you should buy new pistons. The upholstery must be installed in place using light blows so that the pistons snap into place. A click will be heard. Then screw all the bolts into place.
When using Europistons, their reverse part is installed on the door, and the piston itself is fixed on the trim.
Installation of a ready-made kit
Re-upholstering the cladding yourself does not always help save time or money. If you don’t have time to do this yourself, then you can use ready-made cladding.
The set of door elements Lux 2 from AvtoVAZ has additional sound insulation, a set of standard fasteners, mesh for speakers and screws. Installing a finished panel takes up to 20 minutes for an inexperienced driver. When choosing a casing, choose original replicas; if the set contains only four panels, then the speaker grids, caps and screws must be purchased separately.
The lower part of the door trim needs to be screwed in only with long screws; if the standard kit offers short ones, then you need to change the screws yourself.
Installation of Lux 2 cladding in steps:
- Remove the old card.
- Attach a new panel, check the gaps and the alignment of the fastener locations.
- If the car is equipped with a mechanical window lift, then the panel needs to be modified. Lux 2 does not have a hole for the handle of a mechanical lift.
- Secure the trim to the clips.
- Tighten all the bolts and secure the outer trim panels.
Cost and types of finished skins
At a specialized service station, the cost of reupholstering a door trim starts from 3,000 rubles. excluding the cost of the door card. Depending on the model, in 2021 the following prices for ready-made kits for the VAZ 2110 remain:
- factory replicas from AvtoVAZ and KAMAZ - from 2300 rubles;
- Luxury cladding panels – from RUB 3,200;
- door cards Lux 2 for 16.8 cm speaker – 3500 RUR;
- plastic trim linings - from 300 rubles. thing.
Clips and nets for speakers must be purchased separately.
Fastening
The cost of one door trim piston is from 3 rubles. AvtoVAZ produces plastic fasteners in its workshops. Product code 2108-6302015, 21080630201500, width, clip length 1.5 cm.
The mount has a simple shape and holds the door panel trim using a plastic skirt. The manufacturer claims high quality parts, but in practice, when disassembling the door card, two of the six required clips break. When installing Euro sheathing, on average one clip breaks, this is worth taking into account.