Causes of breakdowns
The reasons for the problems are as follows::
- Damage to electrical wiring inside the system . A similar situation may arise due to manufacturing defects, improper operation or late diagnostics.
- Malfunction of the electronic control unit . Many factors can cause this problem. The most common ones include the following: electrical intervention by unqualified specialists, a break or short circuit in the wiring system, and water getting into the ECU. In this case, malfunction may affect other vehicle systems, not just the instrument panel.
- Incorrect installation after removal . If the panel is installed in the wrong order or without taking into account the rules, then problems with the operation of the device cannot be avoided. In this case, you will most likely have to contact a specialist for qualified help.
Oxidation of contacts . The oxidation process starts immediately after electrolytes or its vapors come into contact with the contact. Leakage of the substance occurs due to cracks located on the automatic transmission cover or in places where current leads are loose. Vapors appear due to constant recharging of the battery or when exposed to high temperatures (in the heat). The result is operational problems in the instrument panel. Failure for this reason occurs least often, since the contacts oxidize over a long period of time. If you clean them periodically, you can completely eliminate the risk of such a breakdown.
How to remove and disassemble the instrument panel on a Chevrolet Niva
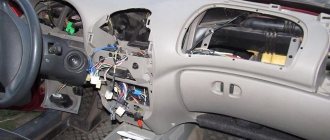
Whatever the problem, you will need to disassemble the panel. You can do this yourself without the help of a specialist. Follow the instructions exactly to avoid additional system failures. Removing the Chevy Niva dashboard is easy if you take into account all the nuances of this process.
Step-by-step instruction
A step-by-step guide will help you remove the instrument panel on a Chevrolet Niva quickly and without errors.
Dismantling includes the following sequence of actions:
In the starting heater casing, remove the two plugs on it and unscrew the screws using a screwdriver
Please note that they are also available on the visor of the device. They also need to be unscrewed.
Carefully remove the right side of the panel
Remove the pads from all buttons, and also disconnect the connector from the MK. Be sure to remember (or film) the entire sequence of connections. This will be needed during reassembly.
Next, proceed to dismantling the left side. This part contains the buttons for the dimensions and headlights. Carefully separate them from the pads and completely remove the PP lining.
Behind the cladding you will see the screws on which the instrument panel itself is attached. Unscrew them, pull out the panel and disconnect it from the connectors.
At this stage, dismantling is complete. Carefully check all parts to ensure they are free of damage and other defects. If necessary, replace them with new ones. At this stage, the cause of the problem is eliminated. After all the work is completed, it is necessary to assemble the structure in the correct sequence.
It includes the following steps:
- Above the PP there are holes in the metal strip. When installed, they should align with the grooves in the panel on both sides. Once the connection between them has been established, reassemble the unit in the reverse order.
- Before installing the PCB itself, install a metal clip on its tongue. It will be needed for further installation.
- At the final stage, press with one hand on the place where the clip was attached, and with the other on the bottom of the visor of the panel itself. You will hear a slight click. This will indicate that the assembly process of the Chevrolet Niva panel was completed correctly and all the grooves matched.
Malfunctions
The PCB is an electronic unit and therefore may fail in the event of a short circuit or open circuit in the power supply. If you encounter one of the problems, then the first thing you should pay attention to is what signs appeared:
- The engine starts and runs, but the panel shows no signs of life. In this situation, there may be no contact on the device connectors. This can be corrected in the following way: you need to disconnect the pads and clean the contacts; this problem can arise when there is an increased level of moisture, for example in winter.
- The tachometer and speedometer stopped working. This may also appear if there is a break in the power supply or if there are problems with the operation of the temperature and fuel level sensor.
- The light bulbs have stopped burning, but all the elements are working as expected, in this case there may be problems in the power wires or in the lamps themselves
Possible dashboard problems
The instrument panel, like other car components, sometimes becomes faulty. Harmful factors for the dashboard of a Chevrolet Niva car:
- break in the power cable or data cable;
- short circuit;
- malfunction of one or more devices.
If the driver sees problems with the operation of the instrument panel, then you need to take a closer look at the signs of panel malfunctions.
- The instruments do not signal at all, but the engine can be started and it runs normally.
- Instrument indicators work normally, but instrument illumination is not observed.
- Speedometer and tachometer do not work.
- The devices do not display information from the fuel level sensor in the tank and the temperature sensor.
"Niva-Chevrolet": instrument panel, designations
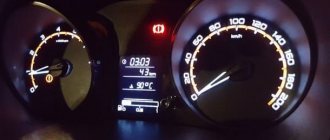
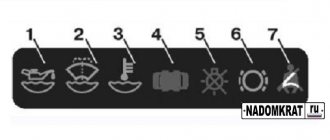
Now let's look at the “screen” itself. What indicators does the instrument panel combine? Chevrolet Niva is not original in this regard. The largest indicators are the tachometer and speedometer. Their round scales are located in the center of the shield. The instrument panel, as well as the instrument panel “Niva-Chevrolet” does not light up, how to remove the instrument panel?. The hands of these devices are driven by small, separate stepper motors.
Below the tachometer there is a liquid crystal screen, which displays information about the ambient temperature, as well as the time. At the bottom of the speedometer scale is the same display informing the driver about the total and daily mileage.
To the left of the tachometer is the coolant temperature gauge scale, to the right of the speedometer is the fuel level indicator in the tank. Both devices have a magnetic-electric design.
Signs of a faulty dashboard
Faulty indicators on the dashboard can be noticed through simple observation . For example, this applies to an arrow indicating the speed of movement or the amount of fill in the gas tank. In this case, they will either remain stationary or change chaotically, regardless of external circumstances and speed of movement.
As a rule, such system failures do not affect the functioning of the vehicle itself . But at the same time they knock down the driver by providing him with incorrect information about the vehicle. For example, you can easily pick up fines for speeding without even knowing about such a violation.
Other signs include flashing of various lights on the panel and problems starting the engine . It is much more difficult to detect malfunctions in the operating system in such a situation, since the symptoms may be associated with breakdowns in other components. To find out that the malfunction is associated specifically with the panel, you need to conduct a thorough diagnosis that will help determine the cause of the problem.
A completely different situation arises if all the devices on the panel fail . In this case, the malfunction is beyond doubt and it is necessary to begin troubleshooting the problem. In most cases, the solution requires disassembling the panel and replacing failed elements. You can do this work yourself, without the help of a specialist.
Main types of breakdowns
Their main faults include the following:
- The instrument clusters do not work , but the engine itself starts without problems. In this case, the breakdown is associated either with the shield itself or with the lack of a power channel.
- The lights on the panel do not work . If all of them do not work, then this is due to a break or chafing of the wires in the entire system. If selectively or partially, then most likely they simply burned out. Then all you need to do is replace them. In this case, you do not have to completely disassemble the panel.
- The speedometer or tachometer device does not work . Under such circumstances, the breakdown is characterized by an electrical type. To troubleshoot problems, you will have to disassemble the shield and look for the source of the problem.
- The fuel level and antifreeze temperature sensors are not functioning correctly This indicates that there are unstable contacts in the electrical circuit. This problem can also affect the improper functioning of the air conditioner in the car.
To eliminate the malfunction, you need to determine the cause of the breakdown and its source.
How to remove and disassemble the instrument panel on a Chevrolet Niva
Whatever the problem, you will need to disassemble the panel. You can do this yourself without the help of a specialist. Follow the instructions exactly to avoid additional system failures. Removing the Chevy Niva dashboard is easy if you take into account all the nuances of this process.
Step-by-step instruction
A step-by-step guide will help you remove the instrument panel on a Chevrolet Niva quickly and without errors.
Dismantling includes the following sequence of actions:
In the starting heater casing, remove the two plugs on it and unscrew the screws using a screwdriver
Please note that they are also available on the visor of the device. They also need to be unscrewed.
Carefully remove the right side of the panel
Remove the pads from all buttons, and also disconnect the connector from the MK. Be sure to remember (or film) the entire sequence of connections. This will be needed during reassembly.
Next, proceed to dismantling the left side. This part contains the buttons for the dimensions and headlights. Carefully separate them from the pads and completely remove the PP lining.
Behind the cladding you will see the screws on which the instrument panel itself is attached. Unscrew them, pull out the panel and disconnect it from the connectors.
At this stage, dismantling is complete. Carefully check all parts to ensure they are free of damage and other defects. If necessary, replace them with new ones. At this stage, the cause of the problem is eliminated. After all the work is completed, it is necessary to assemble the structure in the correct sequence.
It includes the following steps:
- Above the PP there are holes in the metal strip. When installed, they should align with the grooves in the panel on both sides. Once the connection between them has been established, reassemble the unit in the reverse order.
- Before installing the PCB itself, install a metal clip on its tongue. It will be needed for further installation.
- At the final stage, press with one hand on the place where the clip was attached, and with the other on the bottom of the visor of the panel itself. You will hear a slight click. This will indicate that the assembly process of the Chevrolet Niva panel was completed correctly and all the grooves matched.
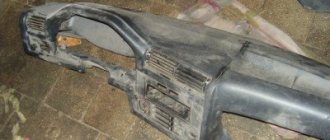
Removing the dashboard of Niva Chevrolet
There is no way without removing the instrument panel and, by the way, replacing lamps is the only repair that the instrument panel is subject to.
If inaccuracies and malfunctions are found in the operation of at least one device, the shield along with the board is replaced. Regardless of whether repair or replacement is needed, the shield will have to be removed. This is done using a Phillips screwdriver and a flathead screwdriver.
Algorithm
The process goes like this:
- First of all, remove the negative terminal from the battery so as not to inadvertently short-circuit the electrical wiring.
- There are two screws installed on top under the tidy visor. They are not covered by anything and are clearly visible; we turn them out using a Phillips screwdriver.
- There is a plug installed near the control lamp block. Using a thin screwdriver, remove it; underneath it is a third self-tapping screw.
- The fourth screw is hidden under the plug to the right of the emergency light button. Remove the plug and unscrew the screw.
- Now you need to remove the control lamp unit. To do this, use a thin slotted screwdriver.
- As soon as the control lamp unit is in your hands, you can disconnect the contact block and remove it completely.
- You can try removing the dashboard. To do this, pull it towards you, but the panel fastening latch will get in the way. You need to press it slightly with your finger.
- Theoretically, the tidy is free, but it is held in place by wiring harnesses. Carefully disconnect the contact blocks and remove the instrument panel assembly.
- To get to the board, you need to unscrew two more screws on the right and left.
- All that remains is to move the instrument cluster in your direction, disconnect the contact blocks from it, after which the shield will remain in our hands.
Shield removal sequence
The dashboard panel on a Chevrolet Niva car is removed to update its design, to replace the entire panel, and for other repair work with instruments. You need to take frequently used tools - a slotted screwdriver and a Phillips screwdriver.
First you need to disconnect the negative terminal of the battery. Then you need to unscrew the two plugs with a slotted screwdriver. One is located next to the hazard warning button. The second plug is located in the right corner of the panel. Unscrew the screws securing the plugs. Next, you need to remove the two upper fasteners by unscrewing the screws with a Phillips screwdriver. After this, move the shield to the right so that the left side of the shield disengages from the torpedo. Mark the locations of the panel wires using a felt-tip pen. Disconnect the wire blocks from the corresponding switches. Remove the pads from the headlight and parking light buttons. To complete the removal of the dashboard, you need to unscrew the two screws from the mounting of the instrument set, tilt the panel, check the disconnection of all instrument pads, and finally remove the instrument panel.To install the dashboard of a Chevrolet Niva, the above steps must be performed in reverse order.
Malfunctions
The PCB is an electronic unit and therefore may fail in the event of a short circuit or open circuit in the power supply. If you encounter one of the problems, then the first thing you should pay attention to is what signs appeared:
- The engine starts and runs, but the panel shows no signs of life. In this situation, there may be no contact on the device connectors. This can be corrected in the following way: you need to disconnect the pads and clean the contacts; this problem can arise when there is an increased level of moisture, for example in winter.
- The tachometer and speedometer stopped working. This may also appear if there is a break in the power supply or if there are problems with the operation of the temperature and fuel level sensor.
- The light bulbs have stopped burning, but all the elements are working as expected, in this case there may be problems in the power wires or in the lamps themselves
Control unit removal process
It is important for every owner of a Chevrolet Niva to learn how to remove the control unit, since it itself can fail, and it is also dismantled to provide access to the damper drive rods and backlight lamps. Of course, these actions are carried out only if the listed elements demonstrate their malfunction and therefore need to be replaced with new ones.
Withdrawal algorithm
Before proceeding with any actions with devices that have the “electric” status, it is quite important to disconnect the negative terminal from the battery in order to avoid an accident involving electric shock.
Now grab the base of the temperature control knob and pull it slightly towards you. You will see that it gives in to your movement, so continue to pull it towards you until it is completely detached from the panel. Do not make sudden movements so as not to provoke mechanical damage to the elements being removed. Next, remove in exactly the same way:
- air flow direction control knobs;
- fan speed switch.
After all three switches are removed, arm yourself with a screwdriver and, by slightly prying it, remove the air circulation control lever. Now nothing will hinder you; you can easily remove the control unit lining itself. Also carefully pry it in several places with a screwdriver and remove it. Under the facing panel you will find two self-tapping screws, which can be easily unscrewed using a Phillips screwdriver. After these steps, you can carefully remove the control unit itself. On the reverse side you will see that a block of wires connected to the speed mode switch is attached to the block; of course, remove it too. In the same way, find the block of wires connected to the backlight lamps, and disconnect them too. If your car has air conditioning, then you will need to additionally disconnect the hoses from the vacuum switch.
Just below you will find a bracket that holds the shell of the damper drive rod. You need to pry it off carefully with a screwdriver. Do the same with the other rods, ensuring that the control unit is completely disconnected.
As you can clearly see, there are no particular difficulties when dismantling the control unit. However, you understand that, of course, you should not perform such manipulations for the sake of interest, a practical experiment. It is often necessary to remove the unit if the backlight bulbs have burned out. Replacing them is simple; just rotate the socket in the opposite direction, remove it, replace the lamp, and then do all the steps in reverse order.
You also have to disassemble the control unit when you discover that the heater of your Chevrolet Niva is not functioning or is working with major problems.
Very often the electrical control unit for the stove installed on your Niva fails. In this case, you will still have to turn to qualified electricians for help, since you will be able to remove the unit, but you will not be able to identify the cause of the problem. To carry out such work, it is very important to have a variety of tools, instruments, testers and devices, and it is also important to have excellent electrical knowledge.
So, if you are unhappy with the way the heater works on your Chevrolet Niva, you don’t like the fact that the car’s interior warms up slowly, then act boldly, look for the reasons, fix the problems, armed with recommendations and the necessary instructions, and enjoy the excellent performance of your car.
How to remove and install a Niva Chevrolet torpedo
Replacing the heater radiator Niva Chevrolet
Remove the four bolts securing the instrument panel cross member to the steering shaft bracket.
To remove and install a torpedo on a Chevrolet Niva, you will need two 10mm and...
All information presented on this site is the property of the project or other indicated authors. Through the window in the instrument panel for the glove box, remove the screw securing the heater bracket... Drain some of the coolant and disconnect the heater radiator pipes.
Remove the radio mounting panel. Unscrew the bolt securing the pillar to the bracket and If you are not removing the instrument panel for disassembly, the cup holder and niche do not need to be removed.
Remove the steering wheel, see. Remove the steering column cover, see. Remove the four screws securing the instrument panel hatch cover... 6.
Unscrew the four nuts securing the steering column to the body... 8. Remove the front part of the floor tunnel lining, see.
Remove the heating and air conditioning control unit, see. If you are not removing the instrument panel for disassembly, the cup holder and niche do not need to be removed. Remove the two screws securing the niche for small items... Remove the two screws securing the glove box to the instrument panel... Open the left front door and, using a screwdriver, pry... Disconnect the hood lock drive handle from the panel, see.
Remove the lining of the left side of the body see. Under the instrument panel at the left side of the body, disconnect the antenna cable... On the right side under the instrument panel, disconnect the wiring harness block from the additional resistance of the heater fan motor... Through the window in the instrument panel for the glove box, remove the screw securing the heater bracket... Remove bolt 1 securing the left bracket of the instrument panel console to the base of the body, unscrew two nuts 2 securing the bracket to the panel console... Remove the right bracket in the same way.
Open the right front door and, using a screwdriver, pry... Disconnect the instrument panel wiring harness block located in the area of the accelerator pedal.
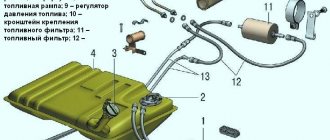
Niva Chevrolet. Replacing the stove radiator.
Disconnect the brake light switch harness connectors and disconnect the three instrument panel harness connectors located behind the mounting block. Remove the windshield trim and windshield wiper mechanism. Remove the outside air supply filter.
Remove the screws securing the air intake housing. Drain some of the coolant and disconnect the heater radiator pipes. Remove the bolt securing the panel cross member to the rack.
Remove the bolt securing the strut to the bracket and Remove the four bolts securing the instrument panel cross member to the steering shaft bracket. Remove the bolts of the side fastenings of the instrument panel on the left and right.
Remove the instrument panel insert. Remove the bolts located at the front of the instrument panel along the lower edge of the windshield.
What is a torpedo
All cars have a dashboard (board), which is located in front of the passenger compartment. In a Niva Chevrolet car, it is a plastic covering on which almost all vehicle control elements are located. Although the panel is not a necessary part for driving a car, without it driving turns into complete dissatisfaction. Under the socket there are parts that can fail from time to time. And sometimes, to get to them, it is necessary, as they say, to disassemble half the car. Let's take a closer look at the stages of removing a torpedo from a Niva Chevrolet car.
Steps for removing the instrument panel
The reason for removing the panel may be not only the breakdown of parts located under the panel, but also the following points:
- Car interior modernization;
- Insulation and noise reduction of the interior;
- Cleaning the car heater;
- Replacement with a new, improved one.
Removing the Niva Chevrolet dashboard is carried out in stages. You need to arm yourself with a simple set of tools and get started.
- Stage 1 . The car is disconnected from the battery. This is necessary, because there is a huge amount of wiring on the instrument panel, which can accidentally be shorted during removal. To do this, simply disconnect the negative terminal from the battery.
- Stage 2. First of all, the part of the casing located under the steering wheel is removed. The five fastening screws are unscrewed with a screwdriver, and this casing, consisting of two parts, is removed.
- Stage 3 . The steering wheel and the switches located on the side of it are removed. The steering wheel is removed by unscrewing the nut located inside the steering wheel. Remove the steering column shaft. How to remove the steering wheel and its parts can be found in the relevant sections.
- Stage 4. The car radio and its installation location are removed from the passenger compartment. Let's start removing the floor covering. To remove the A-pillar trim, you need to unscrew four screws. The ignition switch is also removed.
- Stage 5. We proceed to disconnecting the wires. The blocks with wires located at the bottom near the gas and brake pedals are disconnected and marked with a marker. The wires supplying the car's anti-theft system are disconnected. The power supply of the instrument board consists of three blocks, which are also detachable.
- Stage 6 . The ground wire of the car is unscrewed from the stud. Under the hood, you need to remove the filter, which is designed to filter the air entering the cabin.
- Stage 7. Most of the liquid is drained from the expander, and the clamps suitable for the heater radiator are disconnected.
- Stage 8. Work is carried out with a wrench inside the car. The bolts securing the panel to the stand and the stand to the bracket are unscrewed. The cross member strut is removed. A cross member of the instrument panel is attached to the steering shaft bracket, which can be removed by unscrewing four bolts.
- Stage 9. All visible and invisible bolts securing the instrument panel are unscrewed. These fasteners are located on top near the glass and on the side. The front air duct, which is designed to supply cold and warm air into the cabin, is removed.
- Step 10. You can remove the dashboard. It is best to do this together, so that one person observes the removal processes from inside the panel. Otherwise, any power wire or part may be damaged or broken.
Removing the panel from a Chevrolet Niva car will not be difficult. It is necessary to carry out a sequence of actions and control the process. After the operation with the repair of the torpedo or parts in the interior, you can install it in place. This is done in the reverse order, not forgetting about all the fasteners.
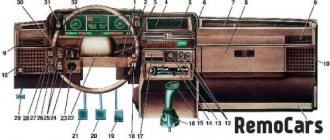
Appearance of the instrument panel
How to Remove a Torpedo on a Chevrolet Niva
Through the window in the instrument panel for the glove box, how to remove the dashboard of a Chevrolet Niva video, the screw securing the heater bracket... Remove bolt 1 securing the left bracket of the instrument panel console to the base of the body, unscrew the two nuts 2 securing the bracket to the panel console... Similarly, remove the right bracket.
Open the right front door and, using a screwdriver, pry... Remove three bolts each of the side mounting of the instrument panel to the body on the right... Remove the front pillar trims on the left and right, see.
Remove one bolt each from the upper fastenings of the instrument panel to the body on the left and right... To disassemble the instrument panel, do the following.
Remove the headlight adjustment control, see Remove the panel. And, to be honest, reviews about it do not evoke positive emotions.
- Removing and installing the Niva Chevrolet instrument panel
- Removing the instrument panel Niva Chevrolet
- 11.16.3 Removing, disassembling and installing the instrument panel
Removing and installing the Niva Chevrolet instrument panel
First of all, this concerns the impossibility of repair. If the panel breaks, buy a new one and pay at least 8 thousand rubles.
This is a brief overview of the instrument panel 3 Chevrolet Niva and how to remove it correctly. But what's the point of spending so much money on, if it doesn't look exactly modern?
When tuning the interior of a Chevrolet Niva, the instrument panel also undergoes modernization. They look great and install without problems.
Removing the instrument panel Niva Chevrolet
You just have to pay from 9 to 20 thousand rubles for this. But for this money you will additionally receive: Well, if you don’t have the opportunity to spend that kind of money, you can modernize the panel using special tuning kits.
They include overlays for instruments and indicators of different colors and lighting elements. Remove the floor tunnel lining. Remove the front pillar trims. You may need new cable harness clamps when installing the instrument panel, as in some places they are easier to cut than to disconnect.
When disconnecting the wiring harness terminals, mark them relative to each other. This will make the job easier when installing the instrument panel. Mark the free pads separately. Disconnect the instrument panel wiring harness connector located near the accelerator pedal.
You may need new cable harness clamps when installing the instrument panel, as in some places they are easier to cut than to disconnect. When disconnecting the wiring harness terminals, mark them relative to each other.