How to remove the instrument panel from a VAZ 2115
Since the instrument panels on the thirteenth, fourteenth and fifteenth models are the same, the procedure for dismantling the dashboard will be considered using the example of the VAZ 2115. But before you begin, you should stock up on everything you need.
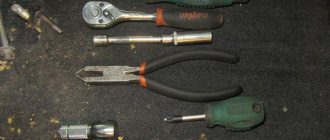
Tools and materials
- flat blade screwdriver;
- Phillips screwdriver;
- pliers;
- set of open-end wrenches.
Sequence of operations when removing the dashboard from a VAZ 2115
- Using a Phillips screwdriver, remove the screws that hold the left side of the console.
Video: removing the dashboard from the tag
Is it allowed to install a dashboard on a VAZ 2115 from another car?
In short, no. The dashboard on the VAZ 2115, 2114 and 2113 has a number of design features that are not found on other cars. Its cross members, mounting brackets and console sides are too long. There is nothing like this even on other VAZ models, not to mention foreign cars. But it should be noted that car owners often practice reverse replacement. In particular, a dashboard from a VAZ 2114 can be successfully installed on a VAZ 2109. But in this case, you have to trim the sides of the console and drill new mounting holes on the brackets.
Step-by-step instructions for disassembly
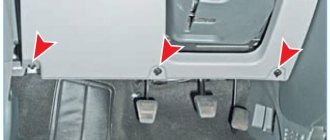
- The first step is to remove the left screen. To do this, you need to unscrew 3 screws, as shown in the photo. Once the fasteners are removed, the left dash screen can be removed.
Now the console can be completely removed if replacement is planned. When performing other repair work, it is recommended to navigate by access to the parts of interest. For example, to access the heater stove, it is enough to remove only the lower part of the dashboard.
Many car owners do not know how to remove the dashboard on a VAZ 2114. We will show you how to do it correctly. Usually the instrument panel is removed to replace the heater, remove the instrument cluster, seal the heater nozzles, glue, etc.
Important points regarding replacement
- When removing the right side of the console, be careful. Behind it are wires that can easily get caught on the side and be damaged. So before removing this cover, you should remove the negative terminal from the battery. You should also turn off the car radio by removing its connector from the common wiring harness located behind the upper instrument panel;
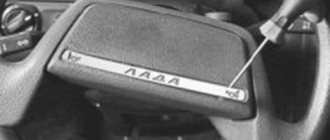
- Removing the plastic handles from the stove levers can cause serious difficulties. The fact is that there are protrusions on the stove levers (top and bottom), and holes on the handles. When you put the handle on, it snaps onto the lever. The only way to remove it is to pry it off with a flat screwdriver as shown in the picture. But when prying up the handle with a screwdriver, you should not bend it too much: the plastic breaks very easily;
So, a novice car enthusiast is quite capable of removing the dashboard from a VAZ 2115 and other cars in this line. All that is required is patience and attentiveness. If, after unscrewing all the fasteners, the dashboard stubbornly refuses to come off, you should inspect everything again: it is quite possible that some tiny screw was missed.
Step-by-step instructions for disassembly
- The first step is to remove the left screen. To do this, you need to unscrew 3 screws, as shown in the photo. Once the fasteners are removed, the left dash screen can be removed.
Now the console can be completely removed if replacement is planned. When performing other repair work, it is recommended to navigate by access to the parts of interest. For example, to access the heater stove, it is enough to remove only the lower part of the dashboard.
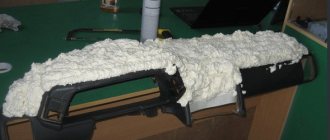
Torpedo is the modern name for the dashboard. Initially it was used for foreign cars, but today this name is used by motorists in the CIS countries. The dashboard in the VAZ 2114 car is a collapsible metal structure that contains plastic elements. It also uses polymer film and polymer foam to cover some of the controls. The instrument panel includes many monitoring instruments and controls.
Tip: a great way to decorate the interior of a VAZ 2114 is to reupholster the dashboard with genuine leather or eco-leather. The costs of such an update are minimal, but with proper design you can achieve high results. Also in the VAZ 2114 they practice covering the visor and roof. Tuning can be done independently, but if you don’t have time, you can contact a car workshop.
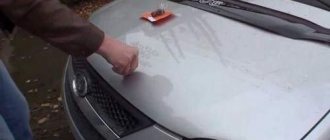
Removing the dashboard may be necessary if the owner of a VAZ 2114 wants to change the heater radiator or even the entire stove. To get to these parts, you will certainly have to disassemble the dashboard. Depending on the purpose, the analysis may or may not be complete. For example, dismantling a heater core requires only partial removal of some elements. For some body work, it is necessary to remove the dashboard, as the structure may be damaged during repairs. Disassembly of the structure is also required when the motorist decides to increase sound insulation in the car interior - for this it is necessary to seal the wheel arches, hood, doors and dashboard.
Read also: Liqui moly special tec ll 5w 30
Regardless of the number of dismantled parts, the following tools are required to disassemble the dashboard:
- Several types of screwdrivers (flat and Phillips);
- A set of keys;
- Flashlight;
- An adhesive base, which is required if the panel is planned to be sealed.
Withdrawal procedure
- Remove the negative cable from the battery.
- Unscrew the left trim of the instrument panel console.
- Remove the cover. To do this, you need to remove the lower protrusion from the bracket.
- Unscrew the right panel of the instrument panel console.
- Disconnect the wires from the cigarette lighter.
- Disconnect the wires from the cigarette lighter light bulb.
- We push from the inside and take out a niche for small items.
- Unscrew the 2 screws and push the diagnostic connector block inside.
- Remove the heater fan switch handle.
- Using a narrow screwdriver, remove the handle from the lever.
- Unscrew the 2 screws above the instrument panel.
- Unscrew the two screws under the instrument panel.
- Remove the plug and unscrew the screw of the upper fastening of the lining.
- Unscrew the 2 screws of the lower fastening of the lining.
- We move the cover to the side.
- Mark the order in which the blocks are connected to the switches.
- Disconnect the wires from the switches.
- Remove the instrument panel.
- Unscrew the bolts securing the steering column and lower it down.
- Unscrew the 2 screws securing the panel to the bracket.
- Unscrew the 2 screws securing the bracket to the right cross member.
- Unscrew the 2 screws of the lower bracket fastening.
- We move the bracket to the side.
- Unscrew and remove the light guide from the instrument panel.
- We unscrew the 4 screws securing the stove control unit and recess it inside.
- Remove the lamp socket for the heater fan switch handle.
- Press the right lock and remove the air duct from the panel.
- Pull out and remove the headlight hydraulic adjustment handle.
- Remove the instrument lighting control knob
- Remove the decorative insert of the instrument panel.
- Unscrew the light guide.
- Unscrew the nut securing the hydraulic corrector and recess it inside the panel.
- Unscrew the nut securing the instrument lighting control.
- We take out the hydraulic corrector illumination lamp.
- Disconnect the wires from the instrument lighting control.
- Disconnect the wires from the immobilizer sensor.
- Disconnect the wires from the immobilizer unit.
- Disconnect the wires from the glove compartment light bulb.
- Disconnect the wires from the socket of the portable lamp.
- Unscrew the 2 screws of the top panel fastening
- Unscrew the 2 screws on the bottom fastening of the panel.
- Unscrew the self-tapping screw securing the panel to the left cross member.
- Remove the instrument panel.
- Installation of the instrument panel on the VAZ 2114 is carried out in the reverse order.
How to remove the dashboard and instrument cluster on a VAZ 2114-2115
Added Mar 31, 2015 to Dashboards
In today's article we will look at the process of removing the instrument panel from cars of the VAZ 2114-VAZ 2115 family. Before moving directly to the description of the dismantling process itself, we will understand the design itself and the method of securing the dashboard. To do this, let's look at the corresponding diagram:
- The instrument panel (also known as the dashboard) is the main part of the entire structure, on which are fixed: the instrument cluster, on-board computer, heating system control knobs, switches and other elements.
- A protective and decorative cover on which air ducts are provided, through which the car windshield is blown.
- Mounting bracket.
- Decorative plug.
- Ashtray cover.
- Cross members to ensure structural rigidity.
- Left and right decorative panels of the center console.
- Instrument panel panel.
- Central mounting bracket.
So, we’ve sorted out the theory, we can move directly to practice. By the way, as an addition, we recommend that you familiarize yourself with the material devoted to the modification of the VAZ2115 dashboard - tuning the VAZ2114-2115 dashboard.
How to install the dashboard?
If you want to install the instrument panel of a VAZ 2114, then everything must be done in the same way, but in reverse order.
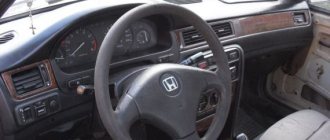
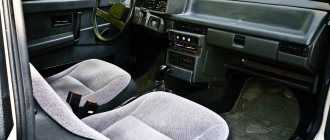
The instrument panel, also known as the “torpedo”, is the most important part of the car’s interior, which largely determines the comfort of both the driver and the front seat passenger.
Torpedo VAZ 2114
There are three key requirements for a “torpedo”:
- Functionality - it must include all the necessary control levers, buttons and indicators to monitor the condition of the vehicle;
- Ergonomics - all functional elements of the “torpedo” must be placed so that their use is convenient for people of different heights and builds;
- Design – by the way the instrument panel is made, you can determine the class of the car. In cheap models, as a rule, developers do not pay due attention to the visual appeal and quality of the materials used, while the distinctive feature of all expensive cars is a beautiful, detailed “torpedo”.
It is worth noting that the designers working on the VAZ 2114 dashboard did their best. The fourteenth “torpedo” is made according to modern European standards. It is made of high-quality wear-resistant plastic, which does not lose its appearance even after several years of using the car, and the “torpedo” design evokes positive emotions even among those who switched to the VAZ 2114 after a foreign car.
The dashboard of the VAZ 2115 and VAZ 2113 cars is in many ways identical to the “torpedo” of the fourteenth, so all the instructions given in this article can be used for the above models.
Read also: Dismantling in Tavrovo Belgorod
We remove the dashboard from a VAZ 2114 (VAZ 2115)
The process of dismantling the dashboard is as follows:
1. Disconnect the negative terminal from the battery. We also remove the radio, if installed. To do this, simply pull the radio out of its seat on the dashboard, disconnect the wiring harness block from it and completely remove it.
2. Using a small Phillips screwdriver, unscrew the screws securing the left decorative trim of the center console. We remove the trim, carefully removing its lower part from the body bracket.
3. Now we need to remove the right center console trim. To do this, unscrew the five screws and, holding the cover with your hand, remove it.
4. Remove the handles of the heating system control levers. In order not to damage the handles and remove them quickly, use a thin flat-blade screwdriver to pry up the latch on the handle, thereby freeing it from the protrusion on the lever.
5. Remove the heating system fan control knob. To do this, pull the handle with some effort until it is removed.
6. Unscrew the right screw that secures the instrument panel trim to the bracket. We also unscrew the screw on the left side of the instrument panel trim.
Installing the trim on the panel of a VAZ 2114
The alteration of the instrument panel was long overdue, everything in the car had long been overlit in white and the original greenish one on the instrument panel stood out from the overall picture. I spent a long time selecting the type and type of backlight boards, as well as the design of the panel overlay.
Having seen the overlays from the Pandora studio, I was, one might say, fascinated by the work. At first I was leaning towards everyone’s favorite panel with 3D rings, but then I decided on the “F” style optitron. Now all that remained was to resolve the issue with the backlight boards.
Many options were found, in different styles and methods of execution. And while I was choosing in Pandora, I decided that I could complete my overlays with backlight boards. I decided to order a set from them right away: an instrument panel overlay and a VDO instrument panel backlight board.
I will not describe in detail the procedure for disassembling the panel and installing the backlight boards and overlays, I did everything according to the Pandora studio video, which I will attach below, I will describe only some of the nuances and functionality.
Removing (European) instrument panel 2113-2115
Using a Phillips screwdriver, unscrew the three screws securing the left screen of the center console: lower, middle and upper.
Remove the left screen of the center console.
Also, use a Phillips screwdriver to unscrew the five screws securing the right screen of the center console and remove the screen.
Disconnect the negative cable terminal from the battery. We remove the radio receiver and disconnect the block of its wiring harness (if the radio receiver is installed) or remove the plug container the instrument panel Disconnect the wiring harness connector from the cigarette lighter and remove the ashtray backlight lamp socket
Using a screwdriver, remove the handles from the heater damper control levers.
For clarity, we show these operations on a removed block of heater control levers. We insert the blade of a screwdriver between the handle and the lever on the side opposite to the protrusion on the handle.
There is a hole in the plastic of the handle into which the lever antenna fits.
Remove the handle from the heater fan switch.
Use a Phillips screwdriver to unscrew:
a self-tapping screw securing the instrument panel to the bracket on the left and similarly - on the right there are two self-tapping screws located above...
instrument cluster and two screws under the instrument cluster.
We use a screwdriver and remove the plug to the right of the heated rear window switch.
Using a Phillips screwdriver, unscrew the self-tapping screw located under the plug.
Move the instrument panel back (towards the steering wheel) and to the right.
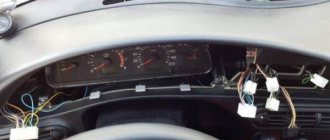
We disconnect the wiring harness connectors from the key switches located on the instrument panel and from the on-board control system unit.
Remove the instrument panel panel.
Using the “8” key, unscrew the self-tapping screw of the lower fastening of the left pillar of the instrument panel bracket (to the body floor bracket).
Similarly, unscrew the self-tapping screw of the lower fastening of the right pillar. We remove the intermediate housing of the central nozzles of the heating and ventilation system from the socket of the instrument panel.
Using the “8” wrench, unscrew the two screws for the upper bracket fastening (to the right cross member of the instrument panel): one on the right and one on the left. Using a Phillips screwdriver, unscrew the two self-tapping screws securing the bracket to the instrument panel (under the heater control lever block).
We move aside the instrument panel bracket along with the controller and holders of relays and fuses of the fuel injection system attached to it.
We disconnect the controller and relay and fuse holders from the bracket. Remove the steering column switches and their connector. We remove the main cylinder of the headlight hydraulic corrector and the instrument lighting switch. We disconnect the ignition switch wiring harness block, the wiring harness block of the car anti-theft system (ALS) unit and the two APS status indicator wiring blocks. We remove the block of heater control levers and disconnect the wiring block for the backlight lamp of the heater fan switch. Having unscrewed the bolts and nuts securing the steering column to the body, lower the steering column without disconnecting it from the steering gear.
Using a Phillips screwdriver, unscrew the upper left self-tapping screw and the lower left fastening screw of the instrument panel .
Similarly, unscrew the upper right screw and the lower right screw of the instrument panel fastening.
Removal procedure
- First, using a Phillips-head screwdriver, unscrew the 3 screws (bottom, middle and top) that secure the left screen of the center console.
- Next, we remove the trim itself, and then remove the protrusion, which is located in the lower part, from the body bracket.
- Using a Phillips screwdriver, unscrew the next five screws that are located in the right panel of the console and remove the screen itself.
- Then disconnect the negative cable terminal from the car battery. If a radio receiver is installed, then remove it and also disconnect the connector of its harness with a wire or remove the plug container from the shield.
- Then the wiring harness block must be disconnected from the cigarette lighter. The ashtray lamp socket also needs to be removed.
- Remove the handle from the levers by prying it slightly with a narrow screwdriver.
- The next step is to remove the heater fan switch handle. To do this, pull it towards you or carefully pry it off with a screwdriver.
- Using a Phillips screwdriver, unscrew the two self-tapping screws that are located above the instrument cluster and the two self-tapping screws that are located under it.
- Lift the plug a little, remove it and unscrew the screw that is located under it.
- Unscrew the two screws of the lower fastening of the lining.
- Remove the instrument panel trim.
- First, we mark the order in which the wiring harness connectors are connected to the switches, and then we disconnect them.
- We set aside the completely removed instrument panel.
- Unscrew the bolts securing the steering column bracket.
- Unscrew two more screws, as shown in the photo.
- Using an 8 mm wrench, unscrew the 2 screws of the lower bracket mounting to the instrument panel.
- Then unscrew the self-tapping screw securing the light guide using a Phillips screwdriver and remove the light guide.
- Then we unscrew the following screws, with which the heating control unit is attached, and from its reverse side we remove the lamp sockets.
- Next we remove this decorative insert, but only after we have taken out all its external parts.
- We unscrew the nut numbered one and two either with pliers or a wrench (21 cm).
- Next you need to remove the hydraulic corrector illumination lamp.
- We unscrew the screws of the upper and lower fastenings of the instrument panel, as well as the fastenings to the left cross member, with a Phillips screwdriver.
- Lastly, simply remove the dashboard of your car.
Order of Operations
- Remove the radio cover using a screwdriver, carefully threading the tool under the socket. First we pull it out from the bottom, then the top part of the lining.
- The electrical wires leading to the cigarette lighter must be disconnected.
- Now we find the screws on the dashboard and unscrew them.
- Remove the handles from the damper sliders and the heater switch by pulling them towards you.
- Now you need to remove the dashboard panel, it is held not only by screws, but also by other fasteners, so first you will have to loosen it a little.
- Now you need to disconnect the wiring from the panel: from the clock, from the alarm, from the headlights and other devices.
- On the back surface we find cartridges. It's easier to unscrew them with small pliers. Release the cartridge by turning it counterclockwise. Half a turn is enough. We do the same with the rest of the cartridges - they are all designed the same.
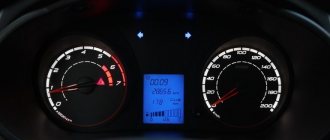
- We check the lamps with a tester and determine which ones are faulty. Or we change the entire combination, for example, to LEDs. We screw in the light bulbs tightly, remembering that they operate under conditions of vibration and shaking.
- We install all the cartridges in place. We use pliers again. Turn half clockwise until it stops.
- Now we connect the panel to the instrument connectors and check the functionality of all the light bulbs: from the ignition to the hazard warning lights.
- If everything works correctly, we fix the panel and perform the installation in the reverse order, before installing the radio cover.
For the procedure for replacing light bulbs in the dashboard of VAZ 2113, 2114 and 2115, watch this video.