Step-by-step instructions for removing and installing the VAZ-2109 steering rack
Sequencing:
- First of all, you need to remove the protection. To do this, you will need to unscrew the fastening nuts that are on it at the top and bottom.
- Remove the tread element completely, otherwise it will interfere with your further work.
- To get rid of the tie rods, unscrew a couple of bolts in the center of the rack. Only then will you be able to disconnect without interference.
- The clamps of all rails are secured with nuts on both sides - they also need to be unscrewed. After this, you will be able to move the element to the side.
- To completely remove the part, you will need to get rid of the coupling bolt, which is located on the interior side, at the very bottom of the steering shaft.
- You are unlikely to be able to remove the rack easily - you will have to rip it off the shaft. If that doesn't work, use a pry bar to pry it from the outside.
If the part needs to be repaired, do everything necessary to do so. If replacement is necessary, you will need to buy a new rail. On average, a new steering rack costs from 1,500 to 2,200 rubles. The price depends on the place of purchase and the manufacturer of the mechanism. Installation of a repaired or new element occurs in the reverse order of dismantling work.
Tips for replacing old rack parts
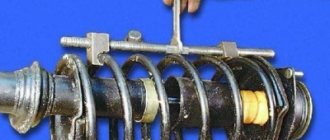
- Damping rings are placed on the new backing plate so that the thin edges of the rubber elements are in the middle of the cutout of the plate. After purchasing a repair kit for the steering rack, you will find in it two rubber bands needed for this purpose.
- The protrusions of the bushing will help you install it correctly in place, after which you need to carefully get rid of the thin rubber bands using a blade.
- The support ring is removed from the gear shaft with special pliers, and then the bearing is dismantled.
- Don't forget to wash the steering gear housing so you can insert a new needle bearing later.
Replacing old rack elements
Place the damping rings on the new base plate so that the thin side of the rubber bands is located in the middle of the plate cutout. It’s almost invisible in the photo, but when you buy a repair kit you will find two necessary rubber bands in it.
Replace the support sleeve. There is a hole in a special recess into which two protrusions on the bushing should fit. After installing it, you need to cut off thin rubber bands with a blade, as in the photo.
Remove the retaining ring from the gear shaft using special pliers, and then remove the bearing.
After this, you need to press out the needle bearing using a special wrench. If you don't have one, you will need a drill and a 1.2-1.5 mm drill bit. Drill a hole so that it fits into the end of the bearing (see photo). Knock out the needle bearing through the hole made.
All that remains is to thoroughly rinse the steering gear housing and insert a new needle bearing, which is included in the repair kit. The hole made can be covered with a mixture of superglue and metal filings. You can also use cold welding. Gear mechanisms should be lubricated with Litol or FIOL lubricant.
Everything needs to be assembled in reverse order. After this, you need to set the gap between the nut and the stop - 0.12 mm.
So, repairing the steering rack yourself will save you a considerable amount of money, since you only need a repair kit and lubricant for the work.
The VAZ 2109 steering rack is a mechanism responsible for rotating the steering wheel, transmitting movement impulses from the steering rods and directing them to the wheels. It has a simple design: it consists of struts, CV joints, and anthers. But the slightest breakdown in one or another part can negatively affect the operation of other systems and affect the car’s controllability while driving, which is already very dangerous. Therefore, it is necessary to monitor the technical condition of the rack and prevent leaving with a malfunction in order to avoid problems.
As a rule, the rail elements are made of rubber. Its advantages are flexibility and low price. But a significant disadvantage of the material is rapid wear. And most often, the anthers, elements that protect the rack structure from harmful dirt and dust during movement, become unusable. But how is the VAZ 2109 steering rack boot replaced, and what is needed for this? More about this later in the article.
We tighten the rail ourselves
VAZ 2115: we repair the steering rack ourselves.
We will carry out the work from under the car, so it is advisable to use an inspection hole or overpass. You can tighten the nut from under the hood, but this is extremely inconvenient and will take more time, we checked.
We install the car and secure it with the handbrake; just in case, we put wheel chocks under the rear wheels. Next we do this:
- Remove the engine protection.
We extend the carrier so that it can be seen better.
We clean the steering gear housing from dirt as thoroughly as possible. Find the adjusting nut.
This is the same nut.
In rare cases, the factory plastic stopper is retained on the nut. This suggests that the rack was either changed or no one adjusted it from the factory, which happens extremely rarely. Remove the stopper with a thin flat screwdriver. We do not spare plastic, since the plug is disposable.
This is what the plastic plug looks like.
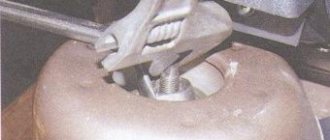
We see the nut, take a tricky 17 key, insert it and turn it 10-20 degrees, no more.
You will have to try a little to get the wrench into the nut.
We control the steering wheel play and the degree of freedom of the rack. First, let’s shake the rack itself by grasping the rods. If there is noticeable play, remove it by tightening the nut a little more. We sway the steering wheel, control the play. We take a test drive. The rack should not make any extraneous sounds when driving over uneven surfaces, the steering wheel should rotate freely and return to the neutral position after turning on its own. If the steering wheel is tight and does not return, loosen the adjusting nut by 5-7 degrees; if it is too loose and we observe play and knocking, tighten the nut .After the adjustment is completed, we do not try to install the factory plug, but lightly jam the threads on the rack housing with a thin core. At the same time, we try not to damage the nut.
Repair
How to repair a steering rack yourself?
The first thing you will need to carry out your own repairs is a repair kit. They are available at almost any auto parts store. However, we strongly recommend that you buy only high-quality kits so that the result of your DIY repair lasts as long as possible.
What you need for work
The proposed kits are incomplete and complete. You will definitely need the following kit components:
- Needle bearing;
- A pair of rubber seals for the bushing;
- Support sleeve made of plastic;
- Set of gaskets;
- Spring;
- Retaining rings;
- Support bearing;
- Drive gear;
- Boot cover;
- Rail;
- Set of ties for the boot.
Repair kit Now that the kit is ready, the tools are available, and there is enough free time, you can get to work.
- First, remove the boot, end caps and stops. As you disassemble elements, even the smallest and insignificant at first glance, be sure to evaluate their current condition. If necessary, all worn-out elements will be replaced with new ones taken from the repair kit.
- Using an octagon, unscrew the screw plugs, which will allow you to remove the springs, retaining rings, and thrust bushings.
- Remove the bearing and check if it has any play. The repair kit includes a new bearing, so if the old component is in satisfactory condition, it is better to replace it immediately. It’s not for nothing that you took on such a complex process to get everything done 50%.
- Remove and inspect the drive gear. Next, you can completely remove the rail itself.
- Be sure to replace the support shaft bushing, not forgetting about the rubber bands. They are also included in the kit.
- Take your time to remove the rubber bands from the sleeve. First, insert the element into the crankcase, after which you can cut off the elastic with scissors or a sharp knife.
- The most difficult step is replacing the needle bearing. To remove it, you will need a special key. But you can do without it. In this case, arm yourself with a 1.5 mm drill bit and a drill. Using a drill, make a hole in such a way as to loosen the end of the bearing. Use a punch to knock out the old bearing from the crankcase.
- Before installing the new needle bearing, be sure to thoroughly clean the steering rack housing of accumulated debris and steel shavings from drilling.
- The hole made cannot be left. To eliminate it, you can mix metal filings with superglue. This mixture will harden quickly and give an excellent result.
- Lubricate literally everything that can be lubricated in the steering rack assembly. Experts advise using Litol 24 or other lubricants of similar quality. It wouldn't hurt to lubricate the CV joints.
- Reassemble the unit by following the reverse sequence of dismantling.
If you don’t have a key to remove the needle, repairing the steering rack yourself allows you to significantly save on replacement, plus gain a lot of experience in performing far from the simplest work related to your VAZ 2109. But you can do it easier, without taking any risks, by contacting a trusted car service center.
Unit in a vice
Checking status
Having completed the repair, you should not think that now the steering rack will serve tens of thousands of kilometers and will no longer cause you trouble. Like many other components, the condition of the rack must be periodically monitored.
What to look for
Your actions
Mounting nuts and bolts
These fasteners are subject to vibration after repair as they are used. Therefore, it is recommended to check and tighten them every 250-300 kilometers.
You can check it a little less often, approximately every 500-1000 kilometers, depending on the operating conditions of your car. Due to different quality, some anthers can last quite a long time, while others will require replacement after 10 thousand kilometers. The choice is yours which parts to use
The rack itself should be constantly monitored
Listen to the behavior of the steering mechanism, pay attention to the above signs of malfunction. As part of a scheduled technical inspection, be sure to include a check of the steering racks in the list of activities.
The repair cannot be called complicated, but it takes a lot of time
Plus, it is extremely important to perform all operations as carefully and efficiently as possible. Otherwise, the result will not last long and you will soon have to interfere with the design of the VAZ 2109 steering unit again
Preparation for repair
Since we are talking about intervention in the steering system, suspension, special attention should be paid to preparation.
- If you have a lift or inspection pit, you will be able to perform operations much faster and easier, which is the most important thing.
- Be sure to get a set of sockets and spanners. It is extremely difficult to work without them. In addition to the wrenches, you will need wire cutters, pliers, a hammer, a flat head screwdriver, and a tie rod end remover.
- To remove all fasteners that have been tightened for a long time, a can of WD40 will certainly not hurt. It removes oxidation from nuts and removes rust. In addition to the almighty WD40, buy graphite lubricant or grease. By treating the fasteners with them, you will be able to remove them much easier in the future.
- The presence of rags, a metal brush, fresh gasoline or solvent is welcome.
- Ask your friend to help you with your work. It's much easier to change steering wheels with four hands.
Be sure to remove the negative terminal from the battery in order to de-energize the car. We don't want short circuits or burned out wiring.
Repair kit
Hanging the axle
To safely and independently change the steering rack in your own garage, it is extremely necessary to correctly and securely hang the front axle of the car.
Sometimes this issue is not given due attention, as a result of which the car falls, this leads, at best, to damage to the elements of the car, and at worst, to injuries to the repairer himself.
In order to do everything in accordance with safety standards, you need to:
- Place your VAZ 2109 on a level surface. Typically, garage floors are fairly level;
- Install wheel chocks, shoes, bars or other similar means under the rear wheels. Block each wheel front and rear;
- Pull the handbrake all the way to stop the wheels. Just make sure first that the handbrake works;
- Set the steering wheel in neutral position;
- Slightly loosen the fasteners on the wheels;
- The front of the car needs to be raised. Here it is better to use two reliable jacks at once;
- Near the jacks, additionally place metal stops that are adjustable. If there are no special devices, an ordinary block of wood, boards or some kind of stump will do. The main thing is that when you make contact with the body, when you pull or push it, the car does not tip over;
- Remove the front wheels completely and begin replacing the steering racks.
Optimal working conditions
Dismantling
Before installing a new steering rack, you need to get rid of the old one. For this:
- Get to the place where the rack is attached in the engine compartment. To do this, you will probably have to remove the alarm and gas adsorber, at the same time dismantling the hoses.
- Disconnect the rack from the steering column shaft. Before this, the plastic casing is removed, blocking the path to the spline joints. The rack shaft is released by unscrewing one bolt.
- Next, remove the steering ends from the levers. Here haste can significantly harm you. Gradually brush the threaded connections, tip pin and mounting nut with a metal brush. Then apply WD40 to these areas. Give the product a little time to react. Then you can use pliers and a screwdriver to remove the cotter pin from the connection. Once the solvent has taken effect, the nuts should come off without much effort.
- If the tip is in normal condition, it is recommended to remove this element from the strut lever with a puller. A more barbaric method can lead to damage, so you will have to change the tips.
- Unscrew the rack fasteners using keys. It is better to treat them with WD40 in advance.
- After unscrewing the nuts, pry the steering rack with a flat screwdriver and remove it from the studs.
- Call a partner to work together to remove the element through the opening in the wheel arch.
Dismantling and restoration work
Assembling a new unit
Since the rail was removed along with the rods and lugs, the structure should be assembled from new parts before the reassembly process.
- Carefully examine the condition of the boot. If the protective cover shows signs of cracks, defects and other damage, the boot must be replaced;
- To replace the rods or boot, unscrew a pair of mounting bolts, first bending the locking plate with a screwdriver or chisel;
- Next, use pliers to remove the clamps that hold the boot in place;
- Remove the rubber support, spacer ring and dismantle the damaged boot;
- New elements are installed in reverse order.
The steering tips can be changed with the rack installed. It's not that difficult to get to them. But experts recommend immediately updating all elements of the mechanism, once you have taken on the task of replacing the rack.
Preparing for assembly
Installation
Reassembling the unit with a new steering rack looks like this:
- Clean the seat, treat the threaded connection with graphite lubricant or grease.
- With the help of a partner, insert the rail into the engine compartment. By rotating the rack along the axis, you can go around all the obstacles you encounter along the way.
- When you place the mechanism on the studs, put on the clamps and attach the mounting nuts along with new washers.
- Don't let your assistant go too far, because without a second pair of hands you won't be able to handle the next step. One should direct the rack shaft into the cabin, and the second should connect the shaft to the column cross. Make sure that the flat on the shaft aligns with the holes on the coupling. This way you can secure the bolt without any problems. After this, clamp and install the plastic column casing.
- Tighten the nuts securing the steering rack in the engine compartment.
- Connect the tie rod ends to the strut arm and tighten the corresponding mounting nuts.
- Do not forget to treat the threaded connection with graphite lubricant or regular grease.
After replacing the steering rack, be sure to check the result of the repair in motion. To do this, just drive out onto the road and see how the car with the new racks will behave.
Signs of breakdown
Self-repair of the VAZ 2110 steering rack
By studying the signs of malfunctions in the design of the steering rack, you will be able to promptly identify the breakdown and take appropriate action to eliminate it.
The symptoms below may indicate not only a damaged rack, but also problems with the steering column, ball joints or linkages. Therefore, be careful.
Symptom of malfunction
Peculiarities
Increases free play of the steering wheel
This indicates that the gear sector has worn out due to dirt and dust getting into it. Or the gap between the rack stops and the rack itself has increased. Therefore, the engagement of the rack with the gear decreases. Plus, such a sign may indicate wear on the silent blocks of the rods or weak fastening of the supports in the steering knuckle
Noisy or knocking noises near the steering unit
Most likely, a gap has formed between the rack and the stop, or the plastic bushings have worn out. A knock is also a sign of wear on the traction silent blocks, ball joints, or loosening of the gear shaft to the column shaft.
Steering wheel turns hard
Here we can talk about possible damage to the steering rack bushing and a violation of the integrity of the gear shaft bearing. But you shouldn’t rule out the possibility of damage to the ball joint or strut bearings.
Having determined the presence of signs of malfunctions, it is important to understand what exactly caused them to appear.
DIY steering rack repair on a VAZ 2109 (Video)
The steering rack in front-wheel drive cars is fully responsible for the functionality of the entire steering mechanism. The VAZ 2109 also belongs to this category of car. If it fails, appropriate action should be taken immediately.
The occurrence of signs of malfunction does not always indicate the need to completely replace the unit. Sometimes it is enough to repair the rack using a special repair kit.
Removing and disassembling the steering rack in a VAZ 2109 car
To carry out repair work, you should purchase a repair kit, which, depending on the type of fault in the steering column, may be incomplete or complete. An incomplete repair kit includes parts, disposable clamps and rubber products that require periodic replacement.
Steering rack repair kit for VAZ 2108, 2109
If the teeth and ground surface are broken or worn, you will need to purchase a complete repair kit, which may include all parts, from a gear pair, needle and ball bearings, to a pressure spring. This repair kit does not include only the crankcase.
You will also need a standard set of tools and a number of special devices and tools:
- internal octagon 24 mm with a hole in the middle with a diameter of 18.5 mm;
- octagon 17 mm;
- ball joint puller;
- ball bearing puller;
- needle bearing removal wrench;
- needle nose pliers for removing the bearing retaining ring;
- bench vice;
- grease "Fiol-1", "Litol-24" or similar lubricants that will not lose their fluidity at low temperatures.
To remove the steering rack, the VAZ 2109 car must be placed above the inspection hole to provide free access to the front wheels and the engine compartment.
Then you should tighten the handbrake, support the rear wheels, and set the front wheels straight. Use a jack to raise the front wheels until they sag and place supports under them. After this, unscrew the mounting nuts and remove the right wheel.
To gain access through the engine compartment, remove the air filter and disconnect the battery. All removed parts and fasteners must be placed in specially prepared containers. This will ensure the safety of the parts and simplify the assembly process.
Steering column removal steps:
- Inside the cabin, between the pedals, using the hinged head, unscrew the locking bolt two turns, which tightens the steering coupling on the splined shank of the gear shaft. If the clutch does not release, you can loosen the splines by gently tapping with a hammer;
- Remove the tie rod ends by straightening the bent end of the tie rod ends with pliers. The cotter pins are pulled out with a 19 mm spanner. After that, the nuts are tightened and the ball joints are squeezed out of the swing arms of the suspension struts with a puller;
- The protective cover is removed through the engine compartment, secured with three nuts with washers and engravers. Using a 13 mm socket, unscrew two self-locking nuts that hold the bracket securing the steering rack housing to the car body;
- The crankcase must be clamped through aluminum plates in a bench vise;
- Using a chisel and hammer, bend the corners of the locking plate that protects against spontaneous unscrewing of the bolts securing the inner tie rod ends;
- Using a 22 mm socket, unscrew the bolts, remove the locking and connecting strips, disconnect both rods;
- Remove the rubber support, the spacer ring on one side, and on the other, disconnect the rubber cap and detachable support, use a screwdriver to pull out the rubber boot that protects the gear shaft;
- Using pliers, cut off the two plastic clamps and remove the protective cover.
After disassembly, you should inspect the rubber elements to determine their degree of wear. If there is no damage or wear, they can be used again for reassembly. Old parts should be replaced with new ones.
Operating principle and design of the steering rack
The steering column in the VAZ 2109 car has a simple design, including:
- a gear rack with two threaded holes for fastening the internal rod ends;
- drive gear with a splined shaft for connection to the steering clutch;
- support half rings creating smooth sliding;
- a stop mechanism that regulates the required design clearance of the gear pair;
- a crankcase into which the parts are assembled and fixedly attached to the car body;
- sealing elements and protection against dust and dirt.
VAZ 2109 steering rack diagram
Let's look at the rack diagram and repair options
Diagram of the VAZ 2109 steering rack
There are three repair methods:
- Complete replacement of the rack (if you don’t have much time to tinker and you’re happy with the price, or the mechanism is not suitable for repair)
- Replacing parts from the repair kit (here you will have to tinker, remove the mechanism, disassemble and reassemble)
- An alternative to repair and the fastest way is to tighten the nut on the steering rack using a special wrench
This method gives a positive effect (just not always and not for long), but can have bad consequences. For example, if you tighten the nut too much, then the force required to rotate the steering wheel will increase, which makes it more difficult to control the car. More serious consequences are the steering wheel jamming while the car is moving; losing control, especially at speed, is extremely dangerous for you and others
Necessary materials and tools
Replacing the steering rack of a VAZ 21093 - 2199 requires the necessary materials:
- Aerosol "Movil"
- Clean rags
- Plastic clamps 200 mm long and 4 mm wide (three pieces)
- Penetrating lubricant WD-40 (“liquid wrench”) to unscrew rusted and soured connections
- Liter of white - spirit
- FEOL type bearing grease or something similar
The following spare parts will also be required for repairs:
- Silent blocks (see Replacing silent blocks on a VAZ: we do it ourselves)
- Reiki cover
- Tips
- Special kit (repair kit) for repair
Repair kit for repairing the steering mechanism of the VAZ 2109
Replacing the steering rack on a VAZ 21093 - 2109 will require the following tools:
- Tip puller
- Hammer
- Socket heads
- A special key for the rack (it fits onto the pressure nut and has an internal octagon)
- Ratchet wrench extension
- A special wrench for unscrewing the bearing nut (octagonal rod at “24” with a recess)
- Metal brush
- Narrow tassel
Sequence of replacement and repair
To quickly and easily replace the rail, follow the procedure as stated in the instructions:
- We roll the car into a pit (inspection ditch)
- We put chocks under the rear wheels, tighten the handbrake (parking brake), and lock the steering wheel.
- Disconnect the power; to do this, remove both terminals from the battery.
- We put the car on a jack and remove the front wheels (it is advisable to put the car on supports (props in the form of wooden blocks).
- Unscrew the nuts of the tips and remove the fingers from the levers
- In this case, you will definitely need a finger puller - apply it, tighten the screw until it stops and hit the lever with a hammer, hold the puller screw with a wrench
Apply the finger puller and tighten the screw until it stops.
Now that both rods are free, unscrew the clamp nuts (in the photo below the nut is indicated by an arrow)
Unscrew the nuts securing the clamps
- Inside the cabin, near the floor, unscrew the bolt on the steering shaft
- Then pull the bar towards you with a rocking motion
- The gear shank often does not immediately detach from the shaft, you will have to tinker
- Having disconnected the rack, pull out the unit through the right hole on the wheel side
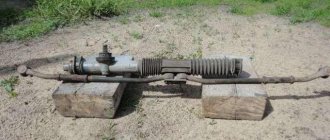
Dismantling
You will not be able to assess the current condition of the steering rack unless you dismantle the device.
There is no optimal way to dismantle the steering rack, since the process in any case involves quite labor-intensive, time-consuming work that involves disassembling many components.
- Suspend the front of the car with a jack to be able to remove the front wheels. Be sure to carefully consider safety measures, install wheel chocks and boots so that the machine does not move while the rack is being repaired.
- Disconnect the gas adsorber, disconnect the wires and take them to the side. This will give you full access to the steering rack.
- Unscrew the bolt from the spline connection. Before doing this, be sure to align the wheels using the steering wheel. The bolt is located near the pedals. To dismantle the fasteners, use a cardan head or a simple spanner.
- Clean the tie rod mounting nuts from accumulated dirt, then undo them using pliers. Unscrew the nuts using a spanner.
- Using a special puller, the rods are disconnected.
- Next, unscrew the rods from the steering rack housing. However, experts recommend dismantling the crankcase with the rods together, since in a vice the removal process is much easier.
- Once you have the rack free, remove it from under the car through the wheel arch. Clean, rinse and clamp in a regular vice.
Now you have a choice - completely replace the steering rack or try to repair it. The second option will take more time, but will save an impressive amount of money.
Repair and replacement
The steering rack of the VAZ 21099 is located directly in the steering mechanism of the car. With its help, the wheels are turned in the direction required by the driver. Sometimes situations arise when the steering rack fails. The cause may be worn out ball joints on the tie rod or tip. In such cases, it is necessary to disassemble and repair the steering rack on a VAZ 21099 car.
The operation of a machine, like any other mechanism, depends on the proper functioning of all its systems. The failure of one will undoubtedly affect the performance of the others - this is the principle of a chain reaction. The steering rack must be in good working order, as defective steering creates a very dangerous driving situation. It is not allowed to operate the machine if a part is broken.
If you hear a crunching sound when turning the steering wheel, the control rack should be replaced. From time to time it is necessary to tighten the screws or replace the seals. Sometimes, after tightening the bolts, the steering wheel feels a little worse or even sticks. In this case, it is necessary to urgently replace the steering rack, especially if you still hear an unpleasant sound when using it.
Replacing the steering rack on a VAZ 21099 is not so difficult, but if you have absolutely no skills in repairing a car, it is better to rush to a service center. Of course, you can replace the part yourself, but it’s more convenient to take a friend to help.
Instructions for replacing the steering rack on a VAZ 21099
To replace the rack, you need several mounting options, suitable tools and wrenches. First, you need to put the car on the handbrake and put a stop under the rear wheels, just in case. Remove the battery terminals. Raise the car using a jack. Unscrew the bolts on the wheels with a wrench and remove them from the car. After removing the wheels, it is necessary to lubricate their nuts with a special solution. Inside, you need to find the universal joint locking bolt and unscrew it. Unscrew the absorber located under the hood of the car to facilitate access to the rack. Loosen the nut and carefully knock out the absorber. It is very important to remember that you should not hit the thread. Carefully unscrew and remove the screws of the VAZ 21099 steering rack. Carefully remove the steering rack, starting from the right side. We remove the steering rack from its pins. The task is completed - the rod is in your hands. Now you need to check the presence and count the number of screws. We take a new rail in our hands and pour a special solution into it. We screw the tips onto the new rail in the reverse order. It is worth remembering that they are different from each other, so do not confuse them! Now you can install the new part in place of the old one
This is where you will need the help of a friend, since it is very difficult for one person to insert the pins correctly when installing and replacing the slats. A locking bolt should be inserted into the installed rail. It has the necessary hole for this purpose.
For any breakdown in your car, it is recommended to consult and diagnose a specialist. Experienced technicians will repair the vehicle quickly, efficiently, and on time. They will select the right part and provide a guarantee for its replacement and repair. You will not waste any of your energy or extra time.
Correct position of the part
But if, nevertheless, the car owner wants to do diagnostics, repair faults and replace spare parts himself, it is worth first familiarizing himself with the characteristics and structure of his car and reading specialized literature. There are now many articles and forums on the Internet about car repairs where you can discuss any problem.
Work technology
Now let's get to work.
ATTENTION: Wait until the engine has completely cooled down; under no circumstances begin repair work when the engine has not cooled down.
- First of all, remove the heat protection, which is held on by three nuts.
- To unscrew the tie rods, you will have to arm yourself with a combat arsenal - a hammer, pliers and a screwdriver.
- Now, taking the key 22, we turn the bolts and pull the rods out of the rack.
IMPORTANT! Replacing the steering rack boot of a VAZ 2109 is a simple job, but the most important step is the final stage - installation of a new part. The main thing here is not to twist or deform the boot.
Now that the part is ready for installation, take the bolts and screw them into place, but under no circumstances turn the steering wheel at this moment, since otherwise the operation of the entire system will be disrupted. The bolts are tightened with a 22 key. Next, installation is carried out in reverse dismantling is in order. The steering rack repair is completed. Good journey and fair wind!
Have you ever heard knocking noises from the steering wheel when driving on gravel or broken roads? If so, then the steering rack was most likely the cause. It gets loose quite quickly and on all front-wheel drive cars, including VAZ 2109-2108, it sometimes has to be tightened. If the tightening does not help, then repair or replacement can be done. In this article I will talk about the second option, that is, the complete replacement of this mechanism.
New rack
The new rack is completely assembled; if it is without rods, you can install rods from the removed rack; they are screwed on with one bolt each. It’s better to install new tips, it’s a cheap part, it costs less than 10 bucks, and you don’t have to bother with repairs again. We put it all back in exactly the same way we removed it. We fasten with bolts, make sure that the clamps are level, although this usually does not cause problems.
The new ends must be screwed onto the tie rods by the same number of turns as they were screwed on the removed rack. The wheel alignment will have to be adjusted in any case, but the service can be reached painlessly. Then we screw the ends into place, tighten it all up and install the wheels.
Inside, we fasten the steering shaft to the rack. There is a special groove to insert the mounting bolt, so you just need to line up the two mating parts so you don't miss. Insert the bolt and tighten it. In principle, if you haven’t forgotten anything, then the rail is ready.
Replacing the VAZ steering rack boot 04/27/17
The purpose of the boot is to prevent dust, liquid or any other dirt from entering the main mechanism, which can cause it to fail.
Over the course of service, this element, like any other, can wear out. The process of removing the boot without dismantling the rack:
- remove the carburetor (injector) from the air filter;
- remove the rubber pipe located above the rail, which performs the function of draining rainwater;
- unscrew the rack protector;
- get rid of steering rods;
- release the rack clamp from the body;
- bite off the cover ties with a tool and remove it;
- clean the surface of the rack and lubricate it with CV joint or regular graphite;
- Before installing a new element, it must be thoroughly lubricated, since its middle part is used while the car is moving;
- After putting on the boot, make sure that it slides easily;
- insert the rods and tighten the bolts;
- clamp the clamps in place and the ties at the edges of the new part;
- perform the remaining manipulations that were performed to provide access to the boot in reverse order.
You need to do the work without balancing, but if you rotated the steering wheel, you will need to set the moving part of the rack to the desired position.