How to remove a torpedo on a VAZ 2109 and 2110? Step-by-step instructions
As a rule, this is done to modernize the dashboard. Tuning a torpedo involves various nuances. But replacing a panel always improves the interior design, although it requires additional modifications. Removing the torpedo is easy to do on your own. The article describes in detail how and what to do. How to remove a torpedo on a VAZ 2109 and 2110 without spending a lot of time and effort? This is easy to do if you have a figured (phillips) screwdriver, a head and a key at hand. No additional tools are needed.
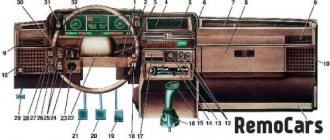
How to remove the dashboard from a car
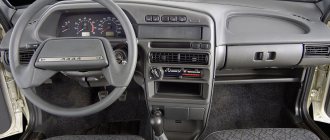
It’s worth saying right away that I got a VAZ 2109 with a low instrument panel, and therefore I will show the entire removal process on it. Of course, many VAZ 2109-2108 already have high panels, but unfortunately, I can’t demonstrate it with such a model yet for obvious reasons. As for this case, to be honest, I didn’t think that this work could be done so easily on the “nines”.
If my memory serves me correctly, then you only need to unscrew about 8 mounting bolts and that’s it. Well, okay, first things first. To do this we need the following tool:
- screwdrivers flat and Phillips
- pliers
- head 22
- knob
Before performing this procedure, you will need to complete the following steps:
The low instrument panel is bolted to the edges only. There are two bolts on each side. The top bolt on the left side of the panel is clearly shown below:
And the second one is located below the glove compartment next to the shelf:
When they are unscrewed, you need to unscrew 4 more bolts that secure the mechanism with the stove control levers:
Now I’ll clearly show the fastenings on the driver’s side. The top one is in almost the same place:
And the lower one is in close proximity to the car hood release handle, as clearly shown in the photo below:
Now you can pull off the instrument panel with small jerks, since it is secured in the center with metal latches. It is enough to simply move it to the side so that you can get to some elements.
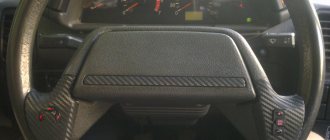
It is also worth noting that it will be necessary to remove the steering column cover, the steering wheel itself and the switches so that nothing gets in the way:
Now all that remains is to disconnect the choke cable by removing the bracket and taking out the locking plate, as well as disconnecting the wire from the end switch:
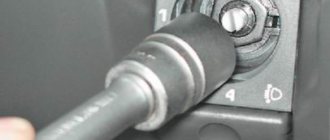
And disconnect the headlight range control. To do this, you first need to pry off the plug from the outside with a thin screwdriver or knife, remove the regulator handle and then unscrew the nut with a 22mm head:
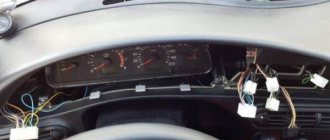
After this, you can remove the instrument panel from the car, the result is shown in the picture below:
And this is what the VAZ 2109-2108 interior looks like without a panel:
VAZ 2109 - removing the high instrument panel
There are many reasons why it may be necessary to remove the high instrument panel on a VAZ 2109 car - this includes replacing the panel itself, disassembling the interior heating system, various body repairs, including work related to painting the car. Before we can easily remove the panel, it is necessary to completely dismantle various hanging elements, appliances, decorative trims, etc.
To carry out the work, prepare a standard set of tools and you can begin:
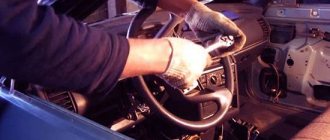
- First of all, it is necessary to remove the steering wheel itself, since it will greatly interfere with us. For the process of removing it, see the corresponding article - How to remove the steering wheel.
- Next, pull out the carburetor choke (in the case of an injection engine there will be none) and remove the plastic handle from the drive rod.
- Remove the decorative trim of the console by unscrewing its two mounting screws on the sides.
- Remove the cigarette lighter and ashtray.
- Remove the fan motor speed control knob.
- Next, using a screwdriver, remove the decorative levers for the interior heater drive.
- Disconnect the block with the power wires from the stove fan operating mode switch, and also remove the two power wires of the heating control panel backlight from the contacts.
- We continue to remove the decorative control knobs - the hydrocorrector of the headlights and the power control knob for the instrument lighting on the panel.
- Now we need to remove the hydraulic corrector and lighting regulator; to do this, use a socket head of suitable diameter to unscrew the nuts securing them. Then push them inside the panel, then we will pull them out.
- On the left and right sides, remove the air deflectors for heating the side windows and then use a Phillips screwdriver to unscrew one screw each securing the top panel trim.
- Remove the exterior lighting switch on the instrument panel by carefully prying it with a flat-head screwdriver and pulling it out as far as the wires will allow. Disconnect the block with the power wires from the switch and put it aside, and push the block itself back into the panel.
- Remove the radio, if you have one, and then remove the standard socket for radio equipment, again, if there is one.
- Remove the central screw securing the panel trim.
- Now we need to remove the instrument panel trim. Before removing it, you need to unclip the latches located under the dashboard, using two flat-head screwdrivers that are inserted along the edges and, pressing them down a little, lift the panel upwards. Then we remove it completely.
- Now that the cover has been removed, you can easily disconnect the power wires from the cigarette lighter and its backlight.
- Disconnect the wires from the hazard warning light connector and the backlight.
- Next, remove the decorative trim of the front speaker and the heated glass switches and rear fog lights. If a speaker is installed, it must also be removed.
- Then we put our hand into the hole under the speaker and disconnect the blocks with power wires from the switch for fog lights and heated rear windshield.
- We remove the instrument cluster by unscrewing the two screws securing it to the panel. Then, by pulling slightly towards yourself, unscrew the fastening nut and remove the flexible speedometer drive cable.
Dismantling
There may be several circumstances for dismantling the low panel of the VAZ 2109:
- Body repair;
- Repair of panel components;
- Car soundproofing;
- The desire to replace an old torpedo with a new one, etc.
We offer you a step-by-step control that will allow you to remove a small type of panel installed on a VAZ 2109 without outside help.
Dismantling process
- Remove the stove control knobs. A total of three difficulties.
- Remove the heater fan switch knob. To do this, you need to pull it towards you.
- Unscrew the 2 fasteners of the dashboard trims from each side of the console. The cover must be pulled towards you.
- Disconnect the wiring block from the rear fog light switch.
- Disconnect a couple of power connectors and one power wire from the heated rear window switch.
- Disconnect the wiring block from the hazard warning light switch.
- Remove the wiring harness from the exterior light switch.
- Disconnect the power supply for the cigarette lighter illumination.
- Disconnect the cigarette lighter wiring harness and remove the panel trim.
- Remove the 4 heater control panel fasteners.
- Unscrew the 2 fasteners of the device shield visor.
- Remove the visor itself of the device composition.
- The spring clamps need to be compressed.
- Remove the instrument cluster
. - Unscrew the speedometer mounting nut, and then disconnect the speedometer cable.
- Disconnect the block with wires (it is white) from the instrument panel.
- Remove the hose from the econometer fitting, and then remove the cotter pin.
- Disconnect the cable from the speedometer that resets the odometer for the day.
- You now need to disconnect the red block from the instrument cluster
- Remove the instrument panel light switch handle and the headlight hydraulic adjustment handle. They need to be pulled towards you.
- Unscrew the mounting nut of the instrument backlight switch.
- Unscrew the fastening nut of the headlight hydraulic corrector socket.
- Remove the steering wheel and its paddle shifters.
- Insert the key into the ignition and turn it to position 1. This will disable the anti-theft device. Only after this can you turn off the power supply to the ignition switch.
- Unscrew the 2 mounting bolts and 2 nuts of the steering column tube.
- Remove this pipe, taking the ignition switch along with it.
- Pull the choke handle towards you (we are talking about carburetor suction). There should be a craving. After this, the handle is removed from the rod.
- Unscrew the 2 choke guide rod fasteners holding it to the instrument panel.
- Remove the mounting screw on the left side of the dashboard.
- Unscrew the fasteners for the lower panel fixation on the left.
- Similarly, remove the fasteners from the side and bottom on the right side of the dashboard.
- Unscrew the panel fastening screw, which is located inside the glove compartment.
- There remains one fastener on both sides of the panel, which must be unscrewed in order to eventually remove the tidy.
Low version dismantling procedure
A low dashboard is used in some VAZ-2109 cars, as well as in the Baltika modification. If the situation forced you to disassemble this part of the interior, then do the work like this:
- First of all, remove the 3 knobs from the panel for switching stove modes.
- Removing the airflow control knob is simple - slightly pull it towards you.
- On both sides of the shield, remove the fasteners of the decorative trim, then slide it towards you.
- Disconnect the connectors with wires from the fog lights and heated rear window switches. There is another wire going to the latter that needs to be disconnected.
- De-energize the hazard light switch and the cigarette lighter illumination.
- Now you can begin to remove the cigarette lighter wiring and decorative trim from the stove.
- On the stove control element you will see 4 fasteners that will need to be removed.
- Next, remove the 2 fasteners from the instrument panel.
- Remove the dashboard visor.
- Compress the spring clips and remove the housing from the instrument cluster.
- Unscrew the speedometer fastener and disconnect it from the drive cable.
- On the instrument panel, find the block with white wires and disconnect it from the power.
- Find the econometer fitting and remove the hose from it. After this you can remove the cotter pin.
- Then disconnect the speedometer from the cable, which is used to record the readings of the device for the day.
- Disconnect the red wire from the power supply.
- Pull the hydraulic corrector and light switch handles towards you.
- Unscrew the two fastening nuts that are located at the hydraulic corrector socket and next to the instrument backlight switch.
- Remove the steering wheel, along with the switches that are located under it.
- You can only remove the power pads from the ignition switch if you turn it to position 1 with the key.
- Remove 2 fasteners and the same number of nuts from the steering column.
- Remove the steering column along with the ignition switch.
- Pull the choke handle towards you to remove it from the rod. This rod is held in place by two fasteners that need to be removed.
- Remove the bolts from the left side and bottom of the instrument panel. Do the same on the right side.
- Inside the glove compartment there is another fastener that needs to be unscrewed.
- Remove the last fasteners and carefully remove the panel.
Now you can install a new torpedo instead or carry out planned repairs.
Beautiful modifications to the VAZ 2109 panel
Every driver of a domestic car wants to make the instrument panel of his VAZ-2109 as bright and original as possible. Here is one of the options for how beautifully you can modify this element of the machine.
You will need a soldering iron. Next you need to buy numbers and a scale panel. It is important that they are translucent from the inside. You should also purchase an ultraviolet lamp. It is powered by 12 volts. Therefore, nothing needs to be changed.
You will also need a fluorescent marker or paint. It will change color if exposed to ultraviolet light. This technique is often used in modern nightclubs. You will also need ordinary light bulbs with sockets, like those in the “tidy”. There is no need to change the LEDs; they will remain in place. Everything you need is there, you can get started.
First you need to remove the plastic, then the dashboard. Also, don't forget about the black plastic that surrounds the glass. We disassemble the standard insert, as well as the arrows. Most often, there are no holes in the new insert. Therefore, you will have to do them. For the arrows, the holes will be needed wider than in the standard trim. Otherwise, the arrows will start to stick.
Next you need to dismantle the lighting that is installed. The work should be done carefully so that the plastic is not damaged. We take out the board with the light bulbs. We install a neon light bulb instead of the usual ones, and stick a plastic protection on top. It used to have factory bulbs screwed in. Don't forget about the control unit for the new neon light bulb. Be careful not to reverse the polarity at all times.
If this happens, nothing will shine. Next you need to screw in the instrument lighting bulbs. This should be done in parallel to the neon lamp. We lay the wiring from the inside; first, for this you need to make holes in the partitions.
Let's check if everything is correct. The light bulbs inside should be adjusted. Next we put on the overlay and seal it. After these steps, all we have to do is paint the hands with a purchased fluorescent marker or paint. It is advisable to repeat painting after 10 minutes. After this, the arrows can be installed in their place. This completes the tuning.
Check the work, otherwise you will have to disassemble everything. If there are no problems, you can assemble everything in strictly reverse order. After such tuning, the interior of the VAZ 2109 will be equipped with a colorful panel like good foreign cars. If desired, you can use fluorescent paint to paint the dashboard trim in the place where the needle reaches its limit. It looks very nice.
Step-by-step tuning steps
Before dismantling the VAZ 21099 panel, you will need to remove the terminals from the power supply by hand. Then the decorative steering wheel trim is removed. The nut should be unscrewed so that its end is flush with the similar element of the steering column shaft. You can’t turn it away right away. Then tuning the VAZ 21099 panel involves removing the steering wheel.
After unscrewing the 6 screws that secure the lower casing, you will need to remove it. The ignition switch trim is removed. The next step involves loosening the bolt that secures the base of the switches. The last element is removed from the shaft, and 2 blocks with the corresponding wires are disconnected.
In this case, you will need to label the washer and wiper switches. The block with wires is disconnected from the corresponding levers and direction indicators. The choke should be pulled out so that a draft occurs. At the same time, the handle of the first unit is pulled towards itself. Then the bolts securing the console trim are removed from the panel and the trim itself is removed.
The cigarette lighter cartridge and ashtray are pulled out of the socket. The VAZ torpedo is equipped with a heater fan that will need to be removed. To do this, it is recommended to use a screwdriver. The block and two wires are disconnected from the fan switch. They illuminate the europanel.
Tuning instrument panel
How to remove a high instrument panel VAZ - 2108, 09, 099 - Yakovlev Dmitry
Complete removal of the VAZ 2109 panel. Preparation for gluing. Part 1
You also need to disconnect the handles for the hydraulic headlight adjustment and the light switch. After unscrewing the nuts, the corresponding switch is pushed inside the panel. The side nozzles are removed with a screwdriver. The high panel provides for turning away the bolts for fixing the linings. The last elements are located on both sides of the torpedo.
Subsequent tuning is carried out taking into account the removal of the radio socket. Existing audio equipment is pre-dismantled. Then, using a screwdriver, the latches are removed and the cover is raised. The block and wires are disconnected from the cigarette lighter. A similar step is carried out in relation to the backlight and alarm switch.
How to replace the high instrument panel panel on a VAZ 2108-VAZ 21099?
Removal: 1) First, disconnect the minus wire from the terminal on the battery on which it is located, if you do not know how to remove wires from the terminal, then read the short instructions on how to do this, namely, read point 1 “here in this article” .
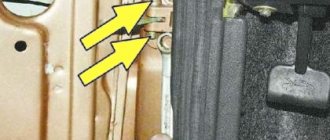
2) Now take a screwdriver and use it to pry up the low beam switch (see photo 1) and the hazard warning switch (see photo 3), when both switches are pulled out, disconnect the buttons from the connectors (see photos 2 and 4) and Then push the connectors inside the panel shield so that they do not interfere.
3) Then, using a Phillips screwdriver, unscrew the two side screws (Only one screw is visible in Photo 1, the second is located strictly in the same place but only on the driver’s side) and then bend the bottom trim and thereby remove it (see Photo 2), then pull out the cigarette lighter and put it away somewhere (Just don’t lose it) and also take out the ashtray (see photo 3), and also if you have a tape recorder, then you will also have to remove it (For information on how to remove the tape recorder, look in the instructions included with him) and, accordingly, after removing it, remove the box in which it was located (see photo 4).
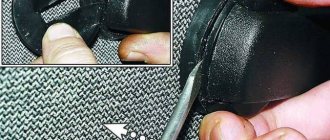
4) Next, use a screwdriver to climb into the place from which you pulled out the tape recorder box and there you will find two latches (One of the latches is indicated by a red arrow in photo 1, but it is hard to see) and then bend them using a screwdriver (Indicated by a blue arrow) and pull by bending it slightly towards you by the shield, then in another place, use a flat screwdriver to pry the shield (you need to pry it above the instrument cluster), thereby freeing the two antennae that secure it (see photo 2).
Note! When the shield is about to come off, bend the last (Third) clamp that secures it and pull the shield towards you, as if removing it from the car, but you don’t need to pull too hard, because you still have all the wires that go from the cigarette lighter and from the switch The alarm system (There are wire blocks, just disconnect them from the connectors, that’s all) will need to be disconnected, and when nothing will interfere with the removal, remove the shield from the car!
Installation: The new shield is installed in its place in the same way as the old one was removed, but only the whole operation is carried out in the reverse order of removal, in addition, if your new shield is bare (without instruments), then in this case you will have to remove them from the old one, there will only be two things left on the old panel, the first thing is the hazard warning lamp and the second is the cigarette lighter housing, the lamp can be removed easily and in two ways, the first way is either you unscrew the screws of the lamp bracket (Indicated by the arrow in photo 1) and move the bracket together with the lamp to another shield, or you simply turn the light bulb clockwise and take it out and transfer it to a new shield (see also photo 1), now a few words about the cigarette lighter body, to remove it you just need to press the petals on the back side (see. photo 3) and then push it inside and thereby you will push it out where and remove it from the instrument panel (see photo 4).
How to remove a torpedo on a VAZ 2109 and 2110? Step-by-step instructions
As a rule, this is done to modernize the dashboard. Tuning a torpedo involves various nuances. But replacing a panel always improves the interior design, although it requires additional modifications. Removing the torpedo is easy to do on your own. The article describes in detail how and what to do.
How to remove a torpedo on a VAZ 2109 and 2110 without spending a lot of time and effort? This is easy to do if you have a figured (phillips) screwdriver, a head and a key at hand. No additional tools are needed.
How to remove a torpedo on a VAZ 2109 low
- Remove the three heater control knobs.
- Remove the heater fan switch handle by pulling it toward you.
- Remove two screws securing the instrument panel console trim on both sides of the console.
- Slide the cover towards you.
- Disconnect the block with wires from the rear fog lamp switch.
- Disconnect two connectors with wires and one wire from the heated rear window switch.
- Disconnect the block with wires from the hazard warning switch.
- Remove the wiring harness from the exterior light switch.
- Disconnect the connector with the cigarette lighter illumination wires.
- Disconnect the connector with the cigarette lighter wires and remove the console trim.
- Remove the four screws securing the heater control panel.
- Remove the two screws securing the instrument cluster visor.
- Remove the instrument cluster visor.
- Compress the spring clips.
- Remove the instrument cluster housing from the panel.
- Unscrew the fastening nut and disconnect the cable from the speedometer.
- Disconnect the white block with wires from the instrument cluster.
- Remove the hose from the econometric fitting.
- Remove the cotter pin.
- Disconnect the trip odometer reset cable from the speedometer.
- Disconnect the red connector from the instrument cluster.
- Remove the handles for the headlight hydraulic adjustment and the instrument cluster lighting switch by pulling them towards you.
- Unscrew the nut securing the instrument cluster lighting switch.
- Unscrew the nut securing the headlight hydraulic corrector socket.
- Remove the steering wheel and steering column switches.
- Turn the ignition key to position “1” to turn off the anti-theft device, and disconnect the ignition switch wiring harness.
- Remove the two bolts and two nuts securing the steering column pipe.
- Remove the steering column pipe along with the ignition switch.
- Pull the carburetor choke handle towards you until a draft appears, and remove the handle from the rod.
- Remove the two screws securing the air damper guide rod to the instrument panel.
- Remove the screw that secures the instrument panel on the left side.
- Unscrew the screw of the lower fastening of the instrument panel on the left side.
- Remove the screw on the side securing the instrument panel on the right side.
- Unscrew the screw of the lower fastening of the instrument panel on the right side.
- Unscrew the screw securing the instrument panel in the glove box.
- Unscrew one screw securing the instrument panel console on both sides and remove the instrument panel.
Installing a low torpedo on a VAZ 2109 is carried out in the reverse order of removal.
If your car has a low dashboard, we recommend installing overlays on the VAZ 2109 panel, they will give the car interior a more modern look and ease of use of the dashboard as a whole.
How to remove the high type panel
If your VAZ-2109 has a high panel model installed, then you need to act differently:
- First remove the steering wheel to gain access to the instrument panel.
- If you have a carburetor engine, pull out the choke and remove the handle from it.
- Now you need to remove the decorative trim; it is held on by two screws.
- Remove the ashtray and cigarette lighter.
- Pull the fan control handle towards you.
- Use a screwdriver to pry off the decorative control knobs for the interior heater drive.
- Be careful when removing the power wire connectors that go to the heater switch and to the heating control light.
- Remove the handles for the headlight hydraulic adjustment and the instrument panel lighting control.
- Use a socket to turn these adjusters and gently push them inward.
- Remove the air deflectors for the left and right side windows, and also remove the fasteners that were located under them.
- Pry the headlight switch with a screwdriver and pull it out to the length of the wires, disconnect it from the power supply. Place the block back behind the plastic part.
- Remove the stereo or standard radio, and then unscrew the center mount of the decor.
- Along the edges of the decorative trim there are latches that will need to be pressed in order to remove the decorative part of the torpedo by moving upwards.
- Disconnect power from the cigarette lighter, backlights, and hazard warning lights.
- Remove the decorative trims and speakers, disconnecting them from the wiring. After this, turn off the power to the heated rear window and fog lamp switches.
- Unscrew the fasteners and remove the instrument panel, remove the central screw on the speedometer and disconnect it from the cables. De-energize the shield.
- Turn off the power and remove the ignition switch, disconnect the choke control rod from the power supply.
- Disconnect the illumination lamp of the compartment for personal belongings from the power supply. Unscrew the remaining fasteners on the left and right and remove the panel.