VAZ (Lada) 2113/2114/2115 1997 - 2014
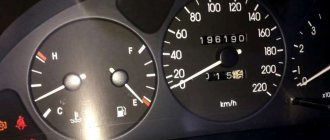
The fuel gauge on my car began to act up - namely, the needle dropped to 0, and does not react at all if I fill it with gasoline. Most likely the sensor is covered. What other signs of its failure are there, and how can I check it (the sensor)?
- What is the pressure in the ramp of the VAZ 21124 engine 1.6? – 1 answer
- VAZ 2114 does not show fuel level correctly - 1 answer
A malfunction of the fuel level sensor on a VAZ 2114 is not a rare occurrence, especially if the car is relatively new. In addition to the problem you mentioned (the fuel level arrow always points to an empty tank), there are several other signs that may indicate a faulty fuel level sensor:
- the needle is always at the maximum mark, regardless of the actual fuel level;
- the fuel level display constantly jumps, showing different marks;
- The arrow may initially show a full tank, but when you hit bumps, the readings get lost and may drop to zero, and then return back.
It is worth remembering that all these malfunctions may not always mean a breakdown of the sensor. In addition, the problem may be in the dashboard itself or in the wiring. In order to accurately determine the problem, you need to check the fuel level sensor.
How to check the FLS on a VAZ 2114?
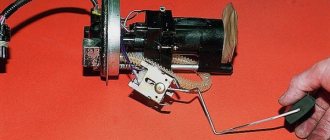
The sensor itself is located in the submersible fuel module, which is located in the gas tank. It is easy to find, since a float is attached to it (the placement is shown in the photo below).
It malfunctions due to oxides on the contacts or their abrasion. Before checking, you need to get to the fuel module itself so that you have access to the sensor. The check can be done in the following ways:
- If the fuel level arrow always points to 0, you need to turn on the ignition, disconnect the pink wire from the FLS sensor, and connect it to ground. If the fuel level arrow on the dashboard starts to move, the sensor is faulty. In rare cases, this may indicate a malfunction in the circuit connecting it to ground.
- If the fuel indicator needle is constantly in the upper value, then you need to disconnect the power wire from the sensor. If the arrow falls, it means it is not working properly;
- You can check the sensor using a multimeter by measuring the resistance. When the float is positioned on an empty tank, the multimeter readings should be in the range of 315 - 345 Ohms, on half the tank - 108 - 128 Ohms, on an empty tank - up to 7 Ohms.
It is also worth remembering that if the fuel level indicator arrow on a VAZ 2114 constantly “jumps”, then you need to check the 2 nuts securing the wires near the handbrake. This wire runs from the sensor to the dashboard, and if it is loose, the needle may become unstable.
To avoid future damage to the sensor, it must be removed periodically (at least after one maintenance) and the contacts cleaned or replaced.
Probably every owner of a domestic car has encountered a situation where the information on the dashboard about the fuel level in the tank did not correspond to reality. This is a fairly common and unpleasant phenomenon, characteristic mainly of older machines.
The VAZ-2114 fuel level sensor with an injector performs one simple but extremely useful task - it informs the driver about the remaining fuel in the gas tank. During the operation of the car, the contacts of the mechanism oxidize, and the sensor itself begins to function incorrectly.
On what principle does the device work and how to replace it if necessary?
Connection diagram for fuel level sensor VAZ 2114
Cars admin26.02.2020
7.13.4.2. Checking the sensor and fuel level indicator
| GENERAL INFORMATION |
The indicator needle does not deviate from the beginning of the scale, regardless of the amount of gasoline in the fuel tank.
Fold down the rear seat and remove the indicator sensor hatch cover. Disconnect the pink wire from the pointer sensor and connect it to ground. Turn on the ignition:
– the pointer arrow has deviated – the sensor is faulty (replace);
– the pointer arrow does not deviate – continue troubleshooting.
Remove the instrument cluster from the panel without disconnecting the pads from it. Turn on the ignition. Connect the wire to the right contact 4
fuel level indicator (which connects to pin
10
of the red block):
– the pointer arrow has deviated – there is a break in the wire connecting the pointer and the sensor;
– the pointer arrow does not deviate – replace the pointer.
The indicator needle is on the scale regardless of the amount of gasoline in the fuel tank.
Disconnect the red block with wires from the block 3
instrument clusters. Turn on the ignition:
– the pointer arrow has deviated to the beginning of the scale – the pointer is working;
– the pointer arrow does not deviate – the pointer is faulty (replace).
The tachometer and speedometer can only be checked on stands in specialized workshops.
We present two diagrams for connecting the fuel level sensor of VAZ 2108, 2109, 21099 cars and their modifications with a carburetor engine.
Electrical diagram for connecting the fuel level sensor for VAZ 2108, 2109, 21099 cars with mounting block 17.3722 and a “low” instrument panel (before 1998 onwards)
Electrical diagram for connecting the fuel level sensor for VAZ 2108, 2109, 21099 cars with mounting block 2114 and a “high” instrument panel (after 1998 onwards)
Features of the fuel level sensor connection diagram
Notes and additions
— The fuel level sensor (FLS) of VAZ 2108, 2109, 21099 cars is installed in the gas tank on the fuel intake. It is a float rheostat that changes its resistance depending on the position of the float. Read more: “Fuel level sensor for VAZ 2108, 2109, 21099 cars.”
More articles on the fuel system of VAZ 2108, 2109, 21099 cars
Click to enlarge (600 KB)
Description:
1 — headlight block VAZ 2114; 2 — gearmotors for headlight cleaners*; 3 — fog lights*; 4 — ambient air temperature sensor VAZ 2114; 5 — sound signals of VAZ 2114; 6 — engine compartment lamp switch; 7 — electric motor of the VAZ 2114 cooling system fan; 8 — VAZ 2114 generator; 9 — sensor for low oil level indicator VAZ 2114; 10 — washer fluid level sensor; 11 — front brake pad wear sensor; 12 — wire tips connected to the common windshield washer pump**; 13 — windshield washer pump VAZ 2114; 14 — headlight washer pump*; 15 — wire ends for connecting to the rear window washer pump on VAZ 2113 and VAZ 2114 cars; 16 — low oil pressure indicator sensor; 17 — lamp for lighting the engine compartment of the VAZ 2114; 18 — wire lug for connection to the wiring harness of the engine control system or to the wiring harness of the ignition system on carburetor VAZ 2114 vehicles; 19 — windshield wiper gearmotor; 20 — starter VAZ 2114; 22 — coolant temperature indicator sensor VAZ 2114; 23 — switch for reversing lights VAZ 2114; 24 — low brake fluid level indicator sensor; 25 - battery; 26 — sensor for insufficient coolant level indicator; 27 — relay for turning on fog lights VAZ 2114; 28 — mounting block VAZ 2114; 29 — brake light switch; 30 — plug socket for a portable lamp; 31 — lamp for illuminating the hydrocorrector scale of the VAZ 2114 headlights; 32 — parking brake warning lamp switch; 33 — backlight lamp connection block; 34 — switch for instrument lighting lamps; 35 — steering column switch; 36 — alarm switch; 37 — relay for the heating element of the front seats of the VAZ 2114; 38 — ignition switch VAZ 2114; 39 — rear fog light circuit fuse; 40 - fuse for the circuit of heating elements for the front seats of the VAZ 2114; 41 - door lock circuit fuse; 42 — front ashtray illumination lamp; 43 — ignition relay VAZ 2114; 44 — cigarette lighter; 45 — glove box lighting lamp; 46 — glove compartment lighting switch; 47 — electric motor of the VAZ 2114 heater fan; 48 — additional resistor of the heater electric motor; 49 — heater fan switch VAZ 2114; 50 — heater switch backlight; 51 — lamp for illuminating the heater levers of the VAZ 2114; 52 — gear motors for electric windows of the front doors; 53 — right front door power window switch (located in the right door); 54 — gearmotors for locking front door locks; 55 — wires for connecting to the right front speaker; 56 — gearmotors for locking the rear doors of the VAZ 2114; 57 — wires for connecting to the right rear speaker; 58 — control unit for blocking the door locks of the VAZ 2114; 59 — wires for connecting to radio equipment; 60 — switch for headlight cleaners VAZ 2114*; 61 — switch for the heated rear window element of the VAZ 2114; 62 — relay for turning on rear fog lights; 63 — block for connection to the heating element of the right front seat of the VAZ 2114; 64 — switch for the rear fog lights of the VAZ 2114: 65 — switch for the heating element of the right front seat of the VAZ 2114; 66 — fog light switch VAZ 2114*; 67 — switch for external lighting lamps; 68 — switch for the heating element of the left front seat of the VAZ 2114; 69 — block for connection to the heating element of the left front seat; 70 — wires for connecting to the left front speaker; 71 — left front door power window switch (located in the left door); 72 — left front door power window switch (located in the left door); 73 — wires for connecting to the left rear speaker; 74 — side direction indicators VAZ 2114: 75 — lamp switch on the front door pillars; 76 — lamp switch on the rear door pillars; 77 — lampshade; 78 — canopy for individual interior lighting; 79 — block for connecting to the wiring harness of the VAZ 2114 electric fuel pump; 80 — trunk light switch; 81 — instrument cluster of VAZ 2114: 82 — trunk lighting lamp; 83 — display unit of the on-board control system of the VAZ 2114; 84 — trip computer VAZ 2114*; 85 — block for connecting the wiring harness of the engine control system; 86 — rear external lights of VAZ 2114; 87 — rear internal lights of VAZ 2114; 88 — block for connection to the rear window heating element; 89 — license plate lights; 90 - additional brake signal located in the spoiler of the VAZ 2114.
What does the fuel level sensor consist of and how does it work?
The fuel level sensor can work properly for a long time. The mechanism itself is not one of the most painful areas of the VAZ-2114, but, like all other devices, sooner or later it fails. Its breakdown is most often due to the fact that the FLS is in unfavorable conditions.
The device body is quite fragile, which often leads to the sensor breaking due to mechanical damage. Among other things, constant temperature changes significantly reduce its service life. The fuel sensor of the VAZ-2114 is especially painful during the frosty season.
The main purpose of the fuel level sensor is to determine the fuel level in the gas tank and transmit the received data to the indicator, which informs the driver.
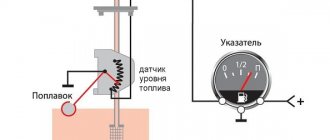
In a VAZ-2114 car you can most often find a sensor of the BM-150 type. Regardless of the design feature, the operation of each fuel controller is based on a measuring float made of lightweight material. The operating principle of the device is as follows: a unique signal corresponds to a certain amount of gasoline in the tank. The design also includes a lever and a resistor element.
Taken together, all the parts of the device make it possible to measure resistance, which has different indicators depending on the level of gasoline. Using a sliding contact, it is possible to turn on and off a special indicator on the dashboard.
A full tank has a resistance of 20 ohms, an empty tank has a resistance of 300 ohms.
Fuel sensor VAZ 2114 - device and replacement
Many VAZ 2114 owners have a problem with the fuel remaining in the tank. The reason is the fuel level sensor FLS.
It is located in the car tank, on the fuel pump. It works with a float, which, when the fuel level changes, lowers or rises, thereby changing the resistance on the potentiometer.
Common FLS malfunctions
Often, the driver can observe the following situation: while driving on a flat road, the instrument panel displays information about a full tank, and after driving off-road, about an empty one. The readings jump, which is clear evidence of a malfunction of the VAZ-2114 FLS. This disease often manifests itself due to wear on the contact tracks.
In some cases, the situation can be corrected quite easily - bend the slider so that it is located above the worn-out place in the diagram. But such a solution to the problem is not always appropriate. Sometimes you have to replace the entire regulator.
Other malfunctions of the mechanism include:
- The pointer is at zero - most likely the problem is related to the limited travel of the float.
- The low fuel light does not light up - there may be a problem with the potentiometer.
- When starting the engine, the indicator does not light up - there is a problem with the electronics.
- Incorrectness of the data displayed on the instrument panel - you should check the tightness of the float.
If such symptoms of a device malfunction appear, experts also recommend checking all the wires securing the nut sensor. The fastening elements clamp the mass, so if they are not tightened well, the contact will appear and disappear. If the sensor does not show the fuel level of the VAZ-2114, then the contacts need to be cleaned, and if this cannot be done, then they can be completely replaced.
Causes of problems
Failure of the sensor is accompanied by incorrect fuel level readings and may be associated with problems:
- Wear of contact tracks on the board.
- The position of the float limiter is knocked down.
- Oxidation or broken wires.
- The fuse is damaged.
- Current collector failure.
- Resistor fault.
Attention! The gasoline sensor on the VAZ-2115 and 2114 has to be changed due to wear of the tracks or their oxidation.
Replacing the FLS on a VAZ-2114
Even a novice driver can repair the sensor with his own hands. Of course, the breakdown should not be serious, then replacing the failed element will not be difficult and will not take much time. For example, if a float breaks, you can always purchase a new copy on the automobile market. The old float is easily removed from the holder and a new one is installed in its place.
Oxidized wires are also often replaced with new ones if stripping them is impossible. The price of a new sensor is relatively low, so most often drivers prefer to simply purchase a new mechanism.
The process of replacing the FLS on a VAZ-2114 includes the following procedure:
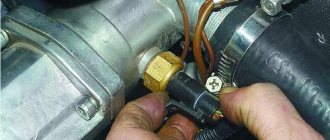
- Remove the lower part of the rear seat and remove the upholstery, since the sensor is a structural part of the fuel pump. It is impossible to get to the mechanism without going through the module.
- Using a key number 7, release the two screws securing the gas tank cap.
- Then you need to unscrew eight more screws securing the edge of the lid.
- After these steps, the cover can be easily moved forward.
When access to the fuel pump is ensured, it is necessary to remove part of the wire block. Don't forget to unscrew the line nuts. Before the cap is completely released, it must be turned once, this way the pressure in the system will be reduced.
It is necessary to carefully and carefully release the fuel pump so as not to damage the float; it should first be lifted, and then turned clockwise and tilted. Once you have the fuel pump in your hands, you can start looking for the sensor itself.
The procedure is as follows:
- use a screwdriver to move the locking ring;
- remove the module cover;
- remove the sensor terminals and release the fastenings from the cover;
- disconnect the block;
- Release the fuel sensor clamps and remove the mechanism.
At this point, the work of replacing the sensor is considered complete. It is necessary to install the new mechanism in place and assemble the module in the reverse order. As you can see, there is nothing difficult in performing this work; you just need to arm yourself with the necessary equipment: screwdrivers and a set of keys.
Electrical diagram for connecting the fuel pump VAZ 2114
The VAZ 2114 fuel pump connection diagram includes one relay and one fuse.
The plus of the battery is supplied to one of the ends of the EBN relay winding through the contacts of the main relay. The second contact is connected to ground through the contact of the on-board controller. The pump motor is connected to the supply voltage through normally open contacts. The operating algorithm is as follows:
- When the ignition is turned on, the main relay is activated and supplies power to the EBN relay;
- The EBN relay is activated because it is supplied with ground from the ECU output;
- The pump motor is connected to the network through closed contacts;
- After a few seconds required to create the required fuel pressure in the rail, the ECU turns off the “ground”, as a result of which the EBN relay de-energizes and breaks the power supply circuit of the pump;
- When the engine is running, the fuel pump is constantly on.
The VAZ 2114 fuel pump relay is located on a block located in the car interior, behind the right wall of the center console (passenger side). The block includes three fuses and three relays. What you need is located in the middle, and to the left of it is the fuse.
The fuel pump wiring diagram and the location of the relay box may differ in some details depending on the type of ECU used and the vehicle modification.
Malfunctions
For what reasons may the fuel level indicator not work:
- lack of good contact on any part of the circuit (breaking off wires, oxidation at the junctions of connectors, cracks at soldering points);
- malfunction of the instrument panel indicator (for example, broken solder joints);
- disconnecting the float from the sliding contact;
- fuse burned out;
- lack of contact between the resistive track and the sliding contact. The reason may be the formation of oxides and deposits on surfaces, weakening of the pressure of the sliding contact on the resistive layer, and abrasion of the tracks of the resistive layer.
The pointer is lying and works intermittently
Reasons why the gauge incorrectly shows the fuel level in the tank:
- the presence of additional resistance in the circuit (oxidation at the connectors, poor ground contact, formation of oxides, deposits on the resistive layer and sliding contact);
- Float casting defect, causing it to fill with fuel. Failure is extremely rare, but still possible, as is bending of the float rod due to mechanical impact during unqualified repairs;
- formation of deposits on the guide post (typical only for tubular type sensors). In this case, the movement of the float will be difficult.
The arrow always shows a full tank if the system has:
- the float has separated from the sliding contact (in this case, the slider will always be in the extreme position);
- the wire going to the indicator has a short to ground somewhere, which causes the resistance in the circuit to decrease.
A twitching arrow of the UUT indicates partial abrasion of the resistive track of the potentiometer. This will also cause interruptions in the operation of the pointer. Since the car is most often used with a fuel tank filled to 40-60%, it is in this range that abrasion of the resistive layer occurs most quickly. Therefore, the pointer can only work properly when the position of the sliding contact falls on an intact resistive layer.
Checking the fuel level sensor with a multimeter
After a visual inspection, a check with a multimeter may also be necessary. In other words, to understand why the fuel sensor is not working, the specified sensor is also checked in ohmmeter mode.
The fact is that the resistor can change resistance over time, which leads to incorrect sensor readings. Resistance should be checked with the tank empty, 50% full and full. If it is determined that the resistance is not normal, it is better to immediately install a new sensor.
We also add that if, after installing a new FLS, the sensor does not accurately determine the fuel level in the tank, this is often due to the fact that the resistance deviates from the nominal one. In fact, we can say that the wrong sensor is installed.
As a rule, when choosing, it is important to consider that although fuel level sensors are visually similar, they usually have different resistance values. In fact, this is what leads to errors.
For this reason, you need to purchase a sensor that has the required resistance.
Fuel level sensor float and other problems
In cases where the fuel level indicator does not work, in some cases it is directly related to the float. Floats can be of two types:
- hollow float made of plastic or thin metal;
- the so-called “foam” float, which is made of a porous base;
In the first case, the float may gradually wear out and become damaged; the fuel level indicator needle gradually fails to reach the maximum when filling a full tank.
Fuel can get inside the hollow float, causing the level sensor to show incorrect data. To fix the problem and carry out repairs, it is necessary to replace the float of the fuel level sensor in the tank.
You also need to understand that if the fuel sensor is lying, you should not exclude the possibility of mechanical damage to the gas tank itself. If the tank is damaged, then the float may simply jam.
As a rule, in this case the pointer works accurately, but the range is very limited. The fuel level arrow may also be “stuck” in only one position. In fact, the problem is not the most harmless and often requires a complete replacement of the gas tank to solve it.
By the way, often when buying a used car, you can hear from the seller that the fuel pump screen was recently cleaned or the fuel pump was replaced, after which the fuel level sensor, etc., stopped working.
At the same time, the seller claims that there is simply no time to fix such a minor breakdown. In fact, if the fuel level sensor in a car does not work, this can be caused either by a failure of the sensor itself or the float, or by deformation of the gas tank. Naturally, changing the tank is quite expensive.
We also note that if the FLS does not indicate the fuel level correctly, the bending of the lever may also be the cause. In this case, the pointer arrow is not able to reach the extreme marks.
The lever can be corrected, but it is important to understand that the problem itself occurs as a result of one or another mechanical effect on the tank. Also, after editing, the float may still jam
Again, in such a situation, it may be that the tank itself needs to be repaired or replaced.
The list of possible problems with the FLS is completed by the fuel level indicator. To understand why the fuel sensor does not work, you need to consider that the problem may be not only in the sensor, but also in the indicator.
In this case, the incorrect fuel level is displayed due to the fact that the movable winding of the indicator is jammed. In turn, this leads to the fact that it is not possible to move freely, and the data on the indicator itself will be inaccurate.
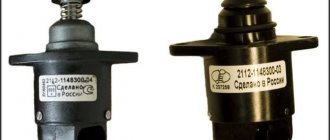
Fuel level sensor VAZ 2114
>The fuel level sensor of the VAZ 2114 is an unreliable element of this car. Many drivers fell for this and found themselves with an empty tank, although the instrument panel showed that there was still gasoline. While the car is new, it works properly, but over time, due to its poor quality, the sensor contacts wear out and oxidize. At the same time, the fuel level indicator needle begins to behave inappropriately, sometimes jumping. It may show a full tank, but after the car drives over a bump - empty. All this is due to poor contact in the sensor. The VAZ 2114 has one feature: before running to the store and buying a new sensor, you need to check how the two nuts securing the wires from the sensor near the handbrake are tightened. These nuts clamp the mass, and naturally, if they are not clamped sufficiently, the contact appears and then disappears. At the same time, the arrow also jumps. Sometimes preventive maintenance of the VAZ 2114 fuel sensor helps - take it out, clean it, or change the contacts. If you still need to replace the fuel level sensor, then you need to remove the sensor installed on the car and go with it to get a new one. The old sensor must have its markings on it; using it, you must select a new sensor. During the production of the VAZ 2114, a variety of fuel sensors were installed on it.
DUT VAZ 2114
A fuel sensor is needed to determine the fuel level in the tank and transmit this information to the instrument panel. The sensor consists of a variable float resistor with a lever and a sliding contact - to turn on the warning lamp on the instrument panel of the VAZ 2114. Thus, the sensor measures its resistance depending on the fuel level in the tank. If the tank is full, then the resistance should be 10-20 Ohms; if the tank is empty, the total resistance of the variable resistor should be about 300 Ohms. Before work, it is necessary to disconnect the battery ground, since when working with gasoline, the formation of a spark from a short circuit of +12V to ground can be disastrous. After the sensor is removed from the tank, you need to plug the hole in the gas tank with a rag. Next, use a multimeter to measure the above resistance of the sensor by moving the float with your hand, simulating a car. If the resistance of the sensor is in order, then it is necessary to check the wires from the sensor to the panel, as well as the fuel level indicator of the instrument panel of the VAZ 2114. At the end of the work, make sure that the arrow on the cover of the fuel pump/fuel sensor points towards the trunk.
Save:
Add a comment Cancel reply
- Here you will find information on the repair, maintenance and operation of VAZ cars. Use the convenient search on the site!
- Categories
- Auto News
How it works
- Lada Vesta
- Useful tips
- Car repair Other brands
- Classic "Zhiguli"
- Front-wheel drive
- Four-wheel drive
- Body repair and painting
How to repair a fuel level sensor with your own hands
Repairing the fuel level sensor is quite affordable for the average car enthusiast. Parts of the device can be freely purchased at an automobile parts store. It is necessary to remove the sensor from the tank and study its characteristics. The marking is located on the front side of the plate directly above the rheostat scale.
If the float is broken, then this is the least of the problems. They change simply. Usually, this is a plastic barrel filled with air; it is simply removed from the holder socket and a new one is inserted. Sometimes this is a porous element and can be replaced in two ways. Remove the locking washer and put on a new one, securing it. Or change the float assembly with the rod, which is much simpler.
If the rheostat scale strips are dirty, you just need to clean them.
Attention! The record should only be cleaned with a soft cloth or cotton wool soaked in alcohol. Hard matter or any other object can damage the thin layer of the scale and the rheostat can be thrown away. Unsoldered or torn wires can be carefully soldered in place or soldered at the fracture site, but a cracked, broken plate can only be replaced with a new one
Unsoldered or torn wires can be carefully soldered into place or soldered at the fracture site, but a cracked, broken plate can only be replaced with a new one.
In most cases, no one suffers from this now. A non-working device is replaced and that’s it. Fortunately, their price is low. Moreover, on cars of recent years, the rheostat plate, and all other parts of the device, are secured with latches.
Inaccurate indicator readings can be deceived by adjusting the angle on the rod holding the float. By bending it in different directions you can ultimately achieve more accurate readings.
First of all, we can mention the electronic display for the instrument panel. It is installed together with a standard dial fuel level indicator on a panel in a free cell or directly on the torpedo. Three wires are output, “+”, “-” and “D”. The latter is connected to the sensor along with the standard device. On the sensor removed from the tank, the level readings are adjusted in digital format, from “empty” to “full tank”. This does not add any particular accuracy to the readings, but it does give a stylish look to the instrument panel and warms the owner’s soul. Signs are used in various shapes and it is quite possible to choose a sign to match the interior design of your car.
A completely different matter is the novelty in this matter (relative) - ultrasonic fuel level sensors. Here, as in most devices, the principle of receiving and transmitting ultrasonic waves is used. The sensor can be installed in the tank without violating its integrity. The signal can be transferred to a digital monitor on the instrument panel and even output to a computer or laptop via the GLONASS system. Today this is the most accurate way to obtain data on fuel level. However, this is still a rather expensive procedure, which also requires special knowledge and skills to calibrate the ultrasound emitter and specialized programming equipment. However, everything suggests that meters of this type will be widely used in the future.
In the video below you can see the replacement of the fuel control sensor on a VAZ Priora car:
Some VAZ 2114 owners notice that the fuel level sensor needle begins to jump or show incorrect data. It’s good if the device indicates a smaller amount than it actually is. It's worse if it's the other way around. One way or another, these are typical signs of a device malfunction, indicating the need to replace it. You can do this yourself, without the help of service stations.
Fuel measuring element VAZ2114
VAZ fuel level sensor error
In this video you will see how to repair the sensor
fuel
level . Enjoy watching. ¦?Best and cheapest.
the fuel level indicator sensor amount of fuel resistance in the sensor tank, ohm empty tank 315–345 half tank 108–128 full tank no more than 7
data for checking the fuel level indicator: position of the arrow, resistance of the sensor indicator, (at an ohm voltage in the on-board network of 13–14 V) at the beginning of the scale 285–335 in the middle of the scale 100–135 at the end of the scale 7–25
If the pointer needle is constantly at the beginning of the scale, with the ignition on, disconnect the pink wire from the sensor and connect it to ground. if the arrow deviates, the sensor or the circuit connecting it to ground is faulty. if the arrow does not deviate, remove the instrument cluster without disconnecting the wires from it, turn on the ignition and connect to ground the right terminal of the indicator connected to plug 10 of the red block of the instrument cluster. deviation of the arrow will indicate a malfunction of the “sensor-pointer” circuit. if the arrow does not deviate, the pointer or its power circuit is faulty.
If the gauge arrow constantly shows a full tank, with the ignition on, disconnect the wire from the sensor. if the arrow deviates to the beginning of the scale, the sensor is faulty; if not, the wire shorts to ground or the indicator does not work. The serviceability of the latter can be checked by disconnecting the red block of wires in the instrument cluster. in this case, for a working indicator, the arrow (with the ignition on) should be at o.
When control devices or sensors fail, they are replaced.
I disconnected the wire from the fuel pump sensor, nothing has changed on the panel, I disconnected the red plug from the dashboard, the arrow is at zero. Conclusion: it is shorted to ground somewhere, I need to raise the floors and look at the results, I will post the results))) Thanks to everyone who responded to the problem )))
What you need to know about the fuel level sensor
- In the first year of the car's service, it does not raise any questions or complaints and copes with its tasks perfectly.
- Over time, the device still fails. This is due to imperfect design, fragile housing, exposure to moisture, condensation, and temperature changes.
- If the seal of the housing is broken, the contacts interact with condensate, oxidation and loss of functionality occur.
- A competent solution to the problem is periodic prevention.
- For this, the sensor is removed, cleaned, and the contacts are changed. In some situations, a complete replacement of the fuel level sensor on a VAZ 2114 is required.
- When replacing, it is important to remember the markings. Without it, it will be practically impossible to find a suitable analogue.
- Markings are rare, so finding a worthy alternative without the help of specialists is difficult. It is recommended to contact, for example, a specialized VAZ service center or a VAZ spare parts store. Remove the old sensor and visit the store with it. This will help you find a suitable meter model.
- The best option is factory components. There are analogues, but they are not particularly useful. VAZ is not an expensive car brand, and the cost of spare parts is already affordable. Another question is if you want to spend a little more but buy a decent digital device.
- It should be taken into account that the standard sensor from the VAZ 2114 is analog, and it is significantly inferior to the digital one. Purchasing a digital system is not difficult. The computer will not only allow you to monitor accurate fuel readings, but also detect problems and notify the driver about them.
What it consists of and how it works
The fuel level sensor serves to calculate the amount of fuel in the tank and provide the corresponding information to the driver through the instrument panel. Sensor components:
- Resistor;
- Float and lever;
- Open-on sliding contact (turns on and off the warning lamp on the instrument panel).
Its operation is carried out due to the movement of the float when the amount of fuel changes. The resistance of a variable resistor changes, causing the resistance in the circuit to change as well. Due to this, the resistances are displayed on the panel. As practice shows, the BM 150 sensor is installed on the VAZ 2114.