Replacing the brushes of a device that is a continuous current motor (starter) is a procedure that requires an appropriate approach, which, if followed correctly, will give a positive result in the future. Regarding the VAZ 2110 car, even an inexperienced person can figure out how to repair its starter.
The brush-collector block is heavily subject to wear, which can be said about the other parts. So, sooner or later, replacing the VAZ 2110 starter brushes will definitely be necessary.
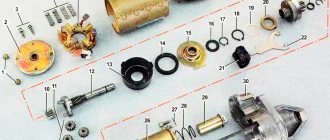
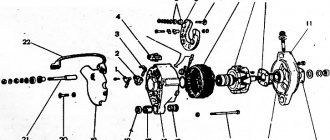
We disassemble the starting device
At the initial stage, you need to unscrew the two screws securing the shaft cover on the back of the starter with a screwdriver. Remove the cover, O-ring and gasket. After this, loosen the two tie rod nuts and dismantle the brush holder assembly. In this case, under the action of springs, the brushes will fall out of their seats, but will be held on the contact wires.
Next, you should inspect the brush holder itself. If it shows signs of mechanical damage, it needs to be replaced. Maybe this is where the cause of the malfunction lies
Pay attention to the manifold of the device. All of its copper plates must be in place
If they show signs of wear (chips, cracks, traces of the effects of a short circuit), the anchor will also have to be replaced.
VAZ 2110 Replacing starter brushes
1. Remove the starter (Section Removing and reinstalling the starter).
2. Give back the nut.
3. Disconnect the starter power cable from the solenoid starter terminal.
4. Loosen and remove the 2 screws securing the shaft cover to the manifold cover.
5. Remove the cover.
6. Remove the O-ring.
7. Remove the ring clamp and remove the gasket and O-ring.
8. Remove the through bolts securing the manifold cover and stopper to the body. Mark the cover in relation to the body.
9. Remove the manifold cover.
10. Remove the brush holder assembly while releasing the power cable sealing gasket from the clamp. If repair or cleaning of the commutator/armature is required, remove it from the stator at this stage, then remove the brush holder assembly. After removing the brush holder assembly, the springs will push the brushes out of their holders, but the brushes will be held in place by the wires.
11. Inspect the brushes for wear and replace them if necessary. It may be possible to purchase brushes separately from automotive workshops, otherwise the brush holder assembly may need to be completely replaced. Clean all components before starting assembly. Clean the commutator using fine sandpaper. If the commutator is excessively worn, it can be machined in an electrical equipment repair shop. Make sure that the brush holders are thoroughly cleaned so that the new brushes move freely in the brush holder.
12. Partially install the brush plates without brush holders onto the commutator, then center the brushes and put the springs and brush holders on them.
13. If removed, replace the armature inside the stator. 14. Place the brush holder assembly in the kit onto the commutator armature, while simultaneously inserting the sealing sleeve of the power cable into the slot in the housing. 15. Install the manifold cover onto the armature, then install the O-ring, gasket(s), and ring clip. Make sure the O-ring is seated correctly. 16. Reinstall the manifold cover, making sure that the previously applied marks for the relative position of the cover and body are aligned. Insert and tighten the through bolts. 17. Reinstall the gaskets and O-ring, then place the shaft cap and O-ring on the manifold cover and tighten the 2 screws. 18. Connect the power cable to the electromagnetic starter terminal and tighten the nut. 19. Reinstall the starter (Section Removing and reinstalling the starter).
Diagnostics
How can we determine that the cause of the problem was the worn starter brushes of the 2109, 2110 VAZ model? First, you should make sure that there is no break in the electrical circuit of the device. Check if the connection of the wires to ground is secure. If everything is fine with them, take an insulated wire and connect the positive terminal of the starter to the positive terminal of the battery. Don't forget to turn the ignition into neutral before doing this. If there is a problem with the wiring, the starter will operate and start the engine.
If this does not happen, the starter will have to be dismantled for further diagnostics.
Replacing a starter in a VAZ-2110
The VAZ-2112 part is also suitable, only it is attached with 2 nuts. They leave the one that is close to the crankcase and is conventionally called “blind”. Don't worry, it will all work out fine. Replacing the VAZ-2110 starter with your own hands is extremely simple. You can even do without an overpass.
Important! When installing and connecting, the negative terminal of the battery must be completely disconnected. It is advisable to remove the coil as well, since a charged capacitor may remain in it
By the way, in the new generations of “tens” the starter has a non-separable design. It is better to refuse such ones immediately, since they fail at the most inopportune moment. Their only advantage is durability and reliability. Their size is slightly smaller, so they are easier to install.
Installation of a new starter is carried out in the reverse order. First, the traction relay is connected (you can take it from the old one if it is not damaged). Next, as during disassembly, the starter housing is attached to the crankcase, after which the traction relay wire is connected to it. Then the positive circuit is closed. All that remains is to connect the coil, put the terminal on the battery and check the functionality of the starter. You cannot take measurements with a multimeter at this moment - it will burn out from too high a voltage (several thousand volts).
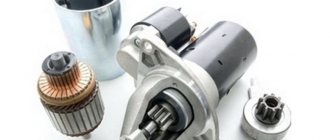
In most cases, repairing 2110 starters is not possible, since the basis of the design is an electric motor. If the anchor is damaged, it will not be possible to solder it. The brushes are also non-repairable. Either the brush holder itself, along with them, or the armature are replaced.
Starting a modern car engine is ensured using a starter. It is an electromechanical device, which is based on an ordinary electric motor powered by a battery. Its design is quite simple and relatively reliable, but it also requires timely maintenance and repair.
One of the most common malfunctions of the starter is wear of the electric brushes, as a result of which it loses the ability to work fully, and over time it stops functioning altogether. Fortunately for car owners, this breakdown is not critical, if, of course, it is diagnosed and repaired in time. In this article we will look at how to replace starter brushes with your own hands in VAZ-2109, 2110 cars.
How to find out if starter brushes are worn out
Replacing the brush in the VAZ 2110 starter
There is no need to immediately start disassembling the starter; first you need to dismantle it and check it by starting it separately from the car. Its condition, that is, its functioning, should be determined. In such a situation, the wire is detached from the terminal and connected directly to the “plus”. If the motor runs, then most likely the problem is a faulty power relay. If the engine does not start, you should pay attention to the condition of the brushes.
Note. You can identify wear or warping of brushes using simple experiment. When checking the starter separately, it is recommended to evaluate its performance. In some cases, the starter works well in one position, but when turned to one side, contact is lost. This phenomenon can be easily argued. Starter brushes with normal length are pressed against the commutator so that there is a small gap between the brush holder and the spring.
Replacing brushes on the VAZ 2110 starter
When they wear out, the spring rests tightly against this brush holder, and contact will be ensured due to the influence of weight. If the position of the motor changes slightly, the contact immediately disappears. This phenomenon can also occur when the brushes become warped and become stuck in the brush holder.
Note! To remove the starter on a VAZ “tenth” model, you need to use an overpass, an inspection pit or a lift.
So:
- The starter is fixed to the gearbox using two nuts, one of which is located under the engine compartment. For safe repair work, you must first disconnect the wire from the “-” terminal of the battery.
Replacing starter brushes for VAZ 2110
- After this, the crankcase protection is removed. In the engine compartment, you can unscrew the top nut to secure it. The wire leading out the traction relay is detached under the machine. Using a 15-size wrench, unscrew the bottom nut and remove the starter (see Repairing the VAZ 2110 starter - we do it all ourselves).
- When the starter is dismantled, it becomes possible to check it further. The device should be installed on a level place and the battery should be connected to it.
Note. The body is rotated on the surface; if the work stops or continues jerkily, this may indicate a malfunction of the brushes. Due to such vibrations, they can fall out of the brush holders, touching the commutator, and the parts will not be long enough to ensure normal operation. Then you cannot do without disassembling the starter.
- The body of the device with two covers is fastened together using two tie rods. Therefore, you first need to unscrew a couple of nuts on these studs and remove the front cover with the gearbox. Next, remove the back cover with the brush holder on which the brushes are placed. Since the brush holder is fixed to the rear cover with 2 bolts, they need to be unscrewed. Use a screwdriver to dismantle the brush retainer with pressure springs, only after that they can be easily removed from the brush holder itself.
- Replacing worn starter elements is relatively easy, you just need to act carefully. New parts are mounted in the grooves, the repaired brush holder is placed on the commutator. The springs are inserted into place and fixed. In such a case, the brushes should not be allowed to warp; they should be pressed evenly.
Note! The brushes do not need to be installed tightly; when properly positioned, they are held loosely in the grooves of the brush holder.
- The documentation for the machine does not indicate the exact length of these parts, so you can use brushes from other models. Despite this situation, it must be taken into account that the distance from the outlet of the element to the functioning edge can be no less than 0.35 centimeters. A lower value indicates a mismatch between the brushes.
- The exact length of the elements is not fixed because the collector wears out over time. If the wear is small, then when replacing the brush it should be cleaned well with sandpaper. With a larger parameter, it can be processed in a workshop on a specialized machine.
Note! The length of the brushes will depend on the diameter of the commutator ring.
Since the price of brushes is affordable, experts recommend replacing the brush holder as a complete assembly. In such a situation, you can get rid of the difficult procedure of fixing and balancing the brushes separately, while the repair process itself will go much faster. On the other hand, if spare parts are already available, it is advisable to use them.
Note! Copper-graphite or graphite brushes can be smoothed with a file, and the length will be selected through practice.
Finding these spare parts for a domestic car is not difficult in every auto repair shop. The price of starter brushes is approximately 50 rubles for the entire set. As for the complete brush block, it will cost about 100 rubles. Thus, we can conclude that the overpayment will be insignificant.
Self-change brushes
VAZ 2110 starter brush
Even a novice auto mechanic can replace the brushes on the starter. To do this, you need to carry out a series of simple sequential manipulations. So:
- The cable is detached from the starter terminal; the screws securing the covers of both the shaft and the collector are dismantled.
- The cover and seal ring, retaining ring, gasket and other seal ring are removed.
- The bolts that connect the manifold cover to the body are removed, and the cover is dismantled.
- The brush holder assembly is removed. The brushes are pushed out by springs, but are still held in place by several wires.
Disassembled starter
After disassembling the starter, it's time to do a visual inspection and replace worn elements.
Note! When disassembling the starter, you need to carefully lay out all the parts so that the assembly sequence is not disrupted.
Diagnostics
How can we determine that the cause of the problem was the worn starter brushes of the 2109, 2110 VAZ model? First, you should make sure that there is no break in the electrical circuit of the device. Check if the connection of the wires to ground is secure. If everything is fine with them, take an insulated wire and connect the positive terminal of the starter to the positive terminal of the battery. Don't forget to turn the ignition into neutral before doing this. If there is a problem with the wiring, the starter will operate and start the engine.
If this does not happen, the starter will have to be dismantled for further diagnostics.
Rules for operating a car in winter
Operating a vehicle in the winter season has its own characteristics and this must be taken into account when preparing the vehicle for frosty weather. Mandatory manipulations include:
Replacing summer tires with winter ones. Replace the windshield washer fluid with a winter equivalent and check the condition of the brushes. Checking the condition of the battery allows you to avoid situations in which the car does not start after a frosty night. You should be careful when leaving your vehicle on the handbrake in winter. The risk of brake pads freezing when exposed to melting snow increases significantly. When the car becomes icy, it is not recommended to pour hot water on the door lock area.
This will damage the paintwork. If you have autostart, you should start the vehicle so that the ice crust moves away on its own as the engine and interior warm up. Be sure to check the presence of cigarette lighter wires, a tow rope, etc. in the trunk.
Main signs of starter malfunction
Despite the fact that the starter is a fairly reliable device, it can also break. Some breakdowns may have symptoms identical to other faults, but there is still something in common when the electric motor malfunctions.
The main symptoms of starter malfunctions:
The solenoid relay does not click (does not operate) and the armature does not rotate.
- Battery discharge (complete or partial) or failure;
- Oxidation of battery terminals and tips connected to it;
- The terminals or tips connected to both the starter itself and the battery have come loose;
- Lack of contact on the terminal bolts, caused by a break in the wires connecting the ignition switch and starter;
- Short circuit, break or breakdown of the solenoid relay windings to ground.
When the electric motor starts and the solenoid relay is operational, the armature rotates slowly or does not rotate at all.
- The contact on the terminal bolts of the solenoid relay is broken;
- High wear of brushes or their jamming;
- Burning or overheating of the collector plates;
- Breakdown of the stator winding caused by insulation failure or interturn short circuit;
- Damage to the insulating layer of the positive brush holder;
- Short circuit of collector plates caused by insulation failure;
The armature of a running starter rotates, but the crankshaft does not spin.
- Overrunning clutch slipping;
- Mechanical damage to the freewheel (buffer spring, underwater ring);
- The starter drive fork is flying out or damaged;
- Difficulty in moving the drive along the thread on the anchor shaft.
After starting the engine, the starter continues to operate.
- Drive fork jamming;
- Damage to the ignition switch spring;
- Jamming of the solenoid relay or starter drive contacts on the anchor shaft;
- Damage or stretching of the springs that return the solenoid relay or overrunning clutch;
- Solenoid relay jammed;
- Warping of the electromagnetic motor caused by unscrewing its fastenings to the internal combustion engine.
Increased noise when the starter is running.
- Increased wear of individual parts of the armature (necks and bushings);
- Violation of the integrity of the starter housing at the drive location;
- Mechanical damage to the teeth of the flywheel or bendix;
- Insufficiently tightened motor mounts;
- Contact of the armature with the pole during rotation due to the weakened fastening of the latter inside the unit.
Signs of wear
First of all, you need to disconnect the starter itself and, without disassembling it, check it by starting it. In this case, the wire must be detached from the terminal and connected to the “plus” directly. If after this the motor starts running, then we can assume that this fact indicates a breakdown of the switching relay. If the engine fails to start, the problem will be hidden in the brushes, which will have to be replaced with your own hands.
It is possible to detect brush wear or misalignment when the starter is not connected to the vehicle but still starts. Sometimes it works properly in a particular position, but if it is tilted a little, it will cause contact loss. The fact is that the brushes, if they do not show wear, should be pressed freely against the commutator, while the gap between the spring and the brush holder will be small. Considering all these facts, you can already have a clearer idea of how to replace brushes. The exact length of the brushes is not indicated in the technical specifications, but if necessary, they can be replaced with those installed on other car models.
As the spring wears out, it is pressed as tightly as possible against the brush holder, and contact is ensured at this moment due to weight action. The slightest change in the position of the motor will result in loss of contact. But this can also happen if the brushes hang in the brush holder or become warped. When considering how to change brushes, you need to know that their length directly depends on the diameter of the commutator ring.
Vehicle electrical malfunctions
The list of faults in the electrical equipment of a car is quite wide. Conventionally, they can be divided into faults of current sources and faults of current consumers. This article discusses malfunctions of current sources.
As you know, the sources of current in a car are the battery and the generator. A malfunction of each current source can immobilize the vehicle at any time.
And if you don’t want to return home on a “tie” or a tow truck, attention must be paid to the technical condition of the battery and generator
In a vehicle's electrical system, the battery and alternator work in tandem. The failure of one leads to the failure of the other. For example, battery malfunctions lead to an increase in the charging current of the generator. Operating the generator in this mode can cause a malfunction of the rectifier unit (diode bridge). On the other hand, a malfunction of the generator voltage regulator is accompanied by an increase in the charging current, which, in turn, leads to systematic recharging of the battery and “boiling off” of the electrolyte.
Battery faults
Battery malfunctions include:
- short circuit between battery electrodes;
- damage to the battery plates;
- cracks in the battery case;
- oxidation of battery terminals.
The main causes of these malfunctions:
- violation of operating rules;
- service life limit;
- manufacturing defects.
Violations of the rules for operating batteries are:
- working with a faulty generator (leads to overcharging or discharging the battery);
- poor contact at the battery terminals (leads to oxidation and destruction of contacts);
- Frequent engine starts or prolonged operation of the starter (leads to deep battery discharge);
- weak fastening of the battery in the engine compartment (leads to mechanical damage to the battery and wires).
The battery can be used effectively for a certain period of time. The average battery life is 3-4 years. With intensive use, as well as operation in harsh climatic conditions, the service life is significantly reduced.
Modern batteries are low-maintenance and maintenance-free. The degree of battery maintenance is determined by the rate of evaporation of water from the electrolyte. For a maintenance-free battery, the critical electrolyte level is reached much later than the end of its service life.
When using rechargeable batteries, you have to deal with manufacturing defects. A faulty battery can be easily replaced under warranty by the seller or manufacturer.
All malfunctions have the same consequence - the battery stops performing its intended function - turning the starter when starting and providing consumers with current when parked. In this case, it is necessary to determine whether the battery needs to be replaced or whether the current source can still serve.
When operating a battery, you must remember that increased discharge at subzero ambient temperatures can lead to freezing of the electrolyte and destruction of the battery case.
Generator faults
The design of a generator is more complex than that of a battery. Therefore, this device has more malfunctions:
- wear of current collecting brushes;
- damage to the voltage regulator;
- damage to the rectifier (diode bridge);
- wear of the commutator (slip rings);
- wear or destruction of the bearing;
- pulley wear or damage;
- short circuit of the stator winding turns;
- damage to the charging circuit wires.
The main causes of these malfunctions:
- violation of operating rules (long-term operation under heavy load, incorrect polarity when connecting the battery, low tension of the generator belt);
- low quality of components;
- exposure to external factors (moisture, salt, high temperature, dirt);
- service life limit.
Wear or destruction of the bearing is accompanied by increased noise when the generator operates. Other generator malfunctions are diagnosed by low charging current. This is indicated by a warning light on the instrument panel, which lights up periodically or constantly in the event of a malfunction.
Checking the retractor
Diagnostics of the element is quite effective and does not require scarce tools and complex measuring instruments. Moreover, it will not take much time, since you can check the starter solenoid relay without dismantling it. Let's consider the main verification methods:
- When you turn the key, you cannot hear the characteristic retractor click. In this case, in addition to the traction relay, the ignition switch and electrical wiring may be faulty. This can be accurately determined using a test lamp. One contact must be connected to the vehicle ground, the other to the pull-in winding (flat contact on the relay cover). Turn the ignition key to the “starter” position. If the lamp is on, the problem is in the traction relay. Otherwise, you need to look for other reasons. If you have a multimeter, you can check the relay by measuring the voltage. To do this, you need to connect its probes instead of the test lamp.
- Often, when you try to start the car, you hear retractor clicks, but the starter does not turn. There may also be several reasons, ranging from a dead battery to relay contacts. It is not difficult to verify this. It is enough to close the contacts of the starter circuit (two large terminals on the retractor cover). Experts do this directly on the car, but if you don’t have the skills, it’s better to remove the starter, it’s more convenient, and most importantly, safer. If, when the contacts are closed with a conductor of the appropriate cross-section, the starter starts to work, it means that the “nickels” are burnt, and the retractor will need to be disassembled or replaced.
To the process
Getting started:
- The first step is to mention how to put on the brushes - the main thing is to maintain the required length and width, since this will be very difficult to do if they are very wide.
- It is necessary to disconnect the cable from the starter terminal, screws, covers for fixing the collector and shaft;
- Remove the cover and the sealing ring and its retainer, the gasket, as well as the other rings on the seal;
- The brush assembly requires a certain order of disassembly and assembly;
- Remove the bolts connecting the manifold cover to the body and dismantle it.
- Remove the brush holder assembly, push out the brushes held by a certain number of wires using springs.
- It is necessary to carefully arrange the parts after disassembly and begin to inspect them;
- How to install the brushes? They are placed by hand. There is no need to tighten them too much - the brushes should move freely. To avoid rapid wear, avoid fixing them in an uneven position.
Is it possible to go to an official dealer with my spare parts?
This issue is quite controversial; some dealers are against their clients buying spare parts on the side. Although some do not mind, they make a replacement without any problems. But the motorist may lose the warranty and be denied service - this is precisely the argument in favor of dealers.
Is it possible to undergo maintenance with my own consumables and what consequences can I expect in case of a breakdown? The advantages of purchasing spare parts yourself are balanced by the disadvantages. The fact is that when installing their consumables, the dealer gives a full guarantee. But if the craftsmen install the parts you bought (or fill in oils or other liquids), then you can lose the warranty on a specific unit. For example, when replacing a pump, the warranty only for it is lost, but not for the entire engine as a whole. And this is precisely what dealers scare their customers with.
If you buy consumables externally, be sure to ask the seller for quality certificates and a guarantee. In this case, in the event of a breakdown, not the dealer, but the seller of the part will be responsible for a specific unit. And if you know for sure whether you can undergo maintenance with your consumables from an official dealer, weigh the pros and cons.
Oil in the automatic machine
Recommended by the manufacturer in Europe: most often for the entire service life Recommended by the manufacturer in Russia: 80-100 thousand km When it is actually desirable: 40-60 thousand km or every 3 years An automatic transmission is a complex structure that also requires high-quality gear oil. Unfortunately, automatic transmission problems are not easy to diagnose and expensive to repair. But to prevent this from happening, you must regularly change the oil in your machine. Mechanics have no doubt that regular automatic transmission oil changes prolong the life of the transmission. Moreover, (at least in a classic torque converter box, but also in a DSG, for example) the oil is also responsible for shifting gears.
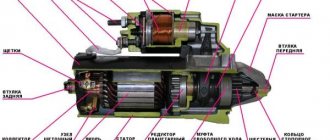
Replacement and repair of VAZ 2110 starter
The VAZ 2110 starter is a powerful DC electric motor. If used incorrectly, the unit may be damaged or burn out. One example is holding the key in the “start” position for a long time.
It is quite easy to determine if the starter is faulty - it does not turn, it clicks when you try to start the engine, or it simply does not work. This article details the process of removing and installing a new component. In some cases, the starter can be repaired - a separate section is devoted to this process.
This is interesting: Repair of starter retractor relay
How often should you have your car inspected?
The timing of the technical inspection and the validity of the diagnostic card depend on the year of manufacture of the car.
The frequency of maintenance depends on the class of the machine and the purpose for which it is used:
periodicity is 2 years for cars if 3 to 7 years have passed since its production (the year of manufacture is the date indicated in the vehicle passport).
after 1 year for cars if more than 7 years have passed since production, taking into account the year of manufacture.
Regardless of the year of manufacture, the following vehicles require maintenance every year:
- A truck with a maximum weight of 3.5 tons.
- All cars equipped with special signals (light and sound).
- “Training” vehicles used for driving training in driving schools.
Once every 6 months, regardless of the year of production, maintenance is carried out (clause 1, part 1, article 15 of Law dated 07/01/2011 N 170-FZ):
- Passenger taxi.
- Bus.
- A truck with the ability to transport passengers, where the number of seats is more than 8. The driver's seat is not taken into account.
- Special vehicles, as well as their trailers, in which dangerous goods are transported.
If desired, the vehicle owner can undergo maintenance until the previous coupon expires. The owner of the car cannot be denied this right.
Vehicle inspection times by year
| Vehicle service life (from the year of vehicle manufacture) | 1 year | 2 years | 3 years | 4 years | 5 years | 6 years | 7 years | from 8 years | ||||||||
| months since the beginning of the year | 6 | 12 | 6 | 12 | 6 | 12 | 6 | 12 | 6 | 12 | 6 | 12 | 6 | 12 | 6 | 12 |
| Vehicle type | ||||||||||||||||
| Taxi | X | X | X | X | X | X | X | X | X | X | X | X | X | X | X | X |
| Buses | X | X | X | X | X | X | X | X | X | X | X | X | X | X | X | X |
| Trucks designed and equipped for the transport of passengers, with a number of seats exceeding 8 (excluding the driver's seat) | X | X | X | X | X | X | X | X | X | X | X | X | X | X | X | X |
| Special vehicles and their principles, designed and equipped for the transportation of hazardous cargo | X | X | X | X | X | X | X | X | X | X | X | X | X | X | X | X |
| Trucks with a permissible maximum weight of more than 3500 kg. (except for the vehicles specified in clause 3) | X | X | X | X | X | X | X | X | ||||||||
| Vehicles equipped in accordance with the legislation of the Russian Federation with devices for supplying special light and sound signals (except for vehicles specified in clauses 1-4) | X | X | X | X | X | X | X | X | ||||||||
| Vehicles intended for training in driving vehicles (except for vehicles specified in clauses 1-4) | X | X | X | X | X | X | X | X | ||||||||
| Passenger cars with a permissible maximum weight of up to 3500 kg. (except for the vehicles specified in clauses 1-7) | X | X | X | X | ||||||||||||
| Trucks with a permissible maximum weight of up to 3500 kg. (except for the vehicles specified in clauses 1-7) | X | X | X | X | ||||||||||||
| Trailers and semi-trailers with a permissible maximum weight of up to 3500 kg. (except for vehicles specified in clauses 1-7) | X | X | X | X | ||||||||||||
| Motor vehicles | X | X | X | X |
Checking the functionality of the VAZ 2110 starter - why doesn’t it turn?
Before we begin disassembling the starting system mechanism of interest to us, we should make sure that it does not work precisely because of its malfunction. The check is performed as follows:
- We turn the gear in the direction of rotation of the armature. It should not turn in the opposite direction. If such reverse rotation is present, this indicates a faulty starter.
- We check the ease of movement of the device coupling along the shaft (use a screwdriver). With a normally functioning mechanism, the coupling moves without the slightest difficulty.
Using the “lighter” wires and the battery, we analyze the serviceability of the starter. To do this, we connect the negative terminal (black wire) to the starter housing, and connect the traction relay through its control cable to the positive terminal (red wire).
In cases where the relay operates normally, the drive clutch extends and a characteristic click is heard. If it does not turn on, you will have to disassemble the starter and replace the traction device.
Also, the starter of a VAZ 2110 car does not turn when its anchor does not work. Checking the armature is done as follows: remove the cable from the relay (from its output); connect the specified cable to the contact bolt. If the armature is in good working order, its rotation frequency should be at least five thousand revolutions per minute. If the frequency is lower, the starter does not operate.
Self-repair of starter on VAZ 2110, 2112, 2111 cars
Starter repair usually occurs on old cars, since this unit is quite reliable and lasts for many years without breakdowns, but no one is immune from low-quality parts and assembly. The most common malfunction is burning of the contacts on the retractor; there may also be a malfunction in the drive overrunning clutch or wear of the contact brushes. Disassembling the starter is not a difficult task and requires a small set of standard tools. The first thing to do is remove the starter from the car.
Next we will repair the traction relay. Repair may involve cleaning the contacts or replacing them completely, but first you need to remove it.
After removing the retractor, check whether the bolts are closed by the contact plate. To do this, push the armature in as far as it will go and measure the resistance on the contact bolts with an ohmmeter. If it is missing, then we replace the relay or repair it.
Fluid replacement: antifreeze, transmission fluid, brake fluid
This point is most important for cars with automatic transmission, since their gearbox needs regular replacement of the working fluid, and the brand and type must strictly correspond to the model
It is recommended not only to strictly follow the schedule established by the manufacturer, but also to replace it a little earlier than required, and also pay attention to how the automatic transmission works, trying to identify even the slightest deviation from standard indicators
As for manual transmissions, they are less demanding to maintain and only require monitoring the oil level, as well as checking for tightness and absence of leaks. If the mileage of your car is quite high and the intensity of use is high, then it is recommended to check and change the transmission oil more often than recommended. These measures will not take much time, but will help save significant amounts on repairs.
It is also recommended to change the coolant at least once every two years, and also regularly monitor its condition. The fact is that in addition to effective cooling, this liquid is also required to resist corrosion in the channels of the cylinder block, as well as in the lines. Therefore, if a brown substance splashes in the expansion tank, it is likely that the corrosion inhibitor present in its composition was not as effective as required by the technical regulations, or its quantity is extremely small.
As for the brake fluid, it should be replaced at least once every two years. In addition, this interval must be reduced if your vehicle is used to tow heavy trailers, or if you are a fan of driving fast. In addition to potentially dangerous leaks, worn-out brake fluid can lead to brake system failure, so don't risk your life over a few thousand dollars spent on timely maintenance. The fact is that this is an extremely hygroscopic liquid that is capable of absorbing moisture from the air in the expansion tank, which, when a certain percentage is reached, can cause it to boil during a long descent or in a traffic jam.
Read the tables carefully!
Most car owners, when deciding on the frequency of car maintenance, first of all study the service book and manual for the car, where, as a rule, there is a table of mandatory and recommended work at a certain mileage.
Usually, many of us limit ourselves to this, believing this table as a history textbook. But you should know that the manufacturer gives its recommendations in general terms. That is, you do not have to strictly adhere to the regulations specified in the service book. Especially if your car is used in difficult conditions.
By the way, many car companies directly warn about this, indicating in the service book that the amount of maintenance should be greater when using the car in difficult conditions. But what do we mean when we talk about harsh operating conditions? Riding on Mars? In fact, everything is simpler. For example, did you know that city driving often means difficult conditions for the car? Especially if we are talking about a large city with traffic jams, which is located in the northern part of the country, where sub-zero temperatures and snowfalls are recorded in winter.
Among other things, you should know that severe conditions for using a car include driving with a trailer, as well as dynamic driving (when drivers like to push). Due to such increased loads, the engine oil loses its properties twice as quickly. That's why you should change the oil twice as often under severe operating conditions. This is especially true for those who do not warm up the engine every day, operating the car for short distances in winter. And it is logical that in a dusty, dirty city, in addition to changing the oil more often, you also need to change the air filter more often, which clogs much faster in such conditions.
This, by the way, also applies to those who often travel only to their dachas. You should know that frequent summer driving through dusty fields will also clog your car's air filter twice as quickly. Even under severe operating conditions, you should also change the gearbox oil and transmission fluid in the axles more often. Although, of course, this type of fluid can last much longer without loss of properties compared to motor oil.
And, of course, you should keep in mind that all car manufacturer recommendations for car maintenance apply to a fully functional car. If one of the car components begins to fail, this is a sign that you should contact the service outside the service interval. Moreover, as a rule, in this case it is often recommended to carry out extraordinary maintenance along with repairs. True, it all depends on the type of breakdown. Picture A prerequisite for a car's factory warranty is compliance with the maintenance regulations developed by the car manufacturer and specified in the service book or in the car manual. That is, if you arrive for maintenance later than the manufacturer recommends, your car may be removed from warranty. But no one forbids you to carry out maintenance more often than recommended in the service book!
Starter repair for VAZ 2110, VAZ 2111, VAZ 2112
Welcome! A starter is a very necessary thing in a car; thanks to it, the engine of the car turns on and starts, but recently starters have begun to be counterfeited and made of poor quality, and therefore many car owners, when installing a new starter, after a very short period of time go back to the service center and replace it with a new one , although you don’t have to change it at all, but simply repair it thoroughly yourself and at the same time put lubricant in the gears, which is so little put at the factory where new starters for cars are made.
Note! To repair the starter, you will need to take from the following tools: Keys, namely wrenches, sockets, sockets, in addition, expansion pliers will be required and a screwdriver (It all depends on what exactly you will change in the car, if there is only one solenoid relay, for example, then In this case, you won’t need anything else except wrenches)!
Summary:
When should the starter be repaired? If your car stops starting or starts poorly, then this indicates that the starter may have become unusable, but besides it, the ignition switch can also cause problems and the car will not start or even the same wires, so it’s clear to say that it’s the starter it didn’t break so easily, but still the most common reasons are when something clicks when you turn the key and the car doesn’t start, or when the starter spins but does it very weakly and the engine cannot start due to this (In this case, the battery is also may be discharged), and the last thing is when, when you turn the key, you hear extraneous sounds (grinding of metal and the like) if you hear such sounds, then we do not recommend using the car in the near future, otherwise in the future you will need to change the crown of the flywheel You will have to remove the flywheel itself from the car to do this.