The importance of timely replacement
The need to monitor the condition of the boot is due to the fact that if it is damaged or worn, dirt and precipitation may get into the hinge joints. Wear will certainly have a detrimental effect on the operation of the steering rack, and therefore on efficiency, driving safety, and vehicle control. Let's imagine that the steering rack boot of a VAZ 2114 in a car breaks and you are moving along a country road at a decent speed, make a maneuver, twist the steering wheel, and it begins to live its own life. The steering wheel does not provide the necessary force to immediately turn the front wheels in the required direction. Unpleasant? Yes. Moreover, it is dangerous to life and health! Therefore, there is no need to delay replacing the sewn cover.
Replacing the steering rack boot yourself
There are hundreds of different parts on a car, the cost of which can range from several hundred to several thousand rubles.
Each of them plays a role in the ability to move along the road. One of the inexpensive parts of VAZ cars is the steering rack boot. The same protective parts are installed on steering rods. Their failure leads to premature wear of the protected hinge.
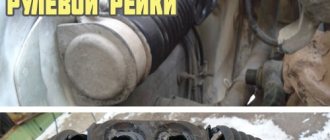
The boot on the steering rack looks like a corrugated hose. As soon as the driver discovers that it is torn, replacement should begin. This operation is not classified as complex or time-consuming, so almost all car owners can perform it.
Monitoring the condition of these parts is not difficult. It is enough to periodically inspect the steering rack, rods, and other parts with protective covers. As soon as it is discovered that one of them is torn, it should be replaced.
- Why replacement is necessary
- Preparing for replacement
- How to change the boot
Replacing the steering rack boot of a VAZ 2114
“You should know! An important part of the replacement process is under the hood, so wait until your vehicle's engine has cooled down before performing the replacement procedure." Today we’ll look at a way to replace the boot without removing the steering rack. Of course, the process is not as easy and relaxed as in a situation where the engine is previously removed. However, this will not affect the positive result. Inventory we will need:
- Screwdriver
- Hammer.
- Pliers.
- Wrenches for “10”, “13” and “22”, but ratchets of the same sizes are better.
- Lithol for lubrication.
For ease of understanding, we will divide the replacement event into 13 consecutive steps:
- As mentioned above, we wait for the engine to cool down (if it was functioning previously). We will be working from a rather cramped engine compartment, so in order to get to the rack it is necessary to dismantle some components that will get in the way. Using a wrench or a ratchet set to “10”, unscrew the adsorber housing and remove it.
- Next, we find a metal protection that is screwed to the car body and protects the unit from mechanical damage. Take a 10" wrench and unscrew the fastening nuts (two on top, one on bottom). Remove the protective rubber band.
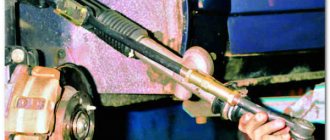
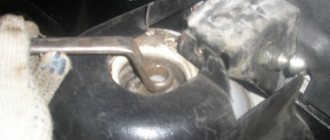
- Now you can see with the naked eye two steering rods secured with bolts. We need to unscrew them and flare them, for this we use a flat-head screwdriver, a hammer, and a key set to “22”.
- When all fastening elements are unscrewed, disconnect and remove the steering rods from the rack.
- Now is the time to start working directly with the rail itself. First of all, we need to unscrew the fastening located at its right end (in the area of the passenger compartment). We unscrew the two nuts from the top and bottom (the key is set to “13”).
- Remove the mount, metal bracket and protective side rubber band.
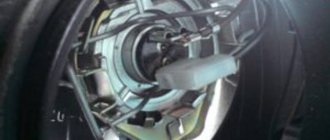
- Pull out the old boot. If it cannot be removed, twist it around the knot and loosen it.
- When the protective cover is removed, inspect the rail for dirt. Clean and lubricate the surface by applying some lithol to it. "Important! When performing work when the steering tips are disconnected, do not rotate the steering wheel.”
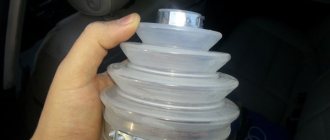
- We put on the new protective product in such a way as not to twist (damage) it.
- When the casing is strung and is positioned as it should be, we use bolts to secure the steering rods directly to the rack (use a key set to “22”). Roll up the nuts.
- We install the side cover and the metal mounting bracket. Check that all fastening bolts are tightened.
- We install metal protection and rubber.
- We return it to its place, screw the adsorber.
Replacing the Kalina steering rack boot without removing it
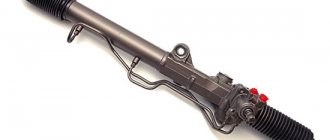
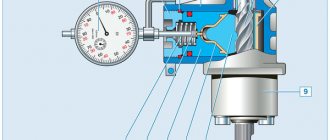
Special attention is traditionally paid to the protection of important components and mechanisms in a car. Mechanisms that transmit torque or rotational movements are especially carefully protected. The steering rack is no exception to this rule. In order to prevent various microparticles (dust, debris, dirt, water) from getting into important areas that ensure the transmission of rotational movements from the steering wheel in the car interior to the rods, a VAZ 2114 steering rack boot is used.
This is a protective cover that is made primarily of rubber. If we talk about its shape or structure, then in appearance it resembles a corrugation; this design is determined by the need to compress and unclench during the operation of the mechanism. The purpose and operation of the boot is quite simple and obvious; it covers an important part of the rack from the influence of negative external factors.
The importance of timely replacement
The need to monitor the condition of the boot is due to the fact that if it is damaged or worn, dirt and precipitation may get into the hinge joints. Wear will certainly have a detrimental effect on the operation of the steering rack, and therefore on efficiency, driving safety, and vehicle control. Let's imagine that the steering rack boot of a VAZ 2114 in a car breaks and you are moving along a country road at a decent speed, make a maneuver, twist the steering wheel, and it begins to live its own life. The steering wheel does not provide the necessary force to immediately turn the front wheels in the required direction. Unpleasant? Yes. Moreover, it is dangerous to life and health! Therefore, there is no need to delay replacing the sewn cover.
Replacing the steering rack boot of a VAZ 2114
“You should know! An important part of the replacement process is under the hood, so wait until your vehicle's engine has cooled down before performing the replacement procedure." Today we’ll look at a way to replace the boot without removing the steering rack. Of course, the process is not as easy and relaxed as in a situation where the engine is previously removed. However, this will not affect the positive result. Inventory we will need:
- Screwdriver
- Hammer.
- Pliers.
- Wrenches for “10”, “13” and “22”, but ratchets of the same sizes are better.
- Lithol for lubrication.
For ease of understanding, we will divide the replacement event into 13 consecutive steps:
- As mentioned above, we wait for the engine to cool down (if it was functioning previously). We will be working from a rather cramped engine compartment, so in order to get to the rack it is necessary to dismantle some components that will get in the way. Using a wrench or a ratchet set to “10”, unscrew the adsorber housing and remove it.
- Next, we find a metal protection that is screwed to the car body and protects the unit from mechanical damage. Take a 10" wrench and unscrew the fastening nuts (two on top, one on bottom). Remove the protective rubber band.
- Now you can see with the naked eye two steering rods secured with bolts. We need to unscrew them and flare them, for this we use a flat-head screwdriver, a hammer, and a key set to “22”.
- When all fastening elements are unscrewed, disconnect and remove the steering rods from the rack.
- Now is the time to start working directly with the rail itself. First of all, we need to unscrew the fastening located at its right end (in the area of the passenger compartment). We unscrew the two nuts from the top and bottom (the key is set to “13”).
- Remove the mount, metal bracket and protective side rubber band.
- Pull out the old boot. If it cannot be removed, twist it around the knot and loosen it.
- When the protective cover is removed, inspect the rail for dirt. Clean and lubricate the surface by applying some lithol to it. "Important! When performing work when the steering tips are disconnected, do not rotate the steering wheel.”
- We put on the new protective product in such a way as not to twist (damage) it.
- When the casing is strung and is positioned as it should be, we use bolts to secure the steering rods directly to the rack (use a key set to “22”). Roll up the nuts.
- We install the side cover and the metal mounting bracket. Check that all fastening bolts are tightened.
- We install metal protection and rubber.
- We return it to its place, screw the adsorber.
This is a simple removal and installation process. The most difficult thing is that the entire operation is complicated by uncomfortable, cramped working conditions. After carrying out the work, test the steering system in road conditions. The operation of the unit after lubrication should become clear and responsive. Now you know how to change the boot on the steering rack of a VAZ 2114 yourself.
What you will need
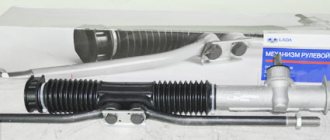
Replacing the steering rack boot requires very few tools. Most likely, you can get by with a screwdriver and a couple of wrenches. You will also need two new boots and clamps to attach them to the steering rack and rods. Old metal clamps may rust, and it is better to replace them to ensure reliability. In some car models, for example, in VAZs, the boot is a cover that immediately covers both the steering rack and two tie rods. In this case, you will need not four clamps, but only two.
A screwdriver will be needed to unscrew the screws holding the clamps together, and wrenches will be needed to remove the tie rods. The wrench numbers for each car model may be different. And the screwdriver can have a flat blade or a Phillips blade, depending on which screw is used on the clamp.
If a plastic tie is used instead of a metal clamp, you will need a sharp knife to cut it.
A small amount of viscous lubricant, for example, grease, will also be useful. Why it may be needed will be indicated below.
It may be useful to watch a video showing the technology for replacing the boot specifically for your car model. Why do I recommend watching the video? Although the replacement principle is the same for all cars, there may be nuances that affect the quality and reliability of the further service of the element. The video will help you understand the details and avoid mistakes.
Why is the integrity of the anther so important?
Since the boot is usually a corrugated rubber cover that protects the steering rack from moisture and dirt, and rubber tends to age and lose strength, after some time the integrity of the boot may be compromised. Anther rupture can also occur as a result of mechanical damage. In this case, it is necessary to urgently replace the element that has become unusable.
Why is there such urgency? The answer is simple. To avoid in the future large financial costs associated with repairing or replacing more steering elements. It is easier and cheaper to change one or two boots than to replace the steering rack and related elements, such as a pressure piston, spring, bearings and others.
Moisture and dirt trapped in a torn boot will definitely lead to corrosion and failure of all hinges, and this usually requires their replacement.
If moisture gets to the worm gear of the steering rack, then again corrosion can simply “eat” the teeth of this mechanism. As a result, play in the steering wheel begins to appear, which will only increase. The pressure piston of the worm mechanism may jam. The spring of this piston may also completely rot or burst. All this can lead to loss of control of the car, which will cause an accident when driving on the road. Videos of the disastrous consequences are also easy to find on the Internet.
Preparing the car
The preparatory work in our case is very simple and consists of providing convenient access to carry out the necessary work. On some cars you will have to remove the engine protection, jack up the front end and remove the wheel. On others, you may need to remove the alternator or battery. If it is possible to park the car on a pit or overpass, this will make the task much easier. If you use a jack, do not forget to put stops under the rear wheels to prevent the car from falling. No one wants body damage and possible injuries.
What you will need
Replacing the steering rack boot requires very few tools. Most likely, you can get by with a screwdriver and a couple of wrenches. You will also need two new boots and clamps to attach them to the steering rack and rods. Old metal clamps may rust, and it is better to replace them to ensure reliability. In some car models, for example, in VAZs, the boot is a cover that immediately covers both the steering rack and two tie rods. In this case, you will need not four clamps, but only two.
A screwdriver will be needed to unscrew the screws holding the clamps together, and wrenches will be needed to remove the tie rods. The wrench numbers for each car model may be different. And the screwdriver can have a flat blade or a Phillips blade, depending on which screw is used on the clamp.
If a plastic tie is used instead of a metal clamp, you will need a sharp knife to cut it.
A small amount of viscous lubricant, for example, grease, will also be useful. Why it may be needed will be indicated below.
It may be useful to watch a video showing the technology for replacing the boot specifically for your car model. Why do I recommend watching the video? Although the replacement principle is the same for all cars, there may be nuances that affect the quality and reliability of the further service of the element. The video will help you understand the details and avoid mistakes.
Replacing the steering rack boot: choosing a quality part
Issues discussed in the material:
- Why do you need a steering rack boot?
- How to choose a steering rack boot
- How to replace the steering rack boot
A car is a technologically complex means of transportation that requires significant financial expenditure, human resources and a lot of development time. Every year the safety and technology of cars increases. In the complex structure of a modern car, every detail is needed, down to the smallest rubber gasket. Anthers are no exception. Let us next consider the functions of this part, as well as how to replace the steering rack boot and how to choose the right replacement product.
Preparing the car
The preparatory work in our case is very simple and consists of providing convenient access to carry out the necessary work. On some cars you will have to remove the engine protection, jack up the front end and remove the wheel. On others, you may need to remove the alternator or battery. If it is possible to park the car on a pit or overpass, this will make the task much easier. If you use a jack, do not forget to put stops under the rear wheels to prevent the car from falling. No one wants body damage and possible injuries.
What car enthusiasts say about replacing steering rack boots
- Field replacement
“Once, my tie rod boot broke too. This happened 400 km from the nearest populated area. Temporarily tying a tarpaulin around the rod, securing it with threads and a clamp, I built an impromptu boot and so drove to the city. At the car service center, the employees laughed at this amateurish activity and exchanged the product for a normal one. For me, it’s important that dirt doesn’t get inside.”
Lubricant for replacement
“I recommend AZMOL FIOL-1 for this work. This is an NLGI 1 class lubricant with lower viscosity at low temperatures compared to the universal Litol type oil (NLGI-2 class). For operation, this is a definite plus, I think. It is enough to use 150 g of lubricant on each side of the steering rack.”
Reusing clamps
“To replace it, I decided not to spend money on new clamps and installed the old ones, squeezing them with special pliers. In principle, ordinary wire cutters will do for this. I also took the used lock washers and straightened them. Everything has been working without problems for 4 years. However, I am not advocating for anyone to do the same. The place where the boot contacts the steering rod needs to be lubricated with some kind of compound. I again used the old grease, collecting it from the removed rods. With the new anthers everything is pretty tight. I think even solid oil will do here if there is nothing else.”
We recommend
“If the boot is severely deformed, you can check the bypass channel, through which air flows from the left half of the steering rack to the right and vice versa. Often the channel is located inside the rack rod, sometimes it is made in the form of a separate tube. You need to clean it so that the boot folds normally. The cause of clogging is often the grease applied liberally to the steering rod ball joint.”
Manufacturer's choice
“Once I bought a pair of Lemforder anthers. I noticed that one of them is made of high-quality rubber, quite elastic and soft. For the second one, the material was no different from the products I had previously purchased, which subsequently tore. Moreover, the price and packaging of both anthers were the same. Well, I installed them and took the car out into the cold. As a result, the soft Lemforder retained its elasticity, but the second one became so stiff that it tore off the elastic band on which it was attached. There is a suspicion that this is a fake, like all previous products that required replacement. The original Lemforder has the inscription Made in Germany and will not tear even in severe frost.”
Replacement instructions
So, the preparatory work has been completed, the video has been watched, the tools have been prepared. First of all, we unscrew the steering rods to ensure the removal of the damaged part. If disconnecting the steering rods can subsequently lead to a wheel alignment disorder, then in order to avoid a future trip to the service station, I recommend putting marks that will help return everything to its place. Another solution would be to measure the required distances using a caliper. However, this will not be needed for all car models.
Functions of the steering rack boot
It is well known that dust is a constant companion and enemy of a car on Russian roads. This worst enemy of a car is often invisible, but it can easily cause damage to a car amounting to many thousands of rubles. Large dust is easy to remove, but fine dust causes the greatest problems for the car owner.
Microscopic dust particles are able to penetrate into the smallest cracks and holes, gradually disabling internal components and mechanisms. As a result, urgent replacement will be required. How to deal with this phenomenon? Once upon a time, engineers became concerned about solving this problem and designed a new part - the boot. The history of this product began shortly after the invention of steam engines and internal combustion engines. First of all, let us remember that thanks to the invention of the vulcanization method by Charles Goodyear in 1839, such a material as rubber was born. Later it became a necessary raw material in the automotive industry.
The boot is a product made of high quality rubber, very durable, but at the same time elastic. It protects the rubbing surfaces of automotive components from water, dirt and dust. The product also contains a lubricant inside, which provides another function - preserving lubricants inside a certain unit. Thus, the service life of the part is significantly extended without the need for frequent replacement.
Anthers are installed in several places of various automotive mechanisms: ball joints, CV joints, rods, racks and supports, gearbox, protective units, shock absorbers, etc. Due to their versatility, these products differ from each other both in size and appearance . However, the main function is the same for all.
It is recommended to inspect all boots, including those protecting the steering racks, every 2 months. The rubber from which these products are made ages and loses strength over time. As a result, the rack protection may break. A rupture is possible not only due to aging of the rubber, but also in the event of mechanical damage, after which the product will require urgent replacement.
The urgency is due to the fact that if the damaged steering rack boot is not immediately replaced, water and dirt will get inside it, causing corrosion and failure of the hinges. In the future, this will lead to expensive repairs and replacement of steering parts. It is much cheaper and easier to purchase a pair of new protective covers and accessories for them (spring, pressure piston, set of bearings, etc.) for replacement.