Owners of carburetor classics, regardless of whether they have a contact or non-contact ignition system, periodically have to face the task of adjusting the ignition. Correctly adjusting the ignition on a VAZ-2107 is not difficult; even without experience and skills, you can adjust it in various ways, with a strobe light, a control light, or simply set it according to certain parameters. Today we will try to tell you what nuances you will have to face when adjusting and what you need to know in order to adjust the ignition on a VAZ-2106 yourself .
After all, we all know that an incorrectly adjusted ignition on a classic can lead to such consequences as excessive fuel consumption, uneven idling, poor traction, etc.
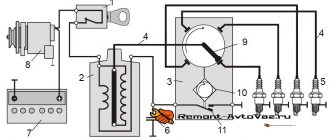
In order to set the ignition on a VAZ 2105, we need the following tool: A key at “13”, a control, a voltmeter or strobe, a spark plug key and a key for turning the crankshaft. We set the ignition to the first or fourth cylinder to suit your taste. We will go the classic route and exhibit the first one. So, let's pay attention to the timing cover of our engine, there are marks there, and a counter mark on the crankshaft pulley. The short mark on the cover corresponds to a lead angle of 10°. Medium - 5° and long - 0°. TDC (top dead center) is indicated by a mark on the pulley. Remove the cover from the distributor.
Using a key, turn the crankshaft until the mark on the crankshaft pulley is aligned with the 3rd mark on the timing cover, which corresponds to 0°.
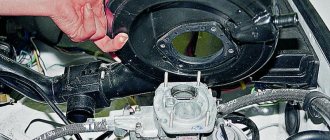
In this case, the distributor slider should be located opposite the high-voltage wire of the first cylinder. We connect one of the light bulb wires to the wire going from the distributor to the ignition coil, and connect the second wire to ground. We take out the central wire from the distributor cover and also lean it against ground. Loosen the nut securing the distributor body.
Turn the key to the position where the ignition is on. Turn the distributor body clockwise until the light goes out (the distributor contacts are closed). Then slowly rotate in the other direction until the lamp lights up (the contacts open). By the way, instead of a light bulb, you can use a candle, onto which we put a wire directly from the ignition coil. At the moment of opening, a spark will jump. In this position we fix the distributor body. Tighten the nut. Now let’s check how correctly we adjusted the ignition on our carburetor VAZ-2107 . To do this, start and warm up the engine to operating temperature and start driving. We accelerate to approximately 45 kilometers per hour, engage 4th gear and press the gas pedal. We listen to see if there is detonation. It should be there, but with acceleration it should quickly disappear. If detonation persists during acceleration, the ignition may be too early. And if there is no detonation at all, then later. We adjust until you achieve detonation, which “self-destructs” a couple of seconds after pressing the gas pedal. Then we can assume that the ignition adjustment on our classic is complete.
How to set the ignition on a VAZ 2107
VAZ 2107: how to set the ignition correctly?
Quite often, owners of VAZ classics are faced with unreasonably high fuel consumption, an unsatisfactory level of dynamic characteristics, etc. In a significant proportion of these cases, the culprit is an incorrectly set ignition. True, not everyone knows how to set the ignition on a VAZ 2107 without resorting to paid help from service workers. Therefore, we suggest that you familiarize yourself with a brief guide to this procedure.
Incorrectly set ignition can sometimes affect unreasonably high fuel consumption
Setting the ignition
Another important problem among VAZ 2107 owners with an injector system is how to accurately set the ignition.
As you know, in such models, all engine control is carried out electronically, so for such work you will need a computer, installation of a special program on it for the engine of an injection car, a tester, as well as keys and screwdrivers.
First of all, turn on the ignition and ground to make sure the electric pump is working. If it does not work, then check the relay that controls it.
Is the fault light flashing? Connect your personal laptop with a special program to the car’s on-board computer to try to determine the cause using the available data.
If the engine is working properly, you should start it and check the throttle device: throttle position sensor, throttle opening level (no more than 1%) and passing wires. Use a tester to measure the voltage of the sensor (it should not exceed 0.55 volts) and the on-board network (its voltage should exceed 12 volts).
Perform the same actions again, but with the gas pedal pressed all the way. Now all readings should change as the sensor voltage is normally around 4-4.5 volts and the throttle opening is hovering around 90%. Adjust the throttle to full opening and turn off the additional air flow, and then start the engine and lock the throttle at half opening. Now you should adjust the throttle to completely close the hole.
As you can see, there is nothing difficult either in installing the coil yourself or in setting the ignition on this car model. Now you can decide for yourself whether to contact specialists or not. Remember that by performing small checks and minor repairs on your VAZ 2107 on time, you will always be confident in the reliability of your “iron horse”.
The VAZ 2107 ignition module (injector) is a unit whose malfunctions are quite difficult to diagnose. Problems with the module's operation are noticed only after serious engine malfunctions occur. If the engine does not start, you should try adjusting the ignition. If the engine is running unevenly, a serious check of the functionality of the VAZ 2107 ignition module may be required.
Ignition is an electronic system for converting the low voltage of the vehicle's on-board network into high voltage and supplying the latter to the electrodes of the spark plugs.
How to correctly set the ignition on a VAZ 2107 (carburetor)
According to factory rules, adjustment of the conventional (contact) ignition on the “seven” should be carried out with such an exotic device as a strobe light. But it is still possible to use an alternative in the form of primitive tools: a 12 V indicator light, a 13 V key and a special key for the crankshaft.
Video tutorial on setting the ignition on a carburetor VAZ 2107:
The ignition setting procedure is performed with the engine turned off. The first thing you need to do is set the piston of the first cylinder of the engine to the ignition position. This is done as follows. By removing the spark plug. Turn the crankshaft clockwise, plugging the free hole with your finger. When the compressed air begins to clearly push out the finger with its pressure, it can be stated that this is a compression stroke.
After this, it is necessary, carefully turning the shaft, to align the mark on the pulley with the second mark on the timing cover.
Even if the marks are not visible, do not despair and wipe the surfaces thoroughly, add lighting - the marks are always present.
The middle (second) mark means the ignition advance is 5º (both for 92 and 95 gasoline). You can remove the key, screw back the spark plug, reinstall the wires.
The ignition timing is determined using a pre-prepared light bulb
The next stage will be determining the ignition timing. To do this, go to the ignition distributor and use a 13 key to slightly loosen its fastening nut. One wire of the pre-prepared light bulb must be connected to the low-voltage terminal of the ignition coil, the second to ground. After this, you need to turn on the ignition with the key.
Turning the distributor body clockwise, you must stop when the light goes out. Now you need to slowly turn the ignition distributor rotor counterclockwise until the contact opens and the light comes on again. Now you can tighten the nut and drive safely.
Tuning on carburetor modifications of the VAZ 2107
All old textbooks on servicing classic Zhiguli models describe a method for setting the moment of spark formation using a light bulb, although experienced motorists can easily do without it. You will understand why this happens as you read this material, but for beginners it will be useful to familiarize yourself with the old proven technique.
To correctly set the ignition of the “seven”, you need to ensure that the following conditions are met simultaneously:
- the notch on the crankshaft pulley is opposite the long mark on the timing cover;
- in this case, the round mark marked on the camshaft chain drive gear coincides with the boss on its body;
- the piston of the 4th cylinder has completed the compression stroke and is at top dead center;
- the contacts inside the distributor are open;
- The movable contact of the slider faces the fixed contact on the distributor cover, where the wire from the spark plug of the 4th cylinder is connected.
Note. On non-contact systems, at this moment the Hall sensor sends a signal to the switch to break the low voltage electrical circuit, which leads to the appearance of a high voltage pulse on the wire leading to the spark plug of the 4th cylinder.
The diagram shows what happens in the cylinders when the marks are aligned
The light bulb is used to control the ignition timing, for which it must be connected with one wire to the “K” contact of the high-voltage coil, and with the second to the vehicle ground. You should know that at the same moment the piston of the first cylinder is also in the TDC position, only there the air-fuel mixture is not compressed, but exhaust gases are released after its combustion. This is why ignorant car enthusiasts often confuse the first cylinder with the fourth when installing the ignition.
Layout of marks on the timing cover
When the above actions occur simultaneously, a spark discharge occurs on the electrodes of the spark plug of the 4th cylinder, as evidenced by the flash of the connected light bulb. To achieve these conditions and set the ignition correctly, follow the instructions:
- Turn the crankshaft with a 36 mm wrench, aligning the notch on the pulley with the long notch on the timing cover.
- If at this moment the engine valve cover is removed, then it is better to navigate by the mark on the camshaft gear, placing it opposite the housing boss.
- Take the ignition distributor, remove the cover and turn its shaft to place the slider opposite the wire leading to cylinder No. 4 (there are cylinder number markings on the cover). Insert the distributor into the engine hole, holding the slider and housing in this position, and then secure it with a 13 mm wrench nut.
- Connect the light bulb wires and turn on the ignition by turning the key. Loosen the nut securing the distributor and slowly turn it by the housing until the lamp flashes, indicating the moment of sparking. Reattach the distributor.
- Turn off the ignition and make sure that the contacts inside the distributor are currently open. Take a 0.35 mm feeler gauge and check the gap between them, if necessary, adjust it by loosening the fastening screws with a screwdriver.
The marks must be aligned by turning the crankshaft with a wrench
Note. The instructions imply that before starting work the distributor was removed from the engine without aligning the marks.
The ignition is considered to be set correctly if, after installing the distributor cap and connecting the wires, you manage to start the engine, and then you need to adjust the timing. The non-contact system is installed in the same way, with the exception of checking the gap in the contact group due to its absence.
The mark on the camshaft gear is aligned with the boss on the body
Important point. In most cases, the ignition is set without removing the valve cover, which is why the position of the mark on the gear is not visible. You have done everything according to the instructions, but the engine does not start. This means that a spark is supplied to the 4th cylinder during the exhaust stroke, and compression at this moment occurs in the first cylinder. The problem can be solved simply:
- remove the distributor cover;
- unscrew the nut securing it;
- pull the distributor out of the socket, turn the slider exactly 180° and insert the element back;
- Press the distributor skirt with the nut and install the cover.
Read, it may come in handy: Description of the fuel pump on the VAZ 2107
Advice. If the engine does not start after these steps, but begins to show signs of life, then the problem lies not in the ignition setting, but in a malfunction of one of the system elements.
Where and what kind of contactless ignition system for the VAZ 2107 can you buy?
As you know, it always makes sense to switch from conventional ignition to contactless. And many people do this. If we talk about the necessary parts for conversion, then acquiring them is not at all difficult. To solve such a problem, it is quite enough to contact a specialized store with auto goods. They will always offer several popular options to choose from. You can also use Internet sites where you can actually purchase the same product items from the warehouse, but at more favorable prices.
It’s hard to say anything regarding brands and models. But it is better not to take the cheapest spare parts, especially when the difference compared to the average market price is quite significant.
The consumer has the opportunity to choose both a domestically produced factory ignition system and imported analogues.
However, one should not assume that only the latter are capable of providing a decent level of quality and durability. For example, the BSZV.625-01 version, produced in the Russian Federation (Stary Oskol), has a lot of positive reviews. It may not be the cheapest system, but there certainly shouldn’t be any problems with it.
How to install and adjust electronic (non-contact) ignition on a VAZ 2107
Tools required to install electronic ignition:
- drill with drill bit;
- open-end wrench 13;
- keys for 8 and 10;
- ratchet wrench 38.
The contactless ignition system equipment includes an ignition coil, a switch, a distributor and wires. To avoid confusion about what connects to what, manufacturers usually provide the buyer with installation instructions.
First, a contactless coil must be installed, as well as a distributor. Both the first and second elements in the engine compartment have their own places with fastenings. After that we move on to the distributor. It should be noted that the engine must be aligned with the marks: the crankshaft is set according to the risk of TDC. In this case, the distributor will point to the first or fourth cylinders. It is necessary to remember how the body itself stands and in which direction the slider is located. We install a new distributor in the same way.
This is interesting: We personally repair rotten car sills
In parallel with replacing the ignition system, it is recommended to update the spark plugs - BOSCH is best suited
In principle, the installation can be completed at this point. But it makes sense to pay attention to some details. In parallel with replacing the ignition system, it is recommended to update the spark plugs - BOSCH, NGK and other options of this level are best suited. You should also not skimp on wires - take silicone ones. Please note that many cars that were not originally equipped with a switch have original mounts for it, so you don’t need to change anything - the switch simply sits on these mounts and is screwed on. If in your case there is nowhere to attach this element, use a drill: drill holes and provide them with fastening bolts. The main thing is that the switch is screwed securely, otherwise the part will fail ahead of time.
There is another problem that owners of VAZ 2107 produced before 1994 face. After installing the contactless system, the tachometer stops working. But don't be upset. It is enough to install a capacitor or a resistance of 1.2-1.4 kOhm in the “coil-tachometer” circuit.
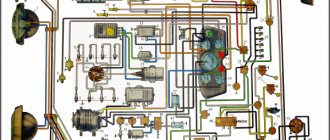
Diagram, procedure for connecting VAZ high-voltage wires.
First, let's decide which of the four cylinders is first?
The first cylinder in front-wheel drive VAZs is located closer to the timing belt. If you look at the engine from the front, the first cylinder is the leftmost). And then everything is simple - from left to right - 1, 2, 3, 4.
In rear-wheel drive VAZ Classic and Niva, the first cylinder is located closer to the front bumper of the car.
Common malfunctions of high-voltage wires
Replacement of high-voltage wires on cars must be done not only when signs of their malfunction appear, but also regularly at the appropriate mileage, which depends on the quality of the products used. If malfunctions occur in the ignition system, then the causes of their occurrence may be GDP. Common malfunctions of armored wires on the seven include:
On a candle
- Violation of insulation integrity. The slightest cracks, scratches, cuts, etc. entail the need to replace products. If the insulation is broken, moisture gets into the conductor, the resistance increases, and the current decreases. The slightest scratches and cracks require immediate replacement of all conductors.
- Increasing resistance - wires have a corresponding resistance, which increases over time due to the deterioration of the cores. The greater the resistance, the less the amount of current flowing, and therefore the worse the spark created by the spark plug.
- Damage to contacts. This is due to oxidation that occurs inside the caps placed on the spark plugs or inserted into the distributor or ignition module. Oxides contribute to increased resistance, so they should be cleaned. If oxides are not removed in a timely manner, the metal contacts begin to deteriorate.
If at least one product malfunctions, it is necessary to perform a comprehensive replacement. In order to make sure that it is necessary to replace the armored wires on the seven, you will need to check them first. How to check the serviceability and suitability of the GDP is carried out, we will find out further.
How to correctly set the electronic ignition on a VAZ 2107 (injector)
It’s worth immediately making a reservation about the fact that one of the most important differences between an injection engine and a carburetor engine is the absence of the need for all sorts of settings. Including the electronic control unit, using sensors, independently determines the ignition timing and other nuances in a particular case. The main thing is to correctly mark the timing belt or chain. Therefore, next we will talk about carburetor versions equipped with an electronic ignition system.
So, after successfully installing the BSZ on a car, its adjustment is always necessary. Of course, the masters will use special tools; in particular, a strobe light is recommended. But in practice everything can turn out to be much simpler. For example, it is quite possible to adjust the system, as they say, by ear.
To start the process, you need to loosen the ignition distributor mounting nut (or simply do not tighten it when installing the distributor). After starting and warming up the engine, we begin to turn the distributor housing in one direction and then in the other. The rpm should be approximately 2000.
Listening to changes in engine operation, it will be easy to catch how the revolutions jump and whether dips appear. The optimal “golden” mean is the position in which the engine consistently produces maximum speed without any dips. In this position, it is necessary to tighten the distributor nut. If possible, it is better to use the services of a service station and check the correct adjustment with a strobe light.
Ignition coil
The main purpose of the coil installed on a VAZ 2107 car is to convert a low voltage current into a high one, which pierces the air gap between the spark plug electrode and forms a spark that ignites the working mixture. When a contact ignition system is installed on a vehicle, use a B 117 A coil.
It is installed in the engine compartment on the left mudguard, and is secured using two studs. In terms of its design, it is a transformer with a magnetic core, which consists of an external magnetic core and a core, and has two windings - primary and secondary. The ignition coil housing is made of metal and has a cylindrical shape.
The top is closed with a sealed lid made of insulating material. If the ignition coil fails, replacing it with a new one will not be difficult, even for a person who does not have certain skills and knowledge. To do this, you need two wrenches, an 8mm socket and a 10mm socket. Photos will help you more clearly understand how this needs to be done.
First you need to disconnect the negative cable from the battery terminal.
Then disconnect the high-voltage wire from the ignition coil.
Using an 8mm wrench, unscrew the nuts on its terminals and disconnect the wires. The red-blue wire is connected to the “+B” terminal.
Using a socket wrench, slightly loosen the two nuts that secure the coil without unscrewing them completely.
Slowly moving the coil, remove it from the studs.
Installation is carried out in reverse order and will not take much time. In this case, the wire that goes to ground must be installed between the washer and the eye of the coil.
Check in motion
When moving with cruising stability, you need to sharply depress the accelerator pedal. At this moment, it will not be difficult to detect the sound of detonation in the engine. This phenomenon is also called “finger ringing.” The approximate time for the ringing to stop is the moment when the car has managed to accelerate by 3-5 km according to the speedometer.
If soon after the start of acceleration the detonation stops on its own, the ignition is set correctly. If you clearly hear the characteristic ringing for longer than the recommended period of time, it makes sense to adjust the distributor. At the same time, its body rotates clockwise by 1º. But it also happens that the fingers do not ring at all, or the sound is very weak and indistinct. Then we have the opposite picture - the ignition distributor rotates counterclockwise by the same 1º.
In the absence of a specialist, you can always check the correct ignition setting “by ear” while driving
When, upon returning to the wheel and repeating the experiment described above, it turns out that the problem has not resolved itself, you need to stop again and try to turn the distributor in the appropriate directions until the result is achieved. As a result, the duration of detonation should approach 1-1.5 s. Motorists call this “light detonation”, which does not cause noticeable harm to the engine.
Of course, many of the recommendations given may require testing on professional equipment. Therefore, we advise you not to neglect the opinion of qualified specialists and if you encounter difficulties in setting up the system, contact them.
Do-it-yourself ignition adjustment
On some domestic cars, such a procedure as adjusting the ignition timing is relevant. For example, the classic VAZ, before they began installing an injection engine power system, often bothered car owners with incorrect ignition timing.
For a long time, from the very birth of VAZ cars, these cars used a contact spark generation system. Initially, it required frequent ignition adjustments for these first VAZ 2101s.
It is this contact system that is an outdated (although very cheap), the most complex scheme for distributing and transmitting sparks to the coil and then to the cylinders.
The fact is that before adjusting the ignition of the VAZ 2106 begins, which in itself is archaic, several preparatory actions have to be performed. Let's list which ones.
- It is necessary to inspect the very contact group that is located in the distributor. The contacts close depending on the position of the eccentric, which rotates from the motor shaft. The contacts are often covered with soot; if they are black, they need to be cleaned with a piece of sandpaper. In addition, it is necessary to set the correct gap between the breaker contacts of 0.4 mm.
- It is also necessary to make sure that the carburetor is working properly, is in perfect condition, and that no problems will arise with the supply of gasoline to the pistons on time.
Only after all this can you begin to adjust the ignition of the VAZ 2106 or another modification of the classic VAZ. Also read about replacing the VAZ 2114 generator brushes and replacing the VAZ 2110 clutch cable.
What is “ignition timing”
Ignition advance means the air-fuel mixture ignites before the piston reaches top dead center (TDC) during the compression stroke. This factor has a great influence on engine performance. A certain amount of time passes between the moment the spark occurs and the moment when the gas pressure in the cylinder reaches its apogee. Although this period of time is extremely short, due to the high speed of the crankshaft, during the time the mixture is ignited, the piston can travel a long way from the moment of sparking to the explosion of the mixture. When the advance angle is correctly set, the mixture explodes at the moment when the piston is at TDC and ready to move down. If the mixture ignites earlier (“pre-ignition”), it explodes during the lifting phase of the piston and interferes with the movement of the piston (the engine detonates). This leads to premature wear of parts and deterioration of engine performance. If ignition is done late (“late ignition”), the mixture explodes after the piston has left TDC, which leads to fuel burning out already in the exhaust manifold, a decrease in gas pressure in the cylinder and, therefore, loss of power and reduced efficiency. Therefore, installing the ignition on a VAZ 2107 is an important and necessary procedure. Sparking should occur at the most appropriate moment, which depends on the position of the gas pedal and crankshaft speed.
How to adjust the torque of the classic and “nine”
Let's now look at how adjustments are made in carburetor classics, for example, in the VAZ 2107. We will need:
- wrenches;
- light bulb with wires.
Begin.
- First of all, turn off the engine.
- We unscrew the spark plugs and carefully close the vacated holes in the cylinders with rag swabs.
- Set the piston of the first cylinder to top dead center. To do this, use the “38” key to turn the crankshaft in a clockwise direction until the mark of the crankshaft pulley aligns with the mark on the engine block. In this case, the tampon should fall out of the hole in the first cylinder. However, a block usually has three marks. The first means an advance of 10 degrees, the second - 5, the third - 0. We need the second.
- Screw in the candles.
- Loosen the nut securing the distributor.
- We connect one wire of the light bulb to the low-voltage terminal of the coil, and the second to ground.
- We get behind the wheel and turn the key to turn on the power.
- Let's return to the distributor. Rotate it very slowly clockwise until the light comes on and then goes out. Returning the distributor back, counterclockwise, we wait until the lamp lights up again, and the contacts separate. This is the right moment.
- Tighten the distributor fastening. The ignition adjustment of the rear-wheel drive VAZ is completed.
However, a front-wheel drive VAZ equipped with a carburetor has exactly the same spark excitation system. Therefore, the ignition adjustment of the VAZ 2109 is carried out according to similar instructions.
Now let’s look at the processes for setting up other systems below.
What to do with other cars
Let's look at how to adjust the ignition on a Buran snowmobile. For this you will need:
- strobe;
- keys, screwdrivers;
- sheet of paper, pencil, protractor, compass.
The actions are as follows.
- On a sheet of paper, draw a circle with a diameter equal to the size of the stationary element of the variator.
- Using a protractor, we mark the degrees around the circle from 0 to 30. Moreover, we put 0 at the top, where the clock shows noon.
- Having unscrewed the spark plugs, insert a screwdriver into the left cylinder.
- By turning the variator with your hand, we catch the moment when the screwdriver shows that the piston has reached top dead center.
- We put a mark on the variator opposite the zero of the scale we made.
- We connect the strobe to the high-voltage wire of the left cylinder, screw in the spark plugs.
- We start the engine, point the strobe light towards the scale. The device lamp should light up when a spark appears, and it should show which scale mark corresponds to the variator mark. This way we find out the existing advance angle.
- To install it, turn off the engine and loosen the magdino mount. Then we turn the magdino, maintaining the desired angle.
This is interesting: Replacing the power window cable of a VAZ 2107
The setup is complete. But here you will have to buy a strobe to adjust the ignition angle.
Now let’s look at the adjustment process on the Ural motorcycle. Modern Ural motorcycles are equipped with a contactless system. However, sometimes it also needs adjustment. Let's see how this happens.
Next you need to prepare:
- wrenches, screwdriver;
- light bulb with wires.
- Using the crankshaft mark, set the piston of the first cylinder to top dead center.
- The microprocessor unit, having loosened its fastening, is turned counterclockwise until it stops.
- The flywheel mark must match the motor mark.
- The light bulb should light up, one contact of which is connected to ground, and the second on the microprocessor unit.
- Turn the block further until the light goes out. This is the right moment. Tighten the fastening.
Next, we will study how ignition adjustment is done on the still popular ZIL-130 trucks. For work you will need:
- First, unscrew the spark plug from the first cylinder and insert a paper plug in its place. We turn the crankshaft by hand, when the plug flies out, we align the mark of the crankshaft pulley with the mark of the timing gear block. The piston of the first cylinder should be at top dead center.
- We install the distributor drive in the cylinder block. We align the holes in the lower drive plate with the holes in the cylinder block. Tighten the bolts.
- We turn the crankshaft until the pulley mark is in front of the mark on the block between 3 and 6 combs.
- Using the adjusting screws, set the upper plate of the corrector to the “0” position of the lower plate.
- We turn the breaker by the body until the cam of the moving contact shaft is pressed out. Tighten the breaker fastening.
- We secure the high-voltage wires, start the engine, and check the operation of the system.
The same principle is used to adjust the ignition on the YaMZ 238 truck engine. Although for detailed instructions it is better to refer to the technical data sheet.
The same applies to ignition adjustment for Kamaz modifications. The presence of a high-pressure fuel pump in Kamaz makes it necessary to set the exact angle of injection of diesel fuel into the working cylinder. An inaccuracy of one degree can lead to engine repair.
In general, in all cases, adjusting the correct ignition timing helps engine performance:
- firstly, it makes it easier to start;
- secondly, fuel consumption is optimized.
Settings price
But the car enthusiast is not always confident in his abilities. Sometimes it’s easier to go to a car service center to adjust the correct ignition timing.
We have indicated how much they will charge for this operation in large cities of Russia in the lines of this table.
Adjusting the ignition of the VAZ 2107
All problems associated with the operation of the power unit require special attention. Adjusting the ignition of a VAZ 2107 with your own hands allows you to extend the life of the engine. Before you begin, you need to understand the ignition systems and familiarize yourself with tips for adjusting contact and non-contact ignition at home.
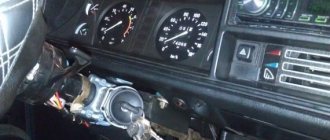
Photo of how to set the ignition on a VAZ 2107.
Ignition adjustment is an important procedure for all cars. An incorrectly configured ignition can damage the power unit of the Zhiguli 2107. As a result, expensive engine repairs will be required.
Correct ignition adjustment allows you to reduce fuel consumption, increase vehicle dynamics and engine efficiency.
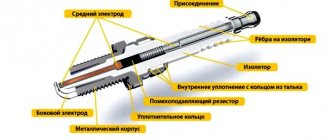
Spark plug
Plugs are used to ignite the fuel-air mixture in the engine cylinders when high voltage is supplied from the ignition coil. The main elements of any spark plug are a metal body, a ceramic insulator, electrodes and a contact rod.
Spark plugs are necessary to generate a spark and ignite the fuel-air mixture in the engine cylinders
Checking spark plugs for VAZ 2107
There are many ways to check spark plugs. The most popular are the following algorithms.
- With the engine running, remove the high-voltage wires one by one and listen to the operation of the engine. If after disconnecting the wire no changes occur, then the corresponding spark plug is faulty. This does not mean that it necessarily needs to be changed. In some cases, you can get by with cleaning it.
- The spark plug is unscrewed and a high-voltage wire is put on it. The spark plug body is leaned against a mass (for example, a valve cover) and the starter is cranked. If the part is working properly, the spark will be clear and bright.
- Sometimes spark plugs are checked with a special tool - a gun. The spark plug is inserted into a special hole and checked for the presence of a spark. If there is no spark, the spark plug is faulty.
You can check the serviceability of the spark plugs using a special tool - a gun - Candles can be checked with a homemade device made from a piezo lighter. The wire from the piezo module is extended and attached to the tip of the candle. The module is pressed against the spark plug body and the button is pressed. If there is no spark, replace the spark plug with a new one.
Video: checking spark plugs
Selection of spark plugs for VAZ 2107
Various models of spark plugs are installed on VAZ 2107 carburetor and injection engines. In addition, the parameters of the spark plugs depend on the type of ignition system.
The choice of spark plugs for the VAZ 2107 is determined by both the ignition system and the engine type
Auto stores offer many types of spark plugs for the VAZ 2107, differing in technical characteristics, quality, manufacturer and price.
Table: characteristics of spark plugs depending on the type of VAZ 2107 engine
| For carburetor engines with contact ignition | For carburetor engines with contactless ignition | For injection 8-valve engines | For injection 16-valve engines | |
| Thread type | M 14/1.25 | M 14/1.25 | M 14/1.25 | M 14/1.25 |
| Thread length, mm | 19 mm | 19 mm | 19 mm | 19 mm |
| Heat number | 17 | 17 | 17 | 17 |
| Thermal enclosure | Stands for spark plug insulator | Stands for spark plug insulator | Stands for spark plug insulator | Stands for spark plug insulator |
| Gap between electrodes, mm | 0.5 – 0.7 mm | 0.7 - 0.8 mm | 0.9 – 1.0 mm | 0.9 – 1.1 mm |
You can install spark plugs from various manufacturers on VAZ cars.
Table: manufacturers of spark plugs for VAZ 2107
| For carburetor engines with contact ignition | For carburetor engines with contactless ignition | For injection 8-valve engines | For injection 16-valve engines |
| A17DV (Russia) | A17DV-10 (Russia) | A17DVRM (Russia) | AU17DVRM (Russia) |
| A17DVM (Russia) | A17DVR (Russia) | AC DECO (USA) APP63 | AC DECO (USA) CFR2CLS |
| AUTOLITE (USA) 14–7D | AUTOLITE (USA) 64 | AUTOLITE (USA) 64 | AUTOLITE (USA) AP3923 |
| BERU (Germany) W7D | BERU (Germany) 14–7D, 14–7DU, 14R-7DU | BERU (Germany) 14R7DU | BERU (Germany) 14FR-7DU |
| BOSCH (Germany) W7D | BOSCH (Germany) W7D, WR7DC, WR7DP | BOSCH (Germany) WR7DC | BOSCH (Germany) WR7DCX, FR7DCU, FR7DPX |
| BRISK (Czech Republic) L15Y | BRISK (Italy) L15Y, L15YC, LR15Y | CHAMPION (England) RN9YC | CHAMPION (England) RC9YC |
| CHAMPION (England) N10Y | CHAMPION (England) N10Y, N9Y, N9YC, RN9Y | DENSO (Japan) W20EPR | DENSO (Japan) Q20PR-U11 |
| DENSO (Japan) W20EP | DENSO (Japan) W20EP, W20EPU, W20EXR | EYQUEM (France) RC52LS | EYQUEM (France) RFC52LS |
| NGK (Japan/France) BP6E | EYQUEM (France) 707LS, C52LS | MARELLI (Italy) F7LPR | MARELLI (Italy) 7LPR |
| HOLA (Netherlands) S12 | NGK (Japan/France) BP6E, BP6ES, BPR6E | NGK (Japan/France) BPR6ES | NGK (Japan/France) BPR6ES |
| MARELLI (Italy) FL7LP | MARELLI (Italy) FL7LP, F7LC, FL7LPR | FINVAL (Germany) F510 | FINVAL (Germany) F516 |
| FINVAL (Germany) F501 | FINVAL (Germany) F508 | HOLA (Netherlands) S14 | HOLA (Netherlands) 536 |
| WEEN (Netherlands/Japan) 121–1371 | HOLA (Netherlands) S13 | WEEN (Netherlands/Japan) 121–1370 | WEEN (Netherlands/Japan) 121–1372 |
Injector
VAZ 2107 was produced with two types of engines: injection and carburetor. Modifications with an injection power unit have a special design and electronic ignition adjustment is not required. The adjustment occurs automatically: the ECU, using sensors, determines the ignition timing and all other details. The participation of car owners in this procedure is limited to marking the timing chain or timing belt.
If problems occur with the electronic ignition of a Lada 2107 on an injection engine, it is necessary to flush the injector and replace the failed components.
Ignition tuning on VAZ 2107 injector.
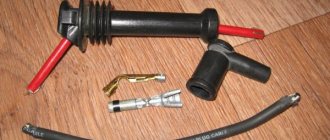
About their device
Before finding out the importance of the elements of the ignition system in question, it is necessary to understand their structure. Structurally, the high-voltage wire consists of the following parts:
- A conductor through which current flows.
- Insulation - rubber or silicone is used as an insulating material.
- Protective caps on both ends.
- Metal contacts.
Each element performs corresponding tasks, and at the slightest violation of integrity, it will be necessary to replace it. Armored wires cannot be repaired, since they play one of the main roles in the car’s ignition system, and also belong to the category of consumables.
This is interesting! Few people know that on a car it is necessary to change not only the spark plugs, but also the armored wires, which wear out over time and begin to malfunction.
For distributor or MZ
Read, it may be useful: All about the VAZ-2107 carburetor
It is a mistaken belief that armored wires on a car are ordinary wires that are designed to transmit current from a source to a receiver. As you know, VAZ 2107 cars were produced in two variations of the fuel supply system - carburetor and injector. Although many parts and mechanisms on the carburetor and injector are the same, this does not apply to the GDP. The carburetor VVP differs from the injection one on the VAZ 2107 in the following parameters:
- The length, on which the amount of resistance also depends. The wires on the injection unit are shorter than on the carburetor.
- Fasteners that connect to the distributor on the carburetor and the ignition module on the injector.
- The amount of GDP. There are four of them on the injector, and five on the carburetor.
- Type of caps.
Knowing the design differences, you must also understand that high voltage flows through the wire. The current comes from the distributor or MG through the wires to the spark plugs. The slightest malfunctions lead to the fact that current is not supplied to the spark plug, and a spark does not occur. If a spark does not occur, the cylinder does not work, which negatively affects the operation of the engine.
Ignition check
The ignition is checked by monitoring the gap distance between the breaker contacts.
All VAZ cars have a common gap distance indicator - from 0.3 to 0.4 mm.
To measure the gap you need to use a special feeler gauge. If the measurement results do not meet the standards, it is necessary to loosen the adjusting screw and adjust the gap.
It is also necessary to check the condition of the contacts and clean them. The contact group must be replaced if there are signs of wear.
Carburetor
There are a large number of stroboscopes on the market, but in general their operating principle is equally suitable for installing an ignition. The price only affects the durability of this device. The strobe operation is performed with the engine idling. Ignition adjustment is carried out by aligning the marks on the crankshaft pulley with the scale on the timing cover. The coincidence of the marks is assessed using a strobe light beam.
When operating the Vaz 2107 on 92 or 95 gasoline fuel, the average mark of the scale should coincide with the pulley mark. If there is a deviation, you need to adjust the ignition angle by turning the distributor body. When the distributor is turned clockwise, the advance angle increases, and when it moves in the opposite direction, it decreases.
Adjusting the ignition timing
Set the crankshaft to the position of the top dead center of the compression stroke of the piston of the first cylinder (long mark).
If the ignition distributor has not been removed from the engine, then the compression stroke of the first cylinder is determined by removing its cover - the rotor contact should be opposite the internal contact of the cover, connected by a wire to the spark plug of the first cylinder.
If the ignition distributor (after replacement or repair) is only installed on the engine, unscrew the spark plug of the first cylinder. Closing the hole with a paper stopper, rotate the crankshaft.
The escaping air, pushing out the plug, will indicate the beginning of the compression stroke in the first cylinder.
Use a 13mm wrench to loosen the nut securing the locking plate.
Turn the distributor housing clockwise until the breaker contacts close - the lamp goes out.
Slowly turn the distributor body counterclockwise until the lamp lights up, while lightly pressing the rotor counterclockwise to select the gap in the drive.
Holding it in this position, tighten the locking plate nut.
After adjustment, we specify the ignition timing.
Adjusting the ignition by ear
On the Lada 2107 you can also adjust the ignition for gas. This is a cruder method, but its advantage is that no additional equipment is required. Before starting, you need to warm up the Semyorka engine. After this, drive onto a straight and level road. When you reach a speed of 60 km/h, you need to sharply press the gas pedal.
By detonation you can determine whether the ignition settings are correct. If weak and rapid detonation occurs, the ignition timing is considered within normal limits.
Severe detonation indicates too early ignition. In this case, you need to turn the regulator clockwise.
No detonation means late ignition. In such a situation, turn the distributor counterclockwise.
Setting the ignition and checking
Having completed the preparation stage, you can proceed to the ignition adjustment itself. To do this, you will need to connect the test light at one end to the terminal of the ignition coil, which is connected to the low-voltage wire of the distributor. The second end must be connected to ground.
Next, turn on the ignition, after which you need to turn the distributor clockwise until the control lamp goes out. If the control does not light up, then there is no need to rotate anything.
- After completing all adjustments, you should start the engine and check that the ignition system is operating correctly. First, you need to accelerate the car to 40 km/h, engage 4th gear and sharply press the gas pedal. Normally, after a couple of seconds you can hear engine detonation and the “fingers” will begin to ring, but the phenomenon will disappear as the car accelerates.
In the case when detonation does not disappear during acceleration, there is a high probability that the ignition is earlier. If there is no detonation, then the ignition is later. In the first case, turn the distributor clockwise by half or one division.
In a situation with late ignition, everything is done exactly the same, only you need to turn it counterclockwise. Having set the desired position, you should check again by accelerating the car again and pressing the gas.
After the optimal position has been found, a mark is applied to the distributor body with paint, marking the position of the middle mark of the pot scale in relation to the block. After this, the VAZ ignition process can be considered set.