Replacing the front passenger door handle
Photo of replacing the door handle hook, I numbered the photos just in case, in case someone changes the thread, it might come in handy:
Step-by-step instructions for replacing the outer and inner door handles on a VAZ 2115
The elements that open and close the door structures on your car wear out over time. Replacing the VAZ 2115 door handle from the inside or outside may be required due to abrasions, scratches, and deformation. The procedure for removing and installing a new part is different for the rear and front doors, so separate instructions are provided for each situation.
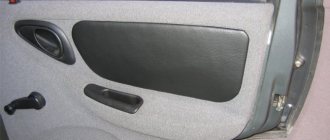
Removing the rear trim
There is no point in repeating the main points; they are almost identical.
The handle is also disassembled and the plug and the upper locking “latch” are removed. But there are no shelves or speakers here.
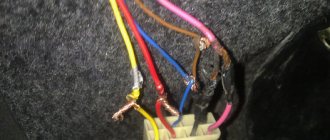
There is also no power window, that is, there is no wiring that needs to be disconnected. But here there is a regular window handle, as people call it – “oars” or a “muscle power” drive. In order to disassemble it, you need to bend it slightly towards yourself with a screwdriver - pull out the lower locking ring. After which the handle will simply come off on its own.
We repeat the same procedure with the upholstery as on the front door, just gently pull. Remember about rivets.
Now a short video.
What else I would like to note is that if you read the instructions, it recommends completely changing the rivets every time you remove the upholstery - they simply lose their characteristics, the antennae fall off, if my memory serves me correctly, there are 8 of them on each upholstery. This threatens to cause rattling on bumps and uneven roads.
Causes of malfunction
Before replacing a part, you should find out the cause of the failure. The main ones:
- damage after an accident;
- mechanical damage to internal elements;
- Hacking attempt;
- failure of the external door opening manipulator;
- pressing hard on the handle.
Most often, the plastic part breaks or breaks as a result of constant opening.
Replacing door handles on VAZ 2110, VAZ 2111, VAZ 2112
Welcome! Door handles are the thing with the help of which the rod twitches and the door opens, the handle itself is made only for convenience and the most important mechanism that opens the door is not the handle, but the rod that goes from it to the lock, the handles are selected for each car individually and therefore It is not always possible to find the same handles on different models (for example, on the VAZ 2110 and VAZ 2114), these handles belong to the decorative elements of the body and therefore some people even replace them with others (with the so-called Euro handles), but there is one minus The Euro handles are that sometimes they break if you pull them hard and the door opens more difficult than with the original trauma-safe handles that were installed from the factory on the tenth family.
Note! To replace this decorative element, you will need: Wrenches, a wrench with socket heads and socket wrenches, be sure to stock up if you don’t have a wrench, they will be very useful to you when you unscrew the nuts securing the handles!
Summary:
When should door handles be replaced? In fact, they are changed when they break, some people begin to think that the handle needs to be changed if it stops opening the door, although this is a misconception and, as we said above, the handles do not affect the opening of the door at all, it’s all the pull that does it, although they can also jam the door also because of this it may not open, by the way, some handles also have built-in cylinders, so if the cylinder stops opening the door (for example, it’s jammed), then either the handle must be completely replaced, or the cylinder can be replaced separately and this handle can be used again.
Replacing the inner handle
If the internal door handle of a VAZ 2115 is broken, then cosmetic repairs are impossible. To repair, you will need a standard set of tools: several types of screwdrivers, a sharp knife and a 8mm wrench. It is better to change the part while in the salon. Algorithm for replacing a part:
- The lining is removed. It is pryed off with the thin end of a screwdriver. It is important to remove all fragments of decor.
- The door card is being dismantled.
- The rod is disconnected.
- To remove the remains of the broken opening device, the fasteners are unscrewed.
- A new element is installed. It should be attached to the rod, and then the facing elements should be reassembled.
The trim on the VAZ is fixed with special clips. To remove them, you can pry up the edge with a screwdriver. Proceed with caution as they are plastic and may break. This is affected by rough handling, material wear or cold.
Installing euro handles on a VAZ 2114
Locking mechanisms, handles and other elements of VAZ 2114 cars, to put it mildly, do not have a very attractive design. One such example is standard door handles. Fortunately, on the market for spare parts and auto accessories you can select and purchase Euro handles for the VAZ 2114.
How are they different from the original ones, you ask? There are differences, here are some of them - smooth operation of the product, excellent appearance and more convenient design. In addition, it is worth noting the higher quality of the materials from which the modified handles are made.
As a result, they will last much longer than stock ones.
Varieties
Today, the most popular products on the auto goods market are: - Euro handles Lynx VAZ 2114. Products from this manufacturer are in greatest demand in Russia. Great demand is due to their stylish design, quality of materials used, trouble-free operation and proven durability of use;
— Prosport. They are slightly inferior to the previous brand, but in terms of quality they are significantly ahead of stock products from AvtoVAZ.
Installing euro handles on a VAZ 2114
Now let's look at the whole process of self-replacement. To carry out the work you will not need any special tools, lifting mechanisms or other favorable conditions. All you need is:
- flat and Phillips screwdrivers;
- key to "8";
- spare clips for fastening the casing (may be useful if you damage the old fastenings);
- a couple of hours of free time and a little patience.
So, the whole stage includes the following steps:
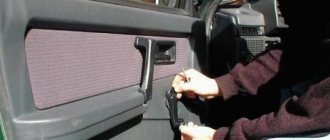
- The first, rather lengthy and responsible job is removing the door trim. First we need to remove the so-called card. It is better to start work from the front doors. First, use a Phillips screwdriver to unscrew several screws around the perimeter of the bottom of the door (storage niche). To remove the trim, you will need to disconnect the window handles and door handles. Disconnect the contact chips. Try to remove the trim carefully, gradually snapping the clips off the fastenings and metal of the doors. It happens that some clips get damaged, so stock up on a small amount in advance.
- Now that the door card has been removed, we can observe the entire interior space. We are, of course, interested in the handle mount. So, we take a regular “8” key and unscrew the nut from inside the door, while at the same time holding it with our hand (so that it does not fall into the internal cavity). The second fastening nut is located at the very edge of the door, above the locking unit. As in the first case, unscrew it.
- Next, you need to remove the two internal rods from the handle.
- From the outside of the car, pull the door handle towards you, while rotating it so that the rods come out of the hole in the metal.
- Take a new product and transfer the internal contents from the factory handles (locking mechanism, cylinder and rods) onto it. Sometimes certain models of Euro handles are equipped with their own rods.
- At the replacement stage, it would not be superfluous to lubricate the internal parts of the lock with a special product. In addition, the places where the handles are attached must be cleaned of dirt or dust.
- Rear handles are much easier and faster to change (they do not have a locking mechanism or cylinder).
- Install everything in reverse order. At the same time, before installing cards on the doors, it is very important to make sure that the mechanism is working. Check each door individually; opening and closing should be done without any complaints.
Now the question of how to install Euro handles on a VAZ 2114 will not cause you confusion or any difficulties.
Source: https://ladaservice.info/vaz-2113-2115/tyuning-vaz-2113-2115/ustanovka-evroruchek-na-vaz-2114/
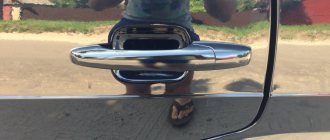
Replacing the outside door handle
Replacing the inner door handle of a VAZ 2115 is not as difficult as dismantling the outer element. First you need to determine the fastening method, which is specified in the technical document for the car. It will not be possible to get to the fasteners without removing the casing. Armed with screwdrivers and a 8mm wrench, it is important to follow the step-by-step instructions:
- Remove trim.
- Remove the thrust rods from the closing mechanism.
- Unscrew the external fastening screw.
- Remove the rubber seals and remove the handle.
- Inspect and clean the installation site of the new structure.
Assembly is carried out in reverse order.
Replacing the door lock cylinder
To gain access to the locking mechanism, you need to remove the trim. On the “Nine” it is quite simple to remove it - the casing is held in place by plastic pistons. These pistons are located around the perimeter; they are simply pressed out and, if necessary, replaced with new ones.
First, as is easy to understand, you need to dismantle three elements: the side handle, the window lifter handle, the socket of the inner handle of the lock. The “dog” must be pulled up, but it is better to remove the seal that protects the glass during the dismantling of the casing.
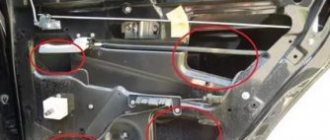
Removing and disassembling the door handle
When the door trim is missing, you can freely disconnect the two rods that go from the door handle to the lock. The following shows exactly what elements we are talking about.
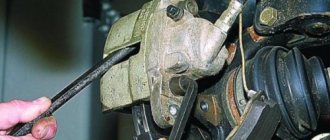
By squeezing the plastic tab with a screwdriver, the rod is disengaged. We will assume that all of the above actions have been completed. Then, you can move on to the next stage.
The outer handle is attached to the metal using two nuts. One of them is located under the trim, the second is on the back side of the door. Both nuts need to be unscrewed.
After dismantling the specified unit, it will be easy to remove the cylinder. This is done like this:
- Push out the pin holding the outer plastic cap;
- Dismantle the mounting spring (see figure);
- By installing the key and turning it, the cylinder is pulled out.
The appearance of the spring holding the cylinder and the handle together is shown below.
It is important to know that the knot itself, called the “larva,” needs careful handling.
Handle selection
Repair will require a new part. The mechanism is sold for the driver's or passenger's door. When purchasing, you should pay attention to:
- Appearance of the product. Experts recommend taking a closer look at Euro pens.
- Manufacturer.
- Material of manufacture. The standard version is made of plastic, but there may be products with additional elements. Some manufacturers add chrome strips.
It is better to purchase AvtoVAZ products. Factory articles: 2109-6105180 – for internal, 2108-6105177 – for external product.