Basic dimensions of valves, guides and valve seats
Basic data for checking the outer (a) and inner (b) valve springs
We remove the cylinder head to replace the gasket, repair the valve drive mechanism and the head itself, as well as for complete disassembly of the engine.
To replace the head gasket or connecting rod-piston group of the engine, remove the cylinder head from the engine complete with the receiver, intake pipe and exhaust manifold.
Using a 13mm socket, unscrew the cylinder head mounting bolt located next to the ignition module bracket.
Using a 12mm socket, unscrew the ten bolts securing the head to the cylinder block. |
Remove the cylinder head assembly with the exhaust manifold, receiver and intake pipe with the fuel rail.
The cylinder head can also be removed from the engine by first dismantling the receiver (see here), the intake pipe and the exhaust manifold (see here).
Remove the cylinder head without the exhaust manifold and intake pipe.
Remove the cylinder head gasket. |
We install the cylinder head on the workbench.
Using a 10mm socket, unscrew the two nuts securing the heater radiator inlet pipe to the block head.
Remove the sealing gasket. |
Using a 13mm socket, unscrew the two nuts securing the outlet pipe of the cooling system jacket. |
. and remove the pipe with the coolant temperature sensor of the injection system. |
Remove the sealing gasket of the pipe. |
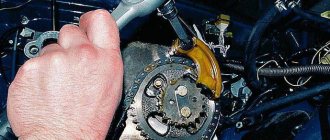
When disassembling the valve mechanism.
. We place a stop - a wooden block - under the plate of the valve being desiccated.
We dry out the valve (see here).
. and remove the valve from the guide sleeve of the cylinder head.
We dismantle the other valves in the same way.
We assemble and install the cylinder head in the reverse order. Before installing the valves, clean them from carbon deposits and lubricate the valve stems with engine oil.
Assembling the valve mechanism.
Before installing the cooling system pipes, we clean the mating surfaces of the pipes and the block head from the remains of old gaskets.
We install new pipe gaskets, applying a thin layer of sealant to them.
We clean the mating surfaces of the head and cylinder block from the remains of the old gasket, dirt and oil.
Using a syringe with a needle or a rubber bulb, remove oil and coolant from the mounting holes of the cylinder block.
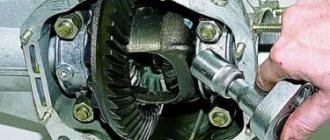
We install the gasket and cylinder head using two centering bushings.
When installing the head on the cylinder block, we pass the chain by the wire through the hole in the head. |
Having installed the cylinder head bolts, tighten them in the order shown in the figure.
To ensure a reliable seal and eliminate the need to tighten the bolts during vehicle maintenance, tighten the bolts in four steps:
1st step – tighten bolts 1–10 to a torque of 20 N.m (2.0 kgf.m); 2nd step - tighten bolts 1–10 with a torque of 69.4–85.7 N.m (7.1–8.7 kgf.m), and bolt 11 with a torque of 31.4–39.1 N.m ( 3.2–4.60 kgf.m). Then we turn bolts 1–10 by 90° (3rd step) and another 90° (4th step).
Video
Source
Chevrolet Niva ☭RED STALKER☭ › Logbook › Replacing the cylinder head gasket.
Hi all! Well, actually from the title it’s clear what we’re going to talk about. The car was driving, but suddenly the temperature began to rise, white smoke started coming out of the muffler, it began to rattle when starting... well, I understood everything right away) I didn’t walk around the car for a long time, I removed the cylinder head. I won’t describe how I removed the cylinder head, because you can’t write obscene words here, and if you remove them, then basically there’s no text left... In general, if I had three elbows on each hand, everything would probably be much easier when disassembling AvtoVAZ developed these cars looking several decades into the future in the hope of a population mutation due to global warming and the food crisis. But I took it off already at that time... and this is what I saw.
There was a hole in the ring near the 4th cylinder, plus burnouts between all the cylinders! I have no idea how it drove... I think the car started after turning the starter 10 times, the gasket simply died. I examined the cylinder head, it looked intact, the 4th cylinder did not really work.
I cleaned the surface, took measurements with a ruler, everything was even. I read it online, and it turns out I wasn’t the only one who suffered in this way; gasket failures occur all the time. Well, okay. My task, once removed, is to wash everything, grind the valves, replace the caps and mill the surface. Well, I started disassembling the cylinder head. I started with desiccation.
I took the whole head apart. I cleaned the combustion chambers, milled and polished the intake and exhaust ports, and polished the valves. This is what it looked like.
I started grinding the valves, started from the 1st... and on the 8th I saw this thing!)
Yes, this is a crack!) Damn, apparently the antifreeze got into the hot outlet and because of this it cracked. Well, it’s good that I saw this before I installed and assembled it all, there would have been consequences... But still, 3 hours of time for disassembling, milling and lapping were wasted. Well, to hell with it, usually in such cases, when something doesn’t work out, I go drink sweet tea and watch TV, or do something else) I drank some tea and took care of the block, cleaning the piston.
Everything is fine with the pistons, the diesel fuel does not leak, the rings hold, the hone is present, the bottom is excellent!
The same cannot be said about the cylinder head, the valves need to be replaced, the surface needs to be milled... and in general I don’t like it anymore. Moreover, the oil rail turned out to be cracked...
But this is also in order. And I thought, do I need this cylinder head? I thought about it and decided that I would remove the excellent cylinder head from the donor engine. I went and took it off, brought it, put it next to it)
This is my old one, the donor one on the back. The donor one turned out to be much more alive... but the oil ramp turned out to be also cracked, but on a different pot. I assembled one out of 2 ramps. I began to disassemble the donor cylinder head.
I desiccated it and laid it all out. The caps flatly refused to be removed using a reverse hammer puller! I read somewhere that someone even broke the valve sleeve while removing them. I decided not to break the bushings, but to warm up the caps with a hairdryer. They came off easier when hot!)
Well, then everything follows the old scheme, milling and polishing the channels and combustion chamber, polishing the valves...
There are no cracks in the valves in this head, but the valves themselves are in the field... as if they were being worn out and ground with an angle grinder at the factory... the execution is strange, or maybe I’m out of the habit of our engines) I ground everything in, washed it with diesel fuel and water under pressure, blew it out, dried it, stuffed in new oil scrapers , put back all the valves, springs, washers. I installed a collector. I took the injectors from the donor, of course before dissolving the deposits in them 646m.
I blew out the injectors and the ramp with pressure. Then I started installing the cylinder head on the block, again I remembered the designers with a bad word. I tightened the new bolts, they were all tightened to a torque of 11 kg, but one bolt, the one on the outermost one to the timing chain, began to stretch at 10... here the words have already ended, these are our rawhide bolts. Of course, I put washers under the bolts, otherwise they just gnaw at the aluminum and don’t really turn, confusing the torque wrench. Dancing with a tambourine from the manuals and turning the bolts 90 degrees is not for this engine... On our cars, it’s generally better to look less into the books written by the factory, then they drive longer!) The gas distribution marks are also made with crooked hands... the chain is fresh, but the mark does not reach a third of the tooth, or jumps to 2) I read it... this is also normal) In the end, groaning and farting, I collected everything.
And lo and behold, it started, and not only drove but flew, the engine began to breathe!) The check engine light disappeared and is no longer on, the engine starts only when you touch the key) Well, I also changed the saber on the rear bumper, threw out the old rusty crap and installed a new one , now it's beautiful)
So here it is, you need a Niva, you need to drag a trailer to the dacha, it can’t be idle for a season!)
Like this. Don't break)
cylinder head NIVA-VAZ-2121-21213-21214-2131
The content of the article:
Replacing the cylinder head gasket NIVA-VAZ-2121-21213-21214-2131
The block is assembled and installed under the hood on supports, which means the whole thing can be ceremoniously covered with the cylinder head. I pick up the gasket that I bought back in the fall, according to the assurances of the seller (and they don’t give a damn why bother you there, as long as they buy it and leave) and a weighty doubt creeps into my soul that the gasket is some kind of worthless! I didn’t take any risks, but went to the store to see what was on sale there. And indeed, in the stores where I visited, there are two types of gaskets on sale, one is a conveyor type, the one I bought is Egoryevskaya, a little more expensive, but looks much better. I also bought it, 150 rubles is not a pity for such a thing. I brought it to the garage and compared it with the one I bought earlier.
At first, the only thing that catches your eye is that the material of the gaskets is strikingly different, that the “conveyor” one is loose, and the Yegoryevskaya one is dense. Then we turn the gaskets over and see
That on the jumper between the cylinders in the “conveyor” one there is not a single rolling of tin, but in the Egoryevskaya one there is only one! This somehow bothered me, and I decided to order an imported cylinder head gasket from the Exist. The choice fell on the gasket from the Spanish company Ajusa, article number 10002400, the price tag for it is 530 rubles! Ordered. A week later I received it and realized that it was worth the money, here it is next to the previously purchased ones
It is even denser than the Egoryevsk gasket, it has a rolled-up jumper between the cylinders, although on the other side, on the side of the block, and not the cylinder head,
which, in my opinion, has its own logic - the jumper does not deform the plane of the aluminum cylinder head. This is how the review of cylinder head gaskets turned out. I also purchased timing belt parts.
Stars LADA-IMAGE Baltic chain DITTON (aka Daugavplis)
Assembled the timing drive on the block
Tightened the sprocket bolts to the specified torque of 50 kN/m
I took the magical, long-suffering cylinder head
And a good gasket
And screwed the cylinder head to the block,
using a torque wrench, as described in the manual in four steps - the first bolts 1-10 in order with a force of 20 N*m, the second step all bolts with a torque of 70 N*m and the eleventh with a torque of 35 N*m, then tighten 10 bolts in order by 90 degrees and, following the advice of experienced people, the last step of turning it by 90 degrees was performed after a break of an hour and a half. I passed the chain into the cylinder head and paid attention to the damper
It is somehow obliquely positioned relative to the chain. I corrected it with editing and it became noticeably better, but of course not perfect
Here are the new parts from the “Three Whales” original spare parts store. The gap between the cylinder head and the engine shield has now become completely minimal due to noise.
Probably, it will sometimes rustle against the noise of the cylinder head, but I don’t want to do anything here, let it rub itself into the necessary groove and that’s it. Then I tightened the camshaft
and a split star,
on which the valve overlap mark was already set. I didn’t check the TDC on the block with an indicator, due to the lack of one