Replacing light bulbs in the dashboard of a VAZ 2110 yourself
Installing a dashboard on a VAZ 2110
The dashboard of a VAZ 2110 is designed to display information about the current state of the car.
Made from regular quality plastic. Having a large number of light bulbs means that sometimes you need to replace them. Many drivers want to replace the nondescript factory panel of the VAZ 2110 with a more modern one. The article suggests learning how to replace the dashboard bulbs of a VAZ 2110 and how to make it more aesthetically pleasing.
Restoring the backlight and changing the warning lamps
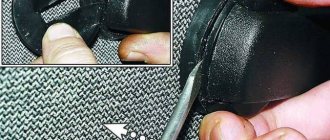
We remove the light bulb that needs to be replaced (the purpose of the light bulbs is in the first photo of the article). To do this, turn the socket counterclockwise 90 degrees, and it will easily come out along with the light bulb.
Replacing a light bulb without disconnecting the power wires on a VAZ 2110
We remove the burnt device from the socket, insert a new one in its place and install the socket with the lamp in place, turning it 90 degrees, but clockwise. After this, we install the terminal on the battery, turn on the ignition and check the operation of the VAZ panel, performing the appropriate manipulations: turn on the hand parking brake, headlights, turn indicators, high beam headlights, etc. If everything is in order, then install the panel and decorative trim in place .
Features of the dashboard of the VAZ 2110 car
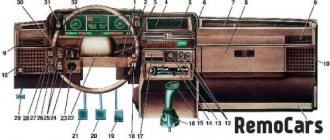
Dashboard VAZ 2110
The dashboard combination on the dashboard of a VAZ 2110 car includes:
- 1 – shows the coolant temperature. If the arrow of this indicator moves into the red zone of the scale, this indicates engine overheating. It is necessary to pay attention to the operation of the electric fan and thermostat of the cooling system.
Advice: Do not operate the engine in overheating mode. Liquid temperature is more than 110 °C.
- 2 – tachometer. Shows the approximate frequency at which the engine crankshaft rotates. To obtain the true value of the unit's rotation speed, you need to multiply the arrow reading on the device by 100. The arrow reading in the red zone means that the engine is operating at a higher frequency, which is dangerous for the vehicle to continue moving.
- 3 – speedometer. The position of the arrow indicates the approximate speed of the vehicle in km/h.
- 4 – shows the fuel level.
- 5 – reset button on the daily mileage counter.
- 6 – display for trip odometer and odometer.
- 7 – display for indicating the time.
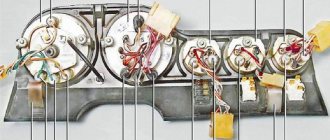
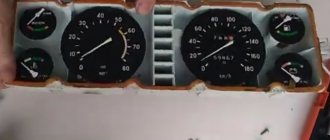
The photo shows the installation of light bulbs on the panel:
- Positions 1 – used to illuminate instrument needles and scales.
- Positions 2 – the smallest in size are used in yellow indicators and red signal indicators. These bulbs are installed without rubber caps. Light filters of the required colors are already built into the device.
- Position 3 – has a medium size, used to indicate a low gasoline level when the needle is at zero. It burns out very rarely.
Installing light bulbs on the panel
The entire instrument cluster is fixed with two screws in the corresponding slot on the dashboard. Its connections are made using printed circuit board mounting using foil getinax. The board is well attached to the back of the case. The speedometer is equipped with two counters showing the distance traveled: one is total, the other is “daily”. Using the corresponding button, the readings of the latter can be easily reset.
Tip: Readings can only be reset when the car is stationary.
The latest VAZ 2110 models are equipped with an electronic dashboard. It contains all components and control indicators, icons and lamps.
Instrument panel VAZ-2112
The red exclamation mark on the Priora lights up. learning to decipher the exclamation mark and other indicator symbols on the instrument panel
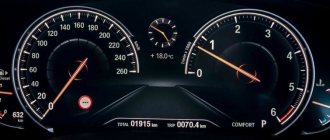
The instrument panel of the VAZ-2112 is quite ascetic by modern standards. In its central part, located in front of the driver, there are two pointer indicators: a tachometer and a speedometer. The first, as you know, shows at what frequency the engine is currently rotating, the second - the speed of the car. Under the tachometer, the designers placed on the panel a dial with an electronic clock and a thermometer that shows the outside temperature if there is a corresponding sensor. Below the speedometer is an electronic odometer showing total and daily mileage.
To the right of the odometer is the electronic clock adjustment lever. On panels with a narrow display installed, this knob can be used to switch the odometer readings to total or daily mileage. Between the tachometer and the speedometer at the top there are indicators for left and right turns, respectively, and at the bottom there are two indicators: “hazard lights” and a critical engine malfunction, which appeared due to a malfunction in the electronic systems. When this indicator comes on, it is best to turn off the engine, since there may be several reasons why it came on. Sometimes this indicator signals the presence of errors in the operation of the on-board computer, which are eliminated at the service using special software.
The VAZ-2112 panel is also equipped with a dial gauge for coolant temperature. A sensor connected to the device detects temperatures starting from 50 degrees Celsius. On the VAZ-2112, the red zone starts at 105 degrees. At 130 degrees, the motor will jam from overheating, so further indication here is simply meaningless. Under the coolant temperature sensor on the VAZ-2112 panel there are 4 indicators:
- fuel mixture enricher (for engines with a carburetor);
- oil pressure – the oil level has dropped to a critically low level. It is best to turn off the engine, identify and, if possible, eliminate the problem, continuing to drive only after adding oil;
- parking brake;
- battery charge - the indicator signals the presence of a malfunction in the system, for example, an open circuit, a broken generator belt, and other such problems.
They all light up if a corresponding malfunction occurs.
Studying the instrument panel of the VAZ-2112, we will see that on the right side there is a fuel level dial indicator. This device receives data on the amount of fuel (in the case of the VAZ-2112 - gasoline) in the tank from a special sensor. It should be remembered that the readings of this device are relevant only for a flat surface, since when a car goes, for example, uphill, the fuel, in accordance with the laws of physics, shifts to the far corner of an incomplete tank. Consequently, the sensor will transmit incorrect information.
To the right of the fuel level indicator is a small icon of a gas station column - it’s easy to guess that it lights up when the level of gasoline in the tank drops to a critical level. However, with a flashing lamp, you will still have a certain power reserve.
Below the fuel gauge there are three indicators:
- high beam – signals the driver that the high beam headlights are on, blinding oncoming traffic;
- low level of brake fluid - it is likely that the fluid leaves the system as a result of a tear in the hose;
- side lights - they will remind the driver of the need to turn them off when getting out of the car, since otherwise he may be faced with a very unpleasant surprise in the form of a dead battery the next time he boards.
How to replace dashboard lights
- The steering wheel lowers to the down position.
- The two upper screws are unscrewed and the decorative trim is pulled out.
- Unscrew the three screws securing the dashboard.
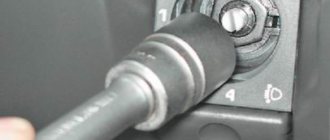
Tip: The speedometer cable prevents you from pulling out the dash. To turn it off, it is first unfastened from the box, the locking ring is pulled to the side and the cable chip is pulled up, which is then pushed into the cabin. Part of the tidy is pulled out towards you, and the cable is conveniently unfastened from the speedometer.
- The cable remains in place, the device is pulled out, all electrical connectors are disconnected.
- The socket is rotated counterclockwise and removed along with the lamp. Baseless light bulbs.
- After replacing the light bulbs in the instrument panel of the VAZ 2110, assembly of the unit is performed in the reverse order.
Removing the car dashboard
- Using a Phillips screwdriver, remove the three screws that secure the center console;
- remove the cover, the protrusion located at the bottom, remove the protrusion from the bracket;
- Using a nozzle, unscrew the five screws located in the console on the right and remove the screen;
- Disconnect the terminal with the (-) sign from the battery. If there is a radio receiver, you need to remove it, remove the plug from the shield;
- Disconnect the wires coming from the cigarette lighter, remove the cartridge;
- Using a narrow screwdriver, remove the handle from the levers;
- pull the handle towards the heating and fan switch;
- unscrew the two screws above the panel and the two located under it using a screwdriver;
- unscrew the screw located behind the panel;
- Also unscrew the two self-tapping screws securing the cover;
- disconnect the harness and wire connectors. To avoid confusion when installing the panels, you should mark the order in which they are connected;
- unscrew the fastening bolts;
- unscrew the two self-tapping screws, those that secure the bottom bracket using an 8 key;
- unscrew the self-tapping screw securing the light guide and remove it;
- Also unscrew the screws securing the heating unit;
- remove lamp sockets;
- after removing the external parts, remove the decorative insert;
- unscrew all nuts with a 21 key;
- hydrocorrector, remove its lamp;
- Unscrew the screws that are attached to the cross member on the left.
- Finally, the panel itself is removed. The panel is assembled accordingly in the reverse order.
In general, the repair work is quite doable even with your own hands, but before starting dismantling work, you need at least a pinout mapped on paper, otherwise it will be difficult: you will need to “trace” every wire and every connection that is on the “path” from devices to the power button.
How many light bulbs are there in the dashboard of a VAZ 2110
The dashboard of VAZ cars, just like any other, displays current information about the condition of the car at the moment. The main material used in its manufacture is plastic. The front side is rich in all kinds of light indicators in the form of icons, illuminated by light bulbs.
With a significant number of lamps, you have to face the problem of their burnout. Also, the bright glow of the factory backlight is not always forced to change it to a brighter optional one. A similar replacement of light bulbs in the dashboard of a VAZ 2110 can be carried out even in a garage.
Classic tidy "tens"
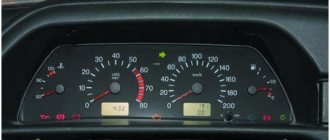
The driver behind the wheel of the tenth VAZ model can monitor the main indicators displayed on the panel behind the steering wheel. There are pointer-type control devices here:
- speedometer;
- tachometer;
- fuel tank full;
- coolant temperature values.
In addition to differentiated values displayed on the scale, the car provides information in the form of burning or blinking indicators, for example, high beam indicators, turn signals, possible problems with the internal combustion engine, emergency lights, handbrake, etc. If the lamps turn off spontaneously, the driver will be misled that can lead not only to the failure of one of the components, systems or mechanisms, but also create a dangerous (emergency) situation on the road.
It is important to know that you can test the functionality of the display on the 2110 dashboard yourself by holding the reset button and turning the ignition key to the first position (then release it). You can complete the test by pressing the button on the panel again.
Working with the center console
During the work, you will need a pair of screwdrivers (Phillips and flathead) and new lamps. It is advisable to disconnect the negative terminal on the battery and the operating cable on the speedometer before work. Next, use a flat screwdriver to pry up the cover and remove the switch from the exterior lighting.
The backlight lamps are removed after tightening the antennae of the socket, this is done with a screwdriver. The emergency lights are replaced in the same way. It is important to disconnect the connector from the switch by slightly pressing down.
Use a Phillips screwdriver to unscrew the pair of screws holding the trim to the dashboard. We take out the heater and ashtray from the socket. We remove the standard radio from its seat. In the process, we press out the spring brackets holding the pad and pull the shield towards us. Using a screwdriver, loosen a pair of plastic tendrils, which will allow you to lift the shield, behind which the third fastening bracket is pressed out.
We remove the cigarette lighter connector, behind which the backlight is hidden. The cigarette lighter blades will need to be held in a compressed position when dismantling.
After all replacements, return the battery terminal to its place. We carry out testing on all light fixtures of the panel until the shield is completely installed in its place. The light bulbs in the buttons are replaced in the same way, prying each one off with a flat screwdriver and then changing the light element inside.
Instrument panel of VAZ 2110 with LED backlight
Therefore, if you really want to, then replacing the backlight, and perhaps the entire dashboard, with your own hands is not at all a complex operation. Let’s try to explain in detail how to do this.
Device
The entire instrument cluster is mounted on the panel with two bolts and consists partly of mechanical and partly of electronic components. The electronic component of a regular panel is a speedometer and tachometer, but some cars from the VAZ 2110 model range already have an electronic panel.
Also, there must be indicators: coolant temperature, availability, fuel level, as well as warning lights, of which there are 12 installed on the VAZ 2110.
All device connections are stored in a printed circuit board, which is mounted on the back of the case.
Dashboard of VAZ 2110 disassembled
Instrument panel VAZ 2110 - description of lamps and indicators
Designations of indicator lamps on the instrument panel of the VAZ 2110 - 15.
Many car enthusiasts are faced with this seemingly simple question. What do the indicator lights on the instrument panel mean?
And what do we know, they all light up together only when the ignition is turned on, and when one of them lights up while driving, it becomes a little uneasy.
I didn’t know this myself when I switched to the “two” after the “seven”; on the 2107, half of them didn’t light up at all, so I didn’t know what it was and what it was for. And my friend after buying a car in Novorossiysk. I even bought a whole book on VAZ, due to my ignorance of these light bulbs.
The symbols on the instrument panels on all VAZs are almost the same, just the location is different.
Let's start in order.
1 — Coolant temperature, in degrees Celsius.
2 — Tachometer, engine speed.
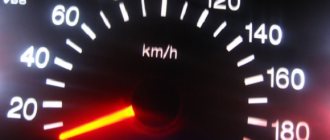
5 — Speedometer, vehicle speed in km/h.
6 - Fuel level in the tank. When there are 5-7 liters left, a yellow light comes on - a warning or an icon with a picture of a gas station.
7 - Actually, this is an image of a gas station, signaling the need to refuel.
8 - Indicator lamp for turning on the dimensions.
9 — The brake fluid level is low, it may be leaking somewhere.
10 - Turn on the high beam.
11 - Clock adjustment knob (hours/minutes - switches when pressed), sometimes this knob serves as the function of switching the total mileage/day mileage (on panels with a narrow display).
12 — The display showing the total mileage/daily mileage is narrow on some models.
13 - Hazard warning lamp - “hazard light”.
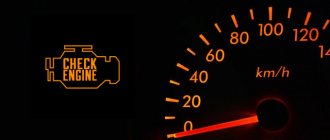
14 - Check Engine, often indicated by this icon - this means a malfunction in the engine, it is recommended to stop the engine.
15 — Display with a clock (can show the outside air temperature if there is a temperature sensor).
16 - Malfunction in the battery charging system: loose or broken generator belt, generator malfunction, open circuit and other problems.
17 - Parking brake indicator.
18 - Insufficient oil pressure in the engine, it is recommended to turn off the engine and find the cause.
19 — Air damper light (on carburetor engines)
I’ll also add about the lamps on the additional panel in the dashboard of the VAZ 2110 - 12.
— The light marked with an arrow is a check for malfunction of the dimensions or brake lights. — Below is a brake pad wear indicator, if it lights up, check the brake pads, maybe it’s time to change them. — Seat belt warning light — this is clear from the picture.
On the other side from above:
— Low engine oil level — Low washer fluid level — Increased coolant temperature
This is how the review turned out. If some kind of lamp lights up and the signal beeps, do not panic. Usually these are small things.
Save this note to yourself on your social network by clicking on one of the buttons below.
Removal and disassembly
Do-it-yourself removal of the instrument board is carried out according to the following algorithm:
- First of all, remove the casing;
- Use a Phillips screwdriver to unscrew the fastening bolts;
- We find and unlatch the latches. It is better to snap off the ones at the bottom first, and then push up. This way it can be easily removed;
- Before tuning, you need to remove the arrows. At first, just pull them lightly. If they don’t give in, start turning them from right to left, while slightly tightening them – they will definitely come off.
Simple and fast upgrade
In principle, with your own hands you can either completely replace the instrument panel of a VAZ 2110 or tuning the existing one.
One of the quite popular options is replacing light bulbs with LEDs. Moreover, there is no difficulty in this - you need to remove the light bulbs and insert LEDs in their place.
However, there is one small trick: they work well only if the polarity is observed! If the LED does not light up immediately when connected, you need to remove it, turn it 180 degrees, then reinsert it into the socket.
Even such a simple replacement will increase the brightness of the dashboard, but this is not enough, it is hardly worth completing the tuning with your own hands.
Instrument panel lighting for VAZ 2109
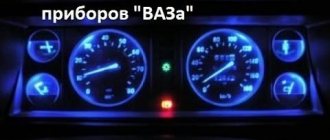
The backlighting of the VAZ 2109 instrument panel is often not satisfactory for drivers. You can change the color and its brightness yourself, without turning to the salon for help.
To improve the lighting, you need to install LEDs instead of conventional incandescent light bulbs. Their glow is much brighter, in addition, you can choose the color of the backlight at your discretion: blue, green, red or white. These are the main colors, but if you look, you can also find purple LEDs.
READ Replacing Outlander 3 front stabilizer bushings
Replacement
The inspection of light bulbs or sockets must be carried out carefully and carefully. If the car owner decides to use LEDs to illuminate the buttons, then you need to purchase a light bulb with a regular base. Soldering and a special cartridge are needed if there is a desire to replace the backlight of the instrument cluster. Among the many LEDs, there are also those that have a diffuse or, conversely, point glow.
These effects are achieved using a focusing lens configuration. A more uniform backlight is suitable for illuminating the scale on the instrument panel, and a brighter light is suitable for the button icon. Every driver should take into account the features of design changes when improving his car.
Deep revision
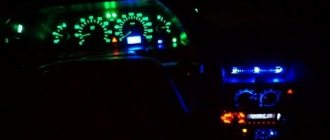
It is also advisable to add lighting - using an LED strip. You can take a white one, or a colored one. Preferably something that is not too harsh on the eyes – perhaps blue or green, depending on the owner’s taste.
Today, blue light is the most popular - it gives good visibility of readings on all instruments, but does not interfere with the driver’s ability to see the road clearly.
Another good idea is to make the arrows glow a different color. To do this, they need to be cleaned of old, red paint, and then painted white.
It could be nitro enamel or, even simpler, white nail polish. A color LED must be installed next to the needle on the instrument scale. The arrow, changing its position, will be colored differently.
Additionally, when using only white light, a colored overlay will help. That is, even without electrical intervention, the colored film overlay will change its appearance.
If possible, the light filter is removed, and the backing is decorated with an overlay, and here you can get creative with different materials and colors (electrical tape, colored tape, colored vinyl film). Such an overlay will significantly transform the panel and make it exclusive.