Selecting electric power steering for a VAZ 2107
To “sharpness” and reduce the rotation ratio all the way, it is necessary to modernize the steering and pendulum bipod.
This makes the steering wheel heavier. To turn a VAZ 2107, you already need to rotate the steering wheel quite actively, and the steering wheel travel cannot be called “light”. In such conditions, steering comfort is achieved primarily by strengthening the steering wheel. It can be used, but it is much better to choose an electric power steering for the VAZ 2107
. In particular, the electric power steering mechanism from is suitable; it can be easily adapted to the VAZ 2107 without any particular difficulties.
Also, for 16,000-19,000 rubles you can purchase a special set of electric power steering for a VAZ 2107. This electric power steering for a VAZ has a fundamentally different operating scheme from a hydraulic power steering. In addition, it functions more adequately, since it does not work directly from the motor, but from its own electric motor.
Electric power steering for VAZ 2107
effectively reduces the force required to rotate the steering wheel, improves vehicle stability, especially in an emergency, relieves driver fatigue, and is reliable.
Does not require much effort for installation and maintenance. No special tools or equipment are required either, everything can be installed independently
In this case, it is important to correctly debug the operation of the speed sensor, which is installed on the gearbox.
In practice, after installing electric power steering on a VAZ 2107, its effect did not appear when it was needed: at the moment of starting to move, when driving at low speed. Normally, the electric booster began to work only after picking up speed. After debugging the speed sensor, everything began to work as it should.
The presence of an electric booster on a VAZ 2110 car allows you to improve the quality of response to changes in the angle of rotation of the steering wheel, improve maneuverability and controllability. The practice of drivers proves that with an electric booster they feel more confident.
An important advantage is that with electric assistance you have to apply less force to enter a turn and make a maneuver. This has a positive effect on a person’s condition during long trips.
Information on the types of oil required
The manufacturer recommends using Pentosin Hydraulik Fluid CHF 11S-TL VW52137, which is manufactured by the German manufacturer Pentosin Werke AG, for hydraulic power steering. But in addition to this oil, the use of many other fluids that meet the Dexron II and Dexron III specifications is also acceptable. Among these it is necessary to note such oils as:
- Motul Multi HF. It is a multifunctional and high-tech synthetic liquid that is green in color. The oil also has universal application, namely, in addition to power steering, it can also be used in various other hydraulic mechanisms. This oil helps reduce the operating noise of the hydraulic booster. This is especially noticeable at low ambient temperatures. It has anti-wear, anti-corrosion and anti-foam properties.
- Comma PSF MVCHF. It is a semi-synthetic hydraulic fluid used in power steering mechanisms. Like all similar oils, it has a green color and is resistant to harsh temperature conditions.
- RAVENOL Hydraulik PSF Fluid. This is a hydraulic oil manufactured by a German manufacturer. Fully synthetic. This oil differs from a large number of Multi and PSF fluids in its color, since it has a red tint, like many ATF oils. It also has a high viscosity index and high resistance to oxidative processes. It uses hydrocracking base oil as a base, supplemented with polyalphaolefins and a special additive package. According to the manufacturer, this oil has high thermal resistance, which ensures proper operation of the hydraulic unit at temperatures down to minus 40 degrees.
- LIQUI MOLY Zentralhydraulik-Oil. This hydraulic fluid is green in color. The oil is a fully synthetic product with a zinc-free additive package. Oil development was carried out by German specialists.
- Mannol Dexron III Automatic Plus. Universal all-season gear oil. It has a red tint, which is also characteristic of all Dexron and Mercon liquids. Thanks to the presence of carefully selected additives and synthetic components, this oil has the best frictional properties when changing gears (if used in a transmission system), as well as excellent low-temperature characteristics, high antioxidant and chemical stability, which is also important for hydraulic power steering. In addition, the liquid is endowed with good anti-foaming and air-displacing properties. According to the manufacturer, this hydraulic fluid does not chemically destroy any sealing materials, but as it turned out in tests, the oil can cause corrosive processes on elements made of a copper alloy.
- Mobil ATF 320 Premium. This product is a mineral oil used in automatic transmissions and hydraulic power steering systems that require Dexron III grade oil. The liquid retains its viscosity characteristics at temperatures down to minus 35 degrees, below which freezing occurs. It is also compatible with other red oils, it is only necessary that the classification of the oils coincide. Unlike the previous oil, this not only does not have harmful effects on sealing materials, but also does not cause oxidation of various surfaces.
- Formula Shell Multi-Vehicle ATF. Gear oil made in the USA. It has the Dexron III specification, which means it can be used in hydraulic power steering. Distinctive features of this oil are its rather modest and affordable cost, as well as balanced low-temperature and anti-corrosion properties, high resistance to oxidative processes and harsh operating temperatures.
- ZIC ATF DEX 3. It is a semi-synthetic liquid with a bright crimson color. In production it uses YUBASE VHVI base oil. Designed to lubricate automatic gearboxes and hydraulic power steering. It has balanced performance characteristics, excellent adhesion and increased strength of the created oil film, which together ensures reliable and effective lubrication of transmission and power steering components during operation in low and high temperature conditions. In addition to all this, this oil also has low volatility.
Operating principle
Technical characteristics and dimensions of Niva 21213;
21214; 2131. Lada 212140 technical specifications. technical characteristics of Lada 212140 The electromechanical amplifier serves to reduce the efforts made by the driver. Plus, the device allows you to actively return the wheels and steering wheel to their original position after performing a maneuver. That is, the power steering system returns the car to straight-line motion faster, which has a positive effect on safety.
The ECU is a modular design built into the steering column. The module itself includes two main components:
- Electrical unit of synchronous nature;
- Controller.
It is important for VAZ 2110 owners to install such a system if they want to use wide wheels that differ from the factory ones by several sizes. And in general, if you want to feel real comfort and enjoy driving, and not turn the steering wheel with all your might, install an electric booster. He will react to even the slightest touch.
Although this is against the rules, now you no longer have to hold the steering rim with both hands. The car will become more than obedient and controllable when moving with one hand.
Numerous tests have shown that cars with powertrain are safer on the roads
Technical specifications
When installing the EU on your VAZ 2110, it is important to take into account its technical characteristics. The node has certain requirements in this regard
Therefore, for the “ten” you should choose a device that corresponds to the parameters specified in the table.
| Parameter | Index |
| Maximum torque compensation | |
| Amount of current consumed (at Mmax 35 Nm and steering wheel rotation speed of 360 degrees in 1 sec) | |
| Operating temperature range | from -40 to +85 degrees Celsius |
| Unit weight | 9.5 kilograms |
| Electronically controlled motor | Inductor reactive |
| Direction of rotation | Reversible |
| Number of phases | |
| Worm gear | With three passes |
| Worm shaft | Made from 40X steel |
| Worm wheel | Made from carbon fiber grade UPA 6/30-2 |
After familiarizing yourself with the specified parameters, you can choose the electric booster that suits your car. Do not forget that this is an electrical unit, so you should work with it very carefully.
Installation benefits
If you decide to install a modern electric booster on your VAZ 2110, you need to find out in advance what benefits you will receive from such manipulation. This will further convince you of the correctness of the decision.
- Installation does not require extensive experience or knowledge. Do it yourself in a few hours of work.
- The unit requires a small amount of electricity to operate. This will not negatively affect the condition of the battery or other components of the car.
- EU has no negative impact on the environmental friendliness of exhaust.
- Positively affects parametric indicators.
- Does not require complex and regular maintenance during operation. Install it and enjoy the comfort.
- Under low-temperature conditions, the electric booster works better than the hydraulic booster.
Some people believe that the operation of the electric booster is slightly weaker compared to the hydraulic booster. But in practice and on our roads you will not feel this. Therefore, this only drawback is more than controversial.
From what year is the gyroscope installed on the field?
This article will be of interest to owners of Nivas produced before 2007. After 2007, they began installing power steering on the Niva from the factory; until 2007, they thought that it was not needed. Having driven a VAZ 21214M with power steering, now I can’t even imagine how you can drive without it; after all, the steering wheel on the Niva is quite heavy. I decided to look into the issue of installing power steering. I analyzed the information on the Internet and came to the conclusion that there are 2 ways to solve this problem. The first is the installation of a hydraulic booster, the second is the installation of an electric booster.
Power steering. Two types of hydro boosters can be installed on the old-style Niva. The first is from Chevrolet Niva with a ZF gearbox, and the second is Russian-made with a specially designed one for Niva 2121-213. During installation and observations, we can say that the fundamental difference in these G/amplifiers is that in the latter, the gearbox housing is steel, not cast iron, and should better withstand shock loads (they are often installed on vehicles prepared for “active off-road”), as well as the bipod is more everted, but so far there have been no complaints about any of the guru designs, as the companies that install them claim.
True, it is necessary to note the difference in the installation of these structures. The Russian-made hydraulic booster is heavier. In the case of installation on a Niva 2121, it is often necessary to change the vacuum booster and its bracket on the 214th or Sh/Niva model, because Gur does not become otherwise.
Brief technical characteristics of the ZF NIVA hydraulic booster Full steering speed 2.9 Screw gear ratio 14.5 Operating pressure 85…100 MPa Volumetric flow 6 l/min Maximum oil temperature 120 degrees C Total oil volume in the system 1 liter Oil tank volume 0 .4 l
A hydraulic booster for Niva costs between 27,000 and 31,000. The kit contains everything necessary for installation, including instructions.
If you are a technician, then I think you can easily figure out how to install it; in extreme cases, there are detailed instructions on the Internet with photographs for installing it, but just in case, I copied the procedure for installing the power steering at the end of the article. If you don’t want to bother installing it, then installing it in the service costs about 5,000 rubles.
Electric power steering. Electric power steering is an original steering column consisting of: a steering column, an electric motor, a worm gear, and a control unit. Electric power steering, in my opinion, is easier to install, and its cost ranges from 14,000 to 17,000 rubles. This is what it looks like.
After installation on the car, it visually looks something like this:
Advantages over the hydraulic booster (according to the manufacturer): • Manufacturability of installation - the EURU is mounted in one unit on the car without intruding into the engine compartment. • Reliability - there are no components inherent in hydraulic boosters (hoses, pulleys, fluids). • Environmental friendliness. • Energy saving, lower fuel consumption from 5% to 8% - the EURU operates only when the steering wheel is turned and mainly in parking and low-speed modes. • Information content - EURU ensures an increase in steering effort with increasing vehicle speed. • Price - EURU is 1.6 times cheaper than a hydraulic booster.
Main technical characteristics of the EURU: • Supply voltage (nominal) - 12V; • Maximum compensating moment from 35 to 42 Nm (corresponds to a decrease in steering force from 22 kgf to 3.5 kgf); • Maximum current consumption is 55A; • Weight of the electric mechanism is 10.5 kg.
We install the hydraulic booster ourselves
Electrical diagram of VAZ 21213 Niva carburetor
Now let's proceed directly to the description of the installation of power steering on the Niva. First, we dismantle the car steering wheel by unscrewing its central nut. We do all this using a special puller. Together with the steering wheel, we remove the universal joint. We save the parts that secure the latter; we will use them to secure the hydraulic booster. In order to install the power steering, you will need to loosen the fan belt and secure it to the hub.
We fill the system: remove the oil tank cap, fill the oil to a certain level. Next, turn the steering wheel from one extreme position to another with the engine not running. Thus, we remove air from the system. When pumping, you must either hang the front wheels or disconnect the steering rod from the bipod. After this, you can start the engine. At the same time, add oil to the reservoir. Try to pour it at a rate of 5.5 liters per minute so that air does not get into the suction line. You can judge whether air has entered the system by the state of the oil in the tank: if it begins to foam, it means that air has nevertheless entered the line. In this case, it is necessary to turn off the engine and let the oil settle for about twenty minutes until bubbles stop appearing.
We inspect the hoses, if we notice damaged ones, we replace them with new ones. We start the engine and let it run for about twenty seconds, bleed the power steering system. We turn the steering wheel from lock to lock, which expels air from the system. We do this three times in each direction; we do not hold the steering wheel in the extreme position for more than 5 seconds, so as not to overheat the oil.
Operating principle of the hydraulic control system
Power steering for this model
How does power steering work? Its main element is a pump, which, using a belt from the crankshaft, sucks in oil and pumps it into the distributor. The latter, in turn, monitors the force applied to the steering wheel and, using a torsion bar (follower device), helps turn the drive wheels. When moving in a straight line, the torsion bar does not twist, so the distributor channels are blocked and the oil drains back into the reservoir.
Power steering is most often useful when parking and turning, making the work of your hands three times easier. We can also say that the mechanism weakens the transmission of microshocks from the road surface to the steering. The mechanism is also useful in case of a sharp drop in tire pressure. The disadvantages of power steering include the fact that it interferes with “feeling the car”, so designers need to achieve a compromise between informativeness and tightness of the steering wheel.
Foreign manufacturers conduct a lot of research in order to make the hydraulic booster light at low speeds and elastic at high speeds. To do this, German hydraulic boosters from ZF are equipped with pressure modulators, which limit the oil pressure in the operating circuit as speed increases. In addition, circuits with power steering driven by an electric motor are acceptable, which makes it possible to change the pump performance in accordance with the rotation of the electric drive. Sometimes the gear ratio is also changed.
Drawings of fastenings for an injection Niva with power steering (VAZ 21214)
Wiring diagram for VAZ 21213 Niva carburetor with description
The author of the design proposes to move the generator to the place of the power steering, having previously installed the following bracket in its place:
Belt 1220 mm profile “A” (ZIL157), wedge angle 40 degrees. High pressure pressure hoses have a length at the centers of the fitting holes of 1450 mm. Return sleeve – 1115 mm. You will have to cut a hole for the hoses in the right protective casing. The belt is 710 mm long, other dimensions are the same. The photo on the left shows the hydraulic pump bracket, on the right - the power steering in the new location.
Drawing of its bracket:
Turn the power steering pump upside down. Result of moving the generator to the top:
There are ready-made kits for moving the Niva generator upwards on sale, but the price for a piece of iron can be greatly inflated. Thus, by making such a bracket ourselves, we extend the service life of the generator and save money.
Lada 4×4 3D › Logbook › Installation of power steering and steering column from Chevrolet Niva in 21213
I matured on power steering for a long time. Last winter, this is where I twisted the steering gear
It’s not legible in the photo, but I bought a complete set from shnivy: gearbox, pump, steering column, steering wheel, steering column switches, casing. This whole epic cost me 12 thousand everwood.
Also originally purchased: 1. Power steering pulley for the crankshaft + spacer sleeve + nut 2. Steering gear boot for the engine shield from 21214 3. Power steering reservoir bracket 4. Gearbox bolts M10*1.25*160 5. Dextron 3 - 2 liters
Since there was no way to install it myself, my garage is very cramped and cold, so I went to troshin1 in Remzon 4x4 for installation. A proven person, he always does things efficiently and conscientiously. I don’t trust my field to anyone anymore.
The gearbox was removed, completely dead
The engine shield was not cut out according to the template circulating on the Internet, but it was perfectly cut according to the boot.
From the inside, everything was immediately reinforced with a plate and boiled
The second task was to strengthen the bushings in the spar. They picked out the spar, but it was all sick. I had to perform an execution on him
Because I have to move the generator, and in general, in order to separate the generator/pump and power steering pump to different belts, it was decided to install the pump in the regular place of the generator. To do this, I had to invent a bracket and order a custom high-pressure hose. We ordered a length of 1450mm (center-to-center from fitting to fitting) according to the murzilka from Niva-FAQ
The belt was selected according to the fact. This one came up
To install the steering column, we had to splice the old mounting platform from 21213 with the platform 2123, and also install a telescopic driveshaft. No photo unfortunately.
I took a ride. ***. How did I live without power steering? 31 Silvera, with tea leaves, and with one finger? Cool! Thanks to Alexander for the work. Without removing it, this installation took 3 working days!
It remains: 1. Buy a reinforced pendulum. I'm leaning towards the product from Dima-Nivovodets. Can anyone else recommend travel products? 2. Reinforced steering rods. Vlad Bochkov has powerful ones, but the price is of course wow. I read somewhere a topic about tips from Hilux (by the way, Vlad has a line of ends similar to them + powerful bushings) Or is it stupid to install a hexagon and ends from 2101? Who can recommend something smart?
Source
We install the hydraulic booster ourselves
Now let's proceed directly to the description of the installation of power steering on the Niva. First, we dismantle the car steering wheel by unscrewing its central nut. We do all this using a special puller. Together with the steering wheel, we remove the universal joint. We save the parts that secure the latter; we will use them to secure the hydraulic booster. In order to install the power steering, you will need to loosen the fan belt and secure it to the hub.
We fill the system: remove the oil tank cap, fill the oil to a certain level. Next, turn the steering wheel from one extreme position to another with the engine not running. Thus, we remove air from the system. When pumping, you must either hang the front wheels or disconnect the steering rod from the bipod. After this, you can start the engine. At the same time, add oil to the reservoir. Try to pour it at a rate of 5.5 liters per minute so that air does not get into the suction line. You can judge whether air has entered the system by the state of the oil in the tank: if it begins to foam, it means that air has nevertheless entered the line. In this case, it is necessary to turn off the engine and let the oil settle for about twenty minutes until bubbles stop appearing.
We inspect the hoses, if we notice damaged ones, we replace them with new ones. We start the engine and let it run for about twenty seconds, bleed the power steering system. We turn the steering wheel from lock to lock, which expels air from the system. We do this three times in each direction; we do not hold the steering wheel in the extreme position for more than 5 seconds, so as not to overheat the oil.
Changing the power steering fluid in a Niva Chevrolet
At the moment, almost all modern car models are equipped with power steering.
It allows you to simplify wheelbase control and make it easier. This is especially true for a car like the Chevrolet Niva, which belongs to the SUV class. The Niva's mass is one and a half tons, and in off-road conditions it is required that the wheels react sharply to turning the steering wheel. Also, the need to add fluid to the steering wheel on a Chevrolet Niva can be determined by its external condition. It is believed that the power steering is refilled once by the manufacturer and does not require replacement during further operation. But if there is damage to the steering rack, oil and dirt may enter the system.
As a result, traces of contamination can be seen in the expansion tank. Also, power steering fluid, like all fractional mixtures, can form a sediment of components over time, which affects its quality and requires replacement. In practice, it is necessary to change it every six years, regardless of its condition, since the temperature difference between winter and summer negatively affects its condition.
- 1 Types of liquid used
- 2 Bleeding the power steering system
We install the amplifier on the Niva ourselves
Power steering is not installed on all Niva cars as standard, so almost all Niva drivers strive to improve their car with the help of this useful unit. You can buy both the German and Russian versions, which are best installed in a workshop if you do not have significant experience in auto repair to do it yourself. The cost of parts is about 25-27 thousand rubles; for work at a service station they can charge about 8-10 thousand rubles.
The general scheme for installing power steering on a domestic Niva is as follows:
- Remove the negative terminal from the battery (key set to “10”).
- Remove the mounting bracket from the spare wheel and the wheel itself.
- Disconnect the tubes/wires from the washer motors and remove the washer reservoir.
- For injection options, remove the fuel filter from the left mudguard without disconnecting the fuel supply hoses (with a socket wrench set to “10”).
- Using a Phillips screwdriver, remove the lower and upper steering shaft housings.
- Remove the harness blocks from the wires from the three-sacrum switch, ignition, emergency lights, and brake signal.
- Using socket wrenches and wrenches set to “13”, unscrew the bolt that secures the end of the intermediate driveshaft.
- Using a chisel, hammer, socket wrench “13”, free the Niva from the shaft bracket (steering wheel), steering wheel and intermediate driveshaft.
- Using a wrench and a socket wrench set to “13”, unscrew the bolt securing the upper end of the propeller shaft and remove the latter.
- Remove the rod from the vacuum brake booster by removing the mounting bracket (done with pliers and a flat-head screwdriver).
How the part is located on the car
To install power steering, you need to make some changes to the engine. To do this, a mounting bracket from the power steering pump is installed on the cylinder block, the marking of the center of the side hole is determined, and a threaded hole with a depth of strictly 12 mm is made. Then the nut securing the pulley on the crankshaft is unscrewed (with 4th gear engaged and the hand brake on). For injection options, the module (ignition) bracket needs to be adjusted. To do this, the coil block is unscrewed from the bracket and its eye is bent using a vice and a hammer in a certain way.
Installation of hydraulic booster on Niva
Installing the hydraulic booster on our Niva took several hours.
The installation kit contains detailed instructions, more precisely, an operation card indicating the sequence of actions, the necessary tools, tightening torques for fasteners and templates for marking the required holes. There is no need to present it here. The most labor-intensive part—cutting holes in the front panel and modifying the bipod—is accessible even to a beginner. But the result! The car with hydraulic booster was transformed so much that all doubts about the feasibility of this acquisition immediately disappeared. Off-road driving has become no longer a struggle with obstacles, but fun. The steering wheel is so light that in the first minutes of movement it seems that the shaft has broken or the bipod pin has burst. The amplifier operates completely silently. You get used to good things quickly, and now, after our Niva, even front-wheel drive VAZs seem prohibitively difficult to drive. The power steering installation kit 21.3400012 is supplied with detailed instructions, and even a beginner can install it on a car.
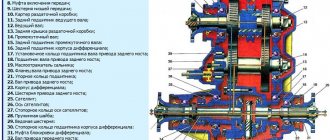
Explanations for the pictures: The steering wheel and spool are turned to the right:
- torsion;
- spool;
- screw;
- balloons;
- piston nut;
- sector;
- tank;
- pump;
- spool body.
The feasibility of installing EUR and power steering
Does it make sense to install an electric or hydraulic booster on your car? The only, but most important thing that such an installation can provide is to provide more comfortable driving. But you need to take into account that installing such a system is a rather complicated task that not everyone can handle.
At the same time, its cost is quite high, and if you cannot install the unit yourself, you will also have to pay a substantial amount for installation. Therefore, you need to decide whether it is profitable for you to install an amplifier from an economic point of view (the author of the video is Gennady Martynyuk).
Detailed instructions for installing electric power steering on a Niva
The procedure for installing the EUR with your own hands is as follows:
- First you need to disconnect the battery.
- Then the plug is removed from the steering wheel, the fixing nut is unscrewed, and the steering wheel itself is dismantled. You also need to unscrew the four screws and remove the plastic cover.
- The mounting bolts are unscrewed and the instrument panel is dismantled. Disconnect the steering column switch plug, unscrew the bolt that secures it, and then remove the device.
- Then the ignition switch wiring is disconnected, the device itself is removed, to do this, unscrew the two mounting screws and turn the key to position I.
- The next step is to dismantle the steering column; to do this, you need to unscrew the steering shaft screw, as well as several mounting screws and nuts. Please note that Nivas use screws with shear heads, so the best option would be to apply notches using a chisel and unscrew them with pliers. Next, the column itself must be lowered down and then dismantled.
- After this, unscrew the nuts on the mounting blocks with fuses and remove them. Also remove the relay cover located under the instrument panel.
- The interior and engine compartment are separated from each other by a partition; it has an elastic plug, which must be removed. The EUR wire is pulled through the hole. Make sure that the installed wire does not come into contact with moving components of the wiper motor.
- Under the dashboard itself, to the left of the steering wheel, there is an 8-pin connector, two gray wires are connected to it. The yellow-blue one from the EUR should be connected to this connector. Then, to the red block, which comes from the tidy, you need to connect the orange and blue-pink wires from the electric amplifier. Here, behind the instrument panel, you can find a ground bolt; you should connect the minus to it.
- An amplifier bracket is installed under the tidy; the wiring from the ignition switch should be threaded into it.
- Next, an intermediate shaft should be installed on the splines of the amplifier itself; remember that a ground should be connected to it in advance. The shaft itself should be securely fixed to the steering gear shaft and the EUR should be attached to the bracket. The shaft must not be pinched or too tight.
- The assembly itself is fixed to the plate using two bolts and two studs; it is advisable to install nuts under them.
- Next, the power and information connectors are connected to the amplifier.
- In fact, the installation procedure can be considered complete. Now you need to reinstall the ignition switch and steering column switch. To install the steering column trim, it will need to be cut, for example, with a hacksaw. The steering wheel and dashboard are put in place. Then the wiring is pulled from the EUR to the battery. Please note that in the existing plug in the partition between the engine compartment and the passenger compartment, it will be necessary to increase the size of the hole. Perform a functional check of the equipment and check all connections again.
Power steering for Niva VAZ-2121 21213 21214 2131
We will install power steering on a VAZ 2121 Niva. Before we get started, let’s figure out why power steering is needed in the first place. First, power steering provides sufficient stability in the event of a sudden drop in tire pressure. Secondly, it increases dynamic cross-country ability in extreme conditions. Thirdly, it reduces the force on the steering wheel by three times, that is, it becomes easier to turn the steering wheel.
So, we have figured out that power steering is really needed in a car, let's begin installation on the Niva. First of all, we remove the car steering wheel, unscrew its central nut, this is done using a special puller. The steering wheel is removed complete with the universal joint. We will use the fasteners of the latter to install the RM power steering. To install the power steering pump we need to loosen the fan belt. Next, remove the fan, place a fan spacer under it and secure it to the hub. To fill the system, remove the oil tank cap and fill it with oil to a certain level. We turn the steering wheel from lock to lock, while the engine remains not started. This way we get rid of air in the tank. When pumping, hang the front wheels or disconnect the steering rod from the bipod. Then we start the Niva engine, at the same time adding oil to the tank. It is recommended to fill the oil at a rate of at least 5.5 liters per minute, this will prevent air from entering the suction line. If the oil in the tank begins to foam, this indicates that air has entered the system. Immediately turn off the power unit and let the oil sit for 20 minutes until bubbles stop appearing.
We inspect the connections of the hoses to the units and, if damage is detected, we replace the hose fragment. We let the Niva engine run for 20 seconds and bleed the power steering system, then we remove residual air from the PM, this is done by turning the steering wheel from lock to lock, without stopping at the extreme positions, three times in each direction. We close the tank with a lid and tighten the lid nut by hand. During further operation, it is best not to hold the steering wheel in the extreme position for more than 5 seconds, otherwise the oil may overheat and, as a result, the power steering pump may fail. If, however, the power steering pump fails, as well as in the event of damage to the hose or pump drive belt, when towing a Niva with the engine not running, the RM can only be used for a short time until the breakdown is repaired. Prolonged use of the steering mechanism with a faulty power steering can lead to its premature wear. The power steering pump must be periodically inspected and serviced. The flow and safety valves are flushed if they are dirty. This is done as follows: unscrew the plug above the pump outlet, pull out the spring and spool of the flow valve, at this time put the plug in place to prevent oil from leaking, wash the spool and safety valve. Assembly is carried out in reverse order.
The feasibility of installing EUR and power steering
Does it make sense to install an electric or hydraulic booster on your car? The only, but most important thing that such an installation can provide is to provide more comfortable driving. But you need to take into account that installing such a system is a rather complicated task that not everyone can handle.
At the same time, its cost is quite high, and if you cannot install the unit yourself, you will also have to pay a substantial amount for installation. Therefore, you need to decide whether it is profitable for you to install an amplifier from an economic point of view (the author of the video is Gennady Martynyuk).
Modification of parts, installation of pumps and hoses
The bipod for the power steering should also be modified. Using a circular electric saw, it is cut off by 3-5 mm in part of the front stop, placed on the lower shaft of the power steering bipod, a lock washer is installed, the fastening nut is tightened, and the nut is locked by bending the antennae of the lock washer.
The power steering assembly with bipod is installed with the steering wheel in the middle position, when the mark on the end of the steering shaft (hydraulic booster) coincides with the corresponding mark on its body. The amplifier is located on the spar using three bolts from the kit, the nuts are tightened with a force of about 35-45 Nm (you will need a wrench and a socket head “17”, a torque wrench). Next, the junction of the car body and the hydraulic booster is sealed with silicone or polyurethane foam. The ball pins from the steering rods are returned to the holes in the bipod, tightened with castle-type nuts and secured with cotter pins.
Buy only original parts
Installation of the power steering pump begins with installing the drive pulley and securing it with a special bushing to an extended nut. Next, the power steering pump bracket is installed, the cylinder head is secured through the upper platform of the bracket, and the pump itself is installed. A V-belt is put on the pump drive pulley on the crankshaft, as well as the pump pulley, which must be tensioned by moving the pump through the grooves of the bracket and tightening the fastening bolts to a torque of about 22 Nm.
Video “How power steering installed on a Niva works”
In the video below you can watch how a self-installed power steering works (the author of the video is Vladislav Mantula).
Niva is an excellent domestic SUV that can compete with modern jeeps. VAZ 21214 received a durable body, a powerful power plant and a reliable suspension. Like any car it has its drawbacks. These include the location of the generator - the unit is installed in the lower part of the body. When testing for strength in forest and mountainous areas, dirt, sand, and water get into it. Another unpleasant point is that coolant constantly drips onto the unit.
The problem can be solved by moving the generator upstairs.
After reading this article, you will learn:
- What is needed to move the generator upstairs. How does the process work for cars with and without power steering? Is it worth buying a new unit for VAZ 21214.
Study this drawing carefully. The author decided to make a bracket for moving the generator with his own hands. The part is made of metal, the thickness of which should be 4 mm, and the width and length should be 80 mm. To assemble the bracket, you will need parts from other domestic cars:
- Belt 6РК1290; Adjustment bar; Crankshaft pulley from tens.
Photo, details of the manufactured bracket 21214:
As you can see in the photo, the standard fan is installed on a pump pulley from GAZ 3110, we also take a crankshaft pin from 2110 and a 6RK1290 brand belt. The generator should be located on the top left side. It must be attached to the top using an M8 cylinder head bolt; at the front, a standard bolt and studs are used. For fixation, the bracket must be secured with an additional lock nut.
Installation of injection (injector) on a carburetor engine.
Installation of injection (injector) on a carburetor engine.
Post by Alex_P » 25 Feb 2011, 21:10
About conversion to injector
Two years ago, when my first stock engine died with a mileage of 199,000 kilometers, it was decided to convert it to an injector.
Let's immediately decide on the + and - the main ones, of course. (I won’t describe everything).
The advantage of an injector for sports is that the Niva does not lose torque when driving through mud, as does the carburetor. Everyone has noticed that when driving onto slightly muddy ground, you have to step up the gas pedal so that the speed does not drop or switch to a lower speed. In addition, it is possible to more accurately adjust the firmware to the characteristics that the owner needs, such as the torque curve, power, ignition timing.
For me, there is only one minus - the high cost if assembled from new parts and not used ones. With a used one, the price drops +/- 2 times.
And now, in order: What is required for this?
Gear retainer (distributor plug) 21214-1011371-00 O-ring 21214-1011384 Fuel pump plug 21214-1002046 Front cover 21214-1002060 Cylinder head 21214 21214-1003011-00/21214 -1003008-00 Chain shoe 21214-1006090-01 Crankshaft sprocket 2123- 1005030 VAZ-2123 oil pump sprocket 2123-1011220 VAZ-21214,2123 camshaft timing sprocket 2123-1006020 VAZ-2123 throttle pipe SB 21230-1148010-00 Crankshaft position sensor 2112-38 47010-03 Mass air flow sensor 21083-1130010 /10/ 01 2112 Speed sensor Cooling temp sensor. liquid 2112-3851010 /-02 /-05 Knock sensor 2112-3855010-01 /020-01 Hose fuel filter interauto 2123-1104226 Oxygen sensor 2112-3850010-20 Front fuel pipe interauto 21230-1104013-00 Fuel pipe front drain interauto 21230 -1104054-00 Fuel drain PIPE 2123 interauto 21230-1104057-00 Intake manifold 2123 Receiver 2123 Front drain hose interauto 2123-1104210 Injector ramp interauto 2123-1144010-11 Drain hose interauto 2123-110 4220 Exhaust manifold 2123 Fuel pump 3110 0 580 464 038 Controller 2111-1411020-61 / JANUARY-5.1 (261.3763-02) ECM wiring harness 2115-3724026-50 with oxygen sensor. Exhaust pipe 21214-1203010-11 Cylinder head gasket 21213-1003020-11 Ignition module ATE-2 2112-3705010 /01 /02 Timing chain 21214-1006040
Injector harness - I don’t remember which one I installed. But you can select one from the same controller from catalogs.
I want to say right away that in the list you can use the controller January 2112-1411020-41.
And with the replacement of the wiring, you can set January 7
Just a couple more points. Fuel rails are different - with and without return. I chose with return, since I did not install a pump in the tank. And I installed a pump from the Volga outside.
The nuances of adjusting the steering wheel position
As for the adjustment, it is usually performed if the driver is not satisfied with the height position of the steering wheel. To adjust the EUR, you need to grind off the edges of the shaft to the required dimensions or install a gasket between the mechanism body and the plate.
Price issue
As for the price, it depends on the type of amplifier, as well as the store where the kit is purchased. The cost of an ESD kit today averages about 27-32 thousand rubles. As for the hydraulic booster, on average the installation kit will cost the buyer from 31 to 40 thousand rubles. You can assemble a power steering system from different parts from different cars, for example, install a column from an Opel or Nissan, and a pump from a BMW or other car models. But you will have to tinker, since you will need to perform more than one alteration.
Loading …
Detailed instructions for installing electric power steering on a Niva
The procedure for installing the EUR with your own hands is as follows:
- First you need to disconnect the battery.
- Then the plug is removed from the steering wheel, the fixing nut is unscrewed, and the steering wheel itself is dismantled. You also need to unscrew the four screws and remove the plastic cover.
- The mounting bolts are unscrewed and the instrument panel is dismantled. Disconnect the steering column switch plug, unscrew the bolt that secures it, and then remove the device.
- Then the ignition switch wiring is disconnected, the device itself is removed, to do this, unscrew the two mounting screws and turn the key to position I.
- The next step is to dismantle the steering column; to do this, you need to unscrew the steering shaft screw, as well as several mounting screws and nuts. Please note that Nivas use screws with shear heads, so the best option would be to apply notches using a chisel and unscrew them with pliers. Next, the column itself must be lowered down and then dismantled.
- After this, unscrew the nuts on the mounting blocks with fuses and remove them. Also remove the relay cover located under the instrument panel.
- The interior and engine compartment are separated from each other by a partition; it has an elastic plug, which must be removed. The EUR wire is pulled through the hole. Make sure that the installed wire does not come into contact with moving components of the wiper motor.
- Under the dashboard itself, to the left of the steering wheel, there is an 8-pin connector, two gray wires are connected to it. The yellow-blue one from the EUR should be connected to this connector. Then, to the red block, which comes from the tidy, you need to connect the orange and blue-pink wires from the electric amplifier. Here, behind the instrument panel, you can find a ground bolt; you should connect the minus to it.
- An amplifier bracket is installed under the tidy; the wiring from the ignition switch should be threaded into it.
- Next, an intermediate shaft should be installed on the splines of the amplifier itself; remember that a ground should be connected to it in advance. The shaft itself should be securely fixed to the steering gear shaft and the EUR should be attached to the bracket. The shaft must not be pinched or too tight.
- The assembly itself is fixed to the plate using two bolts and two studs; it is advisable to install nuts under them.
- Next, the power and information connectors are connected to the amplifier.
- In fact, the installation procedure can be considered complete. Now you need to reinstall the ignition switch and steering column switch. To install the steering column trim, it will need to be cut, for example, with a hacksaw. The steering wheel and dashboard are put in place. Then the wiring is pulled from the EUR to the battery. Please note that in the existing plug in the partition between the engine compartment and the passenger compartment, it will be necessary to increase the size of the hole. Perform a functional check of the equipment and check all connections again.
Electric power steering on a VAZ 2109: do-it-yourself installation, which power steering is suitable, LuxVAZ
Diagram and location of the fuse box Niva VAZ-21213 and 21214
It has become fashionable to install electric power steering on the VAZ 2109. Many motorists believe that life is not life without an EUR. This traction is understandable, driving with power steering is a new level of comfort.
This statement is especially true in large cities densely packed with cars. Parking in a cramped courtyard of a high-rise building late at night in the dark under the critical comments of your neighbors is quite difficult if you have not installed electric power steering on your VAZ 2109. Try to cope without power steering in a dead traffic jam, when a slightly more promising space has become available in the next row and you need to turn it out faster than your neighbor turn the steering wheel to the right all the way, turn it back 15 centimeters, turn the steering wheel all the way to the left, move it forward 20 centimeters, turn it again, turn it back again, turn it out again and drive into the vacant space under the competitor’s nose.
The intensity of automobile life in megacities has recently led to a change in the rules. Just 3-5 years ago, the phrase “I bought a car” meant purchasing a car without power steering. And recently, this means purchasing a vehicle with such additional equipment.
Power steering device
We can say that the “seven” is equipped with the simplest type of power steering. It contains several basic elements that make it easier to control the car:
- Hydraulic pump mechanism. It is through the cavities of the pump that an uninterrupted supply of working fluid is carried out and the necessary pressure is created.
- Steering gearbox with distributor. This device is designed to ensure the passage of air flow. The air directs the oil in two directions: into the cylinder cavity or in the return direction - from the cylinder to the tank containing the working fluid.
- Hydraulic cylinder. It is this mechanism that converts oil pressure into movements of the piston and rod, which reduces physical force when applying pressure to the steering wheel.
- Working fluid (oil). Oil is necessary for the stable operation of the entire power steering system, since it not only transmits movement from the pump to the hydraulic cylinder, but also simultaneously lubricates all components. Oil is poured into a special container and supplied through high-pressure hoses.
Typical equipment of the VAZ 2107 implies two schemes for the operation of the hydraulic booster: transmission of movement to the steering rack or to the steering shaft.
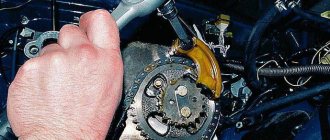
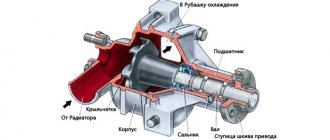
When is a pump replacement necessary?
Despite the simplicity of the design of the water pump and its high reliability, the unit is constantly in operation and malfunctions may occur with it, which are better known in advance. The weak points in the element under consideration are the oil seal and bearing. When the bearing wears out, play and noise appear, which damages the seal.
There are a number of signs that indicate the pump is worn out and needs to be replaced:
- coolant is leaking in the water pump area;
- when the power unit operates, extraneous noise appears;
- When the engine is running, play is visually observed.
The listed signs indicate wear of the bearing and oil seal. There are other less common causes of water pump failure. These include: damage to the impeller, the appearance of cracks on the body of the part, wear of the pulley or gear.
The main reasons for replacing a pump are leakage, bearing noise and play.
Technical inspection after installing the EUR on a VAZ 2107
Installing an electric booster is formally considered to be making changes to the design of the car and is an obstacle to undergoing maintenance without the appropriate certificates of conformity. It will not be possible to hide the fact that an ESD is installed on a VAZ 2107 - the device clearly manifests itself when checking the steering wheel play. This may become a basis for refusing to issue a document confirming the completion of a mandatory technical inspection.
To pass a technical inspection in accordance with the law, you need to find an official letter from the manufacturer about the compliance of this EUR model with the requirements for installation on a VAZ 2107. This letter (copy) must be taken with you when undergoing vehicle inspection.
Also, for maintenance, a document is required confirming the installation of the EUR at a VAZ-certified car service center.
If these two documents are available, the inspection station employees do not have the right to refuse to issue a certificate. In a conflict situation, you should request a written refusal indicating the reasons.
The “Russian Mercedes” or VAZ 2107 was at one time (1980s) one of the most popular domestic passenger cars. Currently, a car of this brand is a favorite object of experimentation for our car craftsmen. The main task of tuning a VAZ 2107 car is to increase safety, increase comfort, convenience, and technical parameters of the car.
This also includes modifications to the steering system. The design of the steering system of the VAZ 2107 car is built according to the worm-roller type
. This design is not able to provide the necessary force on the steering wheel and the “sharpness” of control.
Modification of parts, installation of pumps and hoses
The bipod for the power steering should also be modified. Using a circular electric saw, it is cut off by 3-5 mm in part of the front stop, placed on the lower shaft of the power steering bipod, a lock washer is installed, the fastening nut is tightened, and the nut is locked by bending the antennae of the lock washer.
The power steering assembly with bipod is installed with the steering wheel in the middle position, when the mark on the end of the steering shaft (hydraulic booster) coincides with the corresponding mark on its body. The amplifier is located on the spar using three bolts from the kit, the nuts are tightened with a force of about 35-45 Nm (you will need a wrench and a socket head “17”, a torque wrench). Next, the junction of the car body and the hydraulic booster is sealed with silicone or polyurethane foam. The ball pins from the steering rods are returned to the holes in the bipod, tightened with castle-type nuts and secured with cotter pins.
Buy only original parts
Installation of the power steering pump begins with installing the drive pulley and securing it with a special bushing to an extended nut. Next, the power steering pump bracket is installed, the cylinder head is secured through the upper platform of the bracket, and the pump itself is installed. A V-belt is put on the pump drive pulley on the crankshaft, as well as the pump pulley, which must be tensioned by moving the pump through the grooves of the bracket and tightening the fastening bolts to a torque of about 22 Nm.
The standard location of the Niva 4x4 generator is at the bottom, which cannot be called a good solution. During off-road driving, water and dirt easily get on it, or antifreeze drips, which significantly reduces its service life. To protect an important part from moisture, owners resort to modifications. Let's look at how to move the generator on the Niva up.
GUR NIVA
0:7 Contents of the article:
0:47
- Installation of the steering gearbox on NIVU
- Manufacturing a power steering pump bracket and installing an adjustable steering column from 2110 at NIVU
- Guide to installing power steering on NIVA type vehicles and its modifications
- Installing power steering from a Chevrolet Niva to the standard location of the Niva generator
- Mounting plates for power steering pump in NIVU
- GUR NIVA bracket - working on mistakes
Installation of the steering gearbox on NIVU
The lack of power steering is somehow very outdated. Especially in the future the installation of wheels of non-standard size. Therefore, immediately after purchasing the car, it was decided to install power steering. I did not consider the EUR because my steering gearbox (hereinafter referred to as RR) was leaking oil and was very loose, in general, it had to be replaced.
0:1461
The next day I bought a RR, power steering pump from a Mitsubishi Galant (80s)
0:1573
1:2078 1:9
Galant pump
1:30
That same day in the evening I came across an article on the Internet about installing such a RR in 2121, which contains a template for cutting a hole in the engine shield for this RR (since it is slightly larger than the original one). The template, by the way, is not life-size, so I had to draw it again.
1:531
2:1036
sample
2:1052
Since I work in an advertising agency, I printed a template on self-adhesive film and stuck it on the engine shield.
2:1259
3:1766
Template on film
3:1800
I cut it out using a small grinder and a drill. Use discs with a thickness of 0.8 or 1 mm, although they wear off faster than thick ones, they are a pleasure to cut; they cut very quickly.
3:2126
4:506
5:1013
6:1520
Manufacturing a power steering pump bracket and installing an adjustable steering column from 2110 at NIVU
7:2201
I bought the missing items:
7:50
1. Power steering belt 21214
7:82
2. Power steering pulley for crankshaft (includes ratchet nut and spacer washer
7:229
3. Plastic tank for power steering gas 31105.
7:290
4. High pressure hose (fortunately the hose fits both the rail and the pump, although it’s a bit long, but I didn’t have to choose.
7:501
5. 2 liters of power steering oil (there is about a liter in the system, but I spilled half of one can while I was experimenting with the steering).
7:718
8:1225
9:1732
I started by installing the pulley. I did not use a spacer washer, since with it the power steering pulley moves very far away from the main pulley. I don’t know whether this is how it should be, or whether in 21214 the main pulley has a different shape. In general, I threw out the washer, but the nut had to be modified, or rather, it had to cut the thread in it to the end, shorten it (to the width of the washer) and grind off the chamfer that should fit into the washer.
9:2446
10:506
Next is the bracket for attaching the power steering pump to the engine block. I won’t describe this, because I doubt that anyone will, like me, install a power steering pump from a Galant. I'll just attach a few photos.
10:859
The bracket was made from a plate 5 mm thick.
10:939
11:1446
12:1953
13:2460
14:506
15:1013
It needed to be painted with something, but the cans were all practically empty. in the end it turned out like this.
15:1167
16:1674
17:2181
I installed it, connected all the hoses, filled it with fluid, and turned the steering wheel. The liquid has leaked. I poured more. I started it up and a fountain of 50 centimeters came out of the tank (an unpumped system leads to this result). I added more fluid and thoroughly bled the entire system. Started it up...and HURRAY! everything is working! True, there are still some movements in the tank, in my opinion, this should not be the case, this is not the case in the UAZ.
17:660
18:1167
Guide to installing power steering on NIVA type vehicles and its modifications
This manual describes the installation sequence of the power steering, the requirements for its installation and filling with hydraulic fluid, for vehicles such as VAZ-21213, 21214, 2131 and their modifications, with injection and carburetor engines.
18:1847
1. General requirements
18:1887
Before starting installation work, check the power steering installation kit in accordance with the attached list. After installation, hydraulic system hoses must be routed freely and with small bends (with as large bend radii as possible). Sealing copper washers must be soft, i.e. in an annealed state; if necessary, additional annealing must be done by heating. Before starting work, place the car on a horizontal, level area and brake with the parking brake and additional blocks under the wheels.
18:2920
2. Preparing the car for installation of the hydraulic booster - removing the car components 2.1. Having opened the hood, remove the negative terminal from the battery (tool: wrench 10) 2.2. Remove the spare wheel and spare wheel mounting bracket (tool; socket wrench 13, socket wrench 10) 2.3. Remove the windshield washer reservoir by disconnecting the tubes and wires from the electric washer motors 2.4. For a car with an injection engine, remove the fuel filter on the left mudguard of the car by unscrewing the nuts securing it and moving it to the side without disconnecting the fuel lines (tool: socket wrench 10) 2.5. Remove the upper and lower steering shaft casings by unscrewing the fastening screws (tool: Phillips screwdriver) 2.6. Remove the wiring harness connectors from the ignition switch, from the hazard warning switch, from the three-lever switch, from the brake light switch 2.7. Unscrew the bolt securing the lower end of the intermediate steering wheel driveshaft (tool: socket wrench 13, wrench 13) 2.8. Remove the steering shaft bracket with the steering wheel and intermediate propeller shaft by unscrewing two nuts and two bolts securing it (socket wrench 13 with extension, chisel, hammer) 2.9. Remove the intermediate steering driveshaft. unscrewing the bolt securing its upper end (tool: socket wrench 13. wrench 13) 2.10. Remove the brake booster rod by removing the mounting bracket (tool: flat-head screwdriver, pliers) 2.11. Remove the master brake cylinder from the vacuum booster by unscrewing the nuts securing it and moving it up and to the side without disconnecting the brake pipes (tool: spanner 17) 2.12. Remove the vacuum brake booster by unscrewing the four nuts securing it (tool: socket wrench 13 with extension) 2.13. Remove the clutch drive cylinder and its expansion tank by unscrewing the two nuts securing it and moving it to the side without disconnecting the supply hose from the tank (tool: socket wrench 13 with extension, socket wrench 10 with extension) 2.14. Remove the pedal mounting bracket 2.15. Press the ball pins of the middle and left tie rods out of the holes in the steering gear bipod. why unscrew and unscrew the nuts securing the rods (tools: pliers, socket wrench 22 with extension, puller) 2.16. Remove the steering mechanism with the bipod by unscrewing the nuts and removing the bots that secure it to the spar (tool: socket wrench 17 with extension, socket wrench 17) 2.17. Unscrew the nut securing the bipod of the steering mechanism, having first straightened the lock washer, and remove the bipod from the steering mechanism shaft with a puller, securing the mechanism body in a vice through spacers (tool: vice, socket wrench 30 with extension, puller) 2.18. For a car with an injection engine, remove the ignition module with the bracket assembly by disconnecting the high voltage wires and the wiring harness block, and unscrewing the bracket fastening nuts (tool: socket wrench 13 with extension) 2.19. For a car with an injection engine, remove the adsorber with bracket assembly from the left mudguard by unscrewing the nuts securing the bracket (tool: socket wrench 10) 2.20. Unscrew the upper left M6 stud securing the timing cover from the front of the cylinder block, having first unscrewed the nut (tool: socket wrench 10, wrench 10) 2.21. Unscrew the M8x45 bolt securing the cylinder head from the front left (tool; socket wrench 13 with extension)
18:6008
3. Modification of the body for installation of hydraulic booster 3.1. Enlarge the hole in the bulkhead by cutting using the supplied full-size hole outline template in FIG. 1. Sharp edges and burrs should be dulled after cutting (tool: template according to fig. 1. electric drill, D9 mm drill, jigsaw, chisel, hammer, flat file)
18:633
19:1138
Note. In this article, clicking on the pictures opens their full-size versions in new windows.
19:1322
3.2. Make a groove in the pedal block bracket, marking it according to the sketch shown in FIGURE 2, blunt the sharp edges and burrs after cutting (tool: caliper, electric circular saw, flat file)
19:1708
20:2213
3.3. Touch up the primer along the contour of the edge of the hole in the front panel and the groove on the pedal unit mounting bracket (tool: brush, automotive primer)
20:301
4. Modification of the engine to install a power steering pump 4.1. Mark the center of the side hole on the cylinder block according to FIGURE. 3, installing the power steering pump mounting bracket on the block and securing it with the cylinder head mounting bolt M8x45x1.25 and the M6x25 bolt included in the kit. After marking the center, remove the bracket. unscrewing the previously installed bolts: (tool socket wrench 13, socket wrench 17, hammer, punch)
20:1104
21:1611
4.2. Make a threaded hole M8x1.25 with a depth of 12 mm in the cylinder block at the intended center, in accordance with the sketch according to FIGURE 3. Remove chips (tool: electric drill, drill D6.5, tap M8x1.25, tap handle) 4.3. For a car with an injection engine - Make a threaded hole M8x 1.25 with a depth of 12 mm in the boss of the cylinder flare, located in the center left at the top of the block, in accordance with the pattern according to FIGURE 4. Remove chips (tool: hammer, electric drill punch, drill D6.5; tap M8x1.25; tap handle)
21:2550
22:504
4.4. Unscrew the nut securing the engine crankshaft pulley, engaging 4th gear in the gearbox and the handbrake (tool: socket wrench 38, wrench) 4.5. For a car with an injection engine - Modify the ignition module bracket. having first unscrewed the coil block from the bracket, and then unbent and straightened its eye according to FIGURE 4 (tool: socket wrench 10, bench vice, hammer)
22:1223
5. Installing the bipod on the hydraulic booster 5.1. Cut off the front stop on the steering bipod by 3...5 mm according to the sketch in FIGURE 5 (tool: electric circular saw) 5.2. Install the modified steering bipod onto the lower shaft of the power steering bipod. aligning the double tooth of the spline hole of the bipod with a mark in the form of a mark on the end of the hydraulic booster bipod shaft.
22:1845
23:2350
5.3. Install the lock washer and tighten the bipod fastening nut to a torque of 140… 160 Nm. Lock the nut by bending the arms of the lock washer (14...16 kgm) (tools: socket head 32, torque wrench, chisel, hammer)
23:395
6. Installation of the hydraulic booster with bipod assembly 6.1 Set the average position of the steering shaft of the hydraulic booster relative to its extreme positions by rotating the shaft, while the mark on the end of the steering shaft of the hydraulic booster should coincide with the mark on its body. 6.2. Install the hydraulic booster onto the body side member and secure it with three bolts and self-locking nuts from the kit. Tighten the nuts of the hydraulic booster mounting bolts to a torque of 35…45 Nm (3.5…4.5 kgf) (tool: socket wrench 17, socket head 17, torque wrench; 6.3. Seal the junction of the hydraulic booster housing and the car body using polyurethane foam or silicone. 6.4. Install ball pins steering rods into the conical holes of the steering bipod, tighten with castle nuts to a torque of 45...55 Nm (4.5...5.5 kgm), cotter (tool: socket head 22, torque wrench, pliers) 7. Installation of the power steering pump and its drive 7.1. Install the pump drive pulley and the spacer bushing from the kit, secure them with a special extended nut with a torque of 110...120 Nm (11...12 kGm). In this case, the pump drive pulley and bushing are centered on the nut (tool: socket head 38, torque wrench) 7.2. Install the power steering pump bracket according to Fig. 3, install and tighten the bolts with locking washers from the kit M6x25 bolt -6...8 Nm (0.6...0.8 kgf); M8x20 bolt -20...25 Nm (2...2.5 kgf). Using an M8x50 bolt, secure the cylinder head through the upper support pad of the bracket, placing a flat spacer washer 2 mm thick under it and tightening the bolt to a torque of 35... 38 Nm (3.5...3.8 kgm) (tool: socket wrench 10, socket wrench 13 with extension) 7.3 . Install the power steering pump on the fixed bracket according to FIGURE 3, without tightening the two M12x1.75x30 bolts securing the pump with flat washers. 7.4. Place the V-belt from the kit onto the pump drive pulley on the crankshaft and onto the pulley of the pump itself. Tension the belt by moving the pump in the grooves of the bracket and tighten the pump mounting bolts to a torque of 20...23 Nm (2...2.3 kgm). The deflection of the upper branch of the pump drive belt in the middle part should be 8. . 12 mm when exposed to a force of 100 N (10 kg), if necessary, tighten the belt (tools: socket head 17. torque wrench, dynamometer, ruler, caliper)
23:4467
8. Installation of hydraulic hoses 8.1. Remove the transport plugs from the holes of the power steering, pump, power steering reservoir and hoses immediately before installing the hoses, while ensuring that dirt cannot get into the components and assemblies (tool: Phillips screwdriver) 8.2. Install a high-pressure hose, connecting it with one end to the supply hole of the pump, and the other end to the high-pressure hole of the hydraulic booster through a hollow bolt M14x 1.5 and two copper gaskets D14 mm. Tighten the connections hermetically to a torque of 37…40 Nm (3.7…4 kgm) (tool: socket wrench 17 with extension, wrench 13) 8.3. After tightening the M14x1.5 hollow bolts, make a final tightening of the nuts of the hose corner threaded ends, making sure that the hose does not bend or touch the car parts (tool: wrench 19, wrench 17) 8.4. Install the low pressure pipe D12 from the kit onto the drain hole of the hydraulic booster through a hollow bolt M16×1.5 and two copper gaskets D16. Turn the installed pipe on the hydraulic booster so that the hose with the clamp is put on. Tighten the connection hermetically to a torque of 37…40 Nm (3.7…4 kgm) (tool: socket wrench 19 with extension) 8.5. Install the low pressure drain hose D12 onto the low pressure pipe D12 on the hydraulic booster. Tighten the hose with the screw clamp from the kit to a torque of 2Km (0.2kGm) (tool: socket wrench 6) 8.6. Install the low pressure supply hose D16 onto the inlet pump pipe. Tighten the hose with the screw clamp from the kit to a torque of 2 Nm (0.2 kgm) (tool: flat-head screwdriver, socket wrench 6)
23:2895
9. Installed previously removed components and assemblies and final assembly of power steering systems 9.1. Install and secure the modified pedal unit mounting bracket in the reverse order of removal. 9.2. Install and secure the clutch cylinder, brake master cylinder and brake booster in the reverse order of removal. 9.3. Install the bracket for fastening the power steering oil reservoir so that the center of the circle of the bracket clamp is located between the main brake cylinder and the side member according to FIGURE 6, and secure the bracket with two self-tapping screws, having previously drilled two holes with a diameter of 3 mm on the amplifier of the front panel of the body (tool: electric drill, center punch , drill DZ mm, Phillips screwdriver) 9 4. Install the power steering reservoir so that the reservoir pipes are located parallel to the axis of the main brake cylinder, and tighten the bracket clamp with an M6x25 bolt to a torque of 4 Nm (0.4 kgm) (tool; socket wrench 10) 9.5. Connect the low-pressure drain hose D12 coming from the power steering to the pipe D12 of the power steering reservoir. Tighten the hose with the screw clamp from the kit to a torque of 2 Nm (0.2 kgm), if necessary, adjust the length of the hose to the location (tool: flat-head screwdriver, wrench 6) 9.6. Connect the low pressure supply hose D16 coming from the pump to the pipe D16 of the power steering reservoir. Tighten the hose with the screw clamp from the kit to a torque of 2 Nm (0.2 kgm), if necessary, adjust the length of the hose to the location (tool: flat-head screwdriver, wrench 6) 9.7. Install the intermediate steering propeller shaft from the kit on the steering shaft of the previously removed steering shaft bracket, and tighten the locking bolt with nut and locking washer to a torque of 30…33 Nm (3…3.3 kgm). Attention - the fork locking bolt must pass through the annular groove of the spline shaft (tool: socket head 13, wrench 13, torque wrench) 9.8. Install and secure, without tightening, the steering shaft bracket with the steering wheel using the bolts and locking washers from the kit, replacing the breakaway bolts. At the same time, turn the steering wheel shaft so that the steering wheel spokes are horizontal. It is necessary to ensure that the average position of the power steering shaft is maintained relative to its extreme positions, and that the mark on the end of the power steering shaft matches the mark on its housing. In this position, connect the lower fork of the intermediate propeller steering shaft to the power steering shaft. Tighten the locking bolt with nut and lock washer to a torque of 30…33 Nm (3…3.3 kgm). Attention - the fork locking bolt must pass through the annular groove of the spline shaft (tool; socket wrench 10. socket wrench 13 with extension, wrench 13. torque wrench) 9.9. Install the steering wheel with the steering column and bracket in the axial direction so that there is a gap of 2...3 mm between the plastic thrust washer and the column bearing housing. Tighten the M8 nuts for fastening the bracket to a torque of 27...30 Nm (2.7...3 kGm), tighten the M6 bolts for fastening the bracket to a torque of 7...8 Nm (0.7...0.8 kgm) of the shaft. If necessary, cut the rubber floor mat as follows. so that it does not touch the rotating parts of the intermediate steering propeller shaft (tool: socket socket 10 with extension, socket socket 13 with extension, torque wrench, shoemaker's knife) 9.10. Place the wiring harness blocks on the ignition switch, on the hazard warning switch, on the three-lever switch, to the brake light switch 9.11. Install the upper and lower steering shaft housings by tightening the fastening screws (tool: Phillips screwdriver) 9.12. For a car with an injection engine, install the adsorber with the bracket assembly in the lower part of the left mudguard in place like this. so that it does not touch the pulleys on the engine crankshaft. Drill holes with a diameter of 6.5 mm in place. Secure the adsorber with M6x20 bolts from the kit and bracket fastening nuts with washers (tools: socket head 10, socket wrench 10, electric drill, drill D6.5 mm) 9.13. Modify the windshield washer reservoir in the lower corner on the engine side by first draining the liquid from it. To modify it, you need to heat the corner of the tank with warm air from a hairdryer and, by pressing with a wooden block, deform the corner inside the tank. Try on the reservoir, installing it in place; the corner of the reservoir should not touch the power steering pump pulley. If necessary, repeat the modification (tool: electric hair dryer, wooden block) 9.14. Install the modified windshield washer reservoir by connecting the tubes and wires to the washer motors. 9.15. For a car with an injection engine, install the fuel filter on the left mudguard of the car, tighten the nuts securing it (tool: socket wrench 10) 9.16. For a car with an injection engine - install the ignition module with the bracket assembly, as shown in FIGURE 4, and screw the M8x16 bolt with the lock washer from the kit into the threaded hole previously made in the cylinder block, tighten the bolt to a torque of 25...30 Nm (2.5 ...3 kgm). Connect the high voltage wires and the wiring harness block. If necessary, retie the wiring harness (tool: socket wrench 13 with extension)
23:9354
10. Filling the power steering hydraulic system with oil 10.1. Attention - it is prohibited to start the engine without oil in the power steering hydraulic system to avoid damage to the power steering pump. 10.2. Unscrew the power steering reservoir cap and add oil to the bottom edge of the reservoir filler neck. For refueling, use ATF oil in accordance with the attached list of recommended oils. The volume of oil for refilling the hydraulic booster system is 1 liter 10.3 Place the front wheels of the car on a jack or lift, having previously braked the rear wheels with a hand brake and pads 10.4. Turn the car wheels from lock to lock several times. adding oil to the tank 10.5. If necessary, remove the remaining air from the power steering system by unscrewing the special fitting on the power steering with a wrench. After draining the liquid with bubbles, tighten the fitting (tool: spanner 10.6. If necessary, repeat the bleeding operation, adding liquid and turning the wheels from stop to stop until liquid flows out of the fitting without bubbles 10.7. Bring the oil level in the tank to the MAX mark dipstick of the tank cap, adding oil. Tighten the tank cap tightly 10.8. Lower the front wheels of the car, put the minus terminal on the battery and tighten it with a bolt (tool: wrench 10) 10.9. Start the engine and check the operation of the hydraulic booster, make sure there are no leaks from system when turning the wheels to their extreme positions, If necessary, eliminate the identified leaks and repeat the procedure for filling and bleeding the hydraulic booster 10.10. Install the spare wheel mounting bracket and the spare wheel (tool: socket wrench 13. socket wrench 10). Close the hood of the car.
23:3083
11. Recommended brands of oils for filling the power steering Attention: fill the power steering only with oils for automatic transmissions. AGIP DEXRON II D-21103 ARAL OEL RZ19 DEXRON D-20383 AVIA FLUID ATF 77 DEXRON D-20760 BP AUTRAN DX II D-20335 CALTEX TEXAMATIC FLUID DEXRON D-20139 CASTROL TQ DEXRON II D-20815 ESSO ATF DEXRON D-21 065 ESSO ATF DEXRON D-21611 SHELL DEXRON II D-20137 TEXACO TEXAMATIC 9226 D-20112 VEEDOL ATF DEXRON II D-20816 PENTOSIN CHF IIS
23:622
Installing power steering from a Chevrolet Niva to the standard location of the Niva generator
Finally, I collected all the missing parts and installed the power steering from the Chevrolet Niva. The fact that the steering wheel has become easier to turn is an understatement! Now I don't know how I drove before. Today I took it for a test drive - everything was fine. Now, even with the rear lock on, the steering wheel can be turned with your finger.
23:1245
24:1752
I installed the power steering pump in the regular place of the generator. Since my tractor has long taken root at the top. Well, now the nuances that I encountered.
24:2023
Purchased the pump, steering gear, reservoir and pump bracket
24:108
1) I had to make the pump bracket myself. 2) I purchased a pulley from GUR 21214 with a nut and spacer. 3) I selected the belt, length 670mm 4) I cut a hole for the steering gear according to the template. I foamed the excess, I didn’t have anther. 5) I trimmed the bipod so that the bolt would not interfere with full rotation of the steering wheel. 6) I ordered a high-pressure hose, it was done in 10 minutes. Length 1.1 meters. Goes under engine protection. The ends are 90 degrees. 7) Low pressure hoses Cardan between the steering wheel and the steering wheel. The car came from 21214 Niva with an electric booster, it came without any modifications.
24:1071
25:1578
26:2085
27:506
28:1011
29:1518
Mounting plates for power steering pump in NIVU
Many people buy a power steering kit from Niva Chevrolet (2123). To install the pump to the power steering bracket, you need these plates; I have never seen them on sale anywhere. Made my own. Completely repeat the factory ones.
29:1943
30:2450
Plates securing the power steering pump to the bracket.
30:83
31:590
I made it with reserve.
31:625
GUR NIVA bracket - working on mistakes
I once noticed that when the internal combustion engine is running at idle, the generator along with the bracket moves suspiciously. I turned it off, tugged at the gene, the bracket, the power steering pump, everything sits dead. I start the engine again - no change. I decided to tighten the fastening of the bracket and then everything immediately fell into place, as soon as I touched the bolt with a key, half a bolt breaks off, I touch the next one, the same crap + the same thing happens with the belt tensioner bracket on the gene. Naturally, the broken pieces remain in the block. I started to take it apart.
31:1634
32:2141
You can see a break in the cylinder head and block
32:52
33:557
I removed the radiator because I thought I would have to drill out the broken pieces, but to my surprise, even when they broke by the face, they were unscrewed by hand.
33:812
34:1319
Next, after removing the bracket, I began to find out the cause of this breakdown. Upon closer examination of all the details, it turned out that the original mounting studs for the front cover of the internal combustion engine (which I replaced with longer bolts when installing the bracket) were 6, the holes in the bracket were 8. Well, the material from which they were made played an important role these bolts. To do this, we order adapter pins M6-M8 of the appropriate length from the turner. He turned them out of a drill rod, in short, you'll break the hell out of them.
34:2231
35:506
Left: adapter studs from drill rod. right: original factory stud
35:652
We install the bracket on new studs. And in order not to remember this trouble anymore, I decided to secure the bracket with another point that was provided, but was not secured there because... When installing the power steering, I was afraid to drill the block. This point is in the distributor area, here it is:
35:1153
36:1658
Drilled, tapped and screwed in the bolt.
36:1739
Now the bracket, as it should be, is fixed at all 4 points.
36:1857
37:2364
I put everything back in place, started it up, checked it - everything is fine. I hope it lasts for a long time
37:141 37:151
https://www.niva-faq.msk.ru/tehnika/rulevoe/igur.htm, https://www.drive2.ru/l/1660949/, https://www.drive2.ru/l/1712351 /, https://www.drive2.ru/l/5100674/, https://www.drive2.ru/l/6352414/, https://www.drive2.ru/l/4230093/
37:376 next article:
NIVA steering column
Contents of the article: Strengthening and modification of the steering column for NIV Installing a steering column from 2110 in NIV
38:1164
Rating 5.00 [1 Vote]
99491
Operating principle of EUR and power steering
Before installing the amplifier in the VAZ 2121 with your own hands, let's look at the operating principle of the systems, starting with the power steering. When the steering wheel is in the central position, it is fixed using centering springs. In this position, the liquid circulates through all elements of the system, provided that the distributor is positioned correctly. In this case, the power steering pump operates in enhanced mode, which is due to the need to pump fluid through the system. Moreover, it always functions, regardless of whether the steering wheel is turning or not.
When the steering wheel is turned, the spool moves, as a result of which the element blocks the drain lines and liquid begins to flow into one of the cylinders. In this case, the piston, as well as the rod, are exposed to oil under pressure, which leads to the rotation of the wheel, as well as the housing, in a certain direction. The spool overtakes the device body when it stops moving, which indicates that the driver has completed the turning maneuver. In this case, the spool returns to its original position, and then the hose opens to drain the liquid.
As for the principle of operation of the electric power steering, the amplifier itself is mounted on the steering shaft of the vehicle. Its component parts are connected to each other using a torsion shaft, with an installed engine speed reading controller. When the driver turns the steering wheel, the torsion shaft twists, which is detected by the torque sensor. In accordance with the information received from the torque, speed and engine speed controller, the control module determines the compensation force, as a result of which it sends a command to the amplifier electric motor.
The fundamental difference between the new power steering
Dismantling and installation of a generator on a VAZ 2107
The fundamental difference between the new power steering (model 21.3400012) and the now obsolete ZF8052 is a rotary-type spool valve (manufactured by ZF) instead of a rotating spool valve. A similar design has been successfully working in the ZF8070 model on many European machines since the mid-90s. The spool-type rotary distributor significantly increases steering sensitivity because it reduces the free play of the steering wheel.
Another feature of the new product is that the steering gear housing, when installed on a Niva, requires virtually no changes to the car itself. In the future - amplifiers with an electronic control system that changes the gain depending on the speed of the car, and spools with increased force in the center (see figure).
Probably everyone knows how the standard Niva steering mechanism works and works. Over the 33 years of the “classics” existence, it has remained virtually unchanged. A little more about the new product - a steering mechanism with built-in power steering.
Its task is to catch the driver’s intention to change the direction of the car and turn the wheels to the desired angle. In fact, the driver can only move the spool with the steering wheel, and it, directing the flow of fluid from the pump, controls the movement of the piston. The piston, also known as the rack, is in mesh with a gear sector on the bipod shaft and rotates it to the right or left as needed. If the hydraulic force is not enough, the driver’s muscles will come into play - there is a thread inside the piston, and in it a screw rotates on balls, connected through a torsion bar to the steering column shaft. The same thread allows you to maintain control of the machine even when the amplifier is not working. Oil driven by the piston will be pumped through the valve, bypassing the pump.