Causes of extinguished reverse lights
A contact sensor installed in the transmission housing or inside the gear selector is used to control the operation of the lights when reverse gear is engaged.
When reverse gear is engaged, the handle closes the metal plates and supplies positive power to the lamp. When the speed is turned off, the rod is pushed out by the spring, breaking the electrical circuit.
If the reverse lights on your car do not work, the reasons are:
- The lamp protection fuse is damaged. In some vehicles, this component prevents damage to additional electronic devices. The filament burned out due to an increase in current above the rated current (for example, during a short circuit). When replacing, a fuse with identical parameters is installed; metal jumpers cannot be used.
- Broken or corroded contacts inside the shift lever position sensor. Repair of the device is not provided; the damaged switch must be replaced with a similar one.
- Damage or oxidation of wires from the contact group to the headlights. After checking the wires with a testing device, the damaged area is removed, and the connection points are protected from moisture and dirt with an insulator.
- Corrosion and burns on the wire contacts or on the sensor body. Metal surfaces are cleaned with sandpaper; in case of severe damage, parts must be replaced.
- Failure of negative power supply to the lamps installed in the rear lights. The malfunction occurs on domestic cars (for example, VAZ-2107 or VAZ-2108) due to the leaky design of the lampshades. To restore functionality, disassemble the device and check the condition of the metal jumpers.
- The lamp is faulty. If the car has 2 reverse gear indicators, in this case one lamp remains operational. To replace a light bulb, you must disassemble the light fixture or invert the plug (depending on the car model and manufacturer). After installing the new part, perform a test shift in reverse order.
Place of the switch in the light switching circuit
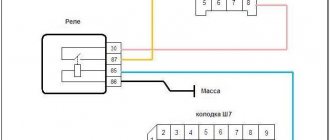
On cars with manual transmission, voltage to the lamps when reversing is supplied through a limit switch (the so-called frog), which is screwed directly into the gearbox housing. When reverse gear is engaged, the switch button is pressed inside the gearbox. The contacts inside the “frog” bridge, and current begins to flow to the lamps.
On the circuit diagram for turning on the reversing lights, we can see that on the VAZ 1118 Kalina, the current from the battery through the ignition switch (No. 2) is supplied to fuse F1. Passing through the fuse that protects the switching circuit, “+” goes to the limit switch (No. 10). The contacts are in a normally open state and close only when reverse gear is engaged. Thus, current begins to flow to the light bulbs. The second contact of the lamps is connected to the “–” battery through the common ground contact of the lamps.
On cars with automatic transmission, the role of the limit switch lies with the selector position sensor. Information about changing the location of the gearshift knob is transmitted to the engine ECU, the light control unit.
How to check the "frog"
- Remove the headlight switch chip.
- Turn on the ignition.
- Using a small piece of wire, connect the contacts of the reverse gear sensor connector to each other.
If the reverse lights are on, then the problem is in the “frog”. Some drivers disassemble the switches, clean the contacts, after which the device continues to work properly. It is up to you to judge the appropriateness of such measures. But keep in mind that on many cars (including VAZ models) the limit switch is located below the oil level in the gearbox. We recommend simply replacing the power sensor. To minimize oil loss, jack up the car on the side where the end switch is installed.
On some cars, the reversing lights do not light up due to incomplete activation of the limit switch. The problem can be solved by installing a thinner washer under the “frog”. To make sure that the switch is working, check with a multimeter in ohmmeter mode whether the contacts close when you press the button.
Checking the circuit
The essence of diagnosing the reason why the reverse lights do not work comes down to identifying the section of the circuit where the voltage is lost. To do this, you can use a regular control light. Continuity testing is done with an ohmmeter, so you need to know how to use a multimeter.
You can start checking directly from the limit switch connector. Turn on the ignition. Connect one contact of the control light to an unpainted metal part in contact with the body, and the second to the “+” connector.
- If power comes in, check the reverse sensor.
- If after installing the “jumper” in the connector the lights do not light up, then the problem is in the section of the wire circuit going from the connector to the lights. Ring the wire to the point where it divides into light bulbs on the left and right sides. Most likely, the reason is the break.
To find the pinout of connectors, light contacts, and wire colors, be sure to study the electrical diagram of your model and vehicle configuration.
Functionality check
If a malfunction is detected, the following checks must be performed:
- activation sensor;
- wiring harness.
Frog sensor
The following algorithm is used:
- Place the vehicle on a control channel or overpass.
- Stop the engine and secure the machine with the parking brake or wheel chocks.
- Check the gearbox housing, the sensor is located on the rear wall. On some models, a speed sensor is installed nearby, which transmits a signal to the electronic speedometer.
- Remove the plug from the sensor connector and check the contacts.
- Use a piece of wire or a paper clip to short out the metal parts inside the washer.
- Turn on the ignition circuit. If the wiring is in good condition, the warning lights should light up.
If the lamps come on, this indicates a failure of the control sensor, which must be unscrewed from the crankcase and replaced. If the lamps do not light up, there may be a problem with the sensor or wiring.
To check the sensor, you should use an adapted lamp, up to 12 V, installed in a socket with patch cords. The lamp is connected to the sensor terminals when reverse gear is engaged and the ignition is on. If the lamp does not turn on, replace or adjust the sensor.
Circuit integrity
To check the continuity of the circuit, use a multimeter in wire test mode. When checking the wiring, be sure to remove the lamp or remove the cover to allow access to the lamp contact area. The meter is connected to the beginning and end of the wire; a buzzer sounds when the circuit is short-circuited. You can use a test light with a power cell shorted through a wire from the sensor to the ceiling. The damaged cable should be replaced with twisted copper wire of suitable cross-section.
Adjusting the gearbox switch
On some vehicles, you can adjust the position of the sensor depending on the position of the gearshift knob. There is a lock nut on the sensor body that needs to be loosened. Then reverse gear is engaged and a warning lamp is attached to the sensor contacts. The housing is screwed into the box housing until the contacts are closed and current is supplied to the filament. The sensor is fixed in a fixed position with a lock nut, then the wire plug is connected.
If the sensor design does not provide a locknut, the position is adjusted using washers. The thickness of the pack of adjusting washers is selected experimentally with the rear rotation speed turned on. Please note that too many washers will reduce the length of the threads that secure the sensor housing to the crankcase.
In automatic transmissions, the reverse sensor is combined with a neutral or park position indicator. An additional indication is required to allow the engine to be started only when the kinematic chain is open. A similar design is used on some transmissions, and there is also a switch in the selector that cannot be adjusted.
Algorithm for setting up a short sensor:
- Remove the plug and check the pin assignment on the label or on the vehicle's wiring diagram.
- Turn on the ignition and move the selector lever to the reverse position.
- Rotate the sensor until the warning lights go out and mark the position of the sensor housing relative to the crankcase with chalk. To check this, use an externally powered indicator light connected to the inverting terminals.
- Connect the lamp to the other contacts and slowly twist the housing until the filament clicks. Mark the position with chalk on the sensor body and box body.
- Set the switch to an intermediate position between the found positions. When set correctly, the stern lights turn on when the lever is moved to the R (reverse) position and the engine can be started in the P and N positions.
Location
The location of the switch or frog largely depends not on the make and model of the car, but on the transmission with which the vehicle is equipped.
If it is a manual transmission, then the switch will be installed directly on the gearbox housing. When reverse gear is engaged, the switch button is pressed, the frog contacts are bridged, and current flows to the rear lights.
As for automatic transmissions, instead of a standard limit switch (frog), a selector position sensor is used. Depending on the change in the position of the automatic transmission handle, the corresponding signal is transmitted to the power unit control unit, which transmits it to the unit that controls the light.
How to replace reverse lights?
Replacing reverse lamps depends on the type of vehicle. For example, in a Lada Kalina station wagon, you need to unscrew 2 screws that hold the lamp in the trunk door opening. Then the housing slides out of the socket with force (the design includes additional plastic handles) and the insert is removed along with the wiring. In cars with a sedan body, to remove the lamp, unhook the valve on the trunk trim and unscrew the nuts with a long-head wrench.
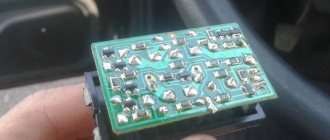
On VAZ-2105 or 2107 models, the rear light is covered with a plastic cover located in the luggage compartment. To remove the cover, unscrew the nuts and then remove the circuit board with the lamps from the lampshade. The damaged element is removed from the socket for replacement, and the condition of the tracks and contacts is visually checked. Any oxidation found must be removed.
Possible reasons
If the reverse lamps do not turn on when shifting into reverse gear, whether it is manual or automatic, you need to look for the reason.
The light must be on. This will not only result in a fine, but can also lead to a serious accident or accident.
- Sensor malfunction
. It is also a reverse switch, limit switch or frog. This controller is quite reliable and durable. But still, the possibility of its breakdown cannot be ruled out. Especially if the car was hit from behind, the headlight was broken and the lights were changed; - Burnt out light bulb
. Or maybe everything is outrageously banal. Over time, the light bulb has used up its resource, and therefore no longer works. It will have to be replaced; - Fuse
. Also, the signal may disappear if the sensor responsible for these lights burns out. This is a fuse link that burns out when the permissible voltage is exceeded. Since this fuse is responsible for several devices at once in most cars, in parallel with the reverse gear, other lamps, dashboard lights, etc. may not light; - Open circuit
. Here pins can break off, wires can fray, and more; - Oxides and corrosion
. Formed in places where the contacts of the circuit leading to the rear lights are connected; - Ground contact
. If the ground is bad, reverse gear may not function. This is also one of the reasons why the brake lights on a car do not light up.
Unlike the situation when the lamp is constantly on, there are many more potential causes.
But still, the most common problem is the failure of the reverse switch. It is also called a frog.
Checking the reverse sensor
It doesn't take too much effort to check your vehicle's reverse sensor (switch). In fact, this process can be completed in several steps.
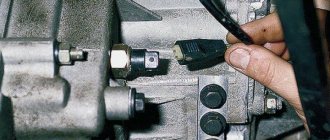
Step 1: Locate the reverse sensor location. In almost all models it is located at the bottom of the gearbox housing. In fact, there are two sensors installed there: one to measure the speed of movement, and the second is a reverse sensor. To get to it, you will need to drive into the “pit”.
This is what the reverse sensor looks like
Step 2. Once you reach the sensor, disconnect the power wires from it.
Step 3. Connect the disconnected wires to each other (connect them).
Connect the wires together
Step 4. After this, you need to turn on the ignition and “stick” the reverse gear.
Burnt out lamps
One of the most common problems is a burnt out lamp. To check this, remove the light bulb from the holder and connect it to the battery terminals with a short wire. If the light comes on, then the fault must be looked for at another point in the electrical circuit.
First, check that the light bulb socket and electrical terminals are clean and bright. If there are any signs of corrosion, clean the socket with wet and dry paper, then reinstall the bulb and retest.
A burnt out light bulb is the most common cause
If the reverse light still does not come on, the fuse may have blown. Also, everything indicates a blown fuse if two reversing lights are constantly on. In this case, a replacement will be needed. Fortunately, getting to the fuse box where they are located will not be too difficult for you.
Checking the electrical wiring
If the current does not reach the lamp socket, you should check the rest of the electrical circuit in reverse order.
- Check your repair manual for the color and route of the reversing wires.
- Probe each wire along its entire length.
- In most cases the wire will disappear into the cable where you can't reach it.
- In this case, you should be extremely careful, because you risk damaging the working wire.
- Once you have identified the faulty section of the wire, remove it and install a piece of new wire in its place.
Important! Be sure to provide high-quality insulation at the wire connection points. The quality of the insulation primarily determines the reliability of the contact and the safety of the driver. You can also eliminate the possibility of a short circuit.
Video - Reverse gear does not light up on VAZ 2108, 2109, 21099. We are looking for the reason
Because You are not logged in. To come in.
Because you are not a trusted user (phone number is not verified). Enter and confirm your phone number. Read more about trusts.
Because The topic is archived.
Why the reverse light doesn't light up - common reasons
These lighting devices, in principle, like all others that have at least some connection with the electrical part, quite often fail during the operation of the car. And there are many reasons for this; it makes no sense to consider each of them. Therefore, we will try to analyze the most common of them.
Device of a warning system about a change in direction of a car
The main reasons for failure of reverse lights:
- the light bulbs are burnt out;
- fuses have failed;
- contacts have oxidized;
- The reverse sensor has failed;
- there was a break in the electrical circuit.
In order to identify the cause of the malfunction and eliminate it as quickly and efficiently as possible, we will consider each option separately.