Front suspension malfunctions
Problems with the VAZ 2107 suspension occur due to bad roads. The first thing that suffers is the ball joints, then the struts and other elements of the shock-absorbing system fail.
Knock
Quite often, owners of the “Seven” complain about a knocking sound when driving at a speed of 20–40 km/h. Then, as you accelerate, the dull sound disappears. The area of noise is the front suspension.
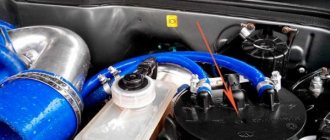
First of all, it is recommended to put the car on a lift and check how the balls, shock absorbers, and silent blocks work. It is possible that the wheel bearings are worn out.
Detailed instructions for the actions of a driver who notices a knock are given below.
- Inspect the glove compartment, elements of the instrument panel and other interior parts that may be knocking. It is also worth checking the engine protection and some parts under the hood - maybe something is loose.
- If everything is in order, you need to move on to checking the suspension.
- The first step is to check the condition of the silent blocks - the rubber bushings on both levers must be checked. Bushings knock, as a rule, when starting from a stop or sharp braking. The problem is eliminated by tightening the bolts and nuts or replacing the elements.
- Diagnose the support bearing of the shock absorber strut. Many people do this: they open the hood, put one hand on the support bearing, and rock the car with the other. If the element is exhausted, shocks and knocks will be immediately felt.
- Inspect the ball joints. The knocking of these elements is characterized by a metallic dull sound; one must learn to identify it by ear. In order not to remove the hinges, but to make sure that they are faulty, do this: drive the car into a pit, unload the front suspension, remove the wheel and insert a crowbar between the upper support housing and the axle. The mount is rocked down/up, checking the play of the ball pin.
- Check the racks. They may start knocking due to weak fastening. It is also possible that the shock absorber bushings are worn out. The stand can also make noise if it is broken and leaking - this can be easily determined by traces of liquid on its body.
Video: what is knocking in the front suspension
What's knocking in the front suspension?
The car is pulled to the side
If the car begins to pull to the side, the steering knuckle or suspension arm may be deformed. On old VAZ 2107 cars, loss of elasticity of the strut spring is possible.
Noise when turning
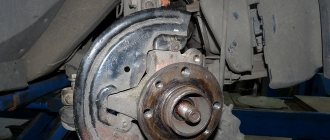
The hum when turning occurs due to wear on the wheel bearing. The nature of the noise is as follows: it is observed on one side, appears up to a speed of 40 km/h, and then disappears.
Here's how to check a wheel bearing for play.
- Place the front wheel on a jack.
- Grasp the top and bottom of the wheel with your hands and begin to swing it away from/towards you.
- If there is play or knocking, then the bearing needs to be replaced.
Eliminating knocking noises and repairing the front suspension of a VAZ 2106
The front suspension is the weak point of any car. Many owners of domestic cars are interested in how to replace the front suspension of a VAZ 2106 with their own hands. There is nothing difficult about this if you follow the instructions and use a good set of tools.
The quality of roads in our country has always not been of high quality, and it especially deteriorates after winter. After the snow melts, numerous potholes and cracks are found in the asphalt. As you know, the VAZ 2106 suspension is designed to soften vibrations transmitted from potholes on the road to the vehicle body. Over time, the chassis wears out and requires repairs, which you can do yourself.
Front suspension device for VAZ 2106
Smooth movement and maneuvering in corners depend on the front suspension of the car. Periodic inspection and maintenance are required to ensure safe driving. If while driving you hear any extraneous sounds and knocks, grinding or feel swaying - all these are signs of a malfunction in the front suspension of the VAZ 2106.
Suspension diagram
It is recommended to carry out diagnostics every 15 thousand kilometers. In this case, it is important to inspect in detail the hinges of the levers, check the condition of the lower and upper ball joints, springs and shock absorbers, as well as the levers themselves. If there are no defects, just do a wheel alignment.
How is the repair carried out?
Do-it-yourself repair of a VAZ 2106 chassis can include a wide range of works, including:
- Adjusting the bearings on the hubs.
- Replacement of grease and bearing seals.
- Replacement of front suspension shock absorbers.
- Replacing springs in pairs.
- Installing new joints on the upper and lower control arms.
- Replacement of arms, both upper and lower.
- Replacing anti-roll bar cushions on a VAZ 2106.
- Installing new upper or lower supports.
After completing all of these or one of the listed works, it is necessary to have the wheel alignment done in a specialized workshop.
Replacing the front cross member
To replace the front suspension cross member of a VAZ 2106 you will need a small set of simple tools:
- keys for 13, 17, 19 and 22;
- screwdriver;
- hammer;
- extension cords
Jumper under the hood
Having prepared all this, get to work. First, remove the lower front suspension arm from the car (we'll tell you how to do this below). It should be removed assembled with the ball joint and silent blocks. After this, open the hood, remove the carburetor air filter and cover this hole with something to protect it from the penetration of contaminants during operation.
Prepare a cross member that will be needed to support the engine in a suspended state when dismantling the front suspension cross member. The material used is an ordinary construction board 5 cm thick. The length of the crossbar should be made equal to the distance between the flanges of the front wings. In the middle of the traverse, make a hole into which a long bolt or pin with a bracket is inserted.
Supports under the cross member
Install a traverse on the flanges of the front wings of the VAZ 2106 under the hood and insert a long bolt and bracket into its hole. The latter should be connected with a bolt to the eye of the power unit. By slightly tightening the nut on the stud, you need to remove the gaps in the connections between the bracket bolt and the motor eye.
Using a socket, through the hole in the cross member on both sides, you need to unscrew the nuts holding the motor mounts and remove the nuts with spring washers. Next, place supports under the cross member and lower the car onto them so that the cross member lightly touches them.
On each side it is necessary to unscrew the horizontal and vertical bolts that secure the cross member to the side members. When jacking up the car, the cross member will remain on the supports. At this point, the process of dismantling the VAZ 2106 front suspension cross member with your own hands is completed: replace it with a new one and reassemble everything in the reverse order of disassembly.
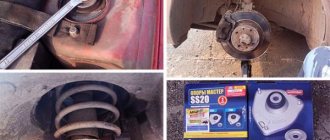
Replacing ball joints
Sometimes self-repair of a VAZ 2106 chassis requires replacement of ball joints. First you need to diagnose the element as follows:
- hang the wheel;
- place something under the lower arm;
- lower the car.
When lowered onto the stand, the lower arm will stop putting pressure on the suspension. Grab the wheel with both hands from below and above, and make several sharp movements: the top towards you, and the bottom away from you, and then vice versa. If at the same time you hear a knock and feel play in the hub and caliper in the area of the ball joints, the front suspension of the VAZ 2106 requires repair.
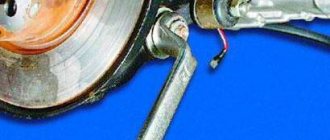
To replace, you will need a jack, a hammer and a regular set of wrenches. First you need to dismantle the wheel and unload the suspension, and then use a 22mm wrench to unscrew the nut of the lower or upper support. Give a few blows with a hammer to the protrusion of the steering knuckle, releasing the ball joint, and then release the support from the lever.
Using a 13mm wrench, unscrew the 3 nuts on the bolts securing the ball to the lever. When removing the ball from the lever, be careful. It is better to dismantle the plate along with it, not forgetting to put it in place when installing the ball joint. Don't forget that the lower and upper supports are different from each other. Assembly is carried out in the reverse order of disassembly.
Replacing the upper arm
Removing the upper arm
To replace the upper arm of the VAZ 2106 front suspension yourself, you will need keys 13 and 22, a jack, a support, and a wheel wrench for removing the wheel. To dismantle the upper front suspension arm, you must follow the instructions:
- Raise the car on a jack and remove the wheel, then place a support under the lower arm and lower the car. This is necessary to load the suspension to the point that the car is standing under its own weight. The levers will then be aligned.
- Secure the upper arm axle with a wrench and loosen the axle nut by unscrewing it until it aligns with the end of the axle.
- Unscrew the bolts that hold the upper ball joint in place, and then move the lever up a little and completely unscrew the axle nut, pulling the axle out of the lever.
- Remove the lever together with the silent blocks without dismantling them.
THIS IS INTERESTING: VAZ 2101 wipers do not work
Next, carry out all the work that required you to remove the front suspension arm of the VAZ 2106, and install it in place or replace it with a new one. The assembly process is the same as disassembly, but in reverse order.
Removing the lower arm
When a VAZ 2106 chassis is being repaired, it may be necessary to replace the lower front suspension arm. To work you will need 13 and 22 wrenches.
First, remove the front suspension spring, and then use a wrench to unscrew the two nuts that hold the control arm to the cross member. Remove it from the cross member bolts without removing the silent blocks, axle and ball joint.
If necessary, replace the ball joint or change the lever. Reinstall it in the reverse order of disassembly.
A selection of videos on repairing the chassis of the VAZ 2106
Source: https://Driving24.ru/kak-otremontirovat-perednyuyu-podvesku-vaz-2106/
DESCRIPTION AND FIXING OF THE BEAM
Structurally, the beam is a massive C-shaped structure made of two stamped steel sheets welded together. At the ends of the beam there are four studs to which the suspension arms are attached. The pins are pressed into the recesses. Above the studs are lugs with several holes. Bolts are screwed into these holes, with which the beam is screwed directly to the body of the VAZ 2107.
MAIN FAULTS OF THE BEAM
At first glance, the beam seems to be a very reliable element that is difficult to damage. In practice, the situation is different, and owners of “sevens” have to change beams more often than they would like. Here are the main reasons:
- beam deformation. Since the beam is located under the bottom of the car, stones can get into it. The driver can also hit the road with the beam if the front wheels suddenly fall into a particularly deep hole that the driver did not notice in time. Finally, the car may have incorrectly adjusted camber and toe. The result of all this will be the same: deformation of the beam. Moreover, it does not have to be big. Even if the beam bends just a few millimeters, this will inevitably affect the car’s handling, and therefore the driver’s safety;
- beam cracking. Since the beam is a device subject to alternating loads, it is susceptible to fatigue failure. This type of failure begins with the appearance of a crack on the surface of the beam. This defect cannot be seen with the naked eye. With a crack, a beam can work for years, and the driver will not even suspect that there is anything wrong with the beam. But at some point, a fatigue crack begins to propagate deep into the structure, and propagation occurs at the speed of sound. And after such a breakdown, the beam can no longer be used;
- tearing out the beam. The weakest point of the cross beam is the mounting bolts and studs of the suspension arms. At the moment of a strong impact on the beam, these bolts and studs are simply cut off by the eyes of the beam. The fact is that the lugs are subjected to special heat treatment, after which their hardness is several times greater than the hardness of the fasteners. As a result, the beam simply comes off. This usually only happens on one side. But in some (very rare) cases the beam is pulled out on both sides.
Why is it necessary to do a wheel alignment after replacing the front beam?
If it is quite possible to do the work of replacing the front beam with your own hands, then it is recommended to contact a service center regarding the adjustment of the wheel alignment. The fact is that when replacing the load-bearing elements of the body, or any manipulations with the steering mechanisms, the alignment of the camber will certainly be disrupted.
Wheel alignment adjustment - display of measurement results.
A timely request for camber adjustment will prevent premature tire wear and will ensure correct vehicle behavior in slippery road conditions.
Violations in wheel alignment parameters can be accurately determined only by using computer diagnostics, but the following symptoms may indicate the need to visit a car service center:
- the steering wheel is turned with variable effort
- the car “steals” while driving
- uneven tread wear on tires
- increasing the noise level generated by the wheels
Why is the wear of rubber seals on the VAZ 2107 suspension harmful?
Now let's talk about why all this is being done. When rubber seals wear out, this leads not only to extraneous noise while driving, but also to decreased vehicle handling. First of all, this applies to all the rubber bands that are designed to hold the transverse stabilizer, shock absorbers, as well as torque rods and Panhard rods in place.
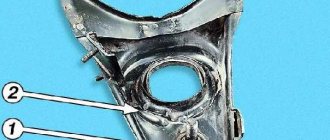
- Beam for VAZ 2107
When the rubber bands wear out, these parts develop free play, which is not compensated for by anything. In general, rubber seals are needed in order to return suspension parts to their places; silent blocks are a striking example of such work. Next, metal begins to come into contact with metal, which leads to damage to parts. For example, the lower bracket of the rear shock absorber often breaks out. Timely replacement of parts helps prevent even greater wear, which means significantly reducing service costs.
Video: replacing silent blocks on a VAZ 2107
Replacing upper seal blocks and balls on a VAZ 2101-07
Replacing the front beam on a VAZ 2107
During intensive use, the body of the VAZ “Seven” is subject to significant loads and the negative impact of adverse environmental factors. In the metal from which the parts of the supporting structure of the VAZ 2107 car are made, fatigue stresses gradually accumulate. As a result, cracks form in the front beam body, which can lead to complete destruction of the element. The best solution to the problem is to replace the part.
This unit is a three-dimensional structure made of steel sheet using stamping and welding technology. This element connects the front side members of the VAZ 2107 and serves as a support for the engine. In addition, the axles of the lower arms are attached to both ends of the part. Replacing this design is quite complex and requires specific skills.
Battery installation and configuration
Front beam
The VAZ 2107 suspension is installed in the reverse order to remove it and comply with the rules and safety measures. A qualified replacement of this power element involves the use of new fasteners. During work, it is necessary to defecate suspended blocks, especially ball joints and silent blocks. Replacing faulty elements will make restoration impossible in a short time.
Repair work of this type on a VAZ 2107 car is usually carried out by the owners themselves. This is usually done to save money, but it is difficult to adjust wheel angles without special equipment. To do this, contact a specialized service station. Replacing load-bearing body elements inevitably leads to changes in parameters.
Installing a new beam on a VAZ 2107 car will eliminate the problem of yawning while driving. The car becomes more controllable and does not deviate from the chosen trajectory. New beam
increases the torsional rigidity of the body, which has a positive effect on its general condition.
Source
Well, I welded the frame to my VAZ 2109, the load on the suspension was with a certain margin, now you can make it heavier. Well, besides, now the face has become 60 kilograms heavier than usual. In other words, about 10%. This must also be compensated. And I haven't hung up the 3mm steel crankcase yet. And this will add 10 kilograms. And the metal bumper is unchanged, another 15 pounds.
READ Modification of the VAZ 2108 with Your Own Hands
Standing stronger is not a problem for the VAZ 2109. In a sense, there are all sorts of non-Soviet requisites, more stringent than ordinary Russian gas and oil (and even moreover, quite regular). But the sources are unclear. I wanted until spring to be about 30-40% more difficult than usual.
Two options were considered - the first was to install several small springs coaxially inside the usual one and raise the springs more.
Laid out in the garage used braces and a bunch of springs, and for a long time he was wise with them. I couldn't figure out how to assemble a small spring inside the standard. I abandoned this (in my opinion, good) idea and began to select springs more rigidly.
The following spring options are being considered:
- From Toyota Corona 190
- From Surf-130 1KZ
- From Toyota LandCruiser Prado
- 1st - a little soft. A little tougher than usual. I haven't tried this with a Camry, but it probably isn't much more difficult.
- 2nd - The last round is tapered, in other words, the cup must be remade to accommodate this. And if you cut it (so it rests on a regular cup), it will be a little short.
- 3rd - strict.
To replace the front beam with vaz2106
You will need a pit, an overpass, or a lift (winch).
Necessary tools for replacing the front beam of a VAZ 2106:
- rolling jack
- two tripods (tragus, supports)
- spring pullers
- set of wrenches (open-end, socket, heads)
- assembly, crowbar
Preparing to replace the front beam of a VAZ 2106. If there is no hole or overpass, you can lift the front of the six with a jack and place trestles. We proceed to disassemble the relevant parts necessary for dismantling the old cross beam of the VAZ 2106:
- We take a horizontal position under the car 2106 (if there is no hole or overpass), take an open-end or socket wrench 10 and remove the engine oil pan.
- further, after removing the engine protective sheet, a view opens to the “pillows” on which the engine itself is attached. Using the same 10mm wrench, unscrew the 2 bolts securing the brackets on the cylinder block - these are the “pillows”.
- then, using a key set to “13”, unscrew the 2 nuts securing the brackets, which connect the lower arms through the rubber anti-roll bar. After unscrewing the two nuts, remove the staples from the studs.
- Now, using a “19” wrench, we unscrew the nuts securing the axles of the lower arms, connecting them to the transverse beam 2106. Using the same “19” wrench, we unscrew the steering knuckles from the ends of the steering rods, and using a puller, squeeze them out.
- it's time to remove the axles from the studs of the vaz 2106 transverse beam. To remove the axle, we use a mounting tool, hammer in the mounting bracket between the axis of the lower arm and the transverse front beam, and using the mounting tool as a lever, we remove the axle from the studs of the front beam.
- Next, you need to remove the front beam. If there is a winch and a crossbar on top where you can hang it, we release the crossbar by raising the engine. If there is no winch, we place bricks with a block under the oil sump and lift the engine with a jack.
- Using a key set to “19”, remove the 1st bolt on each side in the deepening areas of the body brackets. From below, using the head on “19”, remove the two nuts securing the front beam to the side member of the VAZ 2106 body and dismantle the old beam downwards.
- Next, we install “pillows” (supports) on the new front beam of the VAZ 2106. We inspect all rubber bushings, connections, all suspension parts of the “six”; if there are “eaten” bushings, worn parts, then it is better to immediately replace it while the chassis is disassembled.
- Installing a new cross beam and assembling the chassis of the VAZ 2106 is carried out in the reverse order.
After the cross beam has been replaced on the VAZ 2106, it is necessary to adjust the wheel alignment.
Displacement of the rear beam of the VAZ 2109
The front suspension of a passenger car is one of the most loaded devices. It is she who takes all the blows, she “eats up” small unevenness in the road surface, and she also keeps the car from tipping over on sharp turns. One of the most critical elements of the suspension is the front beam, which, despite the massive structure, can also fail. Can I repair it myself? Yes. Let's figure out how this is done.
Preparatory work
Before removing the beam, it is necessary to remove the shock absorbers and suspension springs. For this operation, in addition to standard keys and heads, you will need a pry bar, a jack and spring ties.
The order of operation is as follows:
- Drive the car into the pit, put the handbrake on, and install wheel chocks under the rear wheels.
- Loosen the upper nuts of the front shock absorbers located in the engine compartment (to prevent the shock absorber rod from turning, it should be held with an open-end wrench).
- Unscrew the top nuts and remove them along with the washers and springs (the location of the elements must be remembered, this will be useful during assembly).
- Unscrew the nuts securing the shock absorbers to the lower arms.
- Pull out the shock absorbers.
- Loosen the front wheel mounting bolts.
- Raise the car on a jack, place the front part of the car on supports, remove the front wheels (special supports or ordinary bricks are located under the side members at the point where they connect to the body).
Further actions are performed sequentially for the right and left levers:
- Unscrew the nuts securing the lever two turns (otherwise it will be difficult to lift it with a jack).
- Raise the end of the lever with a jack and remove the stabilizer rubber bracket by unscrewing the fastening nuts.
- Partially unscrew the nuts securing the lower ball joint and knock it out of the knuckle with a hammer (it is better to use a special puller instead of a hammer).
- Move the stabilizer through the top pin using a pry bar.
- Lower the lever and remove the jack.
- Lift the upper arm and pull out the suspension spring, prying it up with a pry bar from below.
Front suspension
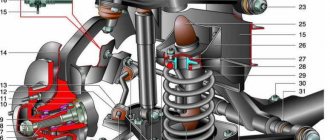
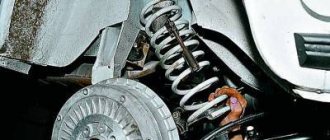
The front suspension of the VAZ 2106 consists of several main parts. The main connecting element of the suspension are two wishbones located at the top and bottom. Between them is the anti-roll bar.
To ensure wheel rotation, both mounting arms are connected to the steering axle using special hinges. This type of connection is very durable and consists of steel wrapped in Teflon fabric. Also, in addition to the protective fabric, there is also a casing that prevents dirt from entering the hinge.
There should always be lubricant inside the hinge mechanism. With prolonged use, it may be used up, and the parts will run dry, which will lead to rapid failure. In order to avoid these troubles, it is enough to add lubricant to the hinge casing using a special hole.
The axle itself (knuckle) has a rounded shape and is connected to the wheel using a screw connection. There are four screws on the knuckle, which are threaded into the holes on the wheel disk, and on the outside, a nut is put on these screws.
In order to cushion the wheel when hitting a bump, the front suspension has shock absorbers, as well as a lock that prevents the wheel from resting on the wheel arch. Thus, protecting the wheel and arch from friction and wear.
Replacing the rear axle of a VAZ 2106
When it is necessary to replace the rear axle of a vehicle such as a VAZ 2106, you will need to acquire special tools for working with this unit. A standard driver kit is provided for this. In this case, you cannot do without a liquid intended for degreasing surfaces. So, experts recommend using white spirit and gasoline.
In order to dismantle the rear axle, you must:
Replacing the rear and front springs of a VAZ 2106
- install the car using a pneumatic lift (repairs can also be performed on an overpass or by driving the vehicle into a deep pit intended for inspection);
- drain the engine fluid into a container and disconnect the universal joint with a part such as the flange mount of the shank;
- dismantle the axle shaft of the humming rear axle, unscrew the fastening element, align the rear axle gearbox with its beam;
- replace the unit, make adjustments if necessary, check the unit for operability;
- clean the structural elements of the unit, degrease the oil seal and bearings, fastening components;
- connect the gearbox to the rear beam of the vehicle and, using the cross technique, tighten the fasteners.
- pour motor fluid into the unit.
Body structure of the VAZ 2101
Before we begin tuning the body of the VAZ 2101, I consider it necessary to take a detailed look at this most important part of our vehicle. So, the body of the VAZ 2101 is a rigid spatial truss made of steel, which consists of sequentially assembled, non-separable elements:
So, the body of the VAZ 2101 is a rigid spatial truss made of steel, which consists of sequentially assembled, non-separable elements:
| 1 | Base (bottom) assembled with front part and rear panel |
| 2 | "Plumage" of the front part |
| 3 | The left and right sidewalls are in line with the rear “tail” |
| 4 | Roof |
The base is a trough-shaped, all-stamped panel with a tunnel in the center. The tunnel has two functions:
- Protects the elements placed in it from damage (in our case, the driveshaft is located in it);
- Increases underbody resistance to torsion/deformation, as do side members welded along the base*.
Spar* is a stamped steel beam with a box-shaped section.
Profile view
In the front part they are combined into a single whole:
- The front side members serve as power elements carrying the front suspension with the power unit;
- Front shield;
- Panel;
- Wings;
- Mudguards.
The rear section also contains mudguards and a luggage compartment panel.
Side view
The left and right sidewalls consist of outer and inner panels connected to each other:
- The outer panel consists of the C-pillar, A-pillar, B-pillar, sill and rear fender;
- The internal panel includes many power elements (strut amplifiers, etc.).
View from above
And finally, the all-stamped structure, reinforced with cross members, is called the roof of the car.
The elements of the body shell are made by stamping from thin sheet steel. The low weight, high strength and durability of such a design fully comply with the basic requirements of the functionality inherent in it.
Next, its removable elements are mounted to this resulting one-piece welded body:
- Trunk lid;
- Hood;
- Doors;
- Front facing;
- Decorative elements, etc. accessories.
But there is no point in flattery going into extraneous “wilds”; let’s continue the conversation about strengthening the body of classic vases.
REPLACING THE CROSS BEAM ON A VAZ 2107
Before moving on to the description of the process, a couple of clarifications should be made:
- firstly, replacing the cross beam on the “seven” is a very labor-intensive task, so the help of a partner will be very helpful;
- secondly, to remove the beam you will need to hang the engine. Consequently, the driver needs to have either a hoist or a simple manual unit in the garage. Without these devices, the beam cannot be removed;
- thirdly, the only acceptable option for repairing a beam in a garage is to replace it. Below we explain in detail why this is so.
Now to the tools. Here's what you need to get it working:
- new cross beam for VAZ 2107;
- set of socket heads and wrenches;
- 2 jacks;
- flashlight;
- set of spanners;
- flat screwdriver.
SEQUENCE OF OPERATION
To work, you will have to use the inspection hole, and only that. Working on a street overpass is not possible, since there is nowhere to attach a block to hang the motor.
- The car is installed on the inspection hole. The front wheels are jacked up and removed. Supports are installed under the body (several wooden blocks stacked on top of each other are usually used as supports).
- Using open-end wrenches, the bolts holding the lower engine protective casing are unscrewed, after which the casing is removed (at the same stage, you can also unscrew the front mudguards, since they may interfere with further work).
- Now the hood is removed from the car. After this, a lifting device with a cable is installed above the engine. The cable is inserted into special eyes on the engine and tensioned so as to prevent the engine from falling after removing the beam.
- The suspension arms are unscrewed and removed from both sides. Then the lower shock absorber springs are removed (before removing, make sure that they are completely relaxed, i.e., in their lowest position).
- There is now access to the beam. The nuts that secure the beam to the engine mounts are unscrewed. After unscrewing these nuts, the beam should be supported from below with something to completely prevent its displacement after complete separation from the side members.
- The main fastening bolts of the beam holding it to the side members are unscrewed. Moreover, first those that are located horizontally are unscrewed, then those that are located vertically. Then the beam is carefully disconnected from the body and removed.
- A new one is installed in place of the old beam, after which the front suspension is reassembled.
Basic procedures
Before disassembling the VAZ front beam 2106
the lower suspension must be removed. After finishing the previous work, you only need to unscrew the 2 nuts that secure the arm axle to the beam. When performing this operation, consider how many washers were on the bolts between the cross member and each axle. After reinstalling the levers, you need to put the washers in the same number and order. The front beam is attached to the side elements with 3 bolts on each side.
Since the engine rests on it, before disassembling the part, make sure there is a special lug (eye) on the cylinder head that is lifted by lifters and lifts the engine up. The eye is usually located on the cylinder head, between the tee and the carburetor. If there is an eye, you need to remove the air filter, install a traverse through the engine compartment or just a solid board (5 cm thick) and connect the engine to it using a bolt with a bracket or a strong metal cable tightened until it stops. The beam is replaced as follows.
- First, unscrew the nuts that secure the engine mount to the beam through the special holes in the bottom of the cross member.
- After this, through the hole, directly under the bar, we install wide boards on top of each other (in a pile) so that they are exactly under the part and remain on them after lifting the front of the car.
- Next, unscrew and remove the horizontal bolts securing the cross member on both sides, and then the nuts of the vertical bolts.
- After this, we raise the front of the car by 10-15 cm, while the beam should remain on the sides.
- Finally, carefully move the old part out of the way, put the new one in place and lower the car.
Source
Beam installation and suspension assembly
The new VAZ 2107 beam is installed in the reverse order of removal. When installing the engine on the beam, it is necessary to control the location of the pillow pins so that they fit into the mounting holes.
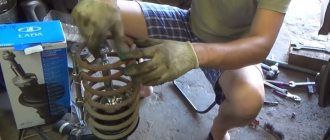
If there are no spring ties, they can be replaced with a jack and wire. To do this, you need a screw jack, used on Zhiguli and Muscovites, and steel wire. It is worth noting that this operation is very risky - if the wire breaks, the spring can “shoot”. The procedure itself looks like this:
- Raise the jack bar up so that a spring can be inserted between it and the base.
- Using two or three wire loops, tighten the spring to the jack so that it does not bend in an arc or jump out during compression.
- Compress the spring, gradually lowering the jack bar.
- Secure the spring with wire twists in a compressed state.
Things to remember:
Extreme caution must be used when using this method. If possible, be sure to use a specialized spring tie and not a jack. The spring must be compressed enough so that it can be easily installed, but no more. Otherwise, problems will arise when removing the twisted wires. After installing the spring in place, the twisted wires must be removed using pliers
They should be removed carefully and evenly so that the spring does not bend, but falls into place
After installing the spring in place, the wire twists must be removed using pliers. They should be removed carefully and evenly so that the spring does not bend, but falls into place.
Replacement of the VAZ 2101-07 internal combustion engine beam.
The front suspension of a passenger car is one of the most loaded devices. It is she who takes all the blows, she “eats up” small unevenness in the road surface, and she also keeps the car from tipping over on sharp turns. One of the most critical elements of the suspension is the front beam, which, despite the massive structure, can also fail. Can I repair it myself? Yes. Let's figure out how this is done.
Disassembly of the assembly
Front beam
VAZ 2107 can be removed using metalworking tools and lifting mechanisms. To perform this operation you will need:
- Wrenches and sockets complete with handle and extension.
- A vehicle or hydraulic jack of appropriate size and capacity.
- Manual lift and structure for its fastening.
- Portable lamp for illuminating the workplace.
Instead of a lifting mechanism, a special device can be used that allows you to hang the engine with support on body parts. It is most convenient to carry out the work in an equipped garage box on an elevator or above the inspection hole. The wizard's work sequence is as follows:
- The front of the car is suspended, the front wheels are removed from it, and the body is heavily supported.
- Remove the steel sheet to protect the engine and protection devices from dirt.
- It is recommended to remove the hood to avoid accidental damage. The power supply is hooked onto an eyelet attached to the case and lifted by an elevator or using a special device.
- In the absence of lifting mechanisms, the resistance can be placed directly under the crankcase; be sure to place a piece of board. This will avoid deformation of the part.
- Disassemble the front suspension on both sides of the car. Remove the springs and lower arms along with the axles.
- We unscrew the bolts securing the rubber fastenings of the engine mounts.
- Unscrew the nuts on the studs using a putty knife that holds the structure in place and release it.
You can now directly remove the beam from its mountings and move it to the side. The specialist recommends inspecting the engine mounts; in case of significant deformation, replacing them with new parts is indicated.
PURPOSE OF THE BEAM
The main task of the transverse beam is to prevent the “seven” from tipping into a ditch when passing the next turn at high speed. When a car goes through a turn, a centrifugal force begins to act on it, tending to throw the car off the road.
It is the beam that prevents the car from overturning into a ditch on a sharp turn.
The beam has an elastic torsion element, which, when a “seven” wheel occurs, thereby counteracts the centrifugal force. In addition, the transverse beam provides additional support for the VAZ 2107 engine. That is why, when dismantling it, the engine is always hung on a special block.
Method for checking the technical condition of the rear suspension
To check the serviceability of parts, the car is placed on an inspection hole or overpass. During a visual inspection, mechanical damage (cracking, ruptures, etc.) is unacceptable on rubber products. If the silent blocks of the rear suspension of the Zhiguli are a rubber mass squeezed out of the eyelets of the rods, they also need to be replaced. Be sure to inspect the attachment points of the rod brackets to the body for cracks. Defective areas must be welded.
To determine the condition of the rubber hinges of the longitudinal rods, put the car on the handbrake and rock the body in the longitudinal direction. Play in the connections will indicate worn bushings. The wear of the longitudinal thrust elements is checked by rocking the rear of the vehicle in the transverse direction. Repairing the rear suspension of a VAZ 2106 does not require special knowledge, but some metalworking skills are still needed.
How to replace springs and shock absorbers?
If the vehicle settles heavily or breaks down, the rear suspension springs of the Zhiguli require replacement. When carrying out the repair procedure, you can simultaneously replace failed shock absorbers. As a rule, before these parts fail, shock absorber fluid leaks out.
There is no point in repairing shock absorbers at home. Practice shows that even parts repaired in special workshops quickly fail. Replacing the rear suspension springs of the “six” is performed in the following order:
- Unscrew the fastening nuts of the lower bolts of the shock absorbers.
- Move the bolts and remove the spacer bushings.
- Move the shock absorbers and remove the spacer and spacer bushings.
- In the same way, the upper mounting points of the shock absorbers are disassembled.
- Shock absorbers are removed.
- To unload the springs, lift the car using a jack.
- Replacement of the Zhiguli rear suspension spring is done using mounting blades, which remove its coils from the supports.
- Installation of new parts is carried out in the reverse order.
Replacing the rear suspension of a Lada requires quite a strong lifting of the rear part of the body, so special attention is required to the flexible brake hose, which is very easy to damage. Accuracy in work will also allow you to avoid troubles associated with the spring “shooting” out of its place.
As you can see, the design of the rear suspension of the VAZ 2106 is not difficult, and any car enthusiast can easily repair it.
Replace the rear suspension spring on a VAZ 2106 car if it has mechanical damage or significant settlement. Signs of spring settlement: deterioration in ride quality, frequent suspension breakdowns; visible distortion of the rear of the car or a significant difference in the height of the front and rear parts that appeared during operation; strongly pronounced traces of the collision of the spring coils. According to their length under a load of 2950 N (305 kgf), springs are divided into two groups: - group A - length greater than 273 mm; - group B - length equal to or less than 273 mm. The rear suspension springs are marked with paint on the outside of the coils: group A - with yellow paint; group B - green. The upper and lower coils of the spring are the same. To replace the rear suspension springs on a VAZ 2106 car you will need: two 19mm wrenches and a mounting blade. USEFUL ADVICE It is more convenient to replace springs on a lift with an assistant. 1. If you are working on a lift, place a support under the rear axle beam and lower the car, lightly loading the suspension. NOTE If you are working on a viewing hole, you do not need to perform step 1. 2. Disconnect the lower shock absorber hinge from the rear axle (see “Replacing the rear suspension shock absorber”). Move the shock absorber to the side so that it does not interfere with operation.
3. Raise the vehicle to relieve the spring. With the mounting blade resting on the spring support, remove the lower coil of the spring from the support forward along the direction of the VAZ 2106. WARNING
5. Remove the lower spring gasket from the support on the rear axle beam.
6. Remove the upper spring gasket from the support on the body. NOTE
7. Secure new gaskets (for example, with insulating tape) to the new spring so that their screw surfaces coincide with the coils of the spring. NOTE
9. ...the screw surfaces of the lower gasket and the support cup on the rear axle housing coincided. 10. Reinstall the removed parts in the reverse order of removal. NOTES Install rear suspension springs of the same group on the left and right of the VAZ 2106 car. Replace springs in pairs and together with gaskets. Install springs of the same class as the front suspension springs. In exceptional cases, when class A springs are installed in the front suspension, it is allowed to install class B springs in the rear suspension. USEFUL ADVICE When removing and installing springs, it is optimal to use any universal spring ties from those available on the market.
The same type of suspension was installed on VAZ Classic cars. Model 2106 is no exception. Since 1984, this car has had rear dependent and front independent suspension. You can learn more about its structure by reading this article.
Installation, repair and replacement of rear suspension on a VAZ 2106
If, when starting your “six” from a stop or driving on an uneven road, knocking noises are heard from the rear axle, and the rear of the car moves to the side on potholes, then most likely the rear suspension of the VAZ 2106 requires repair. Most often, the rubber bushings of the reaction rods or transverse rods are to blame for the loss of vehicle stability on the road.
Less commonly, the cause of unstable behavior on the road is faulty shock absorbers and springs. The price of “classic” rear suspension elements is low, and replacing them is not difficult.
To check the serviceability of parts, the car is placed on an inspection hole or overpass. During a visual inspection, mechanical damage (cracking, ruptures, etc.) is unacceptable on rubber products. If the silent blocks of the rear suspension of the Zhiguli are a rubber mass squeezed out of the eyelets of the rods, they also need to be replaced. Be sure to inspect the attachment points of the rod brackets to the body for cracks. Defective areas must be welded.
To determine the condition of the rubber hinges of the longitudinal rods, put the car on the handbrake and rock the body in the longitudinal direction. Play in the connections will indicate worn bushings. The wear of the longitudinal thrust elements is checked by rocking the rear of the vehicle in the transverse direction. Repairing the rear suspension of a VAZ 2106 does not require special knowledge, but some metalworking skills are still needed.
Replacement of rubber bushings of rear suspension links
The need to replace rubber hinges arises when they are damaged or worn out and require the removal of the longitudinal and transverse rods. The “six” rear suspension links are attached at one end to brackets installed on the floor of the car, and at the other end to brackets installed on the rear axle beam. The “classic” rear suspension diagram will help you better understand the location of its parts.
To carry out repair work you will need 19mm wrenches. Dismantle the parts in this order:
- Remove the top (short) links. To do this, unscrew the nuts and knock out the bolts.
- Remove the long reaction rods. To dismantle them, you need to disconnect the lower hinge of the rear shock absorber and move it to the side. Then you need to unscrew the fastening nuts, remove the spring washers and bolts that secure the rods to the beam.
- To remove the transverse link, you need to unscrew the fastening of this element to the body bracket and rear beam and knock out the bolts.
THIS IS INTERESTING: Why the windshield washer does not work
All rubber joints that are used in the rear suspension links of the VAZ 2106 are similar to each other, although they differ in size. They are pressed into the eyelets of the rods with an interference fit, so to replace them you will need: special mandrels for installation, a brush, a solution of soap in water and a large bench vice. The work should be done like this:
- Remove the metal spacer sleeve from the rubber joint using a vice and a mandrel, and then press the rubber joint itself out of the rod.
- Moisten the inside of the tie rod eye, the inside cavity, and the outside of the rubber joint with soapy water. Also wet the spacer sleeve.
- Using mandrels and a bench vice, first press the hinge into the rear link, and then the spacer sleeve into the rubber hinge itself.
- Similar repairs are carried out for all removed parts. It is important not to confuse the rubber elements intended for short and long rods, so it is better to check the catalog numbers.
When repairing a car, you can do a little tuning of the rear suspension of the “sixth model”. To do this, the metal spacer bushings must be shortened by 2mm. With the help of such a simple improvement, you can increase the life of the articulated joint by 2-3 times, while the stability of the rear axle is significantly increased.
Installation of the rods on the car is carried out in the reverse order.
How to replace springs and shock absorbers?
If the vehicle settles heavily or breaks down, the rear suspension springs of the Zhiguli require replacement. When carrying out the repair procedure, you can simultaneously replace failed shock absorbers. As a rule, before these parts fail, shock absorber fluid leaks out.
There is no point in repairing shock absorbers at home. Practice shows that even parts repaired in special workshops quickly fail. Replacing the rear suspension springs of the “six” is performed in the following order:
- Unscrew the fastening nuts of the lower bolts of the shock absorbers.
- Move the bolts and remove the spacer bushings.
- Move the shock absorbers and remove the spacer and spacer bushings.
- In the same way, the upper mounting points of the shock absorbers are disassembled.
- Shock absorbers are removed.
- To unload the springs, lift the car using a jack.
- Replacement of the Zhiguli rear suspension spring is done using mounting blades, which remove its coils from the supports.
- Installation of new parts is carried out in the reverse order.
Replacing the rear suspension of a Lada requires quite a strong lifting of the rear part of the body, so special attention is required to the flexible brake hose, which is very easy to damage. Accuracy in work will also allow you to avoid troubles associated with the spring “shooting” out of its place.
As you can see, the design of the rear suspension of the VAZ 2106 is not difficult, and any car enthusiast can easily repair it.
Source: https://avtovx.ru/podveska-stoiki-amortizatory/zadnjaja-podveska-vaz-2106-217/
Suspension upgrade
The standard suspension of the “seven” is considered soft and imperfect. That's why many people decide to do tuning and modifications. This helps to significantly improve handling and overall comfort, as well as increase the service life of springs, balls, bushings and other elements.
Reinforced springs
Springs are the main element responsible for a smooth ride, directional stability and good handling. When they weaken or sag, the suspension is not able to compensate for the load, so breakdowns of its elements and other troubles occur.
Owners of the “Seven”, who often drive on bad roads or drive with a loaded trunk, should definitely think about upgrading the standard springs. In addition, there are two main signs by which you can judge that elements need to be replaced.
- Upon visual inspection, it was discovered that the springs were damaged.
- The car's ground clearance has noticeably decreased, as the springs sagged over time or due to excessive load.
Spacers are the first thing that comes to mind for VAZ 2107 owners. But this conclusion is not entirely correct. Yes, they will restore the stiffness of the springs, but will have a negative impact on the service life of the elements. Soon cracks will be found on springs reinforced in this way.
Therefore, the only correct solution would be to replace conventional springs with reinforced ones or modified ones from the VAZ 2104. At the same time, it is necessary to change the shock absorbers to more powerful ones, otherwise the reinforced springs will easily damage the standard system.
Before you begin the replacement procedure, you need to arm yourself with the following tools.
- By lift.
- A set of various keys, including a cylinder key.
- With a tire iron.
- Bar.
- Wire hook.
Now more about the replacement.
- Place the car on a jack and remove the wheels.
- Remove struts or conventional shock absorbers.
- Loosen the upper arm clamps.
- Place a block under the car and jack up the lower arm.
- Unscrew the stabilizer beam fastening.
- Remove the lift.
- Loosen the lower and upper ball joint nuts, but do not completely unscrew them.
- Drive the support pin out of the steering knuckle using a pry bar and hammer.
- Secure the upper lever with a wire hook and lower the lower one.
- Use a pry bar to pry the springs from below and remove them.
Then you need to free both springs from the gaskets and check the condition of the latter. If they are in good condition, install the new spring using electrical tape. Install reinforced springs in place of the standard ones.
The reinforced spring is installed in place of the standard one in reverse order.
Air suspension
The “Seven” has great potential in terms of modernizing the front suspension. And many car owners decide to install an air suspension with an electric compressor, hoses and a control unit.
The air suspension kit includes a compressor, hoses, tubes, struts and other equipment
This is a real electronic assistant that makes it possible to change the ground clearance depending on driving conditions. Thanks to this innovation, the stability of the car at high speeds increases, trips over long distances become comfortable, the car goes over bumps more smoothly, in a word, it becomes like a foreign car.
The system modernization goes like this.
- VAZ 2107 is installed on a pit.
- The battery is de-energized.
- The wheels are removed from the car.
- The front suspension is completely disassembled and air suspension elements are installed in its place.
- Under the hood there is a control unit, compressor and receiver. Then the elements are connected to each other by pipes and hoses.
- The compressor and control unit are integrated with the vehicle's on-board network.
Video: air suspension on a VAZ, is it worth it or not?
Air suspension on VAZ: Is it worth it or not? from Auto overhaul
Electromagnetic suspension
Another modernization option involves the use of an electromagnetic suspension. It is a set of mechanisms and components that serve as a connecting link between the road and the body. Thanks to the use of this type of tuning suspension, a smooth ride, high stability, safety and comfort are ensured. The car will not “sag” even during long-term parking, and thanks to the built-in springs, the suspension will remain operational even in the absence of commands from the on-board network.
The electromagnetic suspension is controlled by a microcontroller and provides a smoother ride and safety
Today, the most famous manufacturers of electromagnetic suspensions are Delphi, SKF, Bose.
The front suspension of the VAZ 2107 requires timely maintenance and control of the main components. Remember that road safety depends on this.
Video: How to Strengthen the Beam of a VAZ 2106
He settled on the spring version from Prado. Not much more difficult. One and a half times. We decided not to limit ourselves to half the measures.
Cut them with a meat grinder to a suitable length. In other words, they narrowed the coil. The length of the standard spring 2108 is 370 millimeters. I cut these 345 millimeters. Further arithmetic is as follows. In the VAZ 2109 strut, the length of the compressed spring (without overload the strut is stretched to its maximum) is 280 millimeters. In other words, a standard spring compresses 370-280 = 90 millimeters. Ours are 345-280 = 65 millimeters. This is approximately 1.4 times less. The spring stiffness (already trimmed) is approximately 1.6 times greater, the pre-compression force is slightly higher than in the standard version.
After that, I thought for a long time which side to put them on. I decided to end it. They were put on with sandpaper beforehand. I put it on the stand, looked at it and started sharpening further. The plot of land is about 0.6 turns from the end. It's like cutting a wedge (from 4 millimeters at the end to 0 millimeters and 0.6 turns). It appears that, more or less in shape, when assembled, the spring presses into the support as a whole, without distortion, as it did on a machined spring.
Gasoline was purchased - Finwhale oil shock absorbers. Took apart a couple of old oil struts and laid them out.
READ Installation of hydraulic compensators on VAZ 2108
I decided to install VAZ 2109 upper supports rather than 2110. The 2110 supports are naturally better, but they are incompatible with the 2108 spring cups. And these cups are better than the 2110 for anomalous sources.
I assembled the struts and decided that there were a lot of oblique springs. Still aggravated. But not from the bottom, but from the outside of the coil, I cut off a segment. In some places in the region, the length of the turn is from the beginning to half, in some places - a third of the turn and a depth of up to 2.5 mm.
Finally, the racks are fully assembled and installed. As expected, it became much tougher. Not a stool, as some advisers said.
But the stiffness of the shock absorbers is now not enough, that is, there is a slight increase in large irregularities. It disappears quickly and with a small amplitude, but it is still there. However, we need stiffer racks. But these fins seem to be the heaviest of the non-sports fins. And the sport is not cheap, and I have some doubts about their resource.
And the face of the VAZ 2109 rose greatly. Sort of like spacers, I expected it to rise up a bit. But not really. Maybe I'll go a little and lower the suspension 2cm by replacing the spring cups with 2110 ones.
In general, the suspension now does not move up (releases) from the rated overload position enough. At rest, the racks unfasten almost to the maximum. And considering that I didn't install spacers, there is room for increasing the gap.
Source
Front beam
The VAZ
2106 is located across the engine compartment, which is why it is also called the transverse element. Replacing the front beam of a VAZ 2106 is required if it is not possible to adjust the lower cross member of the front wheels due to the strong curvature of the transverse element.
In addition, since the vehicle's power supply and lower arms of the front suspension are attached to the beam, it should be replaced if there are fatigue cracks of any size, as well as any other mechanical damage. Replacing the front beam yourself is a labor-intensive procedure. This is due to the need for appropriate disassembly and subsequent installation of front suspension elements. In addition, during this operation you need to hang the engine on hoists or traverses. Therefore, it is better to change the beam together, while the work should be carried out on a hole or a reliable rise.