Using a Phillips screwdriver, unscrew the seven screws securing the engine shield insulation to the frill trim. The fastening screws are located along the entire length of the insulation.
In the corners on the right and left, unscrew the frill under one nut. Ten head nuts.
Lift the cover up and move it to the side.
Lift the coolant expansion tank up and to the side. There is no need to remove the hoses leading to the tank.
Unscrew the two nuts securing the trapezoid to the crossbar under the windshield.
In the depths, unscrew the last bolt securing the trapezoid and remove it along with the motor. Ten head bolt.
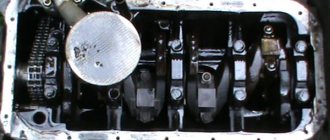
If necessary, unscrew the three bolts securing the motor and move it to a new trapezoid.
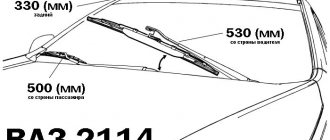
The process of replacing the trapezium wipers of VAZ 2110, 2111, 2112 is clearly shown in this video:
Replacing the windshield wiper motor and trapezoid
The design of the windshield wiper on the VAZ 2110 is quite reliable and during normal operation the motor and the trapezoid itself can easily move all 300,000 km, which has been proven by the personal experience of many owners. But there are also exceptions to the rules.
It often happens that the splines are bypassed or the trapezoid structure simply breaks down. If you have such problems, the repair procedure will be discussed below.
To replace all the wiper parts, we will need the following tool:
- screwdriver flat and Phillips
- ratchet handle
10 mm socket head
To do this job, you first need to do some preparatory steps, namely:
- Remove the windshield trim (jabot)
- Remove the insulation and seal under the hood
- Disconnect one end of the expansion tank rubber and move it to the side
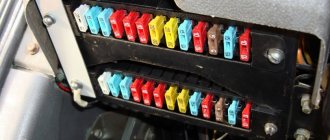
Fuses and relays VAZ 2110
F1 – 5A – License plate lamps. Instrument lighting lamps. Side light indicator lamp. Trunk light. Left side side light lamps F2 – 7.5A – Left headlight (low beam) F3 – 10A – Left headlight (high beam) F4 – 10A – Right fog lamp F5 – 30A – Door window electric motors F6 – 15A – Portable lamp F7 – 20A – Electric motor of the engine cooling system fan. Sound signal F8 – 20A – Rear window heating element. Relay (contacts) for turning on the heated rear window F9 – 20A – Recirculation valve. Windshield and headlight cleaners and washers. Relay (winding) for turning on the rear window heating F10 – 20A – Reserve F11 – 5A – Side light bulbs on the right side F12 – 7.5A – Right headlight (low beam) F13 – 10A – Right headlight (high beam). Indicator lamp for turning on the high beam. F14 – 10A – Left fog lamp F15 – 20A – Electric seat heating. Trunk lock lock F16 – 10A – Relay-breaker for direction indicators and hazard warning lights (in hazard warning mode). Hazard warning lamp F17 – 7.5A – Interior lighting lamp. Individual backlight lamp. Ignition switch illumination lamp. Brake light bulbs. Clock (or trip computer) F18 – 25A – Glove box lighting lamp. Heater controller. Cigarette lighter F19 – 10A – Door locking. Relay for monitoring the health of brake light lamps and side lights. Direction indicators with warning lamps. Reversing lamps. Generator excitation winding. On-board control system display unit. Instrument cluster. Clock (or trip computer) F20 – 7.5A – Rear fog lamps
K1 – relay for monitoring the health of light bulbs; K2 – front wiper relay; K3 – repeater and alarm relay; K4 – low beam relay; K5 – high beam relay; K6 – additional relay; K7 – relay for turning on the heated rear window; K8 – backup relay
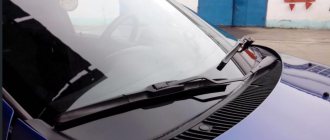
Without wipers, it is almost impossible to overcome rain or snow, as visibility is reduced to a minimum. This is why it is important to keep your windshield wipers (the official name for windshield wipers) intact. This material describes the scheme by which the wipers work in a VAZ 2110 car, the main malfunctions, as well as windshield wiper repair.
Important! The way the washer works is quite simple: an electric motor is installed under the hood, to which a trapezoid is attached; two windshield wipers are attached to it - this is one part of the unit. The second part is a tank with technical fluid, which reaches the windshield wiper using a pump. The electronics are located under the dashboard of the VAZ 2110.
What is a windshield wiper trapezoid and what is it for?
The trapezoids are around here somewhere!
The wiper trapezium is a special unit that converts the engine impulse into forward movements of the windshield wipers.
Simply put, it is she who is responsible for their movement along the windshield or rear window of the car. Since weather conditions are often unpredictable, and the windshield must provide complete visibility, failure of this part must be quickly identified and corrected.
Principle of operation
Most often, plastic bushings wear out in trapezoids.
Although, at first glance, it seems that the movement of the brushes occurs directly, in fact, a trapezoid, which is an electromechanical unit, is responsible for it. It works on the following principle:
- The windshield wiper motor uses the finger, which drives the trapezoid itself.
- Due to the connection of the gearbox and shafts, oscillatory movements occur, causing the brushes to move along the glass, cleaning it.
It often happens that the trapezoid fails. This happens especially often after or during the winter season. Some inexperienced VAZ-2110 owners turn on the “brushes” without bothering to clear the snow from the glass . Often the wipers freeze to the glass, and an attempt to move them ends in breakage. To prevent this from happening, you should always check the brushes before turning them on in winter for freezing .
Replacing wipers
Replacing the windshield wiper motor of a VAZ 2110
First you need to look at the old brushes. You can try to get them out of the levers. Often, special springs are installed that make it possible to bend these levers. Next, you need to determine how the brush is attached to the lever (screws, needles or clamps can be used).
Note! In some situations, the lever and brushes are designed as a single structure.
A ruler or, for example, tape measure measures the length of these brushes. Required replacement tools:
- round nose pliers;
- screwdrivers included in the set;
- paper napkins and a small towel.
Necessary materials to complete the work:
- a set of new brushes;
- special liquid for glass.
The required materials can be purchased in stores specializing in the sale of spare auto parts.
Note! It is not recommended to skimp on new brushes. Cheap products are more difficult to install and do not last long.
If the car was produced earlier, it is almost impossible to find brushes for it. The only thing that can be done is to change only the rubber part attached to a thin metal base.
Note! It is imperative to acquire a high-quality glass liquid. We take into account the fact that many fakes are now being produced. This especially applies to methanol-based liquids. Not everyone knows that methanol is considered a poison; at significant concentrations, vision sharply deteriorates, which subsequently leads to complete or partial blindness.
It is recommended to replace brushes in the following sequence:
- for normal access to the windshield wiper, the car must be parked;
- windshield wipers must be secured in a position that provides unobstructed access to each blade;
- in some certain brands of cars, the windshield wipers are recessed flush, so you need to read the instructions for replacing them specifically for the VAZ 2110;
- You need to spread an unnecessary blanket on the hood of the car, as well as around the windshield wipers. Such measures will prevent glass from breaking and damage to the coating on the hood;
- The old windshield wiper design is removed from the mount.
Note! For machines produced earlier, the brush mount will not be removed from the levers, so actions are limited only to replacing the rubber strip.
- At the end of the rubber brush there is a locking device that can be easily opened with round-nose pliers. The functioning of the locking device is checked several times. You need to compare the rubber brush fixed to the machine with the new brush, they should match. It is removed from the mount and lever. A new brush is inserted, and it must pass through all the points, just like the old design;
- On recent cars, T-shaped mounts for windshield wipers are installed; to remove them, you need to use a small flat-head screwdriver. The purchased unit is installed by pressing the lever itself, as a result a click should be heard;
- Another type of fastening involves the use of screws. In such a situation, the unit with the brush will be secured using one or two screws. The screws are unscrewed with a screwdriver, and the new design is screwed onto the lever. The fastening screws must be tightened tightly, and small washers can be used;
- The new L-shaped design of the fastening levers is noteworthy. This unit is equipped with a rounded latch that has a swivel joint. To install new brushes, no tools are needed; just press the special latch, pull the brush slightly towards you and remove it from the lever. To fix the new structure, you need to press on the latch until it is installed in its place; you should hear a click.
When the manipulations with the first brush are completed, it’s time to start the second, the sequence of actions is the same.
Note! We should not forget about the existence of rear windshield wipers.
It often becomes necessary, especially on modern modifications of the VAZ 2110, to replace the motor. It is he who is responsible for the normal operation of the windshield wipers.
Replacing the windshield wiper motor on a VAZ 2110
Replacing the windshield wiper motor of a VAZ 2110 can also be done with your own hands. In addition, it may be necessary to replace the windshield wiper mechanism of the VAZ 2110 or replace the wiper arms of the VAZ 2110. Sometimes, simply replacing the windshield wiper drive on the VAZ 2110 leads to normal operation of the blades . A detailed video, of which there is a lot on the Internet, will tell you how to do everything without errors. It is also useful to use photo materials and pictures during the work process, especially if everything is done with your own hands. The detailed instructions for replacing windshield wipers presented above are an opportunity to save a lot of money, because the price for services of this kind in services is high, and the result is not always pleasing to the car owner. You can also find out on our website how to replace washer nozzles.
How to determine that a trapezoid is “kirdyk”
Kirdyk is a slang word meaning an extremely bad situation.
It happens that the retaining ring of the bushing breaks and the rod simply flies out.
The slightest disturbance in the operation of the trapezoid can lead to incorrect operation of the wipers. Usually this part is replaced with a new one, although in some cases you can get by with installing a repair kit. Its cost is significantly lower than the price of the entire part, although repairs will take much more time. Here is a list of the main signs by which you can determine that a part will soon fail:
- Windshield wipers begin to do their immediate job poorly. This occurs due to the weakening of pressure.
- An unusual noise is heard during operation.
- A backlash appears, which can be determined even visually, since the glass will be difficult to clean.
- It happens that the brushes move in one direction easily, but back with difficulty, constantly slowing down.
All these problems lead to the fact that the windshield remains dirty, with streaks and smudges.
Repair kit for VAZ-2110
Most often, plastic parts are destroyed in the trapezoid. In this case, a repair kit can help.
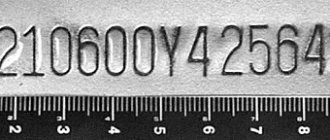
When purchasing a repair kit, pay attention to the part number.
If metal parts are damaged, you will have to replace the entire trapezoid. As a rule, the trapezoid is destroyed as a result of an accident, or due to careless handling of the windshield wiper system.
Do-it-yourself modification and replacement of wipers
Which wipers are better is up to the car owner to decide. Those installed on the VAZ 2110, as well as on the UAZ, do their job well from the factory, but it can be modified with washers from other companies that are of higher quality. Many people are attracted to frameless brushes - this is a good option. They are compact in size and equipped with a special leash mechanism. True, they do not look very attractive on the VAZ 2110, since the fastener to the standard washer arm turns out to be massive. Therefore they need improvement.
Part of the old and new sample
Selecting a new part for a VAZ-2110 is not such a simple matter. Not everyone knows that there are old and new trapezoids.
Therefore, it is better to remove the old part and take it to an auto parts store. They are not only attached differently, but also differ in the connectors through which they are connected to the motor. If you can’t find an old-style trapezoid, and this is exactly what you have, you’ll have to redo the system or look for a used part.
Refinement stages
Wiring
It is easy to modify or replace wipers. To do this you need to take several sequential steps:
- Disconnect the negative cable from the battery;
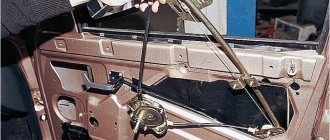
- Pull the wiper towards you;
- Remove the existing brushes;
- If there is a decorative trim, remove it;
- Unscrew the mounting bolt, thereby removing the old wiper;
- Compare the dimensions of the old and new cleaner;
- Ideally, the new device should not exceed the old one by more than 20 millimeters;
- Reverse the assembly procedure.
As you can see, changing windshield wipers is not difficult. But with the repair procedure, everything is somewhat different. But following the instructions, even an inexperienced VAZ 2110 owner will be able to do everything with his own hands.
Replacing the trapezium wipers of a VAZ 2110
I don’t think anyone will argue with the fact that good visibility is necessary to drive safely. To do this, it is necessary that the mechanism driving the brushes works, the trapezoid of the wipers is in good working order, but the brushes themselves must be in good condition and appropriate for the time of year.
Bad weather reminds us to regularly replace our windshield wiper blades. Some manufacturers of these extremely important parts recommend changing brushes once a year. The fact is that under the influence of the environment, rubber inserts gradually dry out and lose their elasticity. Hard rubber works like a scraper, leaving streaks and streaks on the glass. Run your finger along the blade of the eraser; if it is worn out and dull, you need to replace the brushes. Don’t skimp on small things and replace dry or worn wipers before the slushy season sets in.
Replenish the washer fluid supply in the washer barrel in a timely manner. To avoid poisoning from toxic pores, buy only proven glass cleaning liquid.
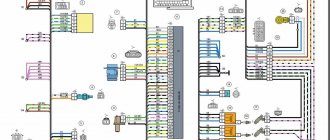
Wiper motor diagram for VAZ
- Registration
- Entrance
- To the beginning of the forum
- Forum Rules
- Old design
- FAQ
- Search
- Users
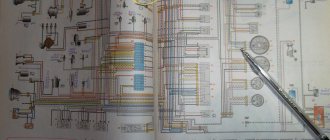
1 — windshield wiper motor; 2 - thermobimetallic fuse; 3 — electric motor of the washer pump; 4 — windshield washer solenoid valve; 5 — mounting block; 6 — ignition switch; 7 - ignition relay; 8 — switch for windshield wipers and washer; Short circuit - windshield wiper relay; A - the order of conditional numbering of the plugs in the wiper block; B - to terminal “30” of the generator; a — 2nd speed windshield wiper blade; b — 1st speed windshield wiper blade; c — spring plate of the limit switch; d, d - contact posts of the limit switch; C1, C2 - noise suppression capacitors; L1, L2 - chokes
Plus, through the ignition relay it comes from the CHYA X11 connector along the orange wire to the gear motor, passes through the thermal fuse there and returns along the yellow-white wire to the steering column switch to pin 53a. In switch position IV or V (slow speed constant and fast speed constant), current is supplied to the motor through the gray and gray-orange wires respectively. All the rest of the tripe, such as the relay, the white-black wire and the parking switch in the motor, are needed for intermittent modes and for parking the wipers if you turned off the right paddle at a time when the blades were not at the bottom of the glass. That's it in a nutshell. If you need details, ask.
They don’t work, then 2 positions work but slowly. I can’t find any patterns, either they work or they don’t.
I removed the steering column switch and there I bridge contacts 53 and 53a with a wire, the wipers wave quickly and don’t falter, they generally work perfectly, I put the switch back, the wipers stand motionless.
Source
Types of wipers
- Classic.
The design consists of seven metal “rocker arms” arranged pyramidally. The largest arc holds two smaller ones, which, in turn, hold even smaller ones and are attached to a rubber blade. This design allows the downforce of the wiper to be evenly distributed. Slowly going out of fashion, these wipers are falling in price every day, while performing their functionality very well in the warm season. The main enemy of such a wiper is snow. But it is impossible to say that these brushes are worse in functionality than frameless ones. The pressing effect of such a design loses its properties over time. Therefore, it is better to change the brush frame itself after a few years.
The “rocker arm” system for this type of wiper is replaced by a thin metal plate that passes through the entire length of the brush. It is a frame, despite the so-called frameless classification. They tolerate snow better, but this design has a disadvantage - the distribution of downforce here is worse than that of “rocker arms”. In the cold there is a shrinking effect. The advantages of these brushes over the previous ones can be called design. Although the taste and color as they say... .
They repeat the classic summer design, but all its moving parts are hidden under a rubber cover. But these brushes are not very suitable for summer, since the casing causes too much windage. If the speed is above 90 km. at an hour, the brushes begin to move away from the glass. As good as such brushes are in winter precipitation, they are just as bad in summer precipitation.
These brushes are the latest development for today. Metal “rocker arms” here replace three plastic arcs, they also act as a winter cover, thereby allowing these wipers to be called hybrid. Another distinctive feature of these wipers is improved aerodynamics. Headwind increases downforce. Although in such a design there is something to freeze on.
In conclusion, we can say that in winter it is better to use winter wipers, and for summer any wipers except winter ones are suitable. It's up to you to choose. In any case, new wipers, no matter what design, are better than those that do not perform their functions at all.
Replacing the windshield wiper trapezoid on a VAZ 2110
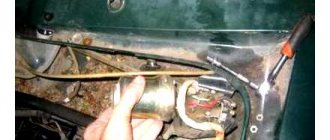
4. Disconnect the wiper motor connector.
5. Then, using a 10mm wrench, unscrew the nut of the left... ...then the right one attaching the wiper to the car,... 6. Unscrew the bolt securing the wiper motor bracket. 7. After this, remove the trapezoid from the studs and remove it from the air duct housing.
8. Using a 13mm wrench, unscrew the nut holding the crank.
9. Using a 10mm wrench, unscrew the 3 bolts holding the engine to the bracket... ...remove it.
Trapezium wipers - replacement for VAZ 2110
The trapezium of the wipers transmits the force from the engine to the windshield wiper arms. The best quality of windshield cleaning will be only if all elements of the wipers are in working order. If the trapezoid hinges are clogged with dirt or the lubricant has dried out, the motor energy will not be enough for proper cleaning. Therefore, owners of cars of the tenth family are forced to repair the trapezoid once every 5–10 years in order to avoid deterioration in the performance of the wipers.
Helpful information
Before purchasing a part, you need to find out which trapezoid is needed: there are “old” and “new” samples, indistinguishable in appearance. However, there are quite serious internal differences, which makes it impossible to install the “wrong” trapezoid.
However, our mechanics found an interesting way: a small modification (removing “extra” fastening studs on both sides of the body) solves the problem.
Moreover, experts advise installing a trapeze from Priora on a VAZ 2110 - in this case, a rework is also needed, but some cost savings are achieved (spare parts from Priora are cheaper). The modification consists of replacing the wiper arms ( on the VAZ 2110 they are slightly smaller
In addition, the connectors for connecting the electric motor are different. Here you need at least minimal knowledge in electronics, because you will have to install new wiring, reliably insulating it.
that such experiments require a fair amount of technical skill, which most car enthusiasts do not possess. In addition, in this case, the correct operation of the windshield wipers is not guaranteed (there is a danger that the blades will not ensure complete cleaning of the windshield, in addition, there may be problems with returning to their original position).
What affects the condition of the trapezius
The wiper motor and trapezoid are located directly under the glass, so some of the water or washer fluid falls on them. In addition to water, dust, dirt and various small debris get there. All this leads to a change in the properties of the lubricant and deterioration in the performance of the trapezoid. When the lubricant loses its properties, the plastic bushings of the hinges begin to wear out, resulting in backlash and increasing resistance during operation.
How to remove the windshield wiper trapezoid
To remove the trapezoid you will need:
- key to 10;
- thin flat screwdriver;
- crosshead screwdriver.
First of all, you need to remove the wipers. To do this, you need to remove the plastic pads and unscrew the nuts with which they are attached to the trapezoid studs. Then unscrew the screws and side fastenings of the protective casing (jabot) and remove it. If the fasteners do not come out, treat with WD-40. Before removing the casing, make sure to remove all screws, bolts and nuts. If the cover does not come off, look for a fastener that you did not remove. Lifting the frill, disconnect the washer fluid supply tube from the tee, and then move the casing to the side.
Remove the belt that supports the radiator tank and move the tank to the side. Then pull out the partition (sound insulation), which is located behind the tank. Don't forget to remove the washer fluid supply tube from it. Disconnect the electric motor power connectors. After this, unscrew the bolts securing the trapezoid and electric motor. To remove the trapezoid, you must either struggle for a long time, coming up with various options, or place a thin flat-head screwdriver under the far end (relative to the motor) of the lower rod of the trapezoid and pull out the entire structure as if on a slide. You can also turn the left edge of the trapezoid clockwise and pull it out, then remove the engine.
Trapezoid repair
During repairs, it is necessary to clean all elements of the trapezoid from dirt and inspect the studs. If wear is detected on their ribs, the trapezoid will have to be replaced. Repairing a trapezoid involves replacing the plastic caps. To do this you will need a repair kit and boiling water. First, disassemble the trapezoid using a pry bar or a heavy-duty flathead screwdriver as leverage. After this, cut off the old plastic caps. If you can’t cut it, use side cutters and bite off the caps piece by piece until you can pull them out of the trapezoid rods. You can also hold the ends of the trapezoid in boiling water, 2 to 3 minutes is enough, then push the caps out of their seats.
Three types of trapezoids were installed on cars of the “tenth” family - VAZ 2110, 2111 and 2112, which differed in minor details. Therefore, there is a possibility that either the trapezoid rods or the caps will have to be adjusted. Remove the cap and inspect it. If there is a fixing protrusion on top of it, check the recess for it on the rod seat. If there is no notch, you will have to either cut off the protrusion on the cap (does not affect the performance and reliability of the trapezoid) or saw through it in the draft. If there is no protrusion on the cap, no adjustment will be necessary.
Clean the rod and seat, then lower the cap into boiling water for 10 - 15 seconds. After this, it will soften and easily fall into place. Do not install a cold cap as this will destroy it. After the cap has cooled completely (20 minutes), the rod is ready for assembly. Before assembly, lubricate the bushings with graphite grease.
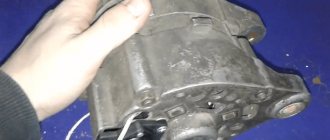
Check the serviceability of the electric motor. To do this, disconnect it from the trapezoid (you need to unscrew the fastening nut) and connect it to the car battery. When working, it should make a low buzzing sound. If you don't know how to connect the motor to the battery, then connect it to the power connector. Turn on various operating modes of the electric motor for 10 - 15 minutes. After that, feel it. If the motor gets hot, it needs to be replaced. An electrical technician can try to repair this device, but regular drivers and car enthusiasts need to replace it.
Tuning VAZ 2109
Many have encountered such a slight inconvenience in the operation of the standard windshield wiper of the VAZ 2109: when the windshield washer is turned on for a short time, the blades make 3 strokes, although the last stroke of the brush is already made on dry glass, and two strokes would be enough to remove all the water that was splashed washer.
This inconvenience, as it turns out, can be easily eliminated. To do this, we buy a new windshield wiper relay (if something doesn’t work out, you can insert the old one and thus not be left without wipers) type 526.3747, or another similar one - the markings may differ depending on the relay manufacturer. In the circuit of this relay, you need to replace resistor R4. The standard one has a nominal value of 130 kOhm, we need to set it smaller, within the range of 40 kOhm - 70 kOhm. I have 56 kOhm. You can find one at points selling radio components, it costs a penny, or you can remove it from old equipment.
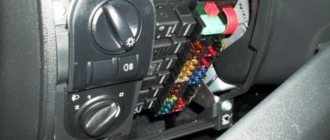
Relay location in the black box
VAZ 2109 wiper relay diagram
The internal design of such a relay can be different:
In all cases, the resistor we need is connected to the 4th leg of the microchip. It is highlighted in the pictures above.
By the way, this modification is also relevant for VAZ 2114-2115, VAZ 2110, Lada Kalina, Lada Granta - for all models where this type of relay is used.
New relays may have a fundamentally different design. For example, I came across this relay marked 723.3777 from the Energomash plant:
Relay 723.3777 Energomash. We can't change it
We cannot remake such a relay, so we can leave it as a spare (original), and we will solder the original one, removed from the mounting block:
Appearance of the original relay
We figured out the number of brush strokes. Now one more thing.
When you first press the lever to wash the glass, it usually happens like this: the brushes have already started moving, but there is no water on the glass yet. This is due to the fact that the pump needs time to drive water through the tubes from the reservoir to the washer nozzle. This situation can be corrected by installing a check valve in the tube to prevent water from flowing from the tubes back into the tank when the pump is not running. Personally, this point doesn’t bother me much, since the brushes run dry only the first time they are turned on, and installing a check valve increases the resistance to water flow in the pipes of the already weak washer pump, so I have not done such a modification on my car and do not plan to.
And for those who want to try, there is this information: you can install parts of the following ratings: R2 - 2.2 kOhm, C2 - 47 μF, R4 - 22 kOhm. The C2 value affects all three relay parameters - the delay between strokes, the number of strokes when the washer is turned on and the delay in starting the brushes, so options are possible. If anyone succeeds, please post in the comments.
If you don’t want to redo anything, you can install a special programmable relay. In this case, the brushes will start with a delay of about 0.5 seconds; it is also possible to set a pause between sweeps of the brushes in intermittent mode by manipulating the wiper switch lever. It is marked 723.3777-01 (analogous to 411.3777), for those interested, Google and Yandex can help. I would recommend adjusting the pause manually as was done in the previous article.
Together with resoldering the resistor in the relay to reduce the number of brush strokes to two, this, in my opinion, is a necessary and sufficient amount of modifications to the VAZ 2109 windshield wiper.
Putting the trapeze in place
Usually, installing the trapezoid into place does not cause difficulties. Insert it and secure with bolts. Do not overtighten the motor mounting bolt; the motor may need to be turned slightly to get the trapezoid to operate smoothly. After making sure that the trapezoid is working properly, tighten the electric motor mounting bolt, install and secure the sound insulation, frill (do not forget to connect the washer tube), and the expansion tank. Insert the plastic plugs and install them in place, install the arms with brushes and check the operation of the wipers in all modes.
Sources:
https://autorn.ru/vaz/2110/438-zamena-i-remont-trapecii-dvornikov-vaz-2110-2111-2112.html https://remont-vaz2110.ru/zamena-motora-i-trapecii -stekloochistitelya/ https://carfrance.ru/trapecia-dvornikov-na-vaz-2110/ https://xn—-8sbapc1bfiir0a.xn--p1ai/remont/elektrika/snyatie-privoda.html https://vipwash. ru/lobovoe-steklo/trapeciya-dvornikov-zamena-na-vaz-2110