Idling VAZ 2106
If your car starts to stall at idle, then the fuel filter needs to be properly adjusted or cleaned.
Table of contents
Adjustment Disappeared How to configure Malfunctions
Adjustment
To adjust the idle speed, the only tool you need is a flat, narrow screwdriver, preferably with a short handle. Adjusting the idle speed should only be done when the engine is warm. The timing and ignition clearances must be adjusted. If the adjustment is carried out on a cold engine, it will not bring the desired effect and it will not be possible to achieve stable performance.
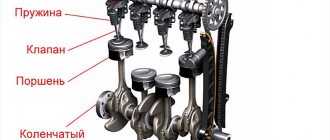
Idle speed adjustment is carried out using 2 adjusting screws: 1st - the quality of the mixture and 2nd - its quantity (Fig. 2). By default, at the factory, adjusting screw 2 is equipped with a restrictive sleeve, which acts as a seal. Thus, the manufacturer indicates that the rotation of the screw is within the factory range. For complete adjustment and when it is not possible to adjust the idle speed, the restrictive sleeve is removed and the basic adjustment is carried out.
Use screw 1 to set the crankshaft speed to 900 min.-1. They can be checked on a special stand or using a tachometer located on the instrument panel.
Using screw 2, you need to achieve a CO2 value that falls within the range of values from 0.5 to 1.2%. A special device will help with this - a gasometer.
The rotation of screw 2 helps to change the crankshaft speed. In this case, we again adjust and set screw 1 to the value of the rotation speed within 900 min.-1.
The correct idle speed setting is checked by pressing the accelerator pedal and releasing it sharply. The crankshaft rotation speed should increase smoothly and without failure, and then decrease as well. The engine should not stall. If this happens or jerks are observed when you press the gas pedal, the setting must be repeated.
It is recommended to place the limiting bushings on the adjusting screws, focusing on the mounting lugs. After completing the idle adjustment, the engine should run stably.
gone missing
I had this happen too - I needed to thoroughly flush the bottom of the carburetor, check and, if necessary, replace the needle valve and adjust the position of the float. Particularly check the idle jet on the back of the carburetor opposite the valve cover.
Check the condition of the contacts, the integrity of the central high-voltage wire and the resistance of the slider. The ELXX valve on the Azon carburetor may be faulty, the tube may have broken or fallen off. A carburetor malfunction is also possible.
How to setup
To solve the problem of how to adjust the idle speed on a VAZ 2106, you need to stock up on a set of driver’s tools, although one screwdriver is enough for this technological operation. On the Internet you can watch the “VAZ 2106 idling” video clip about carrying out adjustment work to stabilize the idling speed of the vehicle.
To adjust the idle speed of the “six” carburetor, a number of preparatory conditions must be observed. These include:
The operation is carried out only on the motor that has reached operating temperature (about 90 degrees Celsius).
The clearances of the timing valves and ignition contacts (with a contact system) must correspond to the required dimensions.
When adjusting the idle speed of a VAZ 2106 carburetor on a cold engine, the required result cannot be achieved. If there is no idle speed, it will appear only if the correct adjustment conditions are met.
If the VAZ of the “sixth model” stalls at idle, then to find out how to adjust the idle speed, you need to use the following algorithm:
The process of adjusting the idle speed on a VAZ 2106 car is carried out using two screws for adjustment, the first is the quality screw, the second is the quantity of the mixture.
In accordance with the factory parameters, the quantitative adjusting screw is locked with a sealed limiter sleeve. To carry out adjustments and when there is no idle speed on the VAZ 2106, the seal is removed and adjustment work is carried out.
Using a high-quality screw, we achieve a value of 900 rpm, checking the value with the tachometer readings.
Using the quantity screw, we use a gas meter to set the carbon monoxide value in the range of 0.6-1.3 percent. The circular movement of the adjusting screw changes the number of rotations of the crankshaft of the power unit.
In this situation, we re-fix the required crankshaft speed parameters with the first screw. If everything is done correctly, then when you sharply press and lower the accelerator pedal, the rotation value should remain stable.
If all operations are performed correctly, there should be a smooth increase in engine speed and the unit should operate stably.
Malfunctions
There are three most common causes of idle speed disappearance:
— clogging of the EMC idle jet;
— EMC burnout;
— lack of power supply to the EMC.
Adjusting the idle speed on a VAZ 2106
First you need to prepare the car. We warm up the engine to a temperature of 900 degrees. We ensure that the engine operates stably at idle speed.
Let's watch a video in which everything is shown in an accessible and understandable way:
The text instructions are as follows:
- Using the quantity screw, we achieve a crankshaft speed of 820 to 900 rpm.
- Using the quality screw, we bring the unit into stable and uniform operation. Then, by tightening the screw, we destabilize the operation of the motor and unscrew it again to restore it. Our task is thus to achieve the most stable engine operation with the leanest possible mixture.
- Using the quantity screw, we again bring the speed to the desired value.
- It is best to carry out the operation two or three times.
The engine does not idle: the main reason
The first thing you need to pay attention to is the solenoid valve. However, it is not installed on all VAZ 2106 carburetors. It is this small device that most often falls into disrepair. Its operating principle is similar to a solenoid relay - there are windings, an armature, and a return spring, but the dimensions are somewhat smaller.
The function of the solenoid valve is to open the path for gasoline to flow (with the throttle valve closed) when the ignition is turned on. And close when disconnected, respectively.
The most common breakdowns of the solenoid valve, as a result of which the idle speed disappears:
- The winding is destroyed, the armature with the needle does not move, fuel is not supplied.
- The fuel nozzle located on the edge of the valve is clogged.
- The valve armature is jammed due to deformation.
You can check this device very quickly; you will need a small piece of wire, stripped from both edges. Connect one end to the positive side of the battery, and connect the other end to the terminal of the solenoid valve. There should be a fairly loud click, but if it doesn’t, then most likely the winding is damaged.
If there is a click, remove the wire connected earlier and turn on the ignition. Place the power connector onto the valve. If there is no click, then the wiring is damaged. In the event of a breakdown, there can be three exits, you can use any:
- If the solenoid valve is completely destroyed, it would be wise to unscrew it and remove the tip (fuel nozzle). And thus get to the nearest store without much difficulty. The price of a new VAZ 2106 solenoid valve is about 100 rubles, so repairs will not be expensive.
- Temporarily connect the output of the solenoid valve to the positive terminal of the battery - if the wiring is damaged. But in this case you will have to remove the wire during each stop.
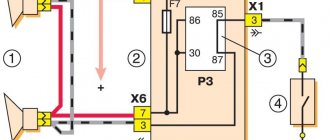
- It would be much more efficient to run a wire from the solenoid valve output to the “+B” ignition coil contact. The fact is that voltage appears on it only after the ignition is turned on.
Troubleshooting carburetor problems
Regardless of whether an EMC is installed or not, the procedure for cleaning the idle fuel jet is the same.
- Unscrew the plug holder or EMC.
- Unscrew and remove the fuel jet XX.
- Clean the central channel of the jet.
In order to remove the XX jet from the radiator body, you will need a 13-size wrench, but depending on the design, a 14-size wrench can also be used. After turning the EMC, remove the nozzle. If the center hole is clogged, carefully clean it with a thin wire or blow it out with compressed air.
Once the fuel jet center channel is clean, reinstall it. Screw in until it stops and tighten carefully with a wrench. Connect the “positive” wire to the power terminal of the EMC. Start the engine.
To make it easier to work with the carburetor, it is necessary to remove the air filter. Turn on the ignition, first removing the power wire from the EMC terminal. Touch the power wire to the valve terminal. A distinct click indicates that power is coming to the EMC input. In this case, the cause of the malfunction should be sought in the jet or in the carburetor itself. The absence of a click indicates that the fault is in the solenoid valve or fuse. To check the valve, connect the “plus” of the car battery to the terminal of the EMC, and the “minus” to its body. If there is no click, the solenoid valve is faulty and must be replaced.
If power does not come to the EMC input, the reason may be a faulty wiring or the need to replace an 8A fuse. If you have a standard fuse box, then this part is installed in the 9th cell.
If the fuse, wiring and the valve itself are in good condition, the reason for poor idling of the VAZ 2106 may be a clogged XX fuel nozzle. In this case, it must be cleaned.
Signs of malfunction:
If the carburetor begins to produce a rich mixture, you will understand this by the following signs:
- Fuel consumption increases
- Loud exhaust is heard from the muffler and the smoke turns black
If the engine receives a lean mixture, you will understand this by the following sign:
- Loud bangs are heard from under the hood.
In both cases, the engine heats up noticeably more, and its power is also lost.
Setting up the VAZ-2106 carburetor with your own hands.
If you encounter a similar problem, remember that it is a natural consequence of using the carburetor. Any element of the car requires care, regular inspection and maintenance. Therefore, the VAZ 2106 carburetor must be adjusted from time to time.
Before proceeding with the adjustment, you need to make sure that the cause of the breakdown is not the failure of any element inside the device. You need to disassemble it, wash it and clean it. And only after you are convinced that all components of the structure are in full working order, you can begin adjustment.
The easiest option is to send the car to a specialist. Carburetor technicians have a special tool - a gas analyzer. Using this device, you can achieve the most efficient system setup. However, the services of specialists in this profile are not cheap. You may want to do all the work yourself, using available materials. Next we will look at how to set up a carburetor step by step.
How to check and replace the Hall sensor on a VAZ 2106: tips, photos and videos
The Hall sensor is one of the main elements of the contactless ignition system of the VAZ 2106 engine. And this device, like all others in domestic cars, tends to break down periodically. Therefore, we will tell you how to understand that the Hall sensor of a VAZ 2106 is broken, how to check it and how to replace the device.
Recognizing the problem
Problems in the functioning of the Hall sensor on a VAZ 2106 car can manifest themselves in different ways. Sometimes even an experienced specialist will not be able to detect a breakdown. Therefore, we will look at the main symptoms that may indicate a malfunction of this element:
- the engine becomes difficult to start or does not start at all;
- the car does not work well at neutral speed: jerking may occur periodically, the car stalls;
- when the car picks up speed, the engine may twitch and stall;
- The engine occasionally stalls while driving.
If one of these symptoms is typical for your car, then this, of course, may indicate other malfunctions. However, first of all it is necessary to check the Hall sensor of the VAZ 2106.
How to check?
There are several methods that will help determine the functionality of the Hall sensor on your car. Let's look at these methods in more detail:
- The simplest method is to diagnose the operation of a VAZ 2106 engine with a new, known working Hall sensor. If you have one, install it in place of the old one and try to operate the car. If the problem has disappeared, then the answer is obvious.
- Try checking for spark in the engine. This is done when the ignition is turned on. To do this, it is necessary to dismantle the block installed on the distributor, which is called the distributor. Now turn on the ignition. After this, you will need to take a small piece of wire and connect its ends to the third and sixth outputs of the switch. If a spark appears while connecting the wire, this means that the Hall sensor of the VAZ 2106 has failed and needs to be replaced.
- You can also check the functionality using a voltmeter. You need to connect the device to the sensor output. If the Hall mechanism is working, then the voltmeter will respond to it. In this case, the device arrow will fluctuate from 0.4 V to 3 V.
Replacement process
So, if you encounter problems with the mechanism, you will need to replace it. It's not that difficult. What will you need for this?
Prepare in advance:
- wrench set to “13”;
- screwdriver;
- pliers;
- hammer.
Phased replacement
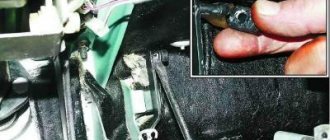
- First, turn off the engine and open the hood of the car. The supply pipe must be disconnected from the vacuum corrector.
- After this, you should unclip the ignition distributor cap and remove it.
- You will then need to unplug the connector of the device you want to replace. Using a wrench set to “13”, you next need to unscrew the nut that secures the holder plate.
- Now remove the distributor.
- Using a hammer, knock out the clutch spring screw from the ignition distributor.
- Then, using a screwdriver, unscrew the screws that secure the vacuum corrector. The corrector needs to be pulled out. This gives you access to your engine's Hall sensor. Using the same screwdriver, unscrew the screws that secure it and remove the mechanism.
- Replace the device with a new one. All subsequent assembly should be done in reverse order. After replacement, take a test drive to ensure that the device is working properly.
In general, the procedure is not particularly complicated, but, as in any other matter, there are some nuances.
For example, you should knock out the clutch spring screw with force, but carefully. Deformation of parts will subsequently lead to worse results. https://www.youtube.com/embed/jMPYbQJL5Lg
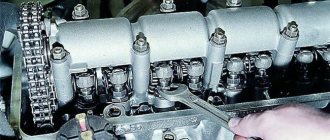
Purpose and design of the VAZ 2106 carburetor
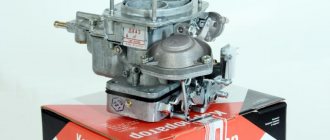
The VAZ 2106 car began production in 1976 and immediately gained great popularity among domestic car enthusiasts. To keep the small engine running smoothly, it required air, fuel, a powerful spark, and compression. The first two elements are mixed in a carburetor, designed to prepare an optimal fuel-air mixture. On the VAZ 2106, the manufacturer installed an “Ozone” carburetor produced by the Dimitrovgrad Automotive Assembly Plant (DAAZ).
On the VAZ 2106, the designers installed an “Ozone” carburetor manufactured by DAAZ
The operation of the device is based on the principle of jet propulsion. A powerful jet of air through the jets located in the diffuser carries fuel from the float chamber. As a result, a fuel-air mixture is formed in the proportions necessary for its ignition in the combustion chamber.
The carburetor consists of three main parts:
- The upper section is a cover with a damper to regulate the flow of air into the combustion chambers. Using a system of channels, it is connected to the throttle valve and the float chamber.
- The middle section consists of diffusers, fuel nozzles and a float chamber. The diameters of the jets are shown in the table.
- The lower section includes the throttle valves of the two chambers.
Table: calibration data for the Ozone carburetor
Any deviation in the composition of the fuel-air mixture from the optimal one affects engine performance. It becomes difficult to start a cold and warm engine, its operation at idle and in operating mode is disrupted, and acceleration dynamics deteriorate.
Setting up the VAZ 2106 carburetor
On a VAZ 2106 car, idle speed adjustment should be carried out provided that all filters are clean (at least install a new air filter), the spark plugs are practically new, and the ignition system works perfectly. Please note that the air filter must be installed when adjusting the carburetor. You also need to take into account that the level in the float chamber must be adjusted in advance, if necessary. Don't forget about the valve clearances either.
1 — quantity screw, 2 — fuel mixture quality screw
Adjusting the idle speed on a VAZ 2106 car occurs by rotating two screws - the quality and quantity of the fuel mixture. The procedure begins by turning the fuel mixture quality screw. This is done using a flat-head screwdriver to achieve the maximum engine crankshaft speed.
Then, turning the quantity screw, set the frequency to about 1100 revolutions. And the last step is to set the final idle speed at 800-900 by turning the mixture quality screw.
That's it, the procedure is completed. If it doesn't work the first time, repeat the whole process from the beginning. If you are not satisfied with the idle speed of the engine of your VAZ 2106, then you can make it a little higher. This is important for beginners, because it reduces the likelihood that the engine will stall when starting to move. Thank you for your attention, do not forget to comment on the post.
Idling is a mode of engine operation when it does not transfer the resulting kinetic energy to the driving units. In other words, the power unit works, but the car stands still.
Why does the car deviate from a straight line?
When the car does not want to move straight, the ride becomes uncomfortable - the driver has to constantly steer, and in some situations actually keep the car from drifting. You can’t relax - you’ll end up in a ditch or have a head-on collision with an oncoming car. It is better not to delay in finding out the causes of the described problem.
Spontaneous movement of the machine from a straight path may be a sign of the following problems:
- The pressure in the front tires is very different;
- uneven wear of the front wheel treads;
- faulty steering parts;
- problems with the front suspension and chassis;
- malfunctions of the brake mechanisms.
Before looking for reasons, it is advisable to make sure that the car actually pulls to the side when you let go of the steering wheel. Example: When driving on unpaved and poorly paved roads with ruts, the wheels tend to follow the path of least resistance and are reluctant to leave the grooves. Carry out the test on a flat piece of road surface.
The bulk of the listed problems occur during the acceleration and forward movement of the car. Brake malfunctions are immediately noticeable: the car drifts when slowing down. The more intense the braking, the more the car deviates from the straight line, and the driver has to turn the steering wheel more to keep the vehicle on the desired trajectory.
Other engine and system malfunctions
- Compression in the engine cylinders is low.
- The cylinder head gasket is damaged.
- The engine control system is faulty.
- The valves of the gas distribution mechanism are burnt out and leaky.
- The exhaust system is leaking.
- The valve clearances are not adjusted (8-valve engines only).
- The hydraulic pushers are faulty.
- The engine air filter is dirty.
- Vacuum hose connections are leaking.
Have you encountered power failures or observed unstable engine operation? What was the reason? We solve similar power unit problems in the comments or on the forum. Let us remind you that along with misfires, other engine malfunctions may appear, for example, floating speed.
Keywords: Lada Granta engine | Lada Priora engine | Lada Kalina engine | Lada Largus engine | Lada Vesta engine | 4x4 engine | lada xray engine | Niva engine | universal article
4
7
Found an error? Select it and press Ctrl+Enter..
- The results of the voting “Car of the Year in Russia - 2020” have been announced
- Operating instructions for Lada Priora 2014
- Replacing the radiator of the Lada Vesta engine cooling system
- Jeep trial on a Lada 4x4 performed by Jean Claude Briavuana (1982)
Adjusting the drive:
- Checking the length between the tips. The required size is 80 millimeters.
- If you deviate from this size, remove one tip.
Setting up the VAZ-2106 carburetor with your own hands.
- Loosen its lock nut and by rotating adjust the distance to the desired size.
Setting up the VAZ-2106 carburetor with your own hands.
- Tighten the nut and return the rod.
Setting up the VAZ-2106 carburetor with your own hands.
- You need to check the adjustment. To do this, our assistant presses the gas pedal. We observe the throttle valve to see if it has opened completely.
Setting up the VAZ-2106 carburetor with your own hands.
- If not, then you need to remove the tip from the lever and reduce the length of the rod.
Setting up the VAZ-2106 carburetor with your own hands.
- Now you need to see what position the damper is in when the gas pedal is released: does it close completely. If not, the pull needs to be lengthened a little.
- Next we work with the air damper. We weaken its drive. In the cabin, we completely recess the damper.
- Press the three-arm lever so that the flap opens all the way. In this position, tighten the locking screw.
Setting up the VAZ-2106 carburetor with your own hands.
- Checking the adjustment. To do this, we completely close and open the door from the passenger compartment again. If the damper has not opened completely, we carry out the adjustment again. If the outcome is positive, fully tighten the screw.
Setting up the VAZ-2106 carburetor with your own hands.
Adjusting the starter
These works can be performed directly in the car. But you will have to first remove the filter cover.
- We turn out the plug. Underneath we find the adjustment screw.
- If you carry out the work without removing the carburetor from the car, pull out the choke. If you have the device in your hands, press the three-arm lever. After the damper is completely closed, push the rod down until it stops.
- Let's see what the gap is between the camera and the air damper. A 5.5 mm drill will help us with this.
- If necessary, make adjustments by turning the adjusting screw using a screwdriver.
- We return the plug back.
- Now you need to check the distance between the camera and the throttle valve. The required size is 1 millimeter. A drill with a similar diameter is suitable for this. The gap is adjusted using a rod, which is either rearranged into a different hole or bent.
If not the valve, then what?
Dirt, low-quality fuel, malfunction of the ignition system - all this separately and in the compartment can affect the idle speed disappearing or becoming unstable. If you have already decided to carry out a full diagnosis, then start with the filters - air and fuel.
If they are heavily clogged, then gasoline or air (these are the main components of the air-fuel mixture) will not enter the carburetor normally. To be more precise, they will hit, but only after overcoming great resistance. And don't forget about the thimble-shaped filter that is installed at the inlet of the carburetor.
The solution is to replace all the filters and not have to worry anymore. But if this does not help, then you have many more faulty nodes. This means it’s time to look at the spark plugs (at the same time, remember how long ago you changed them). Unfortunately, a rare spark plug will last more than 30 thousand km.
And this is about a year and a half of operating the car in average mode. Unscrew the spark plugs, look at the carbon deposits, whether there is any and what color it is. With a long service life, the central electrode of the spark plug wears out and the gap increases as a result. Replace the spark plugs and check if the idle speed is stable.
Does it still stall at idle and not hold the revs? Then the ignition system remains. If you have a contact one, then check the gap in the breaker and set the optimal advance angle. If contactless, then diagnose the switch and Hall sensor.
These two elements fail more often than others. However, there is nothing more to break. Also inspect the condition of the high-voltage wires and, if necessary, remove moisture or dirt from them. The distributor cover should be without damage, and the resistance of the resistor in the slider should be about 5.5 kOhm.
Why do you have to adjust the idle speed?
For proper adjustment, you need to know how to adjust idle operation. If everything is done correctly, the procedure will not take much time. However, to do this you need to understand how the carburetor works and how it works. The main trouble associated with this problem is not the lack of idle speed, but the fact that the engine cannot operate stably and stalls.
Why can't the engine hold idle?
If the engine does not hold idle, first, you need to check the solenoid valve. However, it is not installed on all types of carburetors used in the VAZ 2106. If it is, then most often the problem is hidden in it.
In its operation, the valve is similar to a starter solenoid relay, it is even designed in the same way: there is a winding, a spring, a stator, but the overall dimensions are much smaller. The solenoid valve is needed to open fuel access when the throttle valve is in the closed position (gas pedal released). When the ignition is turned off, the valve should block fuel from reaching the carburetor.
Malfunctions of the solenoid valve that cause problems with stable idle speed include the following breakdowns:
- the winding is broken, the rotor does not move, and fuel does not enter the float chamber;
- the fuel nozzle is clogged with dirt;
- the rotor is deformed and jammed.
There is no need to contact specialists to diagnose valve problems. To check, just take a piece of wire and strip it from both sides of the insulation. One end of the wire must be connected to the positive terminal of the battery, the second is connected to the contact of the solenoid valve. There should be a click when connected. If this does not happen, the valve is faulty and should be replaced. There was a click - then you need to remove the wire and turn on the ignition, and then connect the terminal block to the valve terminal. If a click is not heard, this indicates a wire break in one of the sections of the circuit.
There are three ways to solve a problem with a faulty solenoid valve.
- If the valve is destroyed, you need to, firstly, unscrew it, and secondly, remove the fuel nozzle. This way you can get to the nearest auto parts store and buy a new valve. It costs mere pennies (no more than a hundred rubles).
- If the wiring is broken in a section of the electrical circuit, you can connect the valve output to the positive terminal of the battery using a wire and then drive to the store.
- The most effective temporary solution is to connect the valve contact using a suitable wire to the ignition coil contact. This way, voltage will be supplied to the valve only when the ignition is turned on. When the ignition is turned off, the valve will close.
Return to contents
If the problem is not the solenoid valve
Problems with idle speed can also occur due to low-quality fuel, a malfunction of the ignition system, or dirt. These factors appear both separately and together. Idle speed may become unstable or disappear completely. If you decide to diagnose the problem globally, then it is better to start troubleshooting by checking or replacing the air and fuel filters (including the fine filter on the fuel pump). If there is heavy contamination, the fuel-air mixture will flow into the carburetor intermittently.
You should also pay attention to the filter installed at the mixture inlet to the carburetor. If there is contamination, the filters must be replaced. If the problem XX still remains, it means that the search circle is expanding significantly. The next step is to check the spark plugs. If the spark plugs were last changed more than 30,000 km ago, they must be replaced. You should pay attention to the carbon deposits, or more precisely, to its color. If the service life has expired, the gap between the electrode and the spark plug will increase due to severe wear. After replacing the spark plugs, you need to check the stability of the idle speed again.
If replacing the spark plugs does not help, then you should check the ignition system. For a contact system, first of all, the breaker gap (slider) is measured and the correct ignition timing is set. In the case of a contactless system, you need to check the serviceability of the switch and Hall sensor. As a rule, these parts fail first, although nothing else can break there.
It would be a good idea to inspect high-voltage wires. If they are wet or dirty, they should be wiped down and inspected for damage, as well as checking that the insulation is intact and that there is no loss of spark. You can also inspect the distributor cover; it should not be damaged. And finally, you can measure the resistance of the resistor on the breaker; it should be within 5.5 kOhm.
Source: expertvaz.ru
Not enough air
Often the car starts up well and runs on choke, but as soon as the choke is turned off, the engine stalls. This indicates only one thing - lack of air. Most likely the air jets are clogged. They need to be unscrewed and cleaned. Then check that the car should not stall without suction.
There are an incredible number of reasons for poor performance of car components with similar symptoms, but only a specialist with a set of professional diagnostic tools can figure them out. But if you feel confident in yourself, go for it, VAZ service centers are already waiting for you.
How does a faulty carburetor behave?
No VAZ-2106 will drive without a carburetor. It is there that a mixture of gasoline and air is born, the combustion of which powers the engine. Ideally, the ratio of air to gasoline should be 15 to 1, but an already overworked carburetor may create a mixture of incorrect proportions. This is how it gets into the engine, depleted or enriched, and the quality of operation of the entire car decreases. In this case, there is no need to delay repairs.
What behavior is uncharacteristic of a carburetor:
- excessive engine heating;
- increased consumption of gasoline;
- the engine has difficulty picking up speed or even stalls;
- there are failures in the operation of the gas pedal;
- black smoke and popping sounds from the muffler.
The above signs fit the description of the situation when air saturated with gasoline enters the engine. If a lean fuel mixture is supplied, the car behaves in the same way, except that, unfortunately, gasoline consumption does not seem to decrease and remains at the normal level.
Adjusting the carburetor float OZONE VAZ 2106
Before you begin this work, you need to make sure that the needle valve is working reliably. 1. Take a measurement between the float and the gasket. This distance should be 6.5 millimeters. A slight deviation of 0.25 millimeters is allowed. You can also simply use a suitable drill bit to measure.
2. The clearance is adjusted by changing the angle of the float tongue.
3. Turn the float all the way. We measure the distance to the gasket in this position. It should be equal to 8 millimeters. Using the tongue we achieve the desired value.
Unstable idle speed 2106
You need to know how to set the idle speed of the VAZ 2106 in order to adjust the carburetor. You can perform this procedure quite quickly with your own hands, if, of course, you have an idea of what a carburetor consists of and the functions of its main components. But first things first, let's start with the saddest thing - the case when suddenly there is no idle speed and the engine starts to stall.
It doesn't matter where you are, at what point! It is important that the program for a small car service is always at hand! And wherever you are, information about business processes and spare parts sales is available. Live easier!
You'll be lucky if this happens close to home. But if you’re on the road, it’s not good enough. On my own behalf, I’ll add that several times I had to remove and disassemble the carburetor while standing on a narrow highway, shying away from passing trucks and highlighting it with a flashlight. A good habit is to take a thermos and a flashlight on the road.
Features of choosing IAC manufactured in the Russian Federation
The original product has its own marking, in which the last couple of digits indicate device compatibility. Even and odd numbers are interchangeable. For example, instead of a sensor with 01 at the end of the marking, you can install a device with the last digits 03. The same applies to even numbers: IACs marked 02 and 04 are interchangeable. That is, instead of 01 you cannot put 04.
Recently, a lot of counterfeit products have appeared on the auto parts market, including idle air regulators. Sometimes it is possible to identify them by their characteristic features:
- the packaging is not branded - there are no special marks, barcodes, or holographic stickers;
- the sticker on the sensor body is yellow and without an outer frame;
- the needle has a dark shade;
- the rivets on the regulator body do not have heads, the diameter of which should be 3 mm;
- the sealing ring is very thin and is black instead of red;
- spring – white with sparse winding (should be black);
- the body is 1 mm shorter than the original one.
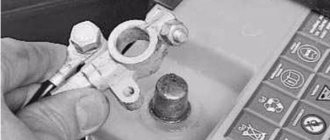
Electrical equipment
The problem of stopping the engine may also be due to a malfunction of electrical equipment. In particular, oxidation may occur at the battery terminals. Whether old cars or new ones, they all need maintenance and careful care. Consequently, the contact deteriorates as the resistance increases, and this leads to the engine stalling. The battery itself may also fail. In the same case, if the generator does not produce the required current, the entire electrical network of the car switches to power from the battery. If you do not immediately see a light on, indicating that there is no charging, the car will continue to move. Given that the lights are on and the ignition system is running, after a while the battery will be completely discharged and the engine will stop. You will have to charge the battery and also completely repair the generator.