Many VAZ 2110 owners are dissatisfied with the performance of their car's heater. It would seem that the interior has already been insulated, no cold air is coming in from outside, the stove seems to be working, but it is still cold in the cabin.
Therefore, auto craftsmen come to the conclusion that the original stove may be nothing, but modifying the thermostat on the VAZ 2110 will not be superfluous at all. Therefore, someone, having bought a new thermostat, even before installing it on the car, makes modifications: the circuit on the 5-hole one is redone, making it 6-hole.
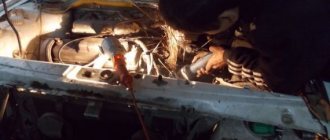
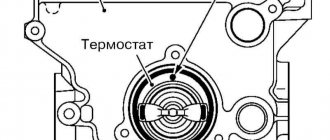
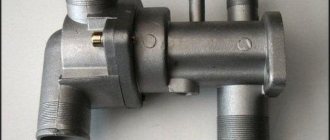
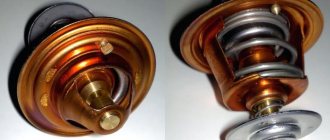
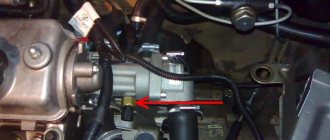
Factory thermostat
Others believe that it is enough to narrow the canal bypass. Third, it is much better to install a Granta thermostat, since it completely shuts off a large circle of coolant and, accordingly, the heater begins to supply hot air to the cabin much faster.
Let's consider all the options, but first you need to check whether the thermostat is to blame for the fact that there is clearly not enough heat in the cabin.
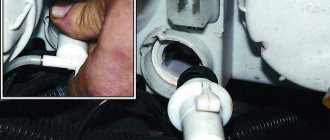
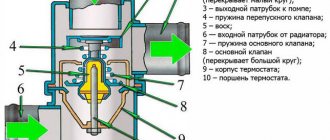
Modification of the thermostat
On a VAZ 2110, it is quite possible to modify the thermostat by adding another hole to the 5-hole device. Why is this needed and what does it give?
So:
- In cars, in particular on the VAZ 2110, the injector becomes warmer with the advent of the sixth fitting due to the fact that the bypass channel decreases. For reference: a bypass is a pump for circulating liquid in a parallel pipeline;
- For the stove to operate, it is necessary for the coolant to circulate in a small circle. This happens through the bypass channel. The smaller its diameter, the more liquid will flow through the stove;
- An additional fitting, as a rule, prevents the heater return tee from leaking, since such malfunctions are not uncommon on “tens”.
An additional 8 mm hole is drilled in the body of the vehicle (thermostat). Install an additional pipe parallel to the same one going to the stove. It is needed so that the “waste” liquid from the heater enters the thermostat cavity, and there is no overcooling of the engine.
Upgrading a 5-hole thermostat to a 6-hole thermostat
Upgrading a 5-hole thermostat to a 6-hole thermostat
Upgrading a 5-hole thermostat to a 6-hole thermostat
You also need a throttle washer - to increase the flow of fluid through the stove if the small circle is open, and an adjusting bolt resting on the leg of the element in order to regulate the opening temperature of the vehicle from the outside.
By the way, having modified it in this way, you can turn the carburetor TS 82, by drilling and tapping, into an injector suitable for the VAZ 2110.
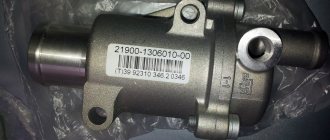
Rating of the best thermostats for VAZ-2110
Lada 2110 Logbook Replacing the thermostat thermoelement of a VAZ 2110
An independent survey conducted for specialists repairing VAZ-2110s and their owners in 2021 showed which units are mostly trusted by drivers and auto mechanics. The top five were determined by analyzing responses to the questions:
- How long did the old model work in the VAZ-2110?
- Which manufacturer deserves more trust?
- Is it more profitable to change the thermostat completely or part by part, for example, just the thermocouple?
According to the survey, the first place among the surveyed VAZ-2110 drivers and specialists was taken by Luzar, with a large gap, 2nd place went to Luzar, 3rd place belonged to PRAMO TermoStato, followed by Electron and Fenox. Some respondents are inclined to believe that all thermostats are of the same quality; the main thing is not to purchase a fake.
As for a holeless or six-hole device, drivers still prefer the usual holeless one, and 10% do not see a significant difference.
The service life of the old model on the VAZ-2110 is on average in the range from 75,000 to 100,000 km. 15.4% of respondents managed to achieve mileage from 100,000 to 150,000 km; 9% of owners can boast of mileage from 150,000 to 200,000 km.
Narrowing of the bypass channel
If you decide that it is the bypass channel on the VAZ 2110 that needs to be adjusted, then the 6-hole thermostat should not have any problems. But with a 5-hole one, malfunctions may occur due to the fact that the cold pipe of the stove (outlet) will not be washed. Therefore, think about whether you need such a modification; maybe it’s better to immediately install a Granta thermostat or a six-hole one.
To reduce the bypass, you need to do the following:
- Cut a plate out of sheet aluminum so that it fits exactly inside the vehicle;
- Secure the plate with a rivet or cold welding, but so that the fastening does not interfere with the flow of coolant in a small circle;
- In this plate you need to drill a new hole of 5 or 6 mm (instead of the standard 8 mm);
- In addition to the steps described above, on a 6-hole heater, the stove return is connected to a thermostat.
Standard bypass channel in thermostat
Aluminum plate to reduce bypass channel
Installed plate with reduced bypass channel
Self-tapping screws are made flush
After this modification, you will notice that the interior will warm up better and faster, but engine warming up will slow down somewhat.
How to check the thermostat
The reason for checking the thermostat may be that the engine has begun to overheat. Most often, the problem is that the thermostat valve does not open when a certain temperature is reached and coolant stops flowing into the radiator. To make sure of this, you can feel the pipes coming from the radiator. If they are cold, we can confidently say that the thermostat needs to be replaced.
Another way to check the thermostat is appropriate if there is no time or opportunity to install it on the car. To do this, place it in a pan of water so that the position of the valve is visible. Heat the water in the pan. If the valve opens during the heating of water, it means that the thermostat is fully operational and can be installed on the car.
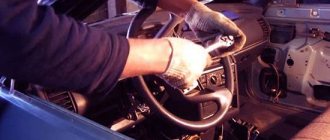
Replacing the thermostat VAZ-2110
It is necessary to be able to dismantle the main element of the cooling system not only for its replacement, but also for periodic inspection. So prepare your tools:
- two canisters (clean, plastic, 5 liters);
- thoroughly washed plastic bottle;
- a medium-sized Phillips screwdriver;
- paint cone;
- wrenches (sizes 8 and 12).
Repair work is carried out according to the instructions:
- Disassembly should begin with the air filter housing. Using a size 8 wrench, unscrew the bolts holding it in place. There are only two of them.
- Carefully inspect the housing and remove the sensor located on it.
- After these procedures, the protective shell can be removed from the filter. Remove the filter itself.
- Immediately after carrying out the procedures described above, you will be able to see the thermostat. Loosen the clamp that was hidden under the body.
- Cut one plastic canister - remove one of its side walls so that the drain hole is located at the bottom. This way you will get a convenient container into which you can collect antifreeze from the pipes. Using a hole with a lid, you can easily transfer the liquid into a whole canister.
- Separate the neck from the plastic bottle.
- Place the cut canister under the pipes at the moments when you disconnect them. Do this in the following sequence:
- separate from the expansion tank;
- from the radiator;
- from the stove;
- from the motor.
- During this repair, you can immediately replace the pipes. Inspect them for wear and, if necessary, install new ones immediately.
- After removing the thermostat, a little more coolant will fall into the prepared canister, so do not remove the container ahead of time.
- Using a filter from a painting paper cone, strain the antifreeze into a clean canister.
- Install the new part and tighten all clamps. Pour coolant into the expansion tank. Assemble the air filter.
During the repair process, it is best to replace the antifreeze and air filter. Immediately after assembly, start the engine to remove any air pockets from the cooling system. You should not move away immediately; to do this, you will need to warm up the engine at idle speed.
Finally, check the fluid level in the expansion tank. If it falls, check the build quality. If necessary, add antifreeze.
Diagram and design of the heating system in the VAZ-2110
The heating unit itself is represented by several components:
- Electric motor. A ventilation device is fixed on it, designed to pump a hot air flow.
- A radiator device, the failure of which will lead to the inoperability of the stove. On old-style heating systems, the radiator assembly is not equipped with a valve designed to shut off the flow of coolant through the device. Therefore, the unit practically does not leak, since leaks are usually associated with the faucet. The absence of this element ensures the fastest heating of the car interior.
- Three dampers. One of them is designed to close and open the heating channel, the second is used for recirculation, and the third is necessary to control the heater.
- The resistor device is designed to regulate the blowing speed.
Components of the heating system
Main parts of the heating system for the interior of a VAZ 2110 car:
- 1 - electro-pneumatic valve device;
- 2 — front housing of the air intake of the heating unit;
- 3 - water deflector device, presented in the form of an air intake flap;
- 4 — valve device for controlling the damper of the air flow recirculation system;
- 5 — recirculation system damper;
- 6 — rear part of the air intake housing of the heating unit;
- 7 — heating channel damper;
- 8 — damper of the heating unit control system;
- 9 — radiator unit;
- 10 - protective plastic casing of the radiator device;
- 11 - bushing installed in the steam outlet pipe;
- 12 — bushing for the supply line of the heating unit;
- 13 — bushing of the outlet pipe;
- 14 - electric motor of the heating system;
- 15 — electric motor housing;
- 16 - supporting surface of the damper drive lever used to control the stove;
- 17 — drive handle for controlling the damper of the heating system;
- 18 — gear motor of the drive device, presented in small sizes;
- 19 - resistor element;
- 20 - protective cover for the heating unit lining.
Connection diagram for blowers and controls
Main components of the stove:
- 1 - air ducts designed to warm up the rear of the car;
- 2 — plastic lining running from the center console to the rear seats;
- 3 - blowers designed to blow feet;
- 4 - main nozzles for ventilation of the car interior;
- 5 — side nozzles for interior ventilation;
- 6 — nozzles intended for heating the glass installed in the front doors;
- 7 — control knob for the interior heating unit;
- 8 — plastic housing of the air distribution device;
- 9 — damper for the foot warming system;
- 10 - plastic flap designed to warm up the windshield;
- 11 - heating unit.
We recommend: Cleaning and washing the cabin filter - all the pros and cons
The difference between old and new stoves
Old and new type heating systems have some features in connection diagrams as a result of the following differences:
- Radiator design. Heats in cars of different years of manufacture have different radiator assembly designs. In older heating systems, radiators are equipped with taps to drain the refrigerant.
- Different designs of SAUO controllers. Cars manufactured before 2003 used five position controllers. In newer versions of the car, devices numbered 4 and 5 were removed from the design.
- Micro-gearbox design. The main difference is the different type of resistor elements. When replacing elements, you need to consider whether these parts are interchangeable or not.