- The importance of proper headlight installation
- How does a hydraulic corrector work?
- Headlight device for VAZ 2114
- Operating principle
- Repair or replacement of hydraulic corrector VAZ 2114 on your own
- Causes of hydraulic corrector malfunction
- Installation of a new device
- Useful video
Any modern car needs diagnostics and repairs. The condition of the suspension, vehicle load and some other factors have a significant impact on the direction and inclination of the light flux. The VAZ 2114 headlight hydrocorrector will help correct the negative consequences associated with headlight illumination.
Hydrocorrector of headlights VAZ 2114
This is especially important on the highway, because incorrectly adjusted headlights can shine not on the road, but directly into the eyes of oncoming drivers, which can lead to an accident. In order to prevent such a scenario from happening, you should monitor the technical condition of the lighting devices and carry out all the necessary preventive procedures in a timely manner.
The importance of proper headlight installation
Proper installation and adjustment of lighting devices is no less important. For example, it is better to lower the headlights of a loaded car slightly lower than usual. In a similar way, you can direct the light flux not to the sky, but to the road. This method will avoid dazzling oncoming vehicles and ensure proper illumination of the road.
If the car is not loaded with anything, then the headlights should be raised slightly. Lighting equipment is quite sensitive and difficult to adjust, so this work is best entrusted to qualified specialists who have extensive experience in adjusting headlights.
Correct headlight settings
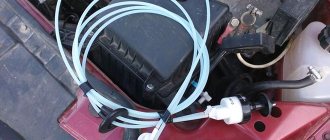
And so, first of all, I checked for operability, then I removed the folding on the control unit using a 6-size drill. I removed the cap with the regulator, and got to the board with the resistors.
Replaceable resistors in the divider.
This is a voltage divider. It can be called a variable resistor, but with fixed positions. Initially, I was upset by the number of positions, there are only 12 of them. But when I opened the case, I discovered a restrictive ring; this ring can be twisted as much as you want. Using the selection method, I replaced the outermost resistors with resistors of the required value, I adjusted the maximum rod overhang to 38 mm (I left 2 mm in reserve, so the gears of the gearbox should not be affected), as well as the rod stroke within 10 mm.
But no matter what, the characteristics of the electric corrector fully correspond to the characteristics of the hydro one.
Max stem extension is about 38 mm.
Min rod overhang approx. 28 mm
After putting the regulator in place, I selected the desired position of the limiter ring in such a way that the number of positions increased to 15. Using a drill bit of 2, I drilled holes in the control unit housing and clamped the cover with screws.
The corrector was installed like it was originally, the only thing was that I had to twist it with the connector to the driver's door, I did this so that the dashboard would fit. I ran the cables through a rubber plug that previously contained the hydraulic corrector hoses. There were quite enough cables, there was even a little extra left. I installed the handle from my original hydraulic one, since the one that came with the kit protruded above the body, which spoiled the look a little.
Everything works, the only negative is the speed at which the motors move the reflectors, it is too low and this is unusual after hydro. I hope that this instruction will be useful and useful to someone. I’ll add that I had the idea in my head to use Hella electric correctors, which are similar to the Lanosov ones.
But I didn’t find accurate information, so I didn’t take any risks. These correctors are good because, like Lanos, the control circuit is located in the corrector itself. You'll only have to spend money on wire and resistors. If the corrector fails, it is quite simple to replace it. Well, if you have correctors from a VAZ 2110, you will have to look for a used motor or replace it with Volgov ones; when replacing, you will have to re-solder the control unit.
Stem adjustment
Stem adjustment
In some cases, the headlight adjuster fails due to a misalignment of the adjustment lever. Thus, if the VAZ 2114 headlight hydraulic corrector does not work, do not rush to change it. First, make sure that the connection between the rod and the lever corresponds to the working position.
The rod of the main cylinder of the corrector rests against a lever that acts on the same rod, which is rigidly fixed to the headlight shade. A lever passes through the adjusting bolt and acts as a fulcrum. The adjustment mechanism functions like a swing. The corrector swings the lampshade, and the adjusting bolt makes it possible to raise/lower the support point of the swing. If the bolt is unscrewed to its extreme position, the opposite end of the lever in the form of a ball may slip out of its attachment point with the lampshade rod.
Hydrocorrector of headlights: design and principle of operation, instructions for repair and replacement with your own hands
The direction of the light stream that the car's head optics emits is directly related to the mass of the cargo that the car is carrying. If there is a lot of it, the rear part of the body sags, the headlights begin to rise up, poorly illuminating the road and blinding oncoming drivers. As a result, the motorist has uncertain control of the situation, where an accident is not far away. The necessary change in the angle of light flow is provided by the headlight hydraulic corrector. And you can do this without leaving your car. According to European standards, the corrector must be on all cars manufactured after 1999. What is this device and how does it work?
Repair or replacement of hydraulic corrector VAZ 2114 on your own
The design of the hydraulic corrector on this model is as follows:
- The master cylinder is located under the instrument panel.
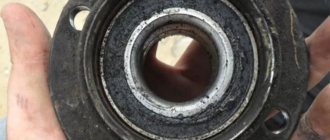
- Small working cylinders are mounted directly under the headlights. It is these devices that are used to raise the headlights on the VAZ 2114.
- The working fluid used in a car is resistant to both high and low temperatures.
- Another element of the hydraulic corrector design is the pipelines. They contain working fluid and are secured with special clamps.
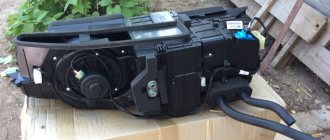
Headlight hydraulic corrector device
If the headlight hydraulic corrector fails, it is necessary to establish the cause of the malfunction as soon as possible. It may be possible to repair the device yourself.
In order to check the functionality of the headlight hydraulic corrector, you should:
- Inspect the condition of the tubes and rubber bands. There shouldn't be even small leaks.
- If no leaks were found, then you should pay attention to the condition of the working cylinders. To do this, you need to measure the stroke of each rod. Under normal conditions, it ranges from 6.5 to 7.5 mm.
- If such diagnostic measures do not help restore the functionality of the headlight hydraulic corrector, then the entire mechanism will have to be replaced. The fact is that the repair of the VAZ 2114 headlight is not provided by the manufacturer, so the easiest way to replace a broken device is with a new one.
Step-by-step instruction
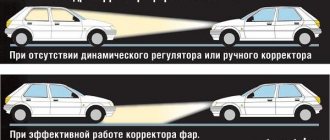
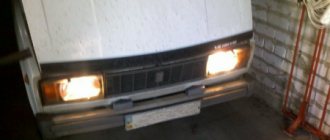
- The adjustment is made with the low beam on. The VAZ 2114 should be placed opposite a flat wall. The distance from the headlights to the plane should be exactly 5 meters. A load weighing about 80 kilograms must be placed on the driver's seat. It is also worth making sure that the tank is filled. Light adjustment is carried out with a standard machine load;
- When the VAZ 2114 is loaded and prepared, you need to start drawing the “screen”. On the wall with chalk and a ruler, you need to draw a vertical line-axis that will correspond to the center of the car. After it, two more vertical lines are drawn, parallel to the axis - they should be at the optics level. Next, you should draw a horizontal line at the level of the headlights. Below, 6.5 cm, a line is drawn to indicate the centers of light spots;
- Adjustments are made one by one. It is better to cover the headlight, which is not involved in the adjustment, with cardboard;
- The process can be completed when the upper boundary coincides with the level of the center axis, as shown in the diagram. The intersection points of vertical straight lines and the centers of the spots must correspond to the points of intersection of the inclined and horizontal sections of the spots;
After completing all the steps, the driver of the VAZ 2114 will receive the ideal light that will illuminate the movement. Other road users will also be pleased with the adjusted optics - the light flux will not hit the eyes.
Headlight range control demonstration:
- Replacing the VAZ 2114 stove motor with your own hands, instructions
- Electric headlight corrector VAZ 2114: purpose and installation
- How to clean the air sensor on a VAZ 2114: all the subtleties of the process
Hello. VAZ 2114 car When trying to adjust the headlights, the adjusting screw responsible for the horizontal plane broke, so now it is possible to somehow adjust the light or you need to change the entire headlight unit. Thank you.
Still, I don’t dare adjust the headlights myself, I tried it once and during the Technical Inspection of the car I was turned down for incorrectly adjusting the headlights. so it’s better to leave it to the experts. Moreover, they have special equipment.
Replacing the headlight corrector
For this VAZ model, if there is a need to replace the device, there are two options:
- install a hydraulic corrector provided by the car manufacturer;
- replace the hydraulic corrector with an electric analogue.
In the first case, you need to purchase device 2114-3718010, which is suitable for VAZ models from 2113 to 2115. Replacement must begin by removing the faulty headlight corrector, which is done in this sequence.
- The screw clamps of the clamps are unscrewed, which attach the connecting tubes to the holding structures.
- The master cylinder handle is removed, after which the nut that attracts the main hydraulic device to the dashboard is unscrewed.
- The working cylinders are disconnected from the headlight structure and, together with the tubes, are pushed into the cabin.
- The installation of a new hydraulic device that corrects the direction of the headlights must be done in the reverse order.
To replace the hydraulic corrector with an electric version suitable for installation in the same places, you need to purchase the Silich-Zenit device. After removing the standard corrector, the following actions are performed:
- The negative voltage from the battery is disconnected.
- After replacing the sealing ring, electrical correctors are mounted in the places where the working cylinders were located.
- “Plus” is connected to block “20”, “minus” is connected to ground.
- The wiring is fixed where the connecting tubes were. You can also attach it to a common power supply harness.
- The negative voltage is connected to the battery and the functionality of the electrical corrector is checked.
Electromechanical headlight leveler for VAZ 2114 As you can see, there are two options for replacing a failed hydraulic corrector. An electric device is more expensive than a hydraulic one. However, many car enthusiasts prefer the electric corrector, noting its more reliable and durable operation. Whatever type of concealer you choose, now you know how to install it yourself.
Electromechanical headlight range control for VAZ 2114
As you can see, there are two options for replacing a failed hydraulic corrector. An electric device is more expensive than a hydraulic one. However, many car enthusiasts prefer the electric corrector, noting its more reliable and durable operation. Whatever type of concealer you choose, now you know how to install it yourself.
Operating principle
When the driver decides that the headlights need to be adjusted, he turns a special knob inside the car to do this. It controls the pressure in the corrector piping system. Accordingly, when it is necessary for the headlights to go down, everything happens as follows:
- The handle turns down;
The switch in the cabin looks like this
- The pressure in the system drops;
- The operating rod enters the housing;
- The headlight goes down.
Based on this, we can say that most of the time high pressure is maintained in the working mechanisms; this is necessary to maintain the horizontal position of the headlight.
In winter, or during the transition period, when the temperatures outside and in the engine compartment are very different from each other, pipelines and rubber seals can delaminate, and working fluid can leak out. In this case, the headlight range control will most likely fail, and the working cylinders will jam and require complete replacement.
In terms of calibrating the device, the instructions from any domestic hydrocorrector will do. This is due to the fact that structurally they are all made very similar and you can figure out any of them yourself.
In order to adjust the position of the headlights, the driver should turn a special handle located in the cabin. It is this that allows you to control the pressure in the pipelines of the corrector. To lower the headlights, turn the handle down. It's a simple control system, but even that can break. What to do if the corrector turns out to be faulty?
Control knob for hydraulic headlight adjustment
Design
Structurally, the headlight hydrocorrector is a set of the following components.
| Component | Characteristic |
| Master cylinder | It is mounted on the dashboard |
| Actuator cylinders | They are located on the headlight unit and ensure their turning |
| Connecting pipeline | Its fixation is carried out with clamps |
| Working fluid | They have increased resistance to low air temperatures |
The operating principle of the device is based on the following: the corrector maintains the required pressure. If the driver switches to low beam, the pressure in the system decreases, and the rod turns the headlights down using a piston. If the liquid has leaked, it becomes impossible to adjust the direction of the light.
Connecting the electrical corrector BUK02-01 to a VAZ-2110
Installation of the BUK02-01 autocorrector on a VAZ-2110 (2111) car is carried out without modifications to standard places. In this case, you must first change the length and adjust the stroke of the rod depending on the specific model:
- VAZ-2110: stroke 2.0 with length 34.0.
- VAZ-2111: stroke 3.63 with length 34.0.
The stroke of the BUK02-01 rod is 7.0 with an offset of 38.8. Therefore, you will have to cut off the rod and reduce its stroke.
To cut the length of the rod, connect power to the drive so that the rod extends to its maximum stroke. First, we cut off part of the rod, then grind it off with a 9 mm file. After this, we glue the sawn-off part back with superglue.
The headlight electric corrector is adjusted in the “0” position, which meets the technical inspection requirements. Each division of the switch allows you to shift the axis of the light flux by 0.06 m, provided that the adjustment stand is installed at a distance of 1.2 m from the car headlights.
Maintenance and operation of the product
The design of the headlight hydraulic corrector is non-separable; in the event of a malfunction, it can be replaced entirely. The main thing is to remove it completely, and not cut it off, to make it easier to install a new device.
- When the car is loaded, the headlights need to be turned down so that the light beam is directed at the roadway.
- If the vehicle load is minimal and the rear part of the frame is in a raised state, the headlights should be projected upward.
If the unit does not resume proper operation, then you need to check the presence of liquid in the cylinders and tubes. To do this, the products are removed and the working stroke of the rods is measured; it should be about 7 mm.
This is how the manufacturers intended that most of the time the hydraulic corrector is under pressure, as a result of which the working cylinder rod is retracted and the optics rotate downward.
What does a hydraulic corrector consist of and how does it work?
The design of the adjustment device is non-separable and simple; the hydrocorrector of the Lada Granta headlights consists of the following elements:
- the main cylinder located under the dashboard;
- a working cylinder located on each headlamp;
- reflector regulating mechanisms;
- connecting components.
A knob for controlling modes is displayed on the instrument panel, helping the owner change the pressure in the master cylinder. A change in pressure causes the reflector to rotate, and therefore the direction of the light flux.
The peculiarity of the hydrocorrector is its tightness and closedness. If a visual inspection reveals places where fluid is leaking or there are cracks, the connecting tubes require replacement.
The change in pressure in the main cylinder is transmitted to the working elements, causing the pistons to rotate, changing the angle of inclination of the reflector. Electrical correctors operate using on-board electricity and therefore do not depend on the ambient temperature. More reliable devices of this type are more expensive.
Operating principle of the VAZ 2110 hydraulic corrector
The corrector works on a fairly simple principle. The driver, by switching the knob located on the instrument panel, changes the fluid pressure in the main cylinder, which is immediately transmitted through the connecting tubes to the working mechanisms. In the cylinders located in the headlight units, this leads to a change in the length of the rods rigidly connected to the pistons. The rod pushes the lever, which exerts force on the reflector, which as a result takes the corresponding position.
All this happens when the system is closed and sealed. In the event of depressurization, the headlight hydraulic corrector stops functioning.
Manual headlight adjustment
Installation of a new device
- We find all the clamps that secure the pipelines with the working fluid and remove them by unscrewing the bolts;
- We return to the cabin, where we carefully remove the rotating handle from its seat on the main cylinder;
- We unscrew all the bolts that hold the main cylinder and remove it;
- We remove the working cylinders from the headlights and pull them out through the interior;
- hydraulic, operating due to the pressure of the pistons and fluid;
- electrical;
- automatic, capable of independently adjusting the level of headlights.
In order to install a new headlight hydrocorrector, there is no need to go to a service station. This is quite simple to do, so you can save time and money if you do the installation yourself. To get started, you will need a flathead screwdriver and an extension cord with a socket head.
Replacing headlight hydraulic corrector
Once these tools have been found, you should proceed to choosing a hydraulic corrector.
Today you can find a wide variety of models on the market:
The cheapest of them are hydrocorrectors. Their only drawback is frequent breakdowns.
So, in order to install a new hydraulic corrector, you need to remove the old one. Anyone can do this if you follow the simplest instructions, which are presented below in the text.
Instructions:
- First you need to find all the clamps securing the pipelines with liquid. They will need to be removed. To do this, you need to unscrew all the bolts.
- After this, you should return to the cabin and carefully remove the rotating handle from its seat. In this case, the rotating handle is located on the main cylinder.
- Now it's time to remove the main cylinder. This can be done using bolts. All bolts (which secure the cylinder) must be unscrewed and removed.
- When there are no more bolts left, you can start removing the cylinders from the headlights. The easiest way to pull them out is directly through the inside of the car. That's all!
Installing a new hydraulic corrector is as easy as removing the old one. To do this, all of the above steps should be carried out in reverse order, but before doing this, the O-ring must be replaced. Once the new device has been successfully installed, the entire system should be checked.
How to find a breakdown
Repair of the VAZ 2110 headlight hydrocorrector Many people, when headlight adjustment fails, immediately blame the hydraulic corrector for everything and rush to replace it as quickly as possible. But don't rush to conclusions. There may be other causes of the malfunction.
- Pay attention to any leaks of working fluid. If they are not there, check the stroke of the rod.
- To check the stroke of the rod, the actuator cylinders are dismantled. The normal value is between 6.5 and 7.5 millimeters.
- It is impossible to repair the hydraulic type corrector provided by the factory for the VAZ 2110, since the design of the device is not dismountable.
- If malfunctions occur, the entire assembly must be replaced, including cylinders and pipes.
Why does it fail
The reasons for hydraulic corrector failure are standard:
- Temperature changes that damage the hydraulic component of the unit;
- The use of rubber for seals is not of the highest quality, which causes leaks of working fluid.
If a leak occurs, you cannot avoid replacing the unit.