Disassembling the generator
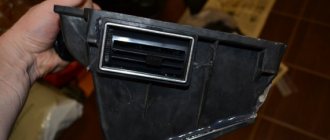
After removing the nuts from the extension 21 (Fig. 7-9) of the contact bolt and unscrewing the fastening screws, remove the protective casing 19 with the hose. Disconnect wire bundle 22.
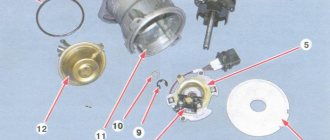
Rice. 7-9. Generator parts:
1 – “negative” brush; 2 – brush holder; 3 – “positive” brush; 4 – neutral wire plug block; 5 – insulating bushings; 6 – rectifier block; 7 – contact bolt; 8 – stator; 9 – rotor; 10 – inner bearing mounting washer; 11 – drive side cover; 12 – outer bearing mounting washer; 13 – rotor bearing; 14 – coupling bolt; 15 – clamping sleeve; 16 – cover from the side of the slip rings; 17 – buffer sleeve; 18 – bushing; 19 – protective casing; 20 – casing fastening screw; 21 – contact bolt extension; 22 – bundle of wires
Unscrew the screws and remove brush holder 2 with brushes.
Unscrew the nuts of the coupling bolts 14 and remove the cover 11 of the generator along with the rotor.
Clamp the rotor in a vice, unscrew the pulley nut and remove the pulley from the rotor shaft using a puller 02.7823.9504. Remove the segment key from the groove on the shaft and remove cover 11.
Unscrew the nuts of the screws connecting the valve tips to the terminals of the stator winding, remove the neutral wire plug from block 4 and remove stator 8 from cover 16 of the generator.
Unscrew the nut of the contact bolt 7 and remove the rectifier block 6.
Generator repair
To understand how the device works, study the layout diagram:
There are three main reasons for repairs:
- The voltage regulator has burned out.
- The diode bridge has failed.
- Break or short circuit in the windings.
Replacing worn out removable brushes
is not a malfunction. This is a consumable item that is checked at every maintenance. To remove the old brushes and install new ones, the entire assembly must be disassembled. Mechanics can be easily “treated” if you have basic plumbing experience. No special tools required. A regular set of wrenches and screwdrivers. Damaged bearings can be removed using a drift or a special puller.
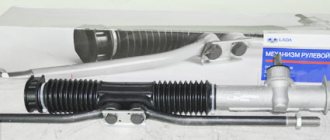
Replacing the VAZ 2121 generator rotor
Now you can remove the pulley, since before this we already unscrewed the nut securing it and it should come out freely:
Keep in mind that it is fixed to the shaft with a key, so be careful not to lose it, immediately remove it and set it aside:
Now you can freely remove the rotor from the Niva generator housing. This is shown more clearly in the photograph below:
If this part is necessary and cannot be repaired, we replace it with a new one. The price of a new rotor is from 300 rubles, so it is much cheaper than replacing the entire generator.
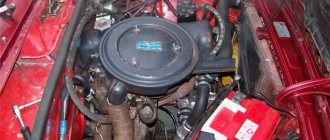
How much should a generator produce in the field?
There are three types of generators that can be installed on popular Russian SUVs. The output voltage is the same, but other parameters vary.
For carburetor engines, a power of 600-750 W . The maximum current that could be removed was 40-50 amperes.
Important! The generator for old modifications of Niva cannot be installed on new engines. Overloading will quickly damage it and require repairs.
If replacement is necessary, such a solution can only be temporary.
Injection engines produced before 2003 were equipped with power from 1100 to 2000 W. Load current from 80 to 130 amperes. Both generations were equipped with a mono-V pulley. Generators of this type can be installed on old carburetor internal combustion engines without consequences. Modern overhead motors are equipped with similar energy sources, only the pulley is designed for a larger load - it is poly-V-ribbed, like a belt.
Procedure for replacing the stator (winding)
In order to release the winding from the second part of the housing, it is necessary to unscrew several nuts securing it to the diode bridge (rectifier unit). There are three such nuts in total and they are clearly visible in the bottom photo:
After which it can be removed quite easily, and all that remains is to disconnect one more wire, this is shown in the picture:
If necessary, replace the winding with a new one. the price of which is no more than 500 rubles, I can’t give exact prices. We install all removed parts in the reverse order.
Signs of trouble:
Control lamp on the dashboard. This is the most reliable indicator, since its power connection is taken from the voltage regulator. How to remove a generator in the field:
- If the value is higher or lower than the set value, the lamp lights up or blinks. Indication details may vary between models, so please read the operating instructions carefully.
- The headlights are not as bright as during normal operation. When the starter is cranked, the voltage “drops” so much that it is noticeable by the blinking of the lamps.
- The sound of the engine changes, and extraneous noises are heard.
- Engine power is lost (provided that other systems are working properly).
- There is a smell of burnt insulation coming from the generator.
- There is less than 13 volts at the battery terminals when the engine is running.
Disassembly and assembly of the generator Niva 2121, Niva 2131
Generator repair, features of assembly and disassembly of the Niva 2121 generator, the procedure for replacing parts of the Niva 2131, VAZ 2121 car generator. Removal and installation of a carburetor engine generator Design of the Niva 2121, Niva 2131 generator, do-it-yourself repair, repair of electrical equipment generator, troubleshooting and inspection
We carry out the work at the inspection room ditch or lift.
Remove the oil pan protection plate and the right engine mudguard (see Removing the Niva 2131 oil pan protection plate and the carburetor engine mudguard). Remove the coolant pump drive belt (see Adjusting the tension and replacing the coolant pump drive belt).
Use pliers to loosen the clamp of the rubber air intake.
Remove the air intake from the branch pipe of the generator protective casing.
We disconnect terminal “61” of the Niva 2121 generator.
Sliding the rubber cover, use a 10mm wrench to unscrew the nut securing the wires to the generator output extension 30.
We remove the wires.
Using the “17” head, unscrew the nut securing the VAZ 2121 generator to the tension bar.
Using a 19mm spanner, unscrew the nut of the bolt securing the generator to the bracket...
...and remove the bolt.
We take the generator out of the engine compartment downwards.
Rubber and metal bushings are installed in the eye of the rear cover of the generator.
Using a “10” wrench, unscrew the nut of the insulating sleeve of the generator output extension “30”.
We are filming the outside...
...and internal insulating sleeves.
Using a slotted screwdriver, unscrew the two screws securing the protective casing to the VAZ 2131 generator.
Remove the protective cover.
Disconnect the wire from terminal “61”.
Using the “10” key, unscrew the “30” terminal extension.
Remove the extension cord.
Disconnect the wire from the voltage regulator.
Using a Phillips screwdriver, unscrew the two screws securing the voltage regulator and brush holder.
Remove the voltage regulator with brush holder.
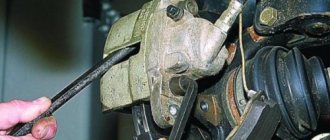
Using a 19mm wrench, unscrew the generator pulley nut. The rotor of the VAZ 2121 can be stopped from turning with a screwdriver (do not bend the impeller).
Remove the washer from the shaft...
...pulley halves,...
...spacer washer...
...impeller.
Use a screwdriver to pry it off and remove the segment key...
...under which there is a washer without a keyway.
Using a 10mm wrench, unscrew the nut securing the capacitor terminal.
We remove the terminal and, using a Phillips screwdriver, remove the capacitor.
Using a sharp scriber or paint, we mark the relative positions of the covers and the stator for subsequent assembly.
Using a 10mm socket, unscrew the four nuts of the coupling bolts.
We take out the bolts.
Remove the front cover.
To replace the bearing, use an “8” key from the outside of the cover to unscrew the four nuts of the screws securing the plates.
Remove the plates with screws.
Use a tool head of a suitable size (or a piece of pipe) to press the bearing out of the cover.
There is a thrust ring located on the rotor shaft.
We screw a nut onto the shaft thread, clamp it in a vice and jerk off the back cover with the stator.
If it is difficult to remove the rotor, tap its end with a soft metal drift through the voltage regulator window.
We disconnect the rotor and stator of the VAZ 2121.
Use a puller to press the bearing off the rotor shaft.
Using the “8” head, unscrew the three nuts securing the stator terminals to the rectifier unit.
Use a screwdriver to pry it off and remove the stator.
Remove the rectifier block.
Remove the contact bolt from the rectifier block.
We assemble the Niva 2121 generator in the reverse order. We place the nuts of the screws securing the bearing plates of the front cover on thread sealant. We press new bearings into the front cover and onto the rotor shaft using suitable pipe sections.
Generator VAZ 2121, Niva 2131
Description of the generatorDescription of the generator Niva 2121, Niva 2131 |
Checking the health of the generatorChecking the generator Niva 2121, Niva 2131 |
Disassembly and assembly of an injection engine generatorRemoval and installation of generator Niva 2121, Niva 2131 |
Removing and installing a carburetor engine generatorDisassembly and assembly of the generator Niva 2121, Niva 2131 |
Units and diagrams of electrical equipment VAZ 2121, VAZ 2131
Diagnostics of electrical circuits of the Niva 2121 car. Instructions for repairing electrical equipment: generator, starter. Niva 2131 car diagram.
circuits and electrical equipment, device
generator, troubleshooting and testing
starter, maintenance, device
lighting, inspection and replacement of parts
DIY windshield wiper repair
instrument panel, replacement and installation
vazclub.com
How to repair generator 9412.3701 of a VAZ-21214 engine
Disconnect the negative cable from the battery.
Remove the oil pan protection plate and the right engine splash guard.
| 1. Disconnect the output wire “D” of the generator. | 2. Sliding the rubber boot, use a 10mm wrench to unscrew the nut securing the wires to terminal “B+” |
| 3. ...and remove them. | 4. Remove the coolant pump drive belt. Using the “13” socket, unscrew the nut of the bolt securing the generator to the tension bar. |
| 5. Using a “13” wrench, unscrew the nut of the bolt from the lower mounting of the generator to the bracket on the cylinder block and remove the bolt. We take the generator out of the engine compartment downwards. |
Having unclenched the three protrusions of the casing,...
| 6. ...remove it. | |
| 7. Using a Phillips screwdriver, unscrew the two screws... | 8. ...and remove the voltage regulator with the brush holder. |
| 9. Disconnect the wire and remove the voltage regulator with brush holder. | 10. Use a 10mm wrench to unscrew the nut... |
| 11. ...remove the sleeve and the capacitor wire. | 12. Having unscrewed the screw with a Phillips screwdriver,... |
| 13. ...remove the capacitor. | 14. Using a Phillips screwdriver, unscrew the screw securing the rectifier unit and the three screws securing the ends of the stator windings. |
D) Diodes or rectifier unit are faulty
To assess the condition of the mentioned components (negative, positive and additional diodes), arm yourself with a low-power lamp and battery. Diodes are indicated by numbers in the diagram: 1. Positive
Operation is determined by connecting “” to the 30 terminal of the generator (for positive), the bolts of the rectifier block (for negative) or to 61 (for additional), and “-” to its body (for negative) or to any of the bolts of the rectifier block (for positive and additional). The glow of the lamp indicates that the diodes have been shorted, which leads to the conclusion that the diode bridge will have to be replaced. Be attentive to the indications on the instrument panel. Often the icon lights up half-heartedly and is not noticeable in bright light.
Read also: Where Does Engine Oil Go?
Nuances of moving a generator
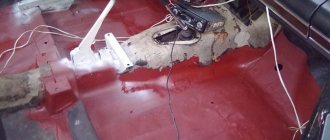
When replacing a generator with a Niva 21213, 2121, 21214, a number of subtleties arise, and one of them is the location of the generator unit. It is located at the bottom of the engine compartment.
Actually, this is why problems arise with the operation of the structure: while driving, various contaminants get on the generator, and coolant drips. If you don’t want to constantly change the generator unit, it is recommended to move it upstairs.
To ensure that no problems arise during the operation of the car, it is important to monitor the condition of the car. First of all, it is recommended to regularly inspect the generator.
So, when the “battery” light blinks on the dashboard, if suspicious noises or creaking sounds occur, you should be wary and think that the generator is not working correctly.
Timely inspection will help to avoid unpleasant situations in the form of breakdowns of the constituent elements of the generator, and as a result, failure of entire electrical systems.
The disadvantage of domestic Niva SUVs is the location of the generator unit - at the bottom of the engine compartment. It constantly gets contaminated when driving off-road, and coolant constantly drips. The problem is solved by moving the generator upstairs (the author of the video is SARTANETS).
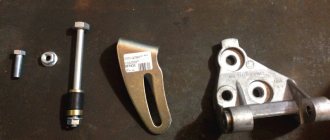
To transfer, you will need a set of keys, a bracket, mounting bolts, and a V-belt. You can make a generator transfer bracket with your own hands according to the drawing below.
Drawing of a homemade bracket
Sequence of actions during transfer:
- We dismantle the propeller, pump and remove the belt.
- By unscrewing the standard bracket, you can remove the generator.
- We cut off the bead around the side of the cylinder head and on the cylinder block.
- Then you should unscrew the two bolts and two studs.
- Next, the assembly is installed on a new bracket and final assembly is performed.
Thus, moving the generator unit upstairs is not difficult.
Characteristics of the standard generator
The main characteristics of the generator installed by the manufacturer in Niva 21214, 21213, 2121 will be considered using the example of generator type 9412.3701:
- current – 80A;
- voltage – 13.2 V,
- rotation is right.
The cost of standard models of electric generators is 5-7 thousand rubles. If the unit breaks down, it is possible to replace its components or completely replace it with the original or analogues. The prices of the most common ones are presented in the table.
| Analogue | vendor code | Cost, in rubles |
| Generator VAZ-2104-21073,21214 | 9412.3701-03 | 5900 |
| Generator VAZ-2104-21073,21214 | 372.3701-03/05 | 3800 |
| Generator VAZ 2121-21213,21214 | 9412.3701 | 5450 |
The table shows that in the process of replacing a generator on a Niva, you can give preference to a cheaper universal analogue.
| Analogue | vendor code | Cost, in rubles |
| Generator VAZ-2104-21073,21214 | 9412.3701-03 | 5900 |
| Generator VAZ-2104-21073,21214 | 372.3701-03/05 | 3800 |
| Generator VAZ 2121-21213,21214 | 9412.3701 | 5450 |
Removal, disassembly, inspection, assembly
Removing the generator from a Chevrolet Niva (top location)
The battery on my beloved ShNiva began to discharge quickly in winter. I had to charge it every 2 weeks. There may be several reasons for this behavior of the battery, but since the generator bearing had already begun to whistle, I decided to start with its revision.
On my car, the generator is installed 80A 2123-3701010-01 (9402.3701-01). The generator is located at the top of the engine. This greatly simplifies the task of removing it from the car.
To remove the generator I needed:
- Key for 10, 8, 13
- A ratchet with a head of 8, 10, 13 is desirable
First, you need to loosen the tension on the auxiliary drive belt (some people out of habit call it the Niva generator belt, but this is incorrect because this belt also turns the pump and power steering pump), otherwise you won’t be able to reset it. To do this, you need to loosen the nuts securing the tension roller bracket (two nuts 8, one nut 10) and unscrew the adjusting bolt 10. It is difficult to reach the far nut 8 with an open-end wrench; I used a ratchet with a head 8.
First, loosen 3 nuts, and then begin to unscrew the adjusting bolt until there is slack in the belt and it can be removed from the generator pulley.
Now you can begin to remove the generator. If I have to work with electrical components or devices, I always disconnect the negative terminal from the battery. Next, you need to disconnect the wires that go to it from the generator. One wire is connected by a block to the generator terminal “D”. This is the output of the generator excitation winding. It is also necessary to unscrew the nut by 10 and disconnect the wires from the contact bolt “B”. On top of the bolt, the bolt is protected from dirt by a rubber protective cap, which must first be removed from the bolt and moved up along the wires.
Next, use a 13mm wrench to unscrew the two nuts and remove the 2 bolts securing the generator to the engine.
The photo below shows the installation location of the generator with the mounting bolts in place (so they don’t get lost).
The generator has been removed from the car and now you can disassemble and check it.
Disassembling the generator Chevrolet Niva 80A 2123-3701010-01 (9402.3701-01)
Since it was winter, I brought the generator home. After reading various articles on disassembling generators, at first I was somewhat doubtful that I would be able to disassemble it at home, “on my knees,” without pullers or a simple vice. However, I succeeded.
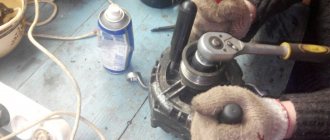
I started by removing the generator pulley. Here the first problem awaited me. The pulley nut did not want to come off. I couldn’t hold the pulley with my hands, and I don’t have a vice at home. After several unsuccessful attempts, I was able to secure the pulley quite well using the old accessory drive belt.
I wrapped the pulley twice with an old belt, then tied a knot with a slight indentation. I inserted a long spanner between the pulley and the assembly and turned it several times, tightening the belt on the pulley. I installed the key under the pulley in such a way that it would lock the pulley from turning when the nut was unscrewed, i.e. when moving a crooked hexagon with the head down (pictured below).
Even with the pulley secured in this way, I was not immediately able to unscrew the nut. A long, heavy key helped me. I hit it with all my might at the very end of the hexagon. After the fifth or seventh blow, the nut gave in and was then unscrewed by hand.
In the photo below is everything that was removed along with the pulley. The order (from right to left) corresponds to the order of removal from the generator.
Next, remove the plastic cover of the generator. To do this, you must first unclip three plastic latches. After this, the cover can be easily removed from the generator housing.
Here is a photo of the insides of my generator, which were hidden under the cover.
To replace or check the technical condition of the brushes, as well as to disassemble the generator, it is necessary to remove the voltage regulator assembled with the brush holder from the generator. It is screwed with two screws to the generator housing. It is also necessary to disconnect the wire going to it.
Unscrew the 4 coupling screws and separate the front cover of the generator and the housing.
The rotor can be knocked out of the bearing in the following way:
- Screw a nut onto the rotor axis so that if something happens you can “correct” the thread with it
- Using a hammer, carefully knock out the rotor through a wooden spacer, holding the cover vertically with your hand and resting it on the floor.
Since I initially planned to replace the front bearing of the generator (it began to creak and squeak when cold), I did not stand on ceremony with it, but simply knocked it out with a head that came to hand. However (I’ll say ahead of time) I shouldn’t have treated him like that. The new bearing I bought in the store had more play than the original French bearing, which had been on the car for almost 10 years. It would just be necessary to open it, wash it and refill it with grease.
Checking and repairing the Niva Chevrolet generator
Since my generator was working and only needed an inspection, there will be no specific advice here yet. I will just describe what I did and what I paid attention to.
- When removing the voltage regulator with brush holder, you must make sure that the brushes protrude from the brush holder by at least 5 mm. Check the ease of movement of the brushes in the brush holder. Otherwise, the regulator must be replaced.
It is also necessary to check the resistance of the generator rotor windings. To do this, we measure the resistance between the two slip rings. If the ohmmeter shows infinity, it means there is a break in the windings and the rotor needs to be replaced.
It is imperative to clean all electrical contact points. Important are the contact point of the capacitor on the generator housing (clean) and the capacitor wire (clean and tighten). It is important to securely tighten the capacitor with screws to the housing, which will ensure reliable contact.
Generator replacement
The instructions below will help those Niva owners who decide to remove the generator for repairs or to completely replace it. Usually, it is not necessary to change the entire device so often, since most of its components are sold in stores, the same rotor, stator or diode bridge. All these spare parts can be replaced with new ones if one of them fails. If you still decide to install a completely new generator, then again, the instructions described below will help you with this.
Or is it still better to take a more powerful one - 100 amperes? I recently thought about this question, because either my gene has become quite worn out and can no longer produce the required voltage. That’s why my battery is almost always dead, so I almost have to immediately turn off the appliances, the stove, etc. In general, if the gene is bad, then you can’t even listen to music in nature for a couple of hours, the battery will die. And if the time has come to change it, then maybe immediately take a more powerful one?
Disassembly and repair procedure
So, the first step is to remove the generator from the car, which you can read about in detail by following the link provided.
Then we unscrew all the nuts from the back cover, there are four of them in total, shown in more detail in the photo:
Now we turn it over and lightly press on the bolts from the reverse side and they usually fall through, thereby resting on the blades, blocking it from turning. This is necessary so that when the nut is unscrewed, the pulley does not turn.
Now take the 19mm wrench and unscrew the nut mentioned above:
If everything went well, we try to divide the generator into two parts. Usually, in a good situation, it splits quite easily. If problems occur with this, then you can lightly tap the fastening ear with a hammer, as shown in the photo below:
As a result, we get a rotor on one side, and a stator (winding) on the other, and visually it all looks something like this:
So, it turns out that in front of us there are two parts of the device, one of which (on the left) is a stator with a winding, and the second is a rotor.