Initially, the front strut brace was used on sports cars that were operated under extreme load conditions. It strengthened the body when driving off-road, jumping from springboards, and also increased the sensitivity of the steering wheel. But currently this accessory is actively used among Lada car enthusiasts (XRAY, Vesta, Largus, Granta, Priora, Kalina and even Niva 4x4). How the “glasses” shift while moving is shown in the video:
Advantages:
- steering sensitivity increases when maneuvering (by increasing the angular rigidity of the body);
- the vehicle's stability increases when moving in a straight line;
- body deformation is reduced when cornering and on uneven roads (reduces the likelihood of cracks appearing on the body), and the stress at the attachment points of the front suspension supports is also reduced.
Flaws:
- In the event of a side impact, the opposite pillar may also be damaged.
Why do you need a front strut brace?
Without touching on other aspects, it should immediately be noted that it increases the rigidity of the body. The connection of the front struts allows you to increase vehicle stability when maneuvering and improve handling. Why and due to what does this happen? To understand, you need to directly touch on the design of the body and its behavior during movement.
Moreover, it is necessary to make a small addition - in most cases, improving the behavior of the car does not depend on its brand, but most often the strut brace is installed on cars of the VAZ family, such as 2109, 2110, Kalina, Priora and others. True, the installation of front strut struts can be carried out on other models.
So, because the body of any vehicle is not a monolithic piece of metal or plastic, when moving due to the influence of external forces it becomes loose. There is nothing strange in this, because for its manufacture many parts are used, connected to each other in various ways (welding, fasteners, etc.). For clarity, the body can be compared to a chair - initially it is strong and stands level on the floor.
But over time, it begins to creak, stagger, tilt and is ready to fall apart when significant forces occur. This is due to weakening of the connection points. This is the kind of situation that can be avoided by using a tie between the pillars, primarily the front ones. Otherwise, the car behaves like that falling apart chair when turning or driving on a bumpy road. It begins to roll, and when driving at high speed, the car can be completely taken off the road.
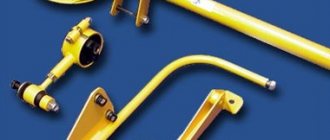
Types of stretch marks
The market for automobile spare parts and tuning parts is quite extensive, and therefore, when purchasing extensions for popular cars, you can choose among several options. Of course, the greatest variety in the domestic space is among the banners for VAZ cars. Let's look at the main advantages and disadvantages of the spacers available for purchase.
- A one-piece stretcher is the simplest option, taking up a minimum of usable space in the trunk.
- Model called TV. Between the rear glasses there is a round pipe with an adjusting screw. The lower part of the body is attached to the bottom of the passenger compartment (on VAZ models to the seat belt mounting bolts). The advantage of this stretch is that it remains possible to fold the rear seats and put large cargo in the trunk. But while maintaining functionality, we lose rigidity. A square-shaped structure acquires good rigidity only if the corresponding corners are rigidly connected to each other diagonally. So it turns out that the effect of having a lower part in the structure is not too superior to the result that can be obtained from regular stretching.
- The spacer is cross-shaped, in the shape of a butterfly. This type of stretching will have the greatest rigidity, as it has diagonal reinforcements. There is only one drawback, but a rather significant one - after installing the extension, access to the interior is blocked, and therefore folding the seats does not add useful space to the trunk.
Not all models on the market are described. In your search, you can even come across products of a similar format.
Agree, the product looks quite technologically advanced. But on a car with a living body, you definitely won’t be able to feel the difference between such a strut and the simplest one-component stretch.
Mounting options
In models from some manufacturers, the method of implementation of fastening leaves much to be desired.
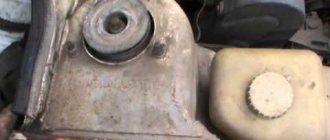
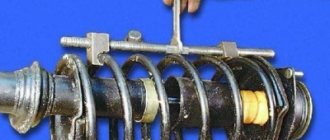
The upper part of the spacer rests on the glass and is pressed from below by two crescents welded to the bolts. Judging by the reviews, the mount is quite flimsy and does not inspire confidence. But due to the fact that the bottom of the upper part is made of a cone, the spacer should fit tightly to the glass, thereby ensuring a more or less stable position. You can find reviews online from people who speak positively about the effect after installing this type of product.
Which stretcher is definitely not worth buying?
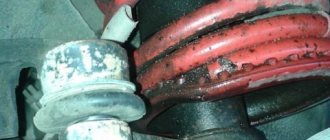
Despite its seemingly obvious uselessness, on the market you can find a rear strut brace attached to the shock absorber rod. Roughly speaking, it would be more correct to call such a strut an additional anti-roll bar. What adds to the absurdity is that in order to reduce vibrations, the shock absorber is attached to the body through a kind of silent block. In some cases, after some time, new extraneous noises appeared in the car from this type of strut. Therefore, we would not recommend purchasing this kind of tuning elements.
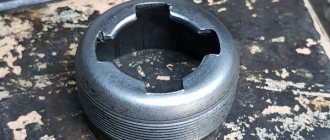
You can resort to installing such a spacer only if the rear pillar glasses do not have a clearly defined shape (for example, as on Renault Logan). In this case, it will be impossible to secure the cup spacer in any other way without welding.
How to install
Installing rear window extensions, as well as front strut struts, will not cause problems even for a novice car enthusiast. The adjusting screws are designed to accurately fit the product to the body of a specific car. This must be done before screwing it to the body. The car must be parked on a flat, horizontal surface. After tightening all the screws, you can slightly tighten the adjusting screw, creating a slight tension on the stretching of the glasses. But no more than that! Excessive spin will result in constant stress, which over time will weaken the body and cause geometry changes.
If you have the desire and straight hands, you can repeat the factory version of the rear struts with your own hands (an example is shown in the video).
What does a front strut brace do?
After considering the processes occurring during movement, all that remains is to summarize why such a screed is needed and what it gives. It is necessary to note the following positive aspects of using a spacer between the racks:
- body rigidity increases;
- the trajectory of the car in turns is maintained;
- improves car controllability on bad roads;
- the service life of suspension elements increases.
The improvement in performance will be more significant if, in addition to the strut between the front struts, a strut for the rear struts is also installed.
Varieties
Most often, 2 types of spacers are used for tuning - adjustable and non-adjustable. In practice, it turned out that a spacer with a control mechanism is worse than without it because it consists of 2 parts. Such a spacer will not bring much benefit after installation and will not achieve the desired success.
There are also differences in fastenings. The most commonly used spacers are 2-hole and 3-hole spacers for installation. A “piece of hardware” with 3 mounting points will last the longest, but to install it sometimes it is necessary to drill holes in the body. It is also worth noting that its installation is more complicated.
Non-adjustable strut extensions are mainly made for a specific car model. Adjustable ones are most often universal; they can be installed in any car, even if the holes do not fit.
Spacers also differ in the manufacturing method. Some of them are made from solid material using hot stamping technology. There are also spacers consisting of previously manufactured parts that are connected by welding. The first option is more reliable, but the second can also bring a lot of benefits after installation, increasing the rigidity of the body.
Some car owners increase the rigidity of the body by installing rear strut struts, but this option is not common, since the part reduces the free space in the trunk, which is often not enough.
Advantages and disadvantages
It’s not difficult to find a spacer option that suits you, using a specific article number or using the search by car model. The Autoproduct store alone offers the widest assortment.
But in order to make a final decision, it is worth dividing the characteristics of the spacer into pros and cons.
The positive points include:
- reduction of possible body deformation;
- confident cornering;
- improved off-road performance;
- increased steering sensitivity;
- improved vehicle stability.
But there are also disadvantages. Among them:
- a strong side impact deforms the entire rack;
- purchase and installation require large financial costs;
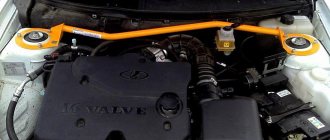
- access to some components in the engine compartment becomes more difficult.
And you can draw your own conclusions, since everyone sets their own priorities.
I'll say this. Spacers on the front struts increase body strength and vehicle stability when driving off-road and when driving straight along the highway.
Pros and cons of spacers
Many drivers who installed spacers either with their own hands or in specialized workshops note the following advantages:
- When cornering, you especially feel stability and ease of control.
- Body vibration is significantly reduced.
- Increases driving stability on a flat road.
- The risk of cracks in the metal is reduced.
Another advantage of stretch marks is the ease of installation. You just need to tighten the bolts and nuts well.
Disadvantages of spacers:
- A rigid coupling does not dampen vibration. If without a brace each part of the body bends separately from each other, then with a brace one strong deformation on the side transfers the force to the other side.
- The spacer pipe may interfere with diagnostic and repair work on the engine.
Spacers are inexpensive. The cheapest is around 1 thousand rubles.
Manufacturers and prices
In fact, the cost of extensions for front struts suitable for a VAZ 2114 car may vary depending on many factors.
Therefore, we suggest that you familiarize yourself with the most attractive options in terms of reliability and price, ideally suited to the design features of the body and pillars of the VAZ 2114.
| Manufacturer | Price |
| TechnoMaster (only for internal combustion engines with 8 valves) | 1500-1600 rubles |
| AutoProduct | 1000-1200 rubles |
| Super-Auto (only for internal combustion engines with 16 valves) | 1200-1300 rubles |
Advantages and disadvantages
The mechanism has both pros and cons. It’s better to start with the good, namely with the advantages:
- Preservation of welds in vulnerable areas of the body;
- Improved control, namely, more stable movement of the car in a straight line and sharper turns;
- The car is controlled more accurately;
- “tolerance” of the car during an aggressive driving style and increased loads;
- The body is subject to minimal risk of deformation, even when used on poor quality surfaces.
Many motorists think that if they don’t like an aggressive driving style, then they don’t need a spacer. However, this is not always the case. Thanks to the spacer, you can enter a turn at speeds higher than normal without losing control. This saves a lot of time and makes movement less difficult.
There is only one drawback to installing rack extensions, but it is very significant. Because of this, in the event of an accident, the damage is more severe. If the blow falls on the side where the spacer is installed - into the wing, then not one “glass” will be damaged, but two at once. In this case, it will be necessary to replace not just one side, but the entire front part at once, which in the future may also compromise the rigidity of the body. However, if the blow is delivered exactly in the center of the front part, then the strut can save the life of the driver and passenger, as it will prevent the body from folding towards the passenger compartment.
Recently, the production of spacers with notches has begun, thanks to which, in the event of an accident, it is not the body that will bend, but only the spacer, which will reduce costs in the event of repairs after an accident.
Due to the design of some vehicles, the spacer may reduce access to the brake fluid reservoir.
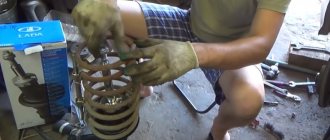
Making a spacer with your own hands
Many car owners do not want to spend money on purchasing this device, so they prefer making it themselves. But in order to do this, you need to be able to use a grinder and other equipment designed for working with metal.
Before moving on to the front strut strut with your own hands, you should select the material. You need to understand that carbon fiber is an expensive material; it is used by professional racers. They spend $500-$1000 on branded stretch marks. An ordinary car enthusiast can make a device from ordinary duralumin, which is lightweight and affordable.
First of all, prepare the following tools:
- roulette;
- file;
- electric drill with different drills;
- calipers;
- cardboard;
- pipe bending machine;
- grinder;
- scissors;
- black marker;
- welding machine;
- a duralumin plate, the width, length and thickness of which are 20, 50 and 0.5 cm, respectively;
- duralumin pipes with round and square cross-sections. With a length of at least 1.5 m and a diameter of 3 cm in the first case, and a length of 20 cm and a width of 3 cm in the second.
The sequence of actions is also important. So, the car owner must perform the following operations:
- Open the hood and use a caliper to measure the diameters of the glasses located on the racks, as well as the distance between their bolts. These dimensions are necessary for making ring templates cut from regular cardboard.
- Using a tape measure, measure the distance between the glasses, which will allow you to find out the length of the stretch.
- Place the templates on the plate, and then use a grinder to cut out two rings. To give them the required dimensions, use a file. After this is done, three holes are drilled on each ring; there should be an equal distance between them.
- The required length of the pipe is cut using a grinder; its ends should also be slightly bent on a special machine.
- The square pipe is cut lengthwise and diagonally. Having received the trimmings, they are welded to the ends of the curved pipe.
- The rings are welded to scraps obtained from a square pipe.
- The extension is painted and installed on the rack studs, after which it is secured with nuts.
The experience of many car owners shows that installing a cross member is optional, but it cannot be said that it is useless. The driver must make the installation decision based on all the pros and cons of such a design.
Advantages and disadvantages
The mechanism has both pros and cons. It’s better to start with the good, namely with the advantages:
- Preservation of welds in vulnerable areas of the body;
- Improved control, namely, more stable movement of the car in a straight line and sharper turns;
- The car is controlled more accurately;
- “tolerance” of the car during an aggressive driving style and increased loads;
- The body is subject to minimal risk of deformation, even when used on poor quality surfaces.
Many motorists think that if they don’t like an aggressive driving style, then they don’t need a spacer. However, this is not always the case. Thanks to the spacer, you can enter a turn at speeds higher than normal without losing control. This saves a lot of time and makes movement less difficult.
How to install?
After purchasing the part, you can install it yourself with your own hands.
It is very important that the car is parked on a level surface, otherwise the non-adjustable strut will not go into place, and the adjustable strut will not be installed correctly.
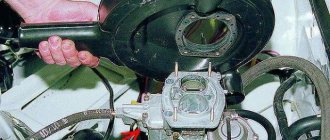
Step 1: Open the hood and unscrew all the nuts on the strut cups
Step 2: Install the spacer. The part should easily snap into place, the holes should align with the studs. If this does not happen, then either the car is not on a level surface, or it is time for it to go for a wheel alignment.
Step 3: If no difficulties arise, install the washers above the spacer and, without overtightening, tighten the nuts. If the stretch is adjustable, now is the time to adjust it.
Ready. We enjoy the result!
Making a spacer with your own hands
The first thing to do is to make flanges.
To do this, unscrew the nuts securing the stands to the glasses and, placing cardboard on them, mark the future holes with a marker. Then cut them out in paper and put it on the pins. Now all that remains is to outline the outline of the flange according to the shape of the glass and trim off the excess cardboard. Inside the template, make a round opening corresponding to the protruding part of the support. Ready cardboard template with holes
Perform further operations in this order:
- Attach the cardboard template to the sheet of metal, outline it with a marker and cut out the steel flange using a grinder. Round all edges and sand to ensure there are no burrs.
- Mark the centers of the holes and drill them according to the diameter of the studs. Use a small drill first and then a large one. Bevel both sides of the holes and try the part in place. If a discrepancy is found, widen each hole slightly with a round file.
- Cut a 4cm wide strip of steel and weld it at a 90° angle to the straight edge of the flange. To prevent the strip from bending back under pressure from the pipe, make triangular stiffening ribs and weld them along the edges.
- Place the flanges on the studs and check for distortions. Press them with two nuts and carefully measure the distance between the strips to cut the pipe as accurately as possible.
- Disconnect the battery and cover the engine compartment with a damp cloth. Attach a pipe cut to size to the flange brackets and securely weld it at both ends. Check the gap between the hood cover and your structure.
- Unscrew the nuts and remove the brace from the car. Boil all the seams thoroughly, remove the slag and try to put it back. If the structure has been welded so badly that the flanges do not fit on the studs, file the holes again.
- Remove the finished spacer again, clean it with a brush from rust, degrease it and paint it in 2 layers, after applying a primer. Place the jumper in place and finally tighten it with nuts.
The coupling for regulation is placed in the pipe gap
If you are a specialist in welding, then you can easily make the stretch adjustable. To do this, buy a ready-made threaded coupling of the required diameter and weld it in the middle of the cross member, having previously cut it into 2 parts. After welding, twist them together, secure the coupling with a locknut, and only then cut the pipe exactly to size between the flanges.
Successful design of the stretcher - it stands right behind the seats
Video about making a front brace
Judging by the practical experience of many drivers, installing the front strut struts is not a necessary step, but in many cases it is useful. Installation of the finished product is easy, so there is no need to go to a car service center. Since the design of the element is not complicated, skilled motorists can save money and do the stretching themselves, provided that the garage has the necessary tools.
Home →
Tuning →