Replacing the front struts of a Lada Priora with your own hands
The front struts of the Lada Priora need to be replaced if they are out of order. Signs of their malfunction are dull knocks, creaks, clicks that occur when the car is driven on an uneven road. However, these problems can be the result of broken ball joints or silent blocks. Therefore, it is necessary to diagnose suspensions, steering rods, ball joints and ends.
Next we will talk about how to replace the front struts yourself. In addition, a photo report will be provided, which will make your work even easier.
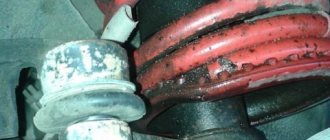
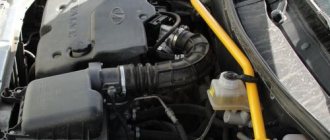
First you need to diagnose everything to make sure that the reason is in the racks. To do this, hold the shock absorber with your hands, check whether there is play in its connections, and make sure that there are no oil leaks. If the strut is faulty, there will be traces of oil on both the piston and the boot. You need to take the wheel out and check it. A non-working stand will be immediately noticeable.
In the disassembled case, Acomi racks were chosen, and specifically the model “Comfort CLASSIC A170.2905.002/003-05. But here the choice is determined only by the preferences of the car owner.
Replacing the front struts of a Lada Priora with your own hands
Replacing the front struts of a Lada Priora with your own hands
Replacing the front struts of a Lada Priora with your own hands
You just need to remember that the racks should be soft and, preferably, affordable. The first property provides comfort, which is very important when moving.
Worth checking out:
- Installation of the upper support of the VAZ 2115 strut
Acomi front struts are convenient in that they are collapsible and hydraulic. In case of any problems, such racks can be easily rehabilitated using special cartridges.
Replacing the front struts of a Lada Priora with your own hands
Replacing the front struts of a Lada Priora with your own hands
It is worth noting that replacing the front struts of a Lada Priora takes quite a lot of time. In addition, you will need special devices for tightening the springs, as well as a puller to uncompress the steering tips.
Replacing the front struts of a Lada Priora with your own hands
What it is
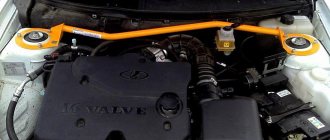
Front pillars are a device located at the front of the car on the sides, fixed in the glasses. They are responsible for the comfort of vehicle movement, stability, smooth ride and turning. Without them, the car would shake while driving, even on smooth roads, and the risk of horizontal car roll would increase significantly.
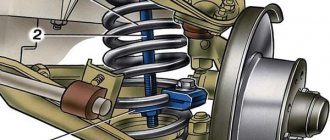
The front struts consist of:
- springs;
- shock absorber;
- ball joint and others.
The rear and front struts with shock absorbers have the same design and differ little from each other. There is an oil type device on the front pillars.
What you need for this: tools, components
Replacing the front struts on a Lada Priora is possible with special equipment. If the appropriate equipment is not available, you should contact a service station. You will need the following tools: spring ties and a puller for steering tips. Some of the more accessible ones will be useful:
- Socket and socket wrenches.
- Six inch hexagons.
- Pliers.
- Hammer.
- A lift or trolley jack to raise the car.
Usually, replacement components are purchased for a car; sometimes they can be found in one set or purchased separately, saving money. The set includes:
- the racks themselves;
- set of bolts;
- support bearing;
- a pair of steering tips, as well as a pair of bump stops and boots.
Before starting disassembly, it is recommended to spray WD-40 on the joints of the parts and leave to “soak” for up to 10 minutes. This will allow you to easily remove old components and other elements.
Which struts are better: gas or oil, or maybe gas-oil
I’ll say right away, not for the sake of advertising, I haven’t seen anything better than the ss-20 on the Priora. To understand which racks are better, or which ones are more suitable for you, you need to know their operating principle.
Gas - the internal filling is gas, very hard, you can’t just push them through with your hand, or if you put them on a car, you can’t just break through the suspension - but you’ll drive like a bucket.
Oil-filled - they are filled with oil, soft, and very often create force in only one direction. Installed on almost all cans from the factory. The suspension is soft and killable - if you hit a good bump, it won’t be difficult to break through the shock absorber until it clicks unpleasantly.
Gas-oil ones are an interesting option; they contain both gas and oil inside. When the strut reaches critical compression, the gas is activated, pushing the oil and with it the rod into the neutral position. That is, on critical bumps the gas will not allow the suspension to break through.
How to replace them yourself
Replacing the front struts on a Lada Priora with your own hands is quite possible if you make sure you have all the tools and components. You also need to take into account the recommended sequence of actions so that you do not have to overpay when correcting errors.
To carry out this procedure:
- We take the jack and install it on the side where the installation begins.
- We remove the wheel, unscrew the brake connections, take out their fastenings located on the rack.
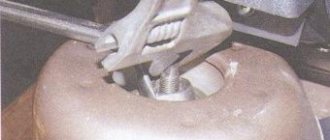
- We take pliers and carefully unbend the lock on the finger of the steering tip, take it out, and unscrew nut number seventeen.
- We reach the steering tip puller and pull it out.
- Scroll the support and unscrew the steering knuckle nuts. If you used WD-40 before, this will not be difficult to do.
- If this was not possible, but you can’t unscrew it, you can try knocking them out with a hammer. We just act as carefully as possible so as not to damage the thread.
- Next, we take on the eccentric bolt located on top and save it - it is necessary for adjusting the wheel alignment. It is also recommended to remember its location, focusing on static elements.
- All that remains is to unscrew the retaining nuts that secure the structure; access to them is under the hood.
- Now it’s time to remove the assembled structure with the shock absorber from the wheel well.
Replacement of racks is carried out after dismantling the old ones, so we disassemble everything step by step.
How to change the front struts of a Lada Priora - detailed instructions
1. First of all, remove the mounting bolts on the wheel, then install the jack on the side from which you are going to make repairs.
2. Next, unscrew the bolts completely and remove the wheel.
3. It is necessary to disconnect the brake hoses, and then remove them from the holder located on the rack.
4. Take pliers and carefully unscrew the locking cotter pin on the steering end pin, then you need to take it out and unscrew the nut with a “17” key.
5. Now it’s the puller’s turn, install it on the steering end as shown in the photo and press it out of the socket.
6. Unfold the support and start unscrewing the fastening nuts on the steering knuckle. If you followed my recommendations and treated all connections with WD-40, there should be no problems with unscrewing.
7. If necessary, use a hammer to knock out the bolts, being careful not to damage the threads!
8. The top eccentric bolt is used to adjust the camber and has a washer on it that often likes to stick to the strut. Do not throw away the bolt itself; it will be reinstalled during the replacement process. There is no point in remembering the position of the eccentric along the axis, since in any case you will have to go to the wheel alignment.
9. Let's move on. Using a wrench set to “13”, unscrew the fastening nuts that secure the front pillar to the body; they are located under the hood.
10. We take out the front strut from the wheel well assembly.
How to disassemble the structure itself
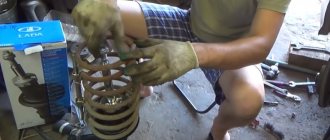
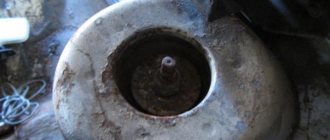
When the structure is removed from the machine, it remains a single piece that still needs to be worked on. It should be done like this:
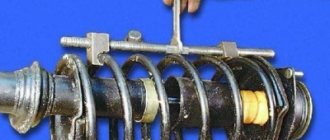
- We take the clamp for the springs that we prepared earlier, fasten it to the second turn from above and below, so as not to allow the possibility of changing the position without the owner’s desire.
- We bring the spring together, tightening the bolts of clamp number 1 until it becomes obvious that number two has begun to move freely on the coils. After this, we tighten until the load is removed from the previous one. In other words, we approach each side one by one.
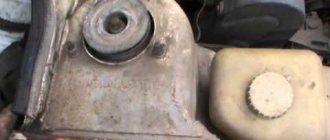
- Next, you will need a 22-diameter ring wrench and a hexagon. With their help, we unscrew the holder nut that secures the strut rod to the support.
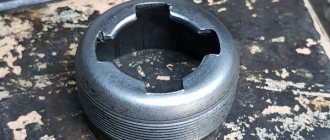
- It's time to start removing the bump stop, the support bearing, the support itself, plus the compression limiter.
- We take the rebound limiter washers and replace them with new parts, sometimes they come complete with the struts.
- Now we remove the cup with the damper from the spring, we also get rid of the compression buffer, the spring itself and the boot.
A stand is in your hands - a structure that requires visual diagnostics. We repeat the same on the second side of the machine. To install a new part, you will need to do the same, only in the reverse order. New components will be needed.
How to understand that the replacement goal has been achieved
As a result, everyone wants to get the perfect sound and softness of the ride, however, replacing the front struts with your own hands usually has specific features and inaccuracies. Although the main goal can be considered achieved if:
- Knocks, periodic or constant, are no longer observed while driving.
- It became noticeable that the suspension was more elastic than it was before.
- The car began to give the feeling of a more stable car, there is no former swaying.
- The roll has decreased, the car is easier to control when turning and turns more smoothly.
- There is greater comfort off-road and at high speed.
- The speed of steering return increased due to the rise in castor level.
- The car overcomes obstacles on the road surface more smoothly.
If most of the changes described above did not affect the repaired car, there is a high probability that mistakes were made. Or there are reasons that have not yet been identified. It is advisable to consult with a specialist for other problems.
The process of replacing the rear shock absorber on a Lada Priora VAZ-2170
Replacing the rear shock absorber of a Priora car...
Hello dear readers of the blog RtiIvaz.ru. Today, thanks to video material, we will look at the process of replacing the rear shock absorber on a VAZ Lada Priora. On front-wheel drive VAZ cars, the process of replacing rear struts can be said to be the same. This article will also be useful for car enthusiasts of other VAZ models.
So let's get down to business, first we unscrew the nut securing the rear strut to the body. For this purpose, it is advisable to use a special key 22X13 (head in head) for replacing, removing and installing rear struts of cars.
Next, we put reliable stops under the car, “tear off” the wheel bolts (but do not unscrew them), then raise the car on a jack, while the stop is placed on the side opposite to the lift.
After jacking up the car, a safety net is placed under the body in the form of a reliable stop. Having lifted the car body, we give back the previously “torn off” bolts and then remove the wheel. We carry out this operation process in order to begin replacing the rear shock absorber of the Priora VAZ 2170.
Having removed the rear wheel, unscrew the bolt securing the lower part of the rear strut to the beam and pull it out. To do this you have to work a little with a hammer. Then the replacement strut assembly with the spring is removed from the machine. First of all, you need to remove all the elements of the shock absorber and simply replace all the parts that have become unusable.
In this case, we will replace the new torn “corrugation” boots, we will also replace the bushings of the upper shock absorber of the rear “donut”, and we will leave the old bump stop, which can still serve, since it is practically not worn out for replacement.
Rear suspension shock absorber housing, repair kit design number: VAZ 2108-2915681
Before installing the “corrugation” casing, a shaped metal fender washer is installed on top of it, and the rear pillar bumper is immediately placed in the “corrugation”. The “corrugated” boot is put on the rod, and the lower rubber “donut” with an iron bushing is placed on top.
Rubber rear shock absorber cushions for spring VAZ 2110, 2111, 2112, 2170, repair kit design number: 2110-2912652
The stuck upper rubber cushion of the shock absorber spring is removed from the body and also defective. In our case, the rubber cushion is still “alive”, so it remains for further use of the VAZ Priora car.
(!) As you can see in the video, on the stand itself the platform for the lower part of the spring is rubberized...
Next, we orient the spring along the cut of the coil on the lower shock absorber cup in order to correctly install the upper spring cushion along the cut of the coil and place the rubber cushion on the spring.
Then we install the spring with the top cushion installed on the shock absorber, and it is ready for installation on the Priora VAZ car. New replacement shock absorbers purchased by the owner of a Priora VAZ car are designated “CC20”. The shock absorber is inserted with its upper part into the niche of the body, with such a condition that the rod will fit into the hole in the upper fastening in the car body and a nut can be attached to the rod. In this case, its lower part is inserted into the mounting bracket and fixed with a mounting bolt, after which a nut is screwed onto it (the nut is self-locking).
Then the lower connection of the rack to the beam itself is crimped with keys. We move on to the upper mount, having first lowered the body slightly to compress the spring with the weight of the car body. We install the upper rubber “donut”, the washer and screw on the rod nut.
Next, we hold the rod from turning with one key, and with the second we tighten the fastening nut with the prescribed force using special tools. key The top of the strut support is assembled and you can put the wheel in place and lower the body from the jack.
We move to the other side, where we carry out the same operations of lifting and securing the car body for the safety of the work.
Next, remove the second rear wheel...
Then we act according to the proven scheme. We unscrew the nut of the upper fastening of the rear shock absorber; for this, use a special wrench for replacing rear shock absorbers (as mentioned above, in the form of two heads inserted one into the other). Afterwards, we unscrew the last turns of the thread on the nut simply by hand, remove the nut, washer, and rear shock absorber rubber “donut” bushing.
Mounting pads for the upper end of the shock absorber, design number of the repair kit: VAZ 2110-2915450 (4 pcs. under number 1, see photo). Rear suspension arm mounting hinge design number: VAZ 2108-2914054-10 (2 pieces under number 2, see photo)
We go down and unscrew the bottom bolt and remove it from the mounting bracket. The fasteners are given and you can remove the shock absorber from the wheel well, which is what we do.
Next, from the old shock absorber we remove the spring, the boot “casing”, the bump stop, the steel shaped washer and the donut with the bushing. All removed parts are also defective. The shock absorber itself is pumped as much as possible (at least five strokes), at the same time the force of the rod stroke is immediately felt, which will indicate its serviceability.
Memo. In general, “according to science,” shock absorbers should be stored in a vertical position, and if they were “lying” on a rack, then pumping is required, corresponding to at least 100 strokes of the rod.
Shock absorber bumpers for VAZ 2110, 2111, 2112, 2170, 1118 repair kit design numbers: 2110-2902816-01 (see photo number 1 on the front strut) and 2110-2912622-01 (see photo number 2 on the rear strut)
Then everything is assembled in the reverse order, as in the first case. A strut bumper, a “corrugation” casing, a shaped washer (a steel cap on which the edge of the corrugation is placed), a lower “donut” rubber bushing with a steel bushing inside and a spring are put on the rod.
Next, the upper rubber cushion of the spring is also removed, wiped off dirt and mounted on the spring.
Front strut bumper VAZ 1118 Kalina, design number: 1118-2902816-01
Another little trick from the category of “advice from experienced people.” In order for the rod to fit exactly into the hole in the upper mount of the body, a brake hose is screwed onto it (it will serve as an excellent guide) from the VAZ 2108 - front.
The precise “device” noticeably facilitates the process of installing the rack, reducing our installation time and, as the experts say, our nerves at home(!). Having inserted the rod into the upper mount of the body, the lower part of the rack is installed in the mounting bracket, then fixed with a bolt and nut, and then crimped with keys.
VAZ 2108 front and rear strut bumpers, design numbers: 2108-2902816-01 (number 1 on the front pillar) and 2108-2912622-01 (number 2 on the rear pillar)
Next, the car body needs to be lowered slightly on the jack (by placing a smaller safety stop under the beam) so that it compresses the spring and the rod appears in the niche of the upper mounting of the rear pillar.
We go to the interior, where we remove the brake hose from the rod, install the second “donut”, a washer and tighten the nut, tighten the rod fastenings. We install a special wrench (head in head) and also work with two wrenches, where one fixes the rod, and the second tightens the nut.
Then, after replacing the rack, we finally tighten the lower mount and put the wheel in place, removing the “goat” and lowering the car. Finally tighten the wheel bolts.
This completes the process of replacing the rear struts, then friends, watch the video...
YouTube VIDEO:
Thank you for attention! Good luck to you and see you soon on the pages of the RtiIvaz.ru blog!
You can also read this useful article:
Lada CV joint boots
Tips for newbies on replacement
- Before you begin replacing a part, be sure to check that all components are present.
- Follow the step-by-step instructions, remember which parts were removed from where, and in what order.
- When tightening the bolts and fastening the parts, there should be no differences from the original: no gaps, tight and even.
- It is better to replace the old ones with hydraulic structures; they can be disassembled, it is easier to replace some parts than to dismantle the entire structure later.
- Don't neglect to use WD-40 before starting work. This will preserve the thread and save effort.
- If you have doubts about whether it will work, it is better to ask an experienced car mechanic to observe and be present.