Install the top cup and support. If you keep the old support, it is advisable to lubricate the bearing before installation. To lubricate the bearing, remove the upper oil seal, then remove the old grease and apply new one. It is best to remove the oil seal with a knife.
Install the support mounting nut and tighten as much as possible without a special wrench. Fully tighten this nut when the shock absorber is on the body.
Next, reinstall the shock absorber on the body; no problems should arise.
The process of replacing the front struts of VAZ 2113, 2114, 2115 is clearly shown in this video:
Replacing front struts on a VAZ 2114
Racks play a significant role in the comfort and safety of driving a VAZ 2114, as well as on any other car. Then their selection, replacement and current condition should be treated with increased attention.
When the old elements are no longer able to properly perform their duties, they have to be replaced. And here the main question arises - which racks are best to install on a VAZ 2114. We cannot give you a definite answer, since the choice largely depends on the individual preferences of each individual car owner. Therefore, we will consider all types and popular manufacturers.
There are three types of A-pillars that are suitable for installation on the VAZ 2114.
- Oil comfortable. If you like a quiet, measured ride, choose oil ones. They are installed on Samara 2 from the factory. They smooth out bumps on the roads well, but at high speeds they behave unstably and the car can sway violently.
- Gas. If you love tuning and huge speeds, then your choice is exclusively gas struts. But get ready for the fact that every bump and unevenness will be felt under you. In urban conditions, such spare parts will not last long. These are rather track solutions for the corresponding tuned versions of the “fourteenth” model. By installing short-travel struts on a VAZ 2114, you can achieve better aerodynamics and downforce by lowering the suspension. Short strokers are a device with limited rebound travel, in short.
Gas-oil. An average solution that will allow you to ride comfortably at low speeds, but at the same time enjoy a sporty driving style if necessary. The best option for the average driver.
Original spare parts
The VAZ 2114 is equipped with SAAZ oil struts. Installing “original struts” makes the car stiffer and higher, and it holds better on the road. A significant drawback of the original spare part is the absence of a reverse sound insulator, which means constant noise. Almost all SAAZ racks have this problem.
You can find them in the catalog under the number:
- 2108-2905402-03 – right front pillar;
- 2108-2905403-30 – left front pillar;
- 2108-2915402-10 - rear pillar.
The price of factory racks will be from 1000 to 1500 for the front and 800-1200 for the rear.
To avoid stumbling upon counterfeit auto parts, take precautions. Ask the seller to provide you with the safety certificates that accompany the racks you purchase.
Compare the appearance of the packaging with what is offered on the official website. All inscriptions must be well printed, in their place, there should be no extraneous symbols or logos.
The part itself should not have external damage: these include scratches, burrs and paint chips, as well as damage to the metal itself. Of course, taking into account the fact that you are not purchasing a used part, but a completely new one.
Leading manufacturers
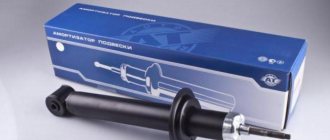
KYB (Kayaba)
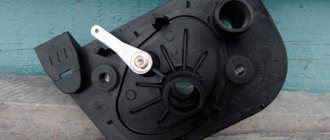
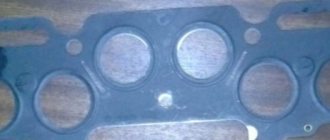
Look at the front element assembly in the photo to first understand what exactly this unit of your car looks like. Choosing a manufacturer is a fairly pressing issue, since each of the options presented today has its own advantages and disadvantages. We invite you to familiarize yourself with them in the table.
The most popular, high-quality, reliable, not afraid of frost
There are many fakes on the market, which makes it difficult to find the original.
Signs of breakdown
Therefore, the car owner’s task is to monitor the condition of the suspension and front struts in particular, identify signs of breakdown in time and replace the units.
Worn out
If your racks are really reaching the end of their service life, you can determine this by the following signs:
- The car behaves unstably on the road;
- When driving over obstacles, the car sways strongly;
- When entering turns and braking, the car is unstable;
- The braking distance increases noticeably;
- There are traces of oil on the body;
- There is a noise or knocking noise from the front of the car.
Some, even with such obvious signs of malfunction, continue to ignore the car’s need to replace the front struts. If you do not take any action, the consequences may be as follows:
- The car will bounce on every bump;
- Controllability in corners will decrease significantly, the car will pull to the side and turn around;
- Tires will lose their quality and wear out in the shortest possible time;
- Soon you will have to go to the wheel alignment.
If the replacement of the front struts on the VAZ 2114 is carried out in a timely manner, these problems and huge financial costs can be avoided.
Why install
In fact, the body of the VAZ 2114 is quite rigid, so it allows you to drive at decent speeds on roads that are not of the highest quality. But the existing rigidity is not enough to keep the body intact during long-term use in such conditions.
Amplifier
If the stiffness is insufficient, the car's handling is characterized by sluggish response. In theory, the presence of a spacer or extension allows you to maneuver more confidently and take turns at speed. Also, the body will not be greatly deformed, and the effect of metal fatigue will be avoided. This is especially true for owners of the VAZ 2114, who regularly drive on roads that are not of the highest class.
To summarize, let's look at what exactly spacers will do.
- They will increase the car's controllability when cornering.
- They will reduce the likelihood of spontaneous transmission shutdown at the gearbox.
- They will protect the engine from active displacements during maneuvering.
- Maintains the integrity of the body and power unit.
Some note that it is not worth installing a spacer, since it significantly increases the noise level in the cabin. The statement is true, but partially. The noise level will indeed increase, but only slightly. In practice, it is impossible to feel the difference, since the increase will be no more than 0.5 decibels.
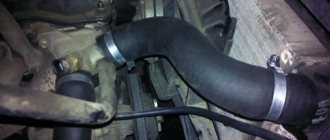
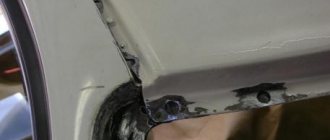
Injection front strut extension with additional support F32 (FA)
For reference, specially trained people are able to distinguish noise levels only starting from 1 decibel.
Replacement
Before you get started, we recommend watching a video on how to make the replacement. This is a useful lesson that will provide the necessary knowledge and concepts about the location of certain components of the unit.
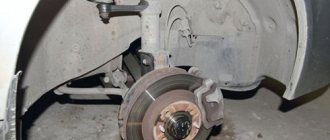
Removed suspension element
If you decide to do everything yourself, then follow the specified algorithm. This will allow the replacement to be completed efficiently and without unnecessary manipulation.
- Place the car on a flat area, preferably with a hole. Loosen the bolts on the front wheels. Be sure to turn on the handbrake and secure the wheels with chocks. You need to think about safety first.
- Use a jack to lift the front of the car, then remove the wheel. Please note, when changing the front suspension elements, it is better to do this on two wheels at once, even if one of the struts is in satisfactory condition.
- Lift the hood and look for the bolts that secure the struts to the body. Look for them on the left and right, near the windshield.
- There is a plastic cap on the glass that needs to be removed. To do this, use a simple flathead screwdriver. The plastic element is pryed off and thus easily removed.
- Unscrew the mounting nuts holding the rack on top of the body.
- A brake hose with a bracket is attached to the rack. This element is also removable.
- Using a wire brush, be sure to clean all the fastening elements of the struts to the body and chassis of the car.
- Now take the pliers in your hands and use them to unscrew the nut. The one that holds the tie rod end joint to the A-pillar.
- A puller removes the hinge from the shock-absorbing strut arm. If this is your first time changing them and no one has removed them before, be sure to tighten the nut a few turns, which will protect the threads.
- Near the place where the fist is attached to the stand, there are nuts that should be removed. Just first mark where the adjusting bolts are located. This way you won’t have to go to a wheel alignment after replacing suspension elements.
- Using a hammer, knock out the bolts that hold the element and the fist. The nodes release, allowing you to pull your fist down and reach the worn post.
- Place the new part, then proceed to reassemble the unit in the reverse order. During the procedure, do not forget to check other components for defects, malfunctions, oil leaks, and so on.
When the procedure is completed, put on the wheels, but do not tighten the bolts tightly. By lowering the car from the jack, you can fully secure the bolts. This is an important rule that, unfortunately, many people forget about.
Kinds
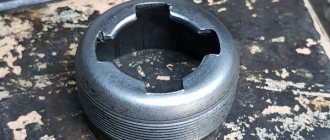
In analysis
There are several types of supports:
- A bearing with an integrated inner or outer ring. No clamping flanges are required for its installation. There are corresponding holes for installation;
- With detachable outer ring;
- With detachable inner ring;
- Finishing and cutting structure, the characteristic feature of which is its strong rigidity.
Article on the topic: Location of sensors on the VAZ 2110 injector (8 valves)
The name of the support bearing speaks for itself. This is something like a strut support on the front shock absorber, which is located in the area where it connects to the body. This arrangement indicates the axial loads that the support must withstand.
Driving "VAZ 2114"
The front struts on VAZ 2114-2115 cars wear out much faster than the rear ones, and this is due to the fact that the front part of the car bears a large load, since the main units are located there. If the shock absorbers are leaking, or are starting to leak heavily in potholes, then it would be best to completely replace them. Many people are used to dealing with such problems at a service station, although if you try a little, you can do it all on your own. The main thing is to have all the necessary tools and equipment at hand. Below is a detailed list of everything:
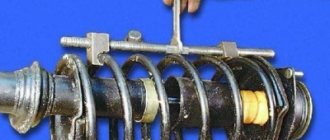
- spring ties
- ball joint or steering wheel remover
- pliers
- hammer
- keys for 13 and 19 as well as similar heads
- crank and ratchet handle
- breakdown
I recommend that you first familiarize yourself with the video, which will be presented below, and then read my photo report on the work done.
Signs of front strut failure
As we mentioned, the front struts can “live” much less than 60 thousand kilometers. In order to avoid problems, you must first focus on the driving performance of the car and its behavior on the road.
Rack malfunctions manifest themselves as follows:
- Reduced road stability;
- excessive rocking of the car when hitting obstacles;
- poor car stability during braking and cornering;
- increased braking distance;
- the appearance of oil drips on the body;
- the occurrence of extraneous noise or knocking in the front of the car.
Please note that if there are obvious signs of malfunction, the front struts of the VAZ 2114 should be replaced as soon as possible. If this is not done, the following consequences are possible:
- The car will literally bounce at the races;
- controllability when cornering will decrease (centrifugal forces will pull the car to the side, try to turn around, or even pull it into a ditch);
- tires wear out faster;
- very soon you will need a wheel alignment.
At the same time, timely replacement of shock absorber struts will avoid many problems and save your own budget.
Basic faults
Wear of the VAZ-2114 bearing is the main reason for replacing it. A knock in the suspension, which is heard when driving on a bumpy road or when turning, should alert the driver. Checking the bearing is simple: you need to grab it with your hand and rock the car; a knock that may appear indicates the need for repairs.
The dirt that is abundant on the roads is one of the causes of defects in the mechanism. The support is practically not protected from it.
It is worth checking the condition of the supports at least after 20,000 km.
How to Check the Support Bearings of Shock Absorber Struts
If the knocking does not go away, then think about this: a completely worn bearing can break completely, and this will lead to the strut breaking through the hood. Repair costs will be completely different.
Replacing a bearing is not that expensive - about 500 rubles per part, 1000 rubles for a replacement at a service station.
The most popular bearings are ss20. They perform best under relaxed driving conditions, although some drivers complain about their harshness.
For a more sporty driving style, with sharp stops and fast accelerations, Acomi bearings have proven themselves well.
Don’t skimp on spare parts; try to buy support bearings from a trusted manufacturer. When choosing, you need to rely on your own driving style and the characteristics of the road surface.
Replacing the front struts of a VAZ 2114, step-by-step instructions
Before you start work, stock up on the necessary tools. Here you can get by with a standard set.
Prepare two open-end wrenches (for “thirteen” and “nineteen”), a special wrench for “twenty-two”, a puller designed to remove the tie rod end, pliers and a small hammer.
Please note that you should change the racks on both sides at the same time. In this way, you will save a lot of personal time and save your nerves in the future.
Otherwise, the worn and new strut may behave differently in motion, which will lead to deterioration in the car’s handling (this will be especially noticeable on wet or slippery roads).
Replacement of racks is carried out according to the following algorithm:
1. Loosen the mounting bolts on the front wheel, apply the handbrake and secure the wheels with wheel chocks. All this is necessary to prevent any movement of the car during work.
2. Raise the front part of the car with a jack, place some supports and remove the wheel.
3. Open the hood and find the bolts securing the struts to the car body (they are located on the left and right sides closer to the windshield).
4. Remove the plastic cap that is fixed on the glass. To do this, just pry it off with something sharp (a regular screwdriver will do).
5. Unscrew the nuts that secure the rack to the car body on top.
6. The brake hose is attached to the car pillar on a bracket - remove it.
7. Take a wire brush and clean all the parts attaching the strut to the elements of the body and chassis.
8. Using pliers, loosen the nut that secures the steering linkage joint to the front strut.
9. Use a special puller and remove the hinge from the suspension strut arm (photo 1). If the racks have not been removed before, then before using the puller (to protect the thread), screw the nut 3-4 turns.
10. Unscrew the nuts located near the place where the “knuckle” is fixed to the shock absorber strut (photo 2). But before that, it would be a good idea to put special marks on the adjusting bolts before unscrewing them (this will allow you to avoid doing wheel alignment).
Note! That experts still recommend doing wheel alignment when changing struts.
11. Use a drift to knock out the bolts holding the knuckle and strut in place. Separate the nodes and move the fist down and remove the stand.
12. Install a new part.
13. Carefully reassemble everything in reverse order.
In conclusion, remember a few simple rules:
- Carefully check all components for damage, cracks, burrs or dents;
- Unscrew and tighten bolts only when the vehicle is firmly planted on the ground.
If everything is done correctly, then the work of replacing both racks will take no more than an hour. Good luck on the roads and of course no breakdowns.
We recommend watching a video that will help you replace the front struts on a VAZ 2114 with your own hands. In this video you will also find everything about pumping shock absorbers. Learn how to bleed shock absorbers on a VAZ 2114 yourself.
Tools for work and materials
When replacing the front strut on a VAZ 2114, it is necessary to have all the following tools at hand:
- Jack (ideally, of course, a hydraulic or pneumatic one would be suitable, since they are convenient to work with).
- A set of keys.
- Pliers, duckbills, forceps.
- Hammer and chisel (just in case).
- Puller for the ball joint of the steering tip.
- Spring tensioner.
- Steel wire.
- Lubricant like WD-40.
Replacing the front struts of a VAZ 2114 with your own hands is impossible without a new set of spare parts. What is better - to take all the elements separately or together? Depends on how “killed” the shock absorbers installed on the car are. If all the elements of the rack have become unusable, then you can purchase it assembled, then the repair procedure becomes much easier - it will be enough to unscrew a few bolts and install all the suspension components.
But this is true for cases when you purchase branded spare parts, for example, Kayaba (KYB, Kayaba). But if the renovation is “budget”, then you can collect all the elements separately:
- Shock absorber strut VAZ 2114. Standard SS20.10P/L.00.000-01 will cost you about 5,000 rubles, but you can find it cheaper. The price directly depends on the manufacturer. But we must not forget that quality can also be judged by price. On the VAZ 2114, the front strut is not replaced so often, so you need to be responsible when choosing components.
- Support bearing number 348702 (or included 8115). Bearing dimensions 14.5x52x1475x100x19 (according to specification).
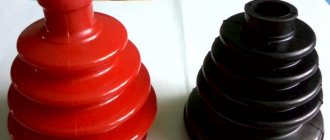
- Chipper (silicone is preferable, but rubber is also possible). The ideal copy is number SS74101 - a complete analogue of the stock one.
- Anther. The cheapest option is plastic, with the number 2108-2902814, but it deteriorates quite quickly and is not worth buying. The similar 2110-2905681-R, from the front pillars of a VAZ 2110, performs much better in operation.
- Bolts securing the hub to the shock absorber.
- A spring is needed if the old one has sagged too much.
- “Little things” such as washers and metal spacers for springs can be borrowed from an old rack.
But we must not forget that the replacement must be carried out simultaneously on both sides! Therefore, all of the above spare parts will have to be purchased in double quantities.
Replacing front struts on VAZ 2113, VAZ 2114, VAZ 2115
The front struts consist of a spring and a shock absorber. Thanks to them, any collision with a bump is absorbed and the impact on the car is not very strong. As an example, take a horse-drawn cart and try to drive it over a bump, each such collision will be accompanied by blows, and you will jump. And if you hit the same bump in a car, you will feel it completely differently. Therefore, telescopic struts are necessary for any car and play a key role in it. In some cars there is not a strut, but a separate spring and a separate shock absorber; a clear example is the classic.
Note! You will need the following tools: keys, namely two wrenches “19” and a spanner “17” and “6”, a puller (remove the ball joints), a puller (unscrew the nut securing the strut rod from above), pliers and a screwdriver.
Rack locations
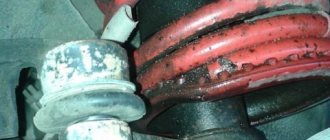
One end of the telescopic strut (correct name) is screwed with nuts to the car body (to the glass, when you open the hood, this place is immediately visible), and with the other end it is secured to the steering knuckle with long bolts. When hitting a bump, this design plays and you feel comfortable in the car. Let us briefly describe the principle of operation. Take a look at the photo, the red arrow indicates the shock absorber, and the blue arrow shows the location of the spring (it is not visible in the photo, because it is at the top). When hitting a bump, the car body falls down (along with the wheel), the earth slows down the wheel (prevents it from going lower) and the body, having moved slightly down, immediately returns to its original position.
Note! We have specially attached a short video about the principle of operation of the rack; just for fun, we recommend that you watch it.
When is it necessary to change struts?
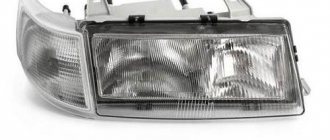
When the strut fails, the first thing it does is start to leak, and driving the car becomes uncomfortable: various kinds of knocking noises appear in the front suspension. Unfortunately, it is impossible to check the performance of the rack yourself, although there is one way, but it only works when the rack has already worn out. So: you need to stand near the corner of the car (let’s take the right pillar), it turns out you stand near the edge of the right headlight (photo below, the tenth family is used there, on Samara-2 it’s similar) and put your hands on the hood or fender. Rock the car a couple of times and, when it is at the bottom, suddenly remove your hands. If the car then goes up and a little down and stops immediately (without unnecessary vibrations), then everything is fine with the stand. A similar method is described in books on car repair, but in life everything is not obvious; it is impossible to understand the serviceability of the strut 100%. You will, of course, immediately identify a badly damaged stand. It’s better to go to a specialized service station that deals with car suspension, and thanks to the special. The device will determine the operation of each rack. You will receive a conclusion in the form of a diagram and it will become clear whether your racks need immediate replacement or will still serve for some time.
Note! Let's look at the visible damage: the spring standing on the telescopic stand should not have cracks. In such a situation, the entire strut, or at least the spring, must be replaced. We would like to warn you that if you are planning to replace the stand, it is also recommended to replace the second one. After all, over time they wear out at about the same rate. In addition, it is much better when the front part handles impacts the same way, and not differently (for example, the right part is soft, and the left part, on the contrary, is hard).
Do I need to change the spring?
A spring is a very durable element, but with prolonged use it can become unusable. Cracks appear, elasticity and length decrease. Diagnosing the condition is very simple:
- Visually inspect the springs for cracks and deformations. If they occur, then the springs must be replaced.
- Apply a load of 325 kg*s (or 3188 N). On export models of the car, the length will be 182 mm. For those produced for the domestic market, the length should be more than 201 mm. If less, then the spring must be replaced.
The springs that were installed on the VAZ-2115 are marked in the form of the letters A and B. The former are capable of working with higher loads. Be sure to install new springs with the same class.