Gasoline sensor for VAZ 2109 (carburetor, injector)
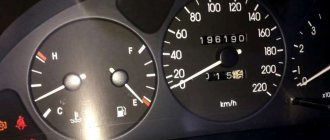
If suddenly the fuel gauge needle drops down or behaves somewhat inappropriately, there is no need to worry too much. You can easily fix the problem yourself if it is a faulty sensor.
Appearance of the device
You should not ignore a breakdown of the fuel level sensor (FLS), because in the absence of information about the remaining amount of fuel, you run a high risk of not getting to the gas station, but stopping somewhere in the middle of nowhere.
How to check the fuel level sensor
Fuel level sensor
We find out about the amount of fuel remaining in the tank using the fuel level indicator. The indicator, in turn, is activated by a fuel level sensor, which is installed in the car’s gas tank and transmits information about the remaining fuel in the tank.
Currently, there are three types of such sensors. The first is a magnetic analog or rheostat, which was widely used until the 80s of the 20th century. The other two are digital and graphic, which recently began to be used on many cars and are gradually replacing their primitive counterparts.
Reasons for replacement
You will definitely have to replace the sensor if the car starts to produce the following:
- The fuel level indicator needle “dances” or has fallen dead to the zero position;
- The indicator is constantly on, indicating a critical fuel level, although you have just filled the tank full.
FLS diagram
FLS on high and low panels
The differences in the sensors on the injectors and carburetors are minimal. Also, the fuel level sensors on VAZ 2109 cars equipped with a low and high panel are slightly different.
The difference lies in the resistance indicators. These parameters must be known when checking the condition of the sensor resistor.
Panel type
Resistance readings
- 238-262 Ohm - the arrow is located at the beginning of the scale, near 0;
- 59-71 Ohm - the pointer arrow is in the middle of the scale;
- 17-23 Ohm - the arrow is at the end of the scale, which indicates a full tank of fuel
- 285-335 Ohm - the arrow is located at the beginning of the scale, near the 0 mark;
- 100-135 Ohm - the indicator arrow is in the middle of the fuel level indicator scale;
- 7-25 Ohm - the arrow is at the end of the scale, which indicates a fully filled tank
In this regard, when buying a new fuel level sensor, be sure to ask for a controller for a high or low panel, depending on what kind of car you have. It is also important to note that in the case of injection engines, the sensor is located inside the fuel pump, but it is based on the same operating principle as a carburetor one.
Functionality check
Do not rush to throw out the old sensor and replace it with a new regulator. First you can try to check if it really doesn't work.
To check, you will have to extract the “suspect” in any case.
- Inside the car, remove the lower part of the rear seat, remove the soundproofing material, if any. This will give you access to the inspection hatch in the floor of the car.
- Using a Phillips screwdriver, unscrew the four mounting screws that hold the hatch in place. Take it off. Under the hatch you will find a sealing gasket made of rubber. In any case, even if the old sensor works again for the benefit of your car, this gasket should be replaced.
- Disconnect the power supply block with wires from the sensor, and then unscrew the fastening nuts around the perimeter that hold the desired fuel level sensor on the tank body. Usually there are 6 of these nuts, and to dismantle them you will need an 8 socket socket or a regular wrench.
- Under one of the nuts there is a ground wire attached to a stud. Remove the wiring and put it aside for now. He shouldn't interfere.
- Carefully remove the sensor and do not forget to remove the rubber sealing gasket, which is located directly under the regulator. If there are signs of damage or defects on it, be sure to replace this component.
- When the sensor is removed, visually check its current condition. If there are mechanical damages, there is no point in further trying to repair it or restore its functionality. Change it right away.
- If there is no visual damage, check the condition of the float. It can be depressurized, that is, there is fuel inside it, cracks and various defects through which fuel has leaked are visible on the surface of the element. If all of this is present at the float, replace the entire sensor.
- Be sure to blow out the fuel filter with compressed air. A useful event that definitely will not harm your fuel system. Especially if the quality of gasoline with which you fill your VAZ 2109 leaves much to be desired.
- Check the condition of the resistor. To do this, you will need a multimeter in ohmmeter mode. Connect a measuring device to the sensor terminals and take readings. In the lowest position (empty tank), the resistance should be about 315-345 Ohms. If the tank is half full, the resistance will be 108-128 ohms. And when the tank is empty, the ohmmeter should show no more than 7 ohms. If the parameters differ from those specified, or there is no resistance at all, this indicates a malfunction of the controller. It must be replaced.
Checking status
Reassembly
It is necessary to follow the reverse principle of dismantling. But there are some nuances here.
- Install the gas tank gasket onto the studs.
- Replace the new or repaired old sensor.
- Place the ground wire from the fuel level regulator onto one of the studs, after which you can tighten all six removed sensor mounting nuts.
- Place the fuel outlet and supply hoses onto both tubes. You can then tighten the screws of the fuel hose clamps all the way.
- Connect the power supply wire to the fuel level regulator and return the hatch cover to its place. Just don't forget about the gaskets. All of them are replaced in most cases with new ones. Even if the condition of the old ones is satisfactory.
Alas, replacing the FLS does not always give the desired result. After the work has been done, it may turn out that everything is fine with the sensor, but the fuel level indicator on the dashboard stubbornly continues to behave inadequately or does not respond at all.
Disable and change
Features of the carburetor float chamber mechanism
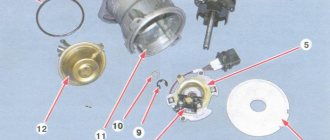
The float chamber is located in the front part of the carburetor body. The top is closed with a lid, and gasoline enters the chamber through a fitting. After the fitting there is a filter made in the form of a mesh, the cleanliness of which should be periodically monitored.
The carburetor float most often has a cylindrical shape, made from two brass halves that are soldered together. The float fasteners are made of the same alloy and are secured by soldering. The float is attached to the carburetor cap using a connection.
There are two tongues on the float mount: one is responsible for adjusting the opening of the valve needle, and the second is designed to limit the stroke of the float (so that it does not touch the bottom of the float chamber). The valve is a mini body screwed into the top cap of the carburetor, inside of which there is a needle. A spring damping ball is installed at the end of the needle. This mechanism protects the needle from impacts against the valve body. To prevent the needle from getting stuck in the closed state, a specific bracket is put on it, which is pulled down by the float mounting tab.
- Checking and adjusting the idle speed of an engine with a 21073 Solex carburetor
From time to time you should check the tightness of the needle valve, as damage to this device can lead to unstable engine operation and increased gasoline consumption. The height of gasoline in the float chamber affects the quality of the fuel mixture that enters the combustion chamber. A low level slows down the fuel supply, and a high level increases its quantity. This is why you need to properly adjust the fuel level in the carburetor float chamber.
The FLS is working properly. What to do?
Try the following activities.
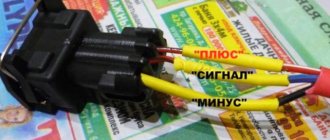
- The sensor connector has a pair of wires - pink and blue;
- The pink one controls the arrow of the fuel level indicator in the tank, and the blue one is responsible for the critically low fuel level indicator;
- Take any jumper at hand, that is, a piece of any wire, and then use the jumper to short the pink wire to ground, while turning on the ignition. At this moment the arrow should be in the full tank position;
- Now, similarly, using a jumper, we connect the blue wire to ground. This should turn on a light that indicates on the dashboard that the fuel level inside the gas tank is low;
- If, when the jumper is shorted to ground, the indicator or lamp does not work, this indicates that the indicator itself is “covered”, or there is a problem with the condition of the wiring.
Repair of fuel level sensor VAZ-2109
If the gasoline readings are incorrectly displayed on the dashboard, then this is not yet a reason to purchase a new part. Sometimes it is enough just to adjust the operation of the old device. Initially, in order to check the functionality, we use a multimeter.
We bend the seat, get to the fuel hatch and unscrew it with a screwdriver. Disconnect the FLS from the connected wires and loosen the clamps on the hoses. We unscrew the tubes using a 10mm wrench and unscrew the 7 fasteners that secure the FLS. We take out the device, trying not to damage it.
We connect the device and look at the resistance. If you do not act on the float, the multimeter should show a resistance of 290–320 Ohms. Let's try to raise it up and look at the values. At this point they should show between 8 and 20 ohms.
We check the readings against the standards. If the readings have deviations, then we throw out the mechanism. It may be that the resistance remains at zero and the multimeter does not show it. In this case, the device is not suitable for use and must only be disposed of.
If the resistance is within normal limits, then the mechanism is working properly and the first thing we will look at is the wire that goes to the ground of the car. It is necessary to check its integrity and also inspect for the presence of rust. If the wire oxidizes, it also does not allow good contact. In this case, it must be cleaned. If stripping the ground wire was successful, but the situation has not changed, then we continue to look for the cause further.
Let's look at the wires that go to the FLS. One of them is red, the other is blue. Red is responsible for the indicator on the driver's dashboard, blue is responsible for the light on the dashboard.
Now let's take a regular wire and use it to connect the red wire to the ground of the car. We look at the readings on the dashboard, if when we close we see that the arrow has risen all the way, then everything should be so. If there is no reaction from the short circuit, then the problem may be in the arrow itself. Also, problems with the wiring cannot be ruled out, so it is recommended to ring each wire at the input and output.
After this, we carry out the same manipulations with the blue wire. If the light comes on at this time, the test is successful.
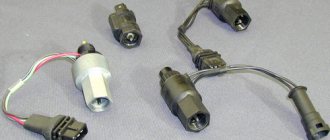
Fuel level sensor (FLS) for VAZ 2108, 2109, 21099 cars
In the power supply system of the carburetor engine of VAZ 2108, 2109, 21099 cars, a fuel level sensor (FLS) is installed, designed to monitor the amount of gasoline in the fuel tank.
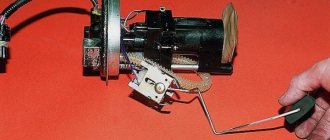
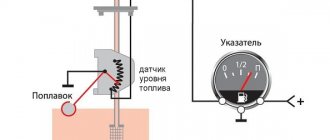
It is located on the fuel intake in the vehicle's fuel tank. On the instrument panel there is a fuel level indicator and a fuel reserve lamp (indicator), connected by an electrical circuit to the fuel level sensor and transmitting information from it directly to the driver. The fuel level sensor (FLS) has a round flange that is attached directly to the fuel tank. On the flange there is a sensor connection block with two terminals. The fuel intake pipe and return pipe are also welded to it. The sensor itself has a plastic housing mounted on a support plate. Inside the housing there is a rheostat with a winding of nichrome wire and a fixed contact for turning on the fuel reserve lamp. The contact is connected to the sensor block (terminal “W”). The rheostat has a slider mounted on a rotating axis and connected to a movable lever, at the end of which a sealed plastic float is installed. The lower end of the rheostat is connected to the sensor block.
The principle of operation of the fuel level sensor for VAZ 2108, 2109, 21099 cars
The float moves down or up when the fuel level in the gas tank drops or increases. At the same time, the slider connected to it moves along the rheostat winding, changing the resistance at the output of the rheostat from low to high and back. A drop and increase in resistance is reflected in the movement of the needle on the fuel level indicator in the instrument panel. The level in the tank is low, the float is lowered - resistance is 285-335 Ohms (the fuel level indicator arrow is at zero), the indicator arrow shows the tank half - resistance is 100-135 Ohms, the tank is full (the arrow is all the way to the right, the float is raised) - 7-25 Ohms .
In the lower position of the float, when the fuel level is at its lowest (4-7 l), the contacts on the slider and the contact of the fuel reserve lamp close. The lamp on the instrument panel lights up.
operation of the fuel level sensor (FLS) with a full tank: the float has floated up, the slider contact at the bottom of the rheostat (minimum resistance), the moving and fixed contacts of the fuel reserve indicator lamp are open (the lamp does not light up)
operation of the fuel level sensor when the fuel level in the fuel tank of a car drops: the float fell, the slider contact moved up the rheostat winding (maximum resistance), the moving and fixed contacts of the fuel reserve lamp closed (the lamp lit up)
Electrical diagram of connections of the fuel level sensor for VAZ 2108, 2109, 21099 cars
Electrical diagrams for connecting the fuel level sensor on VAZ 2108, 2109, 21099 cars with a “low” and “high” instrument panel are presented on the page “Connection diagram for the fuel level sensor on VAZ 2108, 2109, 21099 cars.” Applicability of the fuel level sensor on VAZ 2108, 2109, 21099 vehicles
On VAZ 2108, 2109, 21099 cars and their modifications, fuel level sensor 24.3827 and its variants are used. Its characteristics are as follows: voltage -12 V, rheostat impedance - 350 Ohm, float lever length - 115 mm, lever angle when the tank is empty - 27.5 degrees.
Fuel level sensor malfunctions
If the fuel level sensor fails, the fuel level indicator in the instrument panel either does not work at all or displays incorrect information. For more information about the malfunction of the fuel level sensor, see “The fuel level indicator in the instrument panel of VAZ 2108, 2109, 21099 does not work.”
Notes and additions
— A rheostat is an electrical device that allows you to regulate the current and voltage in an electrical circuit by changing the resistance of the electric current passing through its winding. The slider, being a movable contact, moving along the turns of the rheostat winding (conductor), changes the number of turns included in the circuit, thereby changing the length of the conductor and, accordingly, its resistance.
More articles on the fuel system of VAZ 2108, 2109, 21099 cars
Checking the fuel sensor VAZ 2109
If the fuel level indicator does not work on the VAZ 2108 2109 21099, then it is necessary to check the fuel level sensor. FLS - the fuel level sensor is located in the gas tank and is a lever on which a float is attached. Depending on the fuel level in the tank, the float moves up and down, while the lever moves along the sensor’s rheostat, changing its resistance. The fuel level sensor for the high and low panels looks no different, but they have slightly different resistances. On a high instrument panel, the resistance is from 238 to 262 Ohms; the level arrow should be located at the beginning of the scale. Then, as the resistance decreases and approaches the value of 59-71 Ohms, the arrow is in the middle of the scale. At 17-23 ohms, the needle moves to the beginning of the scale, which will correspond to a full tank of fuel. For the pointer on the low instrument panel, the resistance values are slightly different: Resistance 285-335 ohms - the arrow is at the beginning of the scale. Resistance is 100-135 ohms - in the middle of the scale, which corresponds to half a tank. Resistance 7-25 ohms - at the end of the scale, the fuel tank is full. Therefore, fuel level sensors are available for sale for high and low panels. For injection models, the fuel sensor is located in the fuel pump, but its operating principle is the same. Based on what was written above, the very first thing to do if the fuel level gauge does not work is to check the resistance of the sensor: 1) Remove the rear seat and unscrew the protective cover.
Cover under the rear seat of VAZ 2109
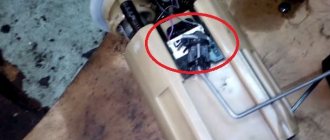
2) Disconnect the wires from the fuel sensor.
Fuel sensor VAZ 2109
3) Unscrew the fuel level sensor and carefully remove it from the gas tank. 4) Now, using a multimeter in ohmmeter mode, we measure the resistance of the sensor at different positions of the float: the float hangs under its own weight - the resistance should be about 280-330 Ohms. Raise the float all the way up - the resistance should be 7-20 Ohms. The figures are for a low instrument panel. 5) If, when the float moves, the sensor does not change its resistance or it differs significantly from the required one, then such a sensor must be replaced. 6) If the sensor is working properly, carefully inspect the sensor connector and the ground wire from the sensor. There should be no oxides or rust. Since the fuel level sensor is a variable resistance, oxide and poor contact prevent it from working properly. Next, let's look at what needs to be done if the sensor is working, but the fuel level indicator still does not work: 1) The fuel sensor connector has two wires, blue and pink. The level indicator arrow works from pink, and the low fuel level light in the tank works from blue.
Checking the fuel gauge
2) Take a jumper - a piece of ordinary wire and use it to connect the pink wire to ground when the ignition is on. The fuel level arrow should indicate a full tank. 3) Now we connect the blue wire to ground using a jumper - the low fuel level light in the car tank should light up. 4) If the indicator does not work when there is a short to ground, then either the reason is in the indicator itself or in the wires from the fuel sensor to the instrument panel. That is, you just need to remember that the pink wire of the fuel sensor is responsible for moving the needle, the blue wire is responsible for turning on the low fuel level light.
Gasoline sensor for VAZ 2109 (carburetor, injector)
If suddenly the fuel gauge needle drops down or behaves somewhat inappropriately, there is no need to worry too much. You can easily fix the problem yourself if it is a faulty sensor.
Appearance of the device
You should not ignore a breakdown of the fuel level sensor (FLS), because in the absence of information about the remaining amount of fuel, you run a high risk of not getting to the gas station, but stopping somewhere in the middle of nowhere.
Location
If usually most repair work related to the engine and its system is carried out through the engine compartment, then in the case of the fuel level sensor everything is somewhat different.
The FLS is located under the rear seat. To access it, you need to remove the seat, bend back the soundproofing material, if any, and find the controller we need in the area above the fuel tank.
FLS location
Reasons for replacement
You will definitely have to replace the sensor if the car starts to produce the following:
- The fuel level indicator needle “dances” or has fallen dead to the zero position;
- The indicator is constantly on, indicating a critical fuel level, although you have just filled the tank full.
FLS diagram
FLS on high and low panels
The differences in the sensors on the injectors and carburetors are minimal. Also, the fuel level sensors on VAZ 2109 cars equipped with a low and high panel are slightly different.
The difference lies in the resistance indicators. These parameters must be known when checking the condition of the sensor resistor.
Panel type
Resistance readings
- 238-262 Ohm - the arrow is located at the beginning of the scale, near 0;
- 59-71 Ohm - the pointer arrow is in the middle of the scale;
- 17-23 Ohm - the arrow is at the end of the scale, which indicates a full tank of fuel
- 285-335 Ohm - the arrow is located at the beginning of the scale, near the 0 mark;
- 100-135 Ohm - the indicator arrow is in the middle of the fuel level indicator scale;
- 7-25 Ohm - the arrow is at the end of the scale, which indicates a fully filled tank
In this regard, when buying a new fuel level sensor, be sure to ask for a controller for a high or low panel, depending on what kind of car you have. It is also important to note that in the case of injection engines, the sensor is located inside the fuel pump, but it is based on the same operating principle as a carburetor one.
Functionality check
Do not rush to throw out the old sensor and replace it with a new regulator. First you can try to check if it really doesn't work.
To check, you will have to extract the “suspect” in any case.
- Inside the car, remove the lower part of the rear seat, remove the soundproofing material, if any. This will give you access to the inspection hatch in the floor of the car.
- Using a Phillips screwdriver, unscrew the four mounting screws that hold the hatch in place. Take it off. Under the hatch you will find a sealing gasket made of rubber. In any case, even if the old sensor works again for the benefit of your car, this gasket should be replaced.
- Disconnect the power supply block with wires from the sensor, and then unscrew the fastening nuts around the perimeter that hold the desired fuel level sensor on the tank body. Usually there are 6 of these nuts, and to dismantle them you will need an 8 socket socket or a regular wrench.
- Under one of the nuts there is a ground wire attached to a stud. Remove the wiring and put it aside for now. He shouldn't interfere.
- Carefully remove the sensor and do not forget to remove the rubber sealing gasket, which is located directly under the regulator. If there are signs of damage or defects on it, be sure to replace this component.
- When the sensor is removed, visually check its current condition. If there are mechanical damages, there is no point in further trying to repair it or restore its functionality. Change it right away.
- If there is no visual damage, check the condition of the float. It can be depressurized, that is, there is fuel inside it, cracks and various defects through which fuel has leaked are visible on the surface of the element. If all of this is present at the float, replace the entire sensor.
- Be sure to blow out the fuel filter with compressed air. A useful event that definitely will not harm your fuel system. Especially if the quality of gasoline with which you fill your VAZ 2109 leaves much to be desired.
- Check the condition of the resistor. To do this, you will need a multimeter in ohmmeter mode. Connect a measuring device to the sensor terminals and take readings. In the lowest position (empty tank), the resistance should be about 315-345 Ohms. If the tank is half full, the resistance will be 108-128 ohms. And when the tank is empty, the ohmmeter should show no more than 7 ohms. If the parameters differ from those specified, or there is no resistance at all, this indicates a malfunction of the controller. It must be replaced.
Checking status
Reassembly
It is necessary to follow the reverse principle of dismantling. But there are some nuances here.
- Install the gas tank gasket onto the studs.
- Replace the new or repaired old sensor.
- Place the ground wire from the fuel level regulator onto one of the studs, after which you can tighten all six removed sensor mounting nuts.
- Place the fuel outlet and supply hoses onto both tubes. You can then tighten the screws of the fuel hose clamps all the way.
- Connect the power supply wire to the fuel level regulator and return the hatch cover to its place. Just don't forget about the gaskets. All of them are replaced in most cases with new ones. Even if the condition of the old ones is satisfactory.
Alas, replacing the FLS does not always give the desired result. After the work has been done, it may turn out that everything is fine with the sensor, but the fuel level indicator on the dashboard stubbornly continues to behave inadequately or does not respond at all.
Disable and change
Possible malfunctions in the operation of the float chamber
If the adjustment was carried out correctly, but there is no parallelism, then the needle is not working properly. In such a situation, the valve should be replaced and the adjustment performed again.
If you doubt the serviceability of the needle valve, it should be replaced, since you will not be able to adjust the fuel level (for example, if the fuel level is adjusted correctly, it will overflow).
After completing the work of regulating the fuel level, we assemble the carburetor in the opposite order. If necessary, adjust the idle speed.
An incorrectly set fuel level in the carburetor float chamber can cause many problems in the operation of the car engine.
Carburetors 2108, 21081, 21083 Solex are especially demanding on the accuracy of this setting. At the same time, it is not difficult to correctly set the fuel level in the float chamber of a Solex carburetor; with some skill, everything takes no more than five minutes. You don't need any fancy tools other than a ruler and a thin 2 mm drill. The procedure for setting the fuel level in the float chamber of carburetors 2108, 21081, 21083 Solex
- Place the car on a level surface
— Remove the engine air filter housing
— Let the engine idle for five minutes
— Remove the top part (cover) of the carburetor
See "How to remove the top part - the Solex carburetor cover."
- Carburetor VAZ 2109 - float adjustment
— We measure the distance from the top edge of the float chamber to the surface of the gasoline
This must be done as quickly as possible, since gasoline evaporates very quickly.
The required fuel level in Solex carburetors, indicated by the manufacturer, is 25 - 26 mm from the top edge of the carburetor float chamber to the surface of the gasoline.
If the measured fuel level differs from the required one, the position of the floats should be adjusted.
measuring the fuel level in the float chamber of the carburetor 2108, 21081, 21083 Solex
In the image, the fuel level is marked with a red line.
Adjusting the float position
— Turn the carburetor cover over and place it on a flat surface
— We measure the distance from the bottom of each of the floats to the cardboard gasket of the lid
The measurement can be carried out with a round probe, a drill, or a piece of wire of the required diameter.
setting the correct position of the floats on the carburetor 2108, 21081, 21083 Solex
It should be 1-2 mm , which will allow you to achieve the above-mentioned 25 - 26 mm. If the measured distance does not correspond to the required one, slightly bend the tongue on the float levers (the one that touches the needle valve ball) or the levers themselves and measure again. At the factory, a special template is used for such installation of floats (its diagram is given in another article on adjusting the fuel level on our website).
You can also use a caliper depth gauge or a ruler to set this distance between the floats and the cardboard spacer. Having attached them to the float, we measure the distance from its highest point to the cardboard spacer. Should be 34 mm . Same for the other float.
setting the height of the floats on the carburetor 2108, 21081, 21083 Solex
Checking the correct fuel level
Place the carburetor cover vertically. In this case, the tongue on the float levers should recess the damping ball on the needle valve and be approximately parallel to the plane of the needle valve, and the stamping line on the floats should be parallel to the surface of the carburetor cover. If this does not happen, we adjust the fuel level again, more carefully.
checking the correct position of the floats on the Solex carburetor
Notes and additions
— When adjusting the fuel level in the float chamber of carburetors 2108, 21081, 21083 Solex, you should check the correct position of the floats in the float chamber. To do this, on the carburetor cover removed, inverted and installed horizontally, we ensure that the floats are parallel with respect to the imprint on the cardboard gasket of the cover. This way we will prevent the floats from touching the walls of the float chamber.
setting the parallelism of floats on a Solex carburetor
— In addition, it is worth setting the amount of free play of the floats. On the inverted lid, use a ruler or caliper to measure the distance from the cardboard spacer to the lower corner of each of the floats.
measuring the distance to the bottom corner of the floats
Raise the floats as high as possible and again measure the distance from the lower corner of the floats to the cardboard spacer. Should add 15 mm . This is the free movement of the floats.
setting the full stroke of the float on a Solex carburetor
If it does not correspond to the required value, we achieve the required value by bending the rear tongue on the float levers.
Five more articles on the website on adjusting the Solex carburetor
— Adjusting the throttle valve drive of the first chamber of the Solex carburetor
— Adjusting the idle speed of an engine with a Solex carburetor
— Adjusting the Solex carburetor trigger
— Adjusting the Solex carburetor air damper drive
— Adjusting the throttle valve drive of the second chamber of the Solex carburetor
Comparative test repair
— Checking and adjusting the fuel level in the float chamber of the carburetor 21073-1107010 Solex
When do you need to adjust the fuel level in the carburetor? The carburetor must be adjusted after:
- Work performed that involved removing the carburetor floats.
- And also if the fuel supply to the carburetor is interrupted.
The FLS is working properly. What to do?
Try the following activities.
- The sensor connector has a pair of wires - pink and blue;
- The pink one controls the arrow of the fuel level indicator in the tank, and the blue one is responsible for the critically low fuel level indicator;
- Take any jumper at hand, that is, a piece of any wire, and then use the jumper to short the pink wire to ground, while turning on the ignition. At this moment the arrow should be in the full tank position;
- Now, similarly, using a jumper, we connect the blue wire to ground. This should turn on a light that indicates on the dashboard that the fuel level inside the gas tank is low;
- If, when the jumper is shorted to ground, the indicator or lamp does not work, this indicates that the indicator itself is “covered”, or there is a problem with the condition of the wiring.
There is absolutely nothing complicated about replacing the sensor. Dismantling work can be completed in 30-60 minutes with even a little experience. As for the FLS itself, it does not fail very often, but every owner of a VAZ 2109 and more should know about the features of its replacement.
Fuel level sensor VAZ 2108-2109 (carburetor) 2108-3827010
- 1. Pickup
- 2. By courier
- 3. Russian Post
- 4. Pick-up points
- 5. Transport companies
Pickup from a warehouse in Yekaterinburg
Address:
st. Martovskaya, 8a (Chkalovsky district, Elizavet m-on) — see address on the map, contacts and opening hours
Payment upon receipt:
- Cash
- Transfer to card
- By bank card
- By invoice (for organizations with VAT)
Important. Before receiving the product, check its availability by phone or place an order on our website.
Delivery by courier in Yekaterinburg and nearby cities
- Payment in cash upon receipt of goods
- The cost of delivery within the city and nearby cities is 100-250 rubles
- Free delivery throughout Yekaterinburg for orders over 10,000 rubles.
- Please check with the RusAvto manager for delivery times and costs.
For minimum order and delivery costs, see the Delivery section.
| Minimum order | Cost of delivery | Free delivery from | |
| Ekaterinburg | 1000 | 150 | 6000 |
| Upper Pyshma | 3000 | 200 | 10000 |
| Berezovsky | 3000 | 200 | 10000 |
| Aramil | 3000 | 200 | 10000 |
| Revda | 5000 | 400 | 17000 |
| Pervouralsk | 5000 | 400 | 17000 |
| Polevskoy | 7000 | 500 | 26000 |
| Sysert | 7000 | 500 | 26000 |
| Novouralsk | 10000 | 600 | 34000 |
| Nevyansk | 12000 | 700 | 37000 |
| * does not apply to large spare parts and special goods. price | |||
Replacing the fuel level sensor on a VAZ 2108, VAZ 2109, VAZ 21099
Welcome! Today we will discuss in detail the replacement of the fuel level sensor in the tank. The entire replacement process will be supported by pictures for your convenience, and at the very end of the article you can see a video that will describe in detail the replacement of the sensor and its configuration.
Note! The replacement process, as you have already seen from the title of this entry, will take place on cars of the “Samara” family!
Summary:
Where is the fuel level sensor located? Its location is very simple, and all because it is located in the floor of the car body under the rear seat. But in order to get to it, you will first need to lift the rear seat cushion and after that, lifting up the noise-insulating material, you will be able to see the fuel level sensor installed in the floor of the car.
Note! In the photo above, the arrow indicates where this sensor is located, but as you can see in the photo, it is invisible, and all because the noise-insulating material is not bent back!
When do you need to change the fuel level sensor? It must be replaced with a new one if:
• The fuel level needle, which is shown in the bottom photo, is not working properly. For example, if the sensor fails, the fuel level needle may begin to work incorrectly or may even stop showing the state of gasoline in the tank.
• Also, if the sensor does not work correctly, the indicator indicating the end of gasoline in the tank may also give incorrect readings. For example, the tank is full, but the indicator is already on.
Note! It is not always necessary to replace the sensor with a new one; in some cases it can simply be adjusted correctly and that’s it. You can find how to adjust the sensor in the video located at the bottom of the article!
Rheostat fuel level sensor
The operating principle of such a sensor is based on bimetallic strips, which move the indicator needle on the instrument panel. The position of the strip depends on the resistance created in the sensor circuit.
A float with a special lever is installed in the car’s gas tank. As the fuel in the tank increases, the resistance decreases, which means the current increases, which heats the strip and it moves the indicator needle.
When the fuel level decreases, the float lowers and uses a lever to reduce the voltage in the circuit. Thus, the current decreases, and the bimetallic strip moves the indicator needle to a different position, corresponding to the fuel level in the tank.
To put it simply, if the circuit breaks, the sensor stops working, and will always indicate that the tank is empty, and if there is a short circuit in the rheostat circuit, it will indicate that the tank is completely filled with gasoline.
There are a number of sensors in which the resistance changes quite the opposite. Accordingly, the readings will be different.
Sensor Features
The VAZ fuel level sensor in most models has virtually no different design features. The FLS is a device with a float mounted in the gas tank of a car. Thanks to the position of the float, we get an idea of the amount of gasoline in stock - the lower it goes, the less the amount of fuel will be. The operating features of this device have minor differences depending on the type of engine. It doesn’t matter the carburetor or injector in your system - the principle of operation and location of the sensor remain the same.
The measuring device, as mentioned earlier, is located in the tank, and can be accessed by tilting the rear passenger seat. This will come in handy if you need to check the sensor for functionality or replace it.
When it becomes necessary to check it:
Electronic fuel level sensor
This type of sensor is significantly different from its analogues and is a modern device that shows a more accurate amount of fuel in the car’s tank.
To indicate the fuel level, a digital display is used, which operates based on data on the resistance of the same circuit. A special voltage regulator receives information about the resistance and decides which part of the display needs to be turned on to display information about the status of the fuel level.
Disassembly of the unit, its reassembly
To check the functionality of the VAZ 2108, VAZ 2109 sensor, it is necessary to disassemble the unit. You will need the following set of tools:
- screwdriver;
- key to 7;
- replaceable head for 10.
The following actions are performed sequentially:
- We recline the back seat and see the lid. Use a Phillips screwdriver to unscrew the fasteners and remove the compartment cover.
- There are a bunch of wires in the compartment, all of them must be carefully disconnected one by one so as not to damage them. This is where the 7 head comes in handy.
- Next, use a 10mm head to unscrew the fuel sensor itself, and then remove it from the gas tank. This should be done carefully, without jerking.
This completes all manipulations to disassemble the sensor assembly. Now the device can be cleaned, resistance checked or replaced. If there is external mechanical damage on the device body, you don’t even have to check it, but it is better to immediately replace it with a new one. The sensor cannot be repaired, just like its spare parts. Assembly is carried out in the reverse order, without any changes. Before connecting the wires, it is advisable to check their integrity. This is all that may be needed when dismantling the unit.
How to replace a carburetor fuel level sensor
Since the location of the carburetor FLS does not differ from the injection one, the replacement process will be identical. Before starting work, you need to open the rear seat cover and find the self-insulating covering. It has a specially cut recess that allows access to the gas tank. We bend the recess and get to the hatch.
It is secured with 2 Phillips screws. We use a screwdriver to unscrew them. After this, unhook the chip with the wires. Next you need to loosen the hoses. Clamps are connected to each of them. Use a screwdriver to loosen them.
Next we use wrenches; we need 10 wrenches. We unscrew the tubes near the hoses using a wrench and disconnect them.
In order to remove the VAZ-2109 fuel sensor, you need to unscrew the mount, which is held in place with 7 nuts. We will need a key for 7, we will use it to dismantle it. Keep in mind that one of the wires is connected to the mount and is connected to ground. After this, we take out the FLS with extreme caution so as not to damage the float.
The gasket must be inspected as it may be damaged. If there is damage, it is recommended to replace it. To do this, you can buy a new gasket or make it yourself. After replacing the gasket, we reassemble.
If the FLS is replaced, then it is necessary to install a new device and reassemble it in the reverse order. Carefully place the FLS to protect the float from damage. We connect the mount and tighten the 7 nuts using a 7 wrench. Next, we attach the wire that engages the ground.
After this, we put the hose on the tubes and tighten it with a 10 wrench. Next, we tighten the clamps using a screwdriver. We take a chip with wires and connect it to the grooves. We tighten the hatch with Phillips screws using a screwdriver and close the access by bending the self-insulating covering and installing the seat back.
If the FLS does not work after replacement, then you need to check whether everything was connected correctly. In confirmation, look at the connection of the chip and insert it more tightly.
Functionality check
The VAZ 2109 fuel sensor can be checked for functionality using an ohmmeter or multimeter. After the device is removed from the gas tank, its contacts should be connected to the tester. We fix the float in one position and look at the indicators. The result should be 275-320 Ohms in the upper position of the float or 5-20 Ohms in the lower position. In the middle the resistance indicator is 100-130 Ohms. These figures are for a low instrument panel.
For a high panel these values are different:
If the device’s performance corresponds to the examples given, the device is working, everything is in order with the sensor, and it does not need repair or replacement. When significant deviations are present, it is worth checking the integrity of the wires. If they are ok, the sensor itself is faulty and needs to be replaced.
How to check the operation of the sensor
There are many ways to check the performance of the fuel level sensor. One of them is checking the circuit resistance. To do this, connect an ohmmeter to the disconnected contacts and pay attention to the readings. If they deviate from the norm, then you have found the cause of the problem. After this, the fuel level sensor is replaced.
To check the fuel in the tank and assess compliance with the sensor readings, you can use many available tools. Insert a clean dipstick into the tank and check that the tank is full. It is not necessary to have exact readings; in this case, approximate ones will do just fine.
Another way to check is to completely drain the gasoline from the tank and gradually top it up. After each topping up, the resistance value of the sensor is monitored and must be changed.
Causes of errors
The main reason why the fuel level may be displayed incorrectly on the instrument panel is long-term operation of the sensor.
Most often, the device is replaced with a similar one from another car model, for example, VAZ 21099, 2110. After the replacement, some drivers notice that the data is displayed incorrectly. Most often this happens if the sensor was removed from an earlier version of the car and installed on a later one, for example, from 2109 to 2110 model. In addition, incorrect data may also appear after installing the Europanel.
The reason may be in the contacts, but there is no exact solution, so if you want to change the sensor, then look for a similar model.
Another reason is a littered float. When this part of the device is left in gasoline for a long time without cleaning, it can become covered with a rather unpleasant coating. As a result, the structure becomes heavier, which leads to constantly overestimated performance, as well as to rapid breakdown of the lever and float. The float can be replaced, but only with exactly the same one, not a similar one.