Components
When purchasing, you will receive what is included in the kit, namely:
- Europlate;
- Inserts for switches (buttons) of devices;
- Trim on the instrument panel;
- Since your instrument combination may differ from those whose installation is structurally provided, there should also be six plugs; they can be inserted instead of buttons;
- The buttons themselves and two pads for them: • Double – for low beam and dimensions; • To turn on the fog lights; • Heated rear window.
- Air ducts;
- Block and wiring harness designed to connect a double button for side lights and low beam;
- Brackets securing the instrument panel.
In addition, if you are not entirely satisfied with this combination, and you need more buttons for other devices, then they, as well as the pads for them, can be purchased separately.
Installation and repair instructions
Replacing the panel, especially if you are installing it on an old VAZ 2112, is a certain difficulty. Older machines do not have some of the functions for which the panel has buttons. The wiring may need to be worked on.
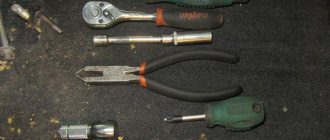
Tools and materials
Standard tools will be required.
But a certain amount of additional materials is needed:
- you will need plugs for extra buttons that are not needed on an old car;
- air duct;
- various inserts, buttons (5 pieces) and pads;
- a new wiring harness suitable for the wiring diagram;
- brackets for mounting the instrument panel;
Algorithm of actions
First you need to remove the old panel. This is done in the same way as on other models of VAZ cars.
When installing, you need to replace the ignition switch with a decimal or Kalinovsky one, depending on how many terminals there are on the block to the lock. You can leave the old one and rearrange the wires, but the new one will work and look better.
The instrument panel wiring needs to be replaced. Also, connect the dimensions with additional two wires in Ш4/13 and Ш3/13 on the mounting block. This applies to older units with 11 relay spaces.
To change the torpedo trim, it is not necessary to remove it completely!
Why doesn't the instrument panel work on the 16 valve VAZ-2112?
So let's get started, let's look at the panel overlays, which are divided into:
Euro-1, another name is “Caprice” and has an index of 21104. The features of this lining are that it does not have a passenger shelf.
Euro-3, a cover without a shelf, but under the instrument panel of Kalina, Priora, and has a climate control module with 3 knobs and an emergency stop button.
There are also exclusive panel overlays that make the interior of the VAZ 2110 similar to the Nissan Primera, where the instrument panel is in the center.
In addition to these Euro-overlays, there are overlays that are installed on top of them. For example, the overlay of the Chestnut panel.
It is not difficult to install the Kashtan overlay on the dashboard, so we will not dwell on this, but changing the old panel overlay to the Euro one is already more difficult.
The euro overlay for the panel consists of:
- On the masonry itself
- Inserts for buttons (small insert 2110L-2120031, large 2110L-2120032)
- Air ducts (2114-81080623)
- Device panel trim (2110L-5325124)
- Double button for turning on the headlights and low beam
- Key for turning on the rear fog lights (with fixation)
- Rear window heating switch (latching)
- Key pads - 2 pcs.
- Plugs instead of keys - 6 pcs.
- Wiring harness for connecting the dual side position switch and low beam headlights
- Block
- Device panel fastenings
- It may be necessary to purchase separately different keys for the VAZ-2114 and pads for them.
The cover gives the impression of a high quality product. It is softer than the old pad and, as the developers say, is more injury-proof. They also promise improved air flow to the side windows.
Now we are moving towards installation, and here we can distinguish 2 methods, each of which has its own advantages and disadvantages:
If disassembly is needed
Let us immediately note that if you have to replace the lining with a new one (the one you choose), then a complete disassembly may not be necessary for this.
But if noise insulation is planned due to the fact that the dashboard rattles when driving, then this cannot be avoided.
Disassembly work requires a lot of time and special scrupulousness. After all, if some fastening is spoiled or broken, then the new or tuned torpedo will not work as it should, it will creak and rattle unhappily while driving, spoiling the mood of the careless disassembler.
This material will help you quickly and accurately dismantle the dashboard: https://vazweb.ru/desyatka/salon/kak-razobrat-panel.html
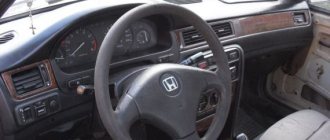
Instrument panel VAZ 2112 - designations
Removing the instrument panel on a VAZ-2110
The more modern the car, the more complex its design and the more difficult it is to control the condition of components and systems independently. For foreign-made cars, this issue has been resolved since the 80s by integrating on-board computers and other auxiliary devices into the car control system. Modern cars from Tolyatti are at the level of the 70s of the last century in terms of electronics equipment, and on-board computers can only display the time and temperature in front of the front bumper.
Designations
Despite such electronic asceticism, it is in principle possible to splurge on several dozen light bulbs and scales. Sitting at home, with a book in hand and drinking tea. But when, at a speed of 140, some indicator begins to frantically demand attention, you involuntarily get lost, and control over the car becomes, to put it mildly, not the most ideal.
Especially when you change from a penny to the wheel of a 2112, you feel like young Gagarin in an alien spaceship, when every light means something, and what exactly - go and figure it out. For these purposes alone, it was worth studying the new panel one hundred and twelfth in more detail, which we are happy to share.
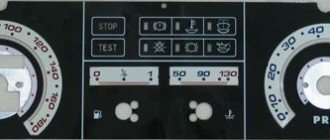
In order not to violate the informational nature of the panel description, and most importantly, so as not to redraw the arrows, we will use the factory layout of warning lamps and indicators on the instrument panel. Here she is.
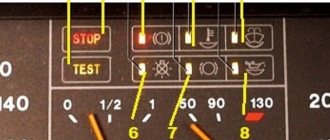
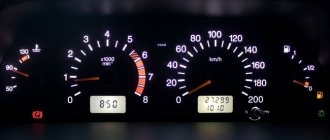
- A pointer indicator that schematically shows the approximate temperature of the coolant in the cooling system. The pointer receives a signal from a sensor that is installed between the cylinder head and the thermostat, so it shows a more objective temperature. The device is divided into divisions with a value of 20 degrees. The sensor is able to recognize temperatures starting from 50 degrees, and unsafe temperature conditions begin in the red zone with a temperature of 105 degrees. The gradation ends at 130 degrees, at which the motor is almost guaranteed to overheat and jam.
- Tachometer. Shows engine revolutions per minute in real time. The tachometer scale has divisions of five units, and digitization is carried out every 10. By adding two zeros we get the real value. The red zone starts at 55 units.
- A llama with an arrow indicating which turn signal is on, in this case, the left one.
- Controlling the activation of the right turn signal.
- An induction speedometer receives data on the speed of the vehicle from a sensor located in the gearbox. The accuracy of the speedometer readings is not very high, and depending on the speed of movement, it may have an error of 5 km/h or more.
- Fuel level indicator. It receives a signal from a sensor located directly in the fuel tank.
- When the fuel level drops to critical, this warning lamp lights up.
- Low beam switch lamp.
- Brake fluid level warning lamp.
- High beam indicator.
- Clock adjustment knob.
- Odometer and daily mileage.
- Alarm.
- Critical engine failure caused by failure of electronic systems.
- Clock and thermometer.
- Low battery charging voltage.
- Handbrake warning indicator.
- Critical oil pressure.
- Fuel mixture enricher indicator.
Europanel
On cars manufactured after 2006, they began to install a new panel, which for some reason was called Euro. Probably similar to European-quality renovations.
Many people install them on old-style 112s, believing that they look better. It has a lot of buttons that support features that older cars don't have, and you often have to install a steering wheel mounted switch assembly to blend in with the new design.
Installing a Europanel on an old-style VAZ 2112
Replacing the entire panel is a rather labor-intensive and time-consuming process, because you will have to repack almost all the wiring. But it's not just the work that makes the replacement process difficult. You will have to purchase some necessary elements for the panel to fit into place. Namely:
- plugs for extra buttons;
- air duct;
- inserts, buttons, pads;
- a new wiring harness corresponding to the wiring diagram;
- shield mounting brackets;
- The door cards will have to be replaced because the old ones do not fit with the new design.
Therefore, before replacing, you should think about the feasibility of the operation. Thus, we have become closely acquainted with the dashboard of the VAZ 2110, and we hope that it will not cause you any trouble on the road. Fewer red lights on your dashboard, and have a good trip!
Diagnosis and troubleshooting
If the instrument panel of the VAZ 2110 does not work, then to fix the problems you need to:
- check the lamps and replace faulty elements;
- check the integrity of the wiring using a multimeter or test indicator;
- inspect the condition of the contacts and clean their surface from traces of oxidation;
- check the condition of the fuses;
- test the operation of the devices.
The diagram shows fuses in blue that need to be checked if problems arise with the devices on the VAZ 2110.
Instrument cluster circuit fuses
To check the temperature or fuel level gauge you must:
- Connect the ignition.
- Connect the positive power output of the device (attached to pin 5 in the white plug) to ground with a wire. If the arrow deviates, you need to check the condition of the wiring connecting the sensor and indicator.
- If the temperature indicator constantly indicates overheating, it must be disconnected from the sensor. If the needle drops to zero, the sensor needs to be replaced. Otherwise, there is a short circuit in the wiring to ground or failure of the indicator device itself.
- To test the device, you need to remove the white plug from the panel and apply power to pin 10 directly from the positive terminal of the battery. At the same time, a negative voltage is applied to pin 1. A working indicator shows a value equal to zero; if the arrow deviates, the device requires replacement.
Other possible repair options:
- Testing the tachometer is only possible on a stand that simulates engine operation. The speedometer is also checked using special equipment, which compares the measurement results with a reference device.
- After this, a visual inspection of the tracks on the printed circuit board located inside the combination is carried out. If cracks, ruptures and delaminations are detected, contact must be restored with solder. If repairs do not help, the instrument cluster will need to be replaced.
A video from the channel “In Sandro’s Garage” demonstrates how to replace backlight bulbs.
Precautionary measures
When repairing the instrument cluster, a number of recommendations must be followed:
- fuses are replaced with the ignition off;
- when testing devices, be careful to avoid short circuits;
- soldering is done with a low-power soldering iron with a thin tip;
- Removal and installation of the combination is carried out with little force so as not to damage the attachment points.
Instrument panel VAZ-2112
Dashboard UAZ 469
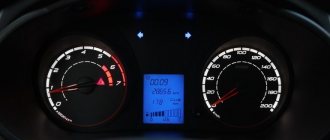
The instrument panel of the VAZ-2112 is quite ascetic by modern standards. In its central part, located in front of the driver, there are two pointer indicators: a tachometer and a speedometer. The first, as you know, shows at what frequency the engine is currently rotating, the second - the speed of the car. Under the tachometer, the designers placed on the panel a dial with an electronic clock and a thermometer that shows the outside temperature if there is a corresponding sensor. Below the speedometer is an electronic odometer showing total and daily mileage.
To the right of the odometer is the electronic clock adjustment lever. On panels with a narrow display installed, this knob can be used to switch the odometer readings to total or daily mileage. Between the tachometer and the speedometer at the top there are indicators for left and right turns, respectively, and at the bottom there are two indicators: “hazard lights” and a critical engine malfunction, which appeared due to a malfunction in the electronic systems. When this indicator comes on, it is best to turn off the engine, since there may be several reasons why it came on. Sometimes this indicator signals the presence of errors in the operation of the on-board computer, which are eliminated at the service using special software.
The VAZ-2112 panel is also equipped with a dial gauge for coolant temperature. A sensor connected to the device detects temperatures starting from 50 degrees Celsius. On the VAZ-2112, the red zone starts at 105 degrees. At 130 degrees, the motor will jam from overheating, so further indication here is simply meaningless. Under the coolant temperature sensor on the VAZ-2112 panel there are 4 indicators:
- fuel mixture enricher (for engines with a carburetor);
- oil pressure – the oil level has dropped to a critically low level. It is best to turn off the engine, identify and, if possible, eliminate the problem, continuing to drive only after adding oil;
- parking brake;
- battery charge - the indicator signals the presence of a malfunction in the system, for example, an open circuit, a broken generator belt, and other such problems.
They all light up if a corresponding malfunction occurs.
Studying the instrument panel of the VAZ-2112, we will see that on the right side there is a fuel level dial indicator. This device receives data on the amount of fuel (in the case of the VAZ-2112 - gasoline) in the tank from a special sensor. It should be remembered that the readings of this device are relevant only for a flat surface, since when a car goes, for example, uphill, the fuel, in accordance with the laws of physics, shifts to the far corner of an incomplete tank. Consequently, the sensor will transmit incorrect information.
To the right of the fuel level indicator is a small icon of a gas station column - it’s easy to guess that it lights up when the level of gasoline in the tank drops to a critical level. However, with a flashing lamp, you will still have a certain power reserve.
Below the fuel gauge there are three indicators:
- high beam – signals the driver that the high beam headlights are on, blinding oncoming traffic;
- low level of brake fluid - it is likely that the fluid leaves the system as a result of a tear in the hose;
- side lights - they will remind the driver of the need to turn them off when getting out of the car, since otherwise he may be faced with a very unpleasant surprise in the form of a dead battery the next time he boards.
Removal and modification
Here's a quick look at the device and control panel icons. If for some reason she refuses, don’t immediately panic. Most often, the reason is the absence of contacts in some place in the wiring. But of course, if you wish, you can completely change or tune the panel.
For example, remove the cover and replace the light bulbs with brighter LEDs. Such a panel works brighter and the signals sent by the car will be more noticeable to the driver. If desired, you can install a more solid europanel, which will transform the interior.
To remove the panel you need:
- Disconnect the “-” wire from the battery;
- Remove the shield by unscrewing the screws;
- Remove the fastenings of the control panel to the trim, remove the instrument cluster from the socket;
- Remove the glass mask;
- Disconnect the wires from the block;
- Make changes to the instrument panel or replace it with a new one. Reassemble everything in reverse order.
Designations of indicator lamps on the instrument panel of VAZ 2110 - 15.
Many car enthusiasts are faced with this seemingly simple question. What do the indicator lights on the instrument panel mean?
And what do we know, they all light up together only when the ignition is turned on, and when one of them lights up while driving, it becomes a little uneasy.
I didn’t know this myself when I switched to a “two” after the “seven”, half of the 2107 didn’t light up at all, so I didn’t know what it was and what it was for. And a friend of mine, after buying a car in Novorossiysk, even bought a whole book on VAZ , due to ignorance of these light bulbs.
The symbols on the instrument panels on all VAZs are almost the same, just the location is different.
Let's start in order.
1 — Coolant temperature, in degrees Celsius.
2 — Tachometer, engine speed.
5 — Speedometer, vehicle speed in km/h.
6 - Fuel level in the tank. When there are 5-7 liters left, a yellow light comes on - a warning or an icon with a picture of a gas station.
7 - Actually, this is an image of a gas station, signaling the need to refuel.
8 - Indicator lamp for turning on the dimensions.
9 — The brake fluid level is low, it may be leaking somewhere.
10 - Turn on the high beam.
11 - Clock adjustment knob (hours/minutes - switches when pressed), sometimes this knob serves as the function of switching the total mileage/day mileage (on panels with a narrow display).
12 — The display showing the total mileage/daily mileage is narrow on some models.
13 - Hazard warning lamp - “hazard light”.
14 - Check Engine, often indicated by this icon - this means a malfunction in the engine, it is recommended to stop the engine.
15 — Display with a clock (can show the outside air temperature if there is a temperature sensor).
16 - Malfunction in the battery charging system: loose or broken generator belt, generator malfunction, open circuit and other problems.
17 - Parking brake indicator.
18 - Insufficient oil pressure in the engine, it is recommended to turn off the engine and find the cause.
19 — Air damper light (on carburetor engines)
I’ll also add about the lamps on the additional panel in the dashboard of the VAZ 2110 - 12.
— The light marked with an arrow is a check for malfunction of the dimensions or brake lights. — Below is a brake pad wear indicator, if it lights up, check the brake pads, maybe it’s time to change them. — Seat belt warning light — this is clear from the picture.
On the other side from above:
— Low engine oil level — Low washer fluid level — Increased coolant temperature
This is how the review turned out. If some kind of lamp lights up and the signal beeps, do not panic. Usually these are small things.
Save this note to yourself on your social network by clicking on one of the buttons below.
The most common breakdown
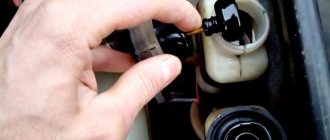
Before digging into the inside of the car, check how securely the ground wire leading to the front panel is secured. A restless passenger in front often simply pulls him out of his place with his feet. To prevent the situation from repeating itself, after fastening it is worth insulating the wire from reach.
Its signs are very characteristic:
- All indicators do not work: speedometer, tachometer, odometer, fuel level recorder, coolant temperature sensor;
- The rest of the equipment - optics, radio, even the panel backlight - turn on normally and do not act up;
- The ignition works properly, the car does not refuse to start;
- Fuse F3 is almost 100% blown. It is located in the mounting block and will have to be changed. But first you need to find out why it was covered, otherwise the new one installed will suffer the same fate. In most cases, a short circuit is to blame for burnout. On well-used VAZ-2114, the fuse often blows after each wash. Instead of carrying a spare one, you need to figure out where moisture is getting into it.
If the fuse is intact, this is not a reason to immediately leave it alone. It would be a good idea to remove it and check the contacts: if the fuse is live, but the terminals are oxidized, the circuit will be interrupted, and the device will stop showing any signs of life.
The next weak link: It is the ignition relay. It is located to the left of the steering column, fixed on a pin, so to speak, upside down. You need to remove it and try to make direct contact with the wires. If there are obvious signs of revival on the instrument panel, it immediately becomes clear that the time has come to change the relay.
Possible faults
The shield is being installed on a VAZ 2114
Possible problems with the panel may be due to incorrect connections. Because of this, some or even all of the indicators may not work.
If initially everything functioned normally, and then some malfunctions arose, check the condition of the wiring. After prolonged use, various buttons may fall off, but they can be easily replaced. The fuse block also burns out; replacing it will cost 1,800 rubles.
Diagram and pinout of the on-board control system BSK VAZ-2110, 2111 and 2112
Pinout of on-board control system VAZ 2110, 2111, 2112
1 — the indicator of insufficient oil level in the engine crankcase lights up in orange when the oil level in the engine crankcase drops below the “MIN” mark of the indicator. 2 - the left front door ajar indicator lights up red when the left front door is not closed. 3 — the right front door ajar indicator lights up red when the right front door is not closed. 4 - the brake light and side light bulb malfunction indicator lights up orange if one of the brake light bulbs or side lights is faulty. 5 — the front brake pad wear indicator lights up orange if the thickness of the linings has decreased to 1.5 mm. 6 - the seat belt warning light lights up red when the driver is not fastening the seat belts. 7 — the right rear door ajar indicator lights up red when the right rear door is not closed. 8 - the left rear door ajar indicator lights up red when the left rear door is not closed. 9 - the indicator of insufficient coolant level in the expansion tank lights up orange when the coolant level in the expansion tank on a cold engine drops below the permissible limit. 10 - the indicator of insufficient washer fluid level in the tank lights up in orange if there is less than 1 liter left in the tank. washer fluid.
Date added: 07/14/2014
Dismantling algorithm
So, let's begin:
- We remove and remove the front seats from the interior so that they do not interfere with the disassembly;
- Disconnect power from the battery;
- We lower the steering wheel of the VAZ 2110 to the lower position;
- Unscrew the screws that secure the panel covers. These are two screws on both sides of the tunnel. Now you can remove the shield;
- We remove the plug on the tunnel in the center by prying it off with a screwdriver;
- We unscrew the screws of the central tunnel to remove it. Before doing this, disconnect the wires from the cigarette lighter;
- We remove the air duct for heating the interior of the VAZ 2110. To do this, having disconnected the cover from the gearbox, you need to pry off the latches with a screwdriver, then remove the air duct;
- We remove the central panel by unscrewing it from the floor;
- Now it is possible to disassemble the torpedo. First, unscrew the mount that holds the glove compartment, disconnect it from the backlight, and take it out;
- In the hole where the glove compartment was located, we remove the screws on both sides, as well as directly behind the glove compartment;
- We unscrew the VAZ 2110 torpedo mount with a key and a screwdriver;
- Near the left pillar we pull out the air duct by prying it with a screwdriver;
- With special care you need to remove the torpedo, supporting it with your hands while unscrewing the nut with a spanner. Then, lifting it up, remove it from the pins;
- Now you need to remove all the wires, marking them with a marker as you go so that you don’t get confused when reinstalling them;
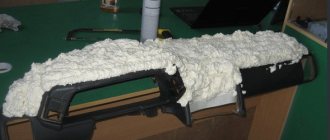
- It became possible to replace the lining and carry out noise insulation work.
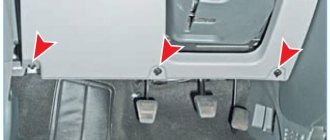
Unscrew the two self-tapping screws securing the right flap of the floor tunnel liningRemove the shield (Left is similar)
Using a screwdriver, remove the plug from the floor tunnel lining cover
Use a Phillips screwdriver to unscrew the screws securing the lining cover: two in the middle part of the tunnel
and two in the back
Raising the cover of the floor tunnel lining
Disconnect the cigarette lighter wire connectors
Using a screwdriver, remove the gearshift lever cover holder from the floor tunnel lining cover
Using a 10mm wrench, unscrew the nut securing the interior heating air duct
and remove the air duct
Using a 10mm socket, unscrew: two nuts in the middle part of the front fastening of the floor tunnel lining housing
and two rear mounting nuts
Removing the floor tunnel lining body
Using a Phillips screwdriver, unscrew the two self-tapping screws securing the glove box hinge brackets
Holding the glove box
disconnect the wires from the lampshade and remove the box
Using a Phillips screwdriver, unscrew the two screws securing the instrument panel, located: on the left - under the cover of the mounting block and on the right - under the glove box
Using a Phillips screwdriver, unscrew two screws (one on each side) of the lower side mounting of the instrument panel
Using a Phillips screwdriver and an “8” wrench, unscrew the two screws securing the instrument panel to the controller bracket
Prying it up with a screwdriver
remove the side ventilation and heating nozzles
Using a 10mm socket, unscrew the two nuts for the upper fastening of the instrument panel.
Lifting up, remove the instrument panel from the studs and move it back
To completely remove the instrument panel, disconnect the connectors of the wiring harnesses (having previously marked them) and remove the headlight hydraulic corrector
Removing the instrument panel
Use a screwdriver to pry off the foot heating duct
and disconnect it from the air distributor housing
How to easily and quickly remove the dashboard on a VAZ 2110 with your own hands?
Without a doubt, the dashboard is the most noticeable interior detail in a car, because it is located right in front of the eyes of passengers and drivers. The need to remove the dashboard on a VAZ 2110 may arise for car owners for a variety of reasons.
So, by removing this part, you can get full access to all the electrical components of your vehicle, replace the burnt-out wiring with a new one, connect additional devices or lighting, install a Euro trim or sound insulation.
Options for replacing the standard VAZ 2110 panel:
If desired, you can cover the dashboard with various materials of your choice, thereby making the desired changes to the interior of the cabin.
I would like to say right away that removing and replacing a torpedo on a VAZ 2110 will require a lot of time and patience from you
In addition, all repair work must be carried out extremely carefully and carefully so as not to accidentally break the fastening, since the dashboard will not fit back as it should and will creak when driving
To work you will need the following tools:
- marker;
- self-adhesive labels;
- set of screwdrivers and wrenches.
Separately illuminated arrows
LEDS IN THE INSTRUMENT PANEL FOR VAZ 2110 2111 2112
Video guide for replacement
instrument panel for VAZ 2110
-2112 with your own hands.
An example of replacing
...
How to remove the instrument panel on a VAZ 2110, 2111, 2112 and replacing light bulbs
Video review - Backlight styling
car interior VAZ 2110 replacement
all incandescent light bulbs to diode ones on
the panel
...
LED instrument panel VAZ 2110
If you want the arrows to glow a different color, you can do the following:
Note: in this case, the arrows will light up in a different color only when ignited.
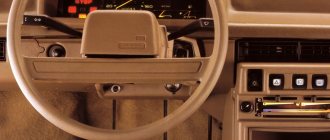
Description and location of indicators on the panel
After 2006, a new dashboard was installed on VAZ 2112 cars. For reasons that are not entirely clear, any description of it includes the prefix “euro”, probably due to its modernity and quality.
But in order to use it, you need to know the symbols, which are not always easy to understand even from the instructions. You can often only guess what this or that indicator and light bulb mean.
To make this task easier for yourself, pay attention to the diagram of the instrument panel below and its explanations
Description of the panel
- Arrow pointer. Intended to indicate the approximate coolant temperature. The data is obtained from a sensor that is installed between the cylinder head and the thermostat. This allows you to obtain accurate data. The sections have a range of 20 degrees, the lower level is 50, and the upper level is 130.
- Tachometer. Its purpose is known to any driver - to show engine revolutions per minute. Sections of 5 units, digitized every 10 units. To get the real value, add a couple of zeros to the number. Starting from 55, the engine enters the red zone in terms of revolutions.
- Left turn signal indicator.
- A similar indicator for the right turn signal.
- Speedometer. It is of the induction type and receives speed data from the sensor on the gearbox. Unfortunately, it’s definitely not very high; the error can be up to 5 km/h or even more.
- Fuel level indicator. The sensor is located directly in the tank.
- A warning light indicating a dangerously low fuel level.
- Low beam indicator.
- Lamp for monitoring the amount of brake fluid.
- High beam indicator.
- Lever for adjusting the clock.
- Total (odometer) and daily mileage.
- Alarm.
- Failure of electronic systems leading to critical engine failure.
- Clock and thermometer.
- Low battery charging voltage.
- Handbrake warning lamp.
- Critical oil pressure level.
- Fuel mixture enricher indicator.
Based on the above diagram, you can easily remember what this or that alarm light means. And although this is an instrument cluster for the VAZ 2112, it is approximately the same on other VAZ cars.
Contactless systems and Hall sensor in the distributor
How to remove the instrument panel on a Priora
The distributor described above is a classic option and was used for many years on all cars, including the VAZ family, such as 2109, 2106, 2107, 2108. However, as electronics developed, voltage switches began to appear , in which the breaker signal was used not to switch the ignition coil, but to control the electronics. Later, the distributor lost its mechanical breaker and was replaced by a Hall sensor.
The Hall sensor used has a fairly simple design. Yes, it must be recalled that the Hall sensor is an element that responds to a magnetic field. Therefore, the design of the sensor using Hall elements is based on this principle. To do this, a Hall sensor is located directly on the plate, on the other side there is a permanent magnet, and between them there is a rotating metal screen in which special slots are made.
At one time, a similar system was implemented in many cars, VAZ 2109, 2106, 2107, 2108 were no exception.
What types of overlays are there?
If you just need a Euro pad, then there are two options:
Euro-1 rubber, another name for which is Caprice. It has the same instrument cluster as the VAZ 2110, the only thing is that there is no shelf on the passenger side;
Panel trim VAZ 2110 Euro-1
Euro-2 is practically no different except for the presence of the mentioned shelf.
Panel trim VAZ 2110 Euro-2
There is also a Euro-3 overlay on sale. But it is for later and more advanced VAZ cars - Priora, Kalina. The fact is that this version provides more devices, for example, there is a unit for climate control, which is not observed in the top ten. Although, in principle, if desired, installing this option is also possible.
Panel trim VAZ 2110 Euro-3
Any Euro pad mentioned above is a quality product, unless, of course, it is a cheap fake. It is softer and even, according to manufacturers, less traumatic, like the old one. In addition, after its installation, the supply of warm air to the side windows should improve.
Components
When purchasing, you will receive what is included in the kit, namely:
- Europlate;
- Inserts for switches (buttons) of devices;
- Trim on the instrument panel;
- Since your instrument combination may differ from those whose installation is structurally provided, there should also be six plugs; they can be inserted instead of buttons;
- The buttons themselves and two pads for them: • Double – for low beam and dimensions; • To turn on the fog lights; • Heated rear window.
- Air ducts;
- Block and wiring harness designed to connect a double button for side lights and low beam;
- Brackets securing the instrument panel.
In addition, if you are not entirely satisfied with this combination, and you need more buttons for other devices, then they, as well as the pads for them, can be purchased separately.
Installation of a “euro” torpedo
The owners of the “twelfth” vases, which were produced after 2006, are very lucky - since from this year the cars will be produced with a “Euro” panel, as well as a Kalinovsky (from the Kalina fret) steering wheel and power steering. What remains for owners of cars equipped with an old panel? Either use what you have or install a “euro” panel if the car was manufactured before 2006:
"Euro" torpedo VAZ
- The main question is whether it is advisable to change the standard panel in an old car to a “euro” one, as in the photo above
- Since the existing so-called “euro” panel contains many indicators and buttons not used in the old generation VAZ2112
- And its old steering column does not fit well with the design of the modern “Euro” panel
To install the “euro” panel with your own hands, you need to purchase additionally:
- Overlay for "euro" panel
- Special inserts for buttons,
- The buttons themselves, pads for them, plugs instead of unused buttons
- New air ducts
- Fuse box
- Wiring harness
- New brackets for the instrument panel
- Matching door trim panels
At the same time, keep in mind that standard connectors for the “brains” do not fit, so you will have to tinker to make adapters; you will also need a steering wheel from Kalina, and power steering for that matter. Of course, if you tinker a lot (the price for such tuning is high), but the result will justify itself, since the advantages of the “euro” panel are many:
- Firstly, modern design
- Secondly, ergonomics are at a high level
- Thirdly, VDO devices are already illuminated from the inside
- Built-in digital odometer, very original warning lights
- Its plastic is much softer and more pleasant to the touch.
- The “Euro” torpedo has a more precise fit of all plastic parts
Another option is that you can install a panel from a Priora, but you will also have to purchase it complete with the door trim; this is also quite expensive. Therefore, tuning VAZ 2112 tuning devices will help you avoid unnecessary emotions and solve the problem at low cost:
- Replacing the instrument cluster with a modern model
- Performing sizing of the instrument panel in order to eliminate squeaks that are unpleasant to the ear
A simple example, a PRO-SPORT type instrument panel is suitable for a VAZ 2112, the number of instruments and their combination remain the same, but it is made in the style of a Lexus car, so it looks very expressive and very individual
Removal and installation of VAZ 2110 panel
Below are step-by-step instructions for removing the “tens” dashboard.
- Disconnecting the battery
- Remove the steering wheel and steering column switches
- Be sure to remove the top lining of the floor tunnel
- Remove the glove compartment and unscrew the mounting screws
- Remove the headlight hydraulic adjustment handle by pulling it towards you
- Unscrew the hydraulic corrector nut and remove it
- Remove the upper side air duct deflectors by prying them up with a screwdriver
- Under the deflectors we find the panel fastening nuts, unscrew them
- We unscrew the screws from the bottom of the dashboard, next to the hood release lever, at the mounting block, in the niche of the glove box, etc.
- Now you can remove the door seals, remove the lining covering the front pillars
- Disconnect the electrical wiring terminals
- You can remove the panel by holding the steering column adjustment lever in the desired position
The fully unscrewed VAZ 2110 panel is supported by two guide pins (see photo above) with white arrows pointing to them. We assemble the panel in the reverse order.
Tuning ideas
VAZ 2112 with europanel
If you have a VAZ 2112, tuning is available for a panel that is not too wide. But you can install additional instrument lighting so that you can see all the readings at night in the dark. It just looks stylish, especially if you use a tuning blue color for the lighting.
This panel has a lot of space for buttons that are not needed on an older machine. But you can install heated side mirrors and turn it on via these buttons.
Bottom of panel
- The air damper light is located on the left edge if the engine has a carburetor installed.
- Oil can sign. You should look at this indicator more often and do not ignore a lit light bulb. Alert! Warns the driver that the oil pressure in the engine has dropped to a critical level. We urgently need to find the reason!
- The letter P in a circle requires attention when, while moving away, the driver forgot to remove the handbrake.
- The sensor with the image of the battery carries information about problems with the generator and battery. For example, the generator stopped charging the battery, there was a break in the electrical circuit, the generator belt became loose or broke. This situation needs to be sorted out without delay. Otherwise, the troubles will be much more serious.
- The worst thing for a car owner is to see the Check Engine light flashing while the engine is running. This means that major malfunctions have arisen in the operating functions of the engine. You need to immediately stop the car and turn off the engine. Most likely, the engine will require expensive repairs.
- There is usually a red triangle on top of the Check Engine. Pressing it activates the hazard warning system, warning passing drivers of an emergency and a request for help.
- The headlight icon notifies you that the high beam is activated. Here, when meeting other cars, you must remember to switch the high beam to low beam.
- The indicator in the form of a red circle also transmits an alarm signal. When this light comes on, there is a risk of being left without brakes, as this is a signal that the brake fluid is running low. It is very dangerous to move without brakes, so it is necessary to immediately address this problem. Most likely there is a fluid leak.
- The side lights are controlled by an indicator with the image of a light bulb.
- In addition to all this, there is a clock. Using the button you can set the appropriate time.