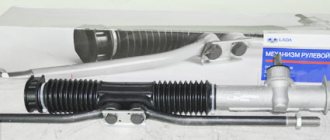
repair of the ignition distributor (distributor) on a VAZ 2108, VAZ 2109, VAZ 21099
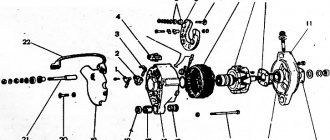
The ignition distributor (distributor) consists of the following parts (see figure below): 1 – o-ring; 2 - coupling; 3 — adjusting washers; 4 — roller with a centrifugal regulator; 5 — support plate; b — dust screen; 7 - slider; 8 - Hall sensor; 9 – lock washer; 10 - thrust washer; 11 – distributor body; 12 - vacuum corrector. 1. Remove the distributor from the VAZ 2108, VAZ 2109, VAZ 21099.
2. Unscrew the two fastening screws and remove the distributor cover. Then remove the slider by pulling the slider up.
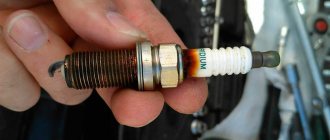
3. Replace the slider with cracks, signs of burning, significant wear or corrosion of the outer contact 1. The slider must be tightly installed on the distributor shaft. This is ensured by leaf spring 2. A slider with a weakened or broken spring must be replaced. Using an ohmmeter, measure the resistance of resistor 3, it should be equal to 1 kOhm. Otherwise, replace the slider.
4. Remove the dust shield from the distributor.
5. Unscrew the screw securing the low voltage wire terminal and remove the terminal from the distributor body.
6. Unclench the holder's claws with a screwdriver and remove the wire from the holder.
7. Remove the two screws securing the Hall sensor support plate.
8. Remove the retaining ring from the backing plate pin.
9. Unscrew the two screws securing the vacuum corrector.
10. Using a screwdriver, remove the vacuum corrector rod from the support plate pin.
11. Remove the vacuum corrector from the distributor.
12. Using a screwdriver, lift up the support plate and remove it.
13. If the bushing is scuffed or significantly worn, replace the support plate.
14. Remove the retaining ring from the ignition distributor shaft, and then the thrust washer.
15. Remove the snap ring holding the clutch mounting pin.
16. Replace the torn or lost elasticity o-ring.
17. Drive out the coupling mounting pin using a suitable punch.
18. Remove the ignition distributor drive clutch and adjusting washers. Replace a coupling with severely worn studs.
19. Remove the roller with the centrifugal regulator.
20. Inspect the bushings in which the shaft rotates on both sides of the distributor body. If there are scuffs or significant wear on the bushings, replace the distributor body complete with bushings.
21. Using a screwdriver, remove the two weight springs from the struts. To avoid confusing the springs during assembly, mark the post to which the small spring is attached.
22. Remove the driven plate of the centrifugal regulator with the screen.
23. The weights of the centrifugal regulator must turn freely on the axes. Otherwise, remove the retaining rings securing the weights.
24. Then remove both weights from the axles. Clean the holes of the weights and lubricate them with grease. Replace the roller if it is badly worn or burred.
25. To replace the Hall sensor, unscrew the two mounting screws and remove the Hall sensor from the base plate.
NOTE On parts of the ignition distributors, the Hall sensor is attached to the support plate using rivets. In this case, the Hall sensor is replaced as an assembly with a support plate.
26. Wipe the distributor cover outside and inside. Replace the distributor cap with cracks, signs of puncture (very thin cracks), chips or badly worn contacts. The contact ember should move freely inside the distributor cover. If the contact angle is chipped, cracked, badly worn, or the angle spring is broken, remove it with the spring from the distributor cover and replace it. 27. Reassemble the ignition distributor (distributor) in the reverse order, having first lubricated the bushings and roller with a thin layer of engine oil.
28. Before installing the clutch, install the slider with the outer contact towards the contact of the 1st cylinder in the cover.
29. Then install the coupling on the shaft so that the spikes of the coupling coincide with the slots on the camshaft with the piston of the 1st cylinder installed at TDC.
parts of the ignition distributor (distributor) of the VAZ 2108, VAZ 2109, VAZ 21099
Source
Questions about choosing and replacing a slider with a resistor
Diagram of the contactless ignition system for VAZ 2108, 2109, 21099 cars
Slider with resistor filled with compound
Replacement resistor for slider
The resistor placed in the slider is subjected to significant electrical and mechanical loads, so over time it can fail - burn out or break (crack). As a rule, a breakdown of the resistor does not disable the engine, but seriously impairs its functioning - the engine does not gain full power, responds poorly to the gas pedal, “troits”, detonates, etc. The fact is that sparks can jump through a burnt out or cracked resistor, so the ignition system continues to work, but with disturbances and less efficiently. If such signs appear, you should first remove the distributor cover (this should only be done with the engine stopped and the terminal removed from the battery), dismantle and inspect the slider. If the slider is ordinary, then it can be removed without a tool, and if the part is connected to the ignition timing regulator, then two screws should be removed using a screwdriver.
If, when examining the resistor, there are no external signs of its malfunction (it is not burnt or broken), or the resistor is filled with compound, then you should check its resistance using a tester - it should be within 5-6 kOhm (for some cars - up to 12 kOhm, but not lower than 5 kOhm). If the resistance tends to infinity, then the resistor is faulty and should be replaced. A replacement part should be of the same type and resistance - this is the only way to guarantee that the resistor will fall into place and the entire system will work normally. Replacing a resistor involves simply removing the old part (it’s easy to pry it off with a screwdriver) and installing a new one. If the resistor is filled with compound, then you will have to change the entire slider - for domestic cars such a replacement will cost several tens of rubles.
Often, car owners install wire jumpers instead of resistors - this is strictly prohibited. The absence of a resistor increases the level of radio interference and can disrupt the operation of the ignition system (including leading to intensive wear of the contacts of the slider and distributor cover, and spark plug electrodes). It is also not recommended to replace a slider with a resistor with a simple slider in ignition systems with high-voltage wires of zero resistance. For replacement, only those types and models of runners recommended by the ignition distributor manufacturer should be used.
Replacing the distributor oil seal on a VAZ 2109 (video)
The ignition system of the VAZ 2109 consists of a number of devices whose task is to create an electrical discharge that ignites the air-fuel mixture in the engine. Among these devices there is a distributor.
Distributor and ignition distributor are synonyms. Remember this so that in the future there are no problems with misunderstanding of instructions for repairing the ignition system .
Filter Features
To determine the reasons for the presence of oil in the filter, the first step is to find out about the features of its operation and functions.
Some people mistakenly believe that VF is an ordinary consumable that does not require special attention. Because of this, checking the condition of the air filter is extremely rare. Sometimes it comes to the point that when dismantling the element, drivers find something like an old dirty rag instead of a filter.
For efficient combustion of the air-fuel mixture in a carburetor engine, it is necessary that the amount of air exceeds the amount of fuel by approximately 15-20 times.
To prevent such a nuisance, which threatens serious engine damage, an air filter (AF) is installed on the VAZ 2109. In addition to the main function of cleaning, the filter also serves as a muffler and fuel cooler.
Brand new filter element
Causes of failure
There are several main reasons why a distributor may break and only need to be replaced:
- The appearance of cracks on the cover;
- Broken Hall sensor;
- Burnt out slider;
- Burnt contacts on the cover;
- Loose bearing holding the Hall sensor;
- Poor contact in the Hall sensor plug.
All these situations, in addition to poor sensor contact, are a signal to replace the distributor.
Unit location
Adjustment
In some cases, it is enough to adjust the ignition system to return the engine to its previous performance.
There are several symptoms that indicate this.
Symptom
Causes
Excessive detonation of the piston system
A characteristic feature of this problem is a ringing sound when you press the gas pedal. The reason is early ignition, which can cause deformation of the piston rings.
Black smoke from the chimney when starting the engine
This indicates that the ignition is too early.
Engine power has decreased, fuel consumption is increasing
Here the ignition is already late, so the mixture cannot burn completely
The engine begins to idle unevenly
Caused by both early and late ignition.
To adjust the distributor, you will need:
- Tachometer;
- Slotted screwdriver;
- Strobes;
- Wrench.
Let's get to work.
- Start the engine, increase idle speed to 800 units. Make sure that the engine temperature is at least 90 degrees.
- Align the crankshaft according to the marks on the cylinder block cover.
- Connect a 12 Volt light bulb to the output wire from the distributor. The second contact goes to ground.
- Turn on the ignition and watch the lamp. If it does not light up, loosen the nut that holds the distributor plate and begin to carefully, slowly turn the distributor body counterclockwise until the lamp lights up.
- Drive several kilometers at speeds up to 50 km/h. If the symptoms of the problem disappear, you have made the correct setting.
- If there are no consistent detonation sounds, you have set the ignition too late. Here the distributor needs to be turned clockwise.
- If there is no positive result, the distributor will have to be repaired or replaced.
Ignition adjustment
In cases where, during reassembly, you forgot about the marks or turned the shaft, as a result of which the piston left TDC, you will have to spend quite a lot of time re-setting the ignition.
Before you begin work, you must:
IMPORTANT! The speed of the car engine should be in the range of 820 – 900 rpm
- At idle speed, set the ignition timing and check it.
- The value of the set angle is 0 - 1 degree, counting from TDC. The consequences of incorrect ignition installation will be engine overheating and a significant reduction in its power, as well as detonation. The latter leads to accelerated destruction of the cylinder rings and increased fuel consumption
- The adjustment mentioned above is carried out on a scale located in a special hatch provided in the clutch housing (the rubber plug must be removed). And according to the mark applied to the flywheel at the factory
Next comes the actual adjustment procedure. But this is the topic of a separate article, which you can read on our website. A video is also posted here, which is step-by-step instructions for eliminating this problem and corresponding photos. In the event that you plan to fix the malfunction at a service station, the price of the work must be specified additionally.
Dismantling
After dismantling the distributor, you can disassemble the device in order to repair its components, or completely replace the distributor with a new unit.
- De-energize the car by removing the negative from the battery;
- Disconnect the high-voltage components and the vacuum ignition corrector hose from the distributor;
- Remove the drive cable responsible for the throttle valves from the bracket. Next, the fastening nuts are unscrewed and the bracket is dismantled;
- Before removing the ignition distributor, apply a mark to the housing of the distributor and drive of auxiliary elements. This way you can simplify your task of setting the ignition timing for its precise setting. The mark is applied to the metal by scratching;
- Press the latch holding the block with the power wires and disconnect it from the distributor;
- Place the piston from the first cylinder to the top dead center position by moving the engine flywheel clockwise;
- Unscrew the remaining ignition distributor screws. The first fastener was removed when removing the damper cable sheath bracket;
- Remove your damaged distributor.
Disassembly and repair
Quite often, repair work with the distributor is associated with wear and the need to change the seals (coupling). To change the oil seal, as well as other failed components of the distributor, we bring to your attention the appropriate instructions, as well as video tips.
- Remove the ignition distributor cap by releasing the locking clip.
- Remove the slider. It is wiped with a clean rag and checked for mechanical damage. If there are chips or cracks, the element must be replaced.
- The runner must fit tightly on the shaft, which is achieved due to the presence of a plate spring with a pressing action. If it stretches or breaks, replace it.
- There is a resistor in the slider housing. The normal reading of its resistance is 1 kOhm. By measuring the data with an ohmmeter, you can draw conclusions regarding the performance of the component.
- Remove the low voltage wiring terminal. To do this, unscrew the mounting screw from the housing.
- Remove the plastic screen that serves as dust protection.
- A power wire comes from the Hall sensor and is held by the holder's claws. Using a screwdriver, the claws are opened and the wire is removed. Next, you need to unscrew the pair of mounting screws securing the Hall sensor support plate.
- Remove the vacuum corrector. Just be sure to disconnect it from the support plate lever before doing this. To perform this operation, carefully remove the retaining ring from the pin.
- The next step is to remove the pair of screws that hold the corrector to the distributor body.
Disassembling the unit
- Lift the corrector lever slightly, which will allow you to remove it from the sensor plate pin and remove the corrector itself.
- These steps will allow you to easily remove the support plate by lifting it with a flat head screwdriver. Remove the element. The plate must be replaced if the bushings are worn out or there is mechanical damage to the unit.
- Unscrew the two fasteners to disconnect the plate and the Hall sensor.
- You need to remove the oil seal, that is, the coupling. It is located on the distributor shaft. The coupling is closed with a thrust washer. That, in turn, is fixed with a retaining ring. You first need to remove the ring, which will make it possible to remove the thrust washer.
- Remove the oil seal by knocking out the pin with a small-diameter borer. Determine the dimensions of the boletus during the repair process.
Checking for damage
- There are adjusting washers under the oil seal.
- Remove the roller along with the centrifugal regulator from the distributor body.
- Clean the housing using kerosene and a dry cloth. Make sure that there are no mechanical damage, chips or cracks on the case.
- Examine the condition of the bushings. The roller rotates on them, and with severe wear, the roller begins to become loose. Also, the device is replaced along with the bushings if there are signs of wear, defects, or damage.
- To disassemble and replace damaged elements of the centrifugal regulator, you first need to remove the weight springs using a screwdriver.
- If the springs are intact and undamaged, not deformed, make notes on their seats. If you mix them up during assembly, problems may arise.
- Remove the driven plate along with the screen from the shaft.
- Make sure how effectively the weights move along their axes. Movements should be free, without any jamming. If there are problems, the weights are changed.
- It is a mistake to check the movement of loads without first removing and cleaning them.
As you disassemble the distributor, you will be able to identify damaged components and replace them with new ones using a repair kit. If the damage is serious, it is better to replace the entire ignition distributor.
The distributor is an important and sometimes capricious element. But replacing it and repairing it shouldn’t cause any problems.
Source
Repair of contact distributor
Adjusting the ignition timing
It is better to repair the distributor-distributor or diagnose it by first removing the device from the engine. Firstly, it will be much more convenient, and secondly, you will have the opportunity to assess the general condition of the distributor.
Dismantling the VAZ 2101 breaker-distributor
To remove the distributor from the engine, you will need two wrenches: 7 and 13 mm. The order of dismantling work is as follows:
- Disconnect the negative terminal from the battery.
- We find a distributor. It is located on the left side of the power plant cylinder block.
- Using your hand, carefully remove the high-voltage wires from the contacts of the cover.
- Disconnect the rubber tube from the vacuum regulator reservoir.
- Using a 7 mm wrench, unscrew the nut that secures the low-voltage wire terminal.
- Using a 13 mm wrench, loosen the nut holding the breaker-distributor.
- We remove the distributor from its mounting hole along with the sealing ring that acts as an oil seal.
- We wipe the lower part of the shaft with a clean rag, removing traces of oil from it.
Disassembly of the distributor, troubleshooting and replacement of failed components
At this stage we will need the following tools and materials:
- hammer;
- thin punch or awl;
- 7mm wrench;
- slotted screwdriver;
- fine sandpaper;
- multimeter;
- medical syringe for 20 cc (optional);
- anti-rust liquid (WD-40 or equivalent);
- pencil and sheet of paper (to make a list of parts that will need to be replaced).
The procedure for disassembling and repairing the distributor is as follows:
Disconnect the device cover from the body. To do this, you need to bend the two metal latches by hand or using a screwdriver. We inspect the cover outside and inside. There should be no cracks or chips on it.
We pay special attention to the condition of the electrodes. If minor traces of burning are found, remove them with sandpaper.
If the contacts are severely burnt, or the cover has mechanical damage, we add it to the list of replacement parts.
We evaluate the condition of the runner. If it shows signs of wear, we add it to the list as well. Otherwise, clean the slider with sandpaper. Turn on the multimeter and switch it to ohmmeter mode (up to 20 kOhm). We measure the resistance value of the slider resistor. If it goes beyond 4–6 kOhm, we add the resistor to the list of future purchases.
Using a screwdriver, unscrew the two screws securing the slider. Let's take it off.
We inspect the weights of the centrifugal regulator mechanism. We check the condition of the springs by moving the weights in different directions. Under no circumstances should the springs be stretched or dangling. If they are hanging out, we make a corresponding entry in our list.
Using a hammer and a thin drift (you can use an awl), we knock out the pin that secures the shaft coupling. We remove the coupling.
We inspect the splines of the distributor shaft. If signs of wear or mechanical damage are detected, the shaft definitely needs to be replaced, so we “take a pencil” to that too. Using a 7 mm wrench, loosen the nut securing the condenser wire. Disconnect the wire. Unscrew the screw that secures the capacitor. Let's take it off.
We carry out diagnostics of the vacuum regulator UOZ. To do this, disconnect the second end of the hose that comes from the “vacuum manifold” from the carburetor fitting. We again put one of the ends of the hose on the fitting of the vacuum regulator reservoir. We place the other end on the tip of the syringe and, by pulling out its piston, we create a vacuum in the hose and reservoir. If you don’t have a syringe at hand, you can create a vacuum with your mouth, after first clearing the end of the hose of dirt. When creating a vacuum, the movable plate of the distributor must rotate. If this does not happen, most likely the membrane in the reservoir has failed. In this case, we add the tank to our list.
Remove the thrust lock washer from the axle. Disconnect the rod.
Unscrew the tank mounting screws (2 pcs.) with a flat screwdriver.
Disconnect the tank.
Unscrew the nuts (2 pcs.) securing the breaker contacts. To do this, we use a 7 mm wrench and a screwdriver, which we use to hold the screws on the back side. We dismantle the contacts. We inspect them and assess their condition. If they are badly burnt, we add the contacts to the list.
Using a slotted screwdriver, unscrew the screws that secure the plate. Let's take it off.
We remove the movable plate assembly with the bearing from the housing.
We check the bearing for play and jamming by shaking and turning the inner ring. If these defects are identified, we prepare it for replacement. We purchase parts according to our list. We assemble the distributor in the reverse order, replacing the failed elements with new ones. There is no need to install the cover and slider yet, since we will still have to set the gap between the contacts.
VAZ 2109: do-it-yourself distributor repair
Repair of ignition distributor VAZ
Correct operation of the distributor (also known as the ignition distributor) affects the stable operation of the engine, since the ignition distributor controls the supply of spark to the spark plugs, both while driving and at idle. This is especially important for dynamics when the engine picks up speed. The main functions of the distributor are setting (adjusting) the moment of spark formation, in accordance with certain factors (changes in speed, engine load, etc.), as well as correct distribution of the spark among the cylinders. If the engine of a VAZ 2109 car jerks, the car starts poorly or does not start at all, the VAZ 2109 distributor may need to be repaired. The repair process is not difficult, you do not need the knowledge of an auto electrician, our instructions will help you identify and fix the problem.
Distributor device
The distributor device is a whole set of elements familiar to all elements of the car’s ignition system. A typical unit of such a formation consists not only of a spark distributor, but also of an ignition coil that forms this very spark. Less commonly, a switch is introduced into this system, but, as a rule, it is still a separate element of the system.
Delving deeper into the consideration of the design of the unit, we note the following components:
- The distributor drive is represented by a conventional rotor. It engages with the motor shaft, thereby starting the spark generation system and monitoring it;
- An ignition coil that constantly interacts with both the distributor elements and the switch. Forms a spark and transfers excess current to the capacitor for storage or further distribution throughout the vehicle system;
- A distributor capacitor that receives current from the ignition coil for “storage” and, if necessary, can be controlled by a switch. Accumulates excess charge for use in the vehicle system;
- Armored wires that ensure the interaction of system elements and the transmission of current in it;
- A distributor slider or a special sensor that receives a spark from the ignition coil and distributes it between the cylinders. A typical distributor diagram assumes that this distributor is placed at the top of the assembly and high-voltage wires go from it to the spark plugs;
- Vacuum octane corrector or similar unit that monitors the flow and quality of fuel supplied to the cylinders. On different versions of the distributor it can be represented by very different mechanisms, but is often based on vacuum compression and is always connected to the fuel supply system. That is, the more the air-fuel mixture is pumped, the earlier the distributor transmits the spark to the spark plugs so that all the fuel burns out with maximum efficiency.
In addition to the distributor elements described above, it is worth highlighting the auxiliary components that are necessary to build a unified system. To be more precise, such elements of the device include:
- Firstly, the distributor contacts. Perhaps one of the main functions is performed by the contact group of the distributor, which ensures the interaction of its components;
- Secondly, the distributor bearing. It increases the service life of the rotor mechanism, which significantly extends the service life of the entire device;
- And thirdly, numerous distributor bushings, cams and fasteners. All of them provide a uniform and reliable distributor design.
Device and purpose
Let us first consider the general structure, purpose and types of distributors:
- The distributor is part of the ignition system, and is designed to regulate, control and transmit an electrical signal to the ignition coil switch, distributing sparks among the spark plugs in the required sequence (in accordance with the ignition stroke)
- There are two types of ignition systems - non-contact and contact (of course, there are others, but they are not very common), accordingly, distributors are also used of two types
- They differ from each other only in design: the presence of contacts (in a contact system there is a breaker-distributor), or sensors (in a contactless system there is an ignition sensor-distributor)
- In terms of basic characteristics, both systems are almost identical
Setting the ignition timing
After we have studied the distributor device on the VAZ 2109, we move on to adjusting the ignition timing. To complete this job you will need:
- Crooked starter or ratchet wrench
- The slotted (flat) screwdriver is durable and has a powerful, wide blade
- Set of probes
- Open-end wrench “12x13”
- Conical rubber plug
- A spark plug wrench or a suitable socket with a wrench instead
Preparing for adjustment
In order for the engine of your car to work as expected, it is necessary that the spark plug spark jumps at the right time, which would ignite the mixture by the time the piston passes TDC and the gas, having completed the work of expansion, pushes the piston down. To ensure that the spark occurs on time, the ignition system uses a distributor, the main components of which are a contact group and a slider. The most important adjustments for cam ignition are: the gaps between the cams, the angles of the closed state of the contacts (UZSK) and the ignition timing. Before you start setting the ignition timing with your own hands, you need to make sure that:
- The spark plugs are in good condition and suitable for further use.
- If they have oil deposits on them, then it is recommended to calcinate them.
- It is not recommended to use sandpaper for cleaning, even fine sandpaper; fine abrasive from it may remain on the ceramic insulator and, as a result, the spark plug will begin to pierce
- It is not at all necessary to ignite the candles red hot, the main thing is to burn off the oil deposits
- Then we will adjust the gaps of all spark plugs in accordance with the manual
- To do this, use a wire probe
- We definitely check the condition of the contacts of our breaker
- If there are signs of metal burnout or signs of corrosion, replace the contacts
- It is not recommended to repair them, for one simple reason: after repair, the contacts will not last long! It’s easier to replace them and forget them for a long time
- We check the capacitor using a tester for charge and discharge
- The current should flow smoothly and slowly
- To do this, it is better to use a pointer tester, it can be seen more clearly
- You need to make sure there is good contact in the main wire coming from the ignition coil.
- By the way, it doesn’t hurt to check it either
- You can also check with a tester, megger, or the easiest way and completely free of charge at a good auto parts store on the stand
- We remove dirt from the ignition coil, distributor cap and distributor
- If carbon deposits have formed on the distributor cap, it must be replaced.
- Don’t save money, take a branded factory cover, the price will be paid off by the quality
- We carefully assess the condition of the carburetor
- If the carburetor does not respond to adjustment, it is time for repair. But this is a separate article
- Checking the operation of the vacuum ignition timing
- So that its drive runs without jamming, and the tube is thick-walled without cracks or breaks
Symptoms of a problem
The main signs indicating a malfunction of the ignition distributor:
- The car jerks while driving
- Engine won't start
- Piston pins knock when accelerating
- The car picks up speed slowly
- Fuel consumption becomes higher than usual
The most common faults:
- Burnt out slider
- Burnt contacts in the cover
- Hall sensor has failed
- The Hall sensor bearing is loose or jammed
- Cracks appeared in the lid
- Poor contact of Hall sensor plug
It is necessary to replace faulty parts in all of the above cases, except the very last one.
Oil entering the distributor
Let's consider a malfunction such as oil getting into the distributor using the example of a real case:
- The owner of a VAZ 2109 began to disassemble the ignition distributor
- Having removed the cover, he discovered that the ember had worn off and the slider had rusted.
- Continuing disassembly, he removed the screen and discovered that everything underneath was covered in oil.
- Then he consulted with a specialist, and it turned out that the oil had penetrated into the distributor through the shank oil seal.
- This happened due to the fact that a small hole in the base of the carburetor was clogged.
- It refers to the engine crankcase ventilation system
- In this case, when idling, excess pressure arose in the crankcase.
- This pressure forced the oil through the oil seal into the distributor
- It is necessary to clean the hole and everything is in order, but doing this with your own hands is problematic, it is better to contact a service station
- The second reason for oil getting into the distributor is a worn oil seal.
- The oil seal needs to be replaced
Removal and installation
In order to easily repair the distributor, you must be able to remove it, and then (after repair) install it in place:
- Remove the negative cable from the battery terminal
- We disconnect the high-voltage wires from the distributor, as well as the vacuum hose coming from the vacuum corrector
- We find the cable holder going to the throttle valve drive and remove the cable from it
- Remove the bracket holding the wires, with studs and wires
- To do this, unscrew the nut (there is a washer under the nut, do not lose it)
- We put marks on the distributor body and the drive of auxiliary devices. If this is not done, then when installing the distributor in place you will no longer be able to maintain the starting ignition timing; you will have to adjust it
- There is a connector on the ignition distributor to which the wiring harness is connected. Press the latch with a screwdriver and pull out the wires
- There is a rubber plug in the clutch housing, remove it
- Rotate the crankshaft until the piston in the first cylinder is at top dead center
- The flywheel mark in the hole will coincide with the middle division on the housing scale
- Unscrew the nuts securing the distributor and remove it
- Install in reverse order
- When installing the ignition distributor back, make sure that its shaft is rotated so that the outer contact of the slider is opposite the terminal corresponding to the first cylinder
- The terminal is located on the cover
- Don’t forget to also align the marks and check the ignition timing
We disassemble the distributor
Before you start disassembling the distributor, you need to remember that each wire on its cover is installed in the sequence of operation of the cylinders (of which only the first is indicated, you need to install the others counterclockwise, while looking from the side of the plastic tank with antifreeze). If necessary, replace the cover or slider - dismantling the ignition distributor is not required. We repair the VAZ 2109 distributor with our own hands in the following sequence:
- Disconnect the high-voltage wires and remove the distributor from the car
- After unscrewing the fastening screws, remove the distributor cover, remove the slider, simply pull it up
- If there are traces of burning on it, rust on the external contact, or obvious wear is noticeable, the slider must be replaced
- In normal condition, the slider ideally fits tightly to the distributor shaft
- Leaf spring (2 in photo below) ensures good contact
- If the spring is weakened, broken or deformed, change the slider
- Measure the resistance of the resistor (it is designated by number 3), it should be 1 kOhm
- Otherwise, install a new slider
Slider top and bottom view (1-external contact, 2-leaf spring, 2-1 kOhm resistor)
- Next, remove the dust shield
- Remove the low voltage terminal by unscrewing the screw that secures it
- Using a screwdriver, open the legs of the holder and remove the wire from it
- Unscrew the two screws securing the Hall sensor support plate and remove it
Unscrew the two screws and remove the Hall sensor support plate
- Then remove the retaining ring from the plate pin. May require significant effort, don't worry it won't break
- Now unscrew the two screws securing the vacuum corrector
- Using a screwdriver, pull out the vacuum corrector rod from the support plate pin
- You can now remove the corrector from the distributor completely
Distributor installation
Please note that on a VAZ 2109 car the distributor can be installed in only one position of its rotor. Therefore, before removing the VAZ 2109 distributor from the camshaft, you do not need to apply any marks. Simply unscrew the three nuts that secure the housing to the cylinder head. But before this, you need to disconnect the plug that connects the Hall sensor to the switch.
If you do not remove the timing belt, but only work on the ignition distributor, then when installing the distributor, you do not need to align the crankshaft with the marks. The design of the ignition distributor drive on “nines”, as well as “eights” and carburetor “tens” differs from that used in cars of the classic series. The distributor cannot be placed in any wrong way; it only fits in one position. In this case, the contact of the slider will always be in the position in which it needs to be. It’s not worth talking much about how to install a distributor on a VAZ 2109. The main thing is to correctly set the marks on the camshaft and crankshaft.
Sequence of doing the work yourself
Before starting work, remember that all the parts inside are stained with oil in the VAZ 2109 distributor. After dismantling, it should be washed and dried.
1. Dismantling the distributor begins with removing the negative wire, which is connected to the battery terminal.
2. Then we disconnect the high-voltage wires from it, then the vacuum hose with which the distributor is connected to the vacuum corrector.
3. The next stage of work will be removing the cable from the holder. It is used to drive the dampers.
4. We remove the bracket, which is a clamp for the wires. Complete with all the studs and those wires that were attached here.
5. We unscrew the fastening nut, making sure that the washer installed under it does not get lost. This work is carried out in several stages: Special marks are applied to the drive of auxiliary devices, on the one hand, and the distributor housing, on the other. This must be done so that when assembling the product, you can maintain the starting ignition timing without making new adjustments.
6. Using a screwdriver, press the lock on the distributor and remove the ignition wire harness.
7. We remove the rubber plug from the car clutch housing.
8. By rotating the crankshaft, we achieve alignment of the piston in the 1st cylinder at TDC.
9. The mark marked on the flywheel, visible in the hole, must coincide with the division marked in the middle of the housing scale.
10. We remove the distributor, having first unscrewed the nuts holding it.
11. Installation is carried out in reverse order.
12. When installing the slider, it is necessary to check the position of the roller. The latter should be placed so that its external contact is located opposite the terminal that corresponds to the 1st cylinder.
13. The terminal is located on the cover.
14. Be sure to align the marks mentioned above.
Below you can watch a video on how to remove and install the distributor on a VAZ 2108-09.