Finally, the first entry in the Logbook))). Replacing the timing belt and tension pulley, which could be easier, the main thing is to do everything according to the instructions and there will be no problems. Googling on the topic “Replacing the timing belt and tension pulley on a VAZ 2115” I found clear and intelligible instructions in pictures for those especially gifted! I downloaded, printed, read and forgot. I didn’t spend a long time choosing consumables; from the “large” assortment of materials offered to me, I bought a timing belt from the company:
Continental CONTITECH CT527
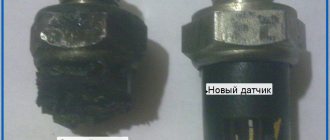
...and a new KRONER model timing belt tensioner K152008
Since this is the first experience in repairing a car, I decided to do this work under the instructions of my comrades, more experienced people in this matter, although the comrades were busy with vibration and noise insulation of their car:
I didn’t bother distracting them from their work and got to work on my own.
I got down to business and... I remembered that I didn’t take the instructions that I had so carefully searched for and found on the Internet))), oh well, what’s so complicated, I thought, I read it, I remember everything.
Necessary tools and material for the work: 1. Jack 2. Socket 19 and extension 3. Wrench 17, 13 and 10 4. Phillips screwdriver 5. New timing belt and tension roller
1. Loosen the wheel mounting bolts and hang it up on a jack:
Use a Phillips screwdriver to unscrew the screws securing the plastic fender liner and remove it to the side.
Using a 13 key, loosen the tension of the generator drive belt and remove the belt.
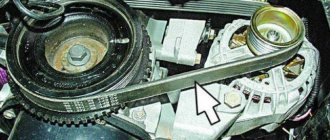
Then, using a 10mm wrench, unscrew the 3 bolts securing the timing belt protective cover.
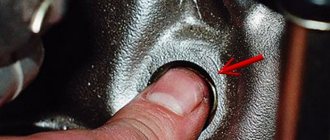
Before unscrewing the crankshaft pulley, you need to lock it... yeah... but how to do this? I remember from the instructions that you need to insert a screwdriver somewhere, ok... I insert it between the crankshaft position sensor and the crankshaft pulley itself, as it turned out later there was no need to do this))) we install the 19 socket on the crankshaft pulley mounting bolt and try to unscrew it using an extension cord bolt, but nothing happens, the pulley still turns (((it turns out that this operation requires another person who will press the brake pedal when the pulley mounting bolt is unscrewed...
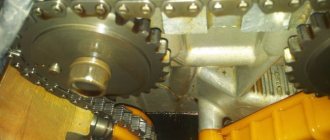
I still had to distract one of my comrades from the task and ask him to hold the brake, the experiment with a screwdriver did not work, we turn on 4th or 5th gear and press the brake pedal, a little force and the pulley mounting bolt gives way and is unscrewed. Remove the pulley and tighten the fastening bolt back, turn the pulley clockwise and match the oil pump mark with the mark on the toothed pulley as in the photo below:
It is also necessary to install a mark on the camshaft pulley with the mounting lug on the rear protective cover:
The marks are set, you can remove the old timing belt, use a 17 wrench to unscrew the nut securing the tension roller
The belt is loose, remove it and remove the old worn timing belt tension roller from the stud. We install a new tensioner and tighten it slightly with a nut:
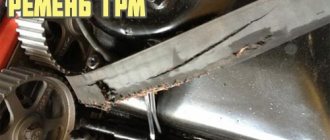
The photo shows how badly the old belt has worn out, and there are also microcracks on the belt:
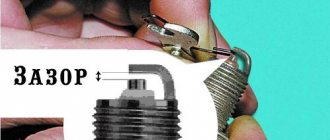
We install a new timing belt and tension it using a roller, I didn’t have a special tensioning wrench, I used two nails and a screwdriver)))). We check the belt tension by turning it in either direction by 90 degrees; if the belt rotates freely by more than 90 degrees or vice versa less, then the belt must be loosened or tightened accordingly:
And so the marks are set, the timing belt and tension pulley are replaced, in principle, you can try to start the car and look at the operation of the timing belt.
Oh yeah... I forgot to install the crankshaft pulley because the crankshaft position sensor cannot transmit information to the ECU (electronic control unit) about what phase the engine is in. OK. We put the pulley in place and tighten it.
Start...and...it won’t start again...what’s the matter this time? hmmmmmm... The marks are set correctly, the crankshaft pulley is installed, the crankshaft position sensor should read the position of the pulley, it would of course count if I hadn’t stuck a screwdriver between it and the pulley when I tried to unscrew the fastening bolt))))) metal rod that protruded 2 mm the sensor has fallen inside... trouble...
We called a mechanic we know at a service station and told us to definitely change it, it cannot be restored!
Hmmm...700 rub. for a new DPKV, and all this is stupid...
And then I had an idea, what if I cut the plastic shell of the sensor and try to pull out the metal rod, there was nothing to lose, it was night outside, I didn’t want to wait until tomorrow, but I didn’t want to walk home anymore)))))
Using a metal hacksaw, the plastic was cut around the sensor body from the edge by about 1.5-2 mm:
Preparatory work
To replace the VAZ 2114 timing belt with your own hands, you will need a lift, an inspection hole in the garage. When there is neither one nor the other, any flat area will do.
The car is placed at the work site, the handbrake cable is tightened, and the gear shift lever is placed in the neutral position. Wheel chocks must be installed under the rear wheels. Using a wheel wrench, tear off the wheel bolts on the wheel in the front of the car on the right side, lift the vehicle with a car manual lift, place a reliable stop under the body and dismantle the wheel. Now you can begin the operation of replacing the timing belt on a VAZ 2114 8 valve.
When replacing, the tension roller must also be changed (in addition, it is recommended to replace the cooling pump every second belt replacement). Operating procedure:
- Stop the car with the handbrake, then place chocks under the rear wheels.
- Raise the front right side with a jack and unscrew the wheel.
- Remove the wheel and protective mudguard
- Using the “10” key, unscrew and remove the timing case
Removing the timing cover
- To remove the generator pulley bolt (you can lock the flywheel by inserting a screwdriver or pry bar through the inspection window on the gearbox housing)
- Remove the alternator belt, then the pulley
- Unscrew and remove the timing belt protective cover
- Align the engine according to the marks (one is located on the camshaft, and the second is on the flywheel)
Camshaft gear mark
Crankshaft mark in the box hatch
- Loosen the tension roller, then remove the belt
Release the tensioner roller
Attention: When the belt is removed or loosened, it is strictly forbidden to turn the crankshaft or camshaft to avoid damage to parts of the gas distribution system.
- After checking the condition of the gears for wear, the pump for play or leakage, then, making sure that there is no oil leakage, you can begin installing a new belt drive
- We install a new tensioner roller and start a new belt drive (you should be careful, sometimes there is an arrow in the direction of rotation on the belt drive)
- Once again, after checking that the marks match (see Timing belt marks and replacement according to them), we put on the belt drive - first by the lower gear (crankshaft)
- Then we continue to put on counterclockwise - the camshaft gear and tensioner roller
- In this case, the free play is on the side of the tensioner roller
- We tension the belt, while following the marks (the marks located on the crankshaft and camshaft should match perfectly when fully tensioned)
- When tensioning, the roller must be rotated in a counterclockwise direction.
- Rotate the engine several times, then check that the marks match
Then the belt tension is checked, as a rule, in the absence of a tool for checking, it is checked as follows:
- From the consolidated (right) side, photo below, it should twist to an angle of 90 degrees, with a little force - about 2 kilograms
- That is, we can confidently say that, before reaching 90 degrees, the resistance is practically not felt, and when twisting it more than 90 degrees, the required effort increases
- Align and install the alternator drive pulley
- Install and tension the alternator belt
- We put the protective cover in its place
- Let's start the engine
- After all the procedures, the engine should start like clockwork.
- Replacing the timing belt on VAZ 2115 was successfully completed
- If suddenly it starts with difficulty, or works unstably and stalls, then your timing marks probably do not match or have shifted
- When you hear extraneous sounds when the engine is running (such as howling, crackling, or knocking on the casing, and others), then it’s likely that your belt drive is overtightened or undertightened
Consequences of untimely replacement of the timing drive
An incorrect level of belt drive tension leads to various unpleasant consequences. If the knot is weak, there is a risk of slippage. The system stops working at optimal speed, the voltage drops. The result is an unacceptably low battery charge and a lack of electricity.
Important! When slippage occurs, the operating temperature of the timing belt rises sharply, it begins to overheat, which increases the risk of ruptures.
If the tension is excessive, timing belts break and wear out faster. Untimely replacement is the main cause of emergency situations.
Replacing the timing belt on a VAZ 2113-VAZ 2115
Removal
1) First, remove the plastic cover that covers the belt from dirt, various types of water and lubricants. The cover is removed as follows: take a wrench or socket wrench and unscrew the three bolts securing the cover (in the bottom photo the bolts are already unscrewed). Two bolts are present on the side and hold the cover in place, and one is located in the central part. By unscrewing them, you can remove the cover from the car engine.
2) Now turn off the power to the car by disconnecting the negative terminal from the battery. Then remove the alternator belt - read the article for details: “Replacing the alternator belt on a VAZ.” Set the piston of the fourth and first cylinders to TDC (top dead center). Simply put, place both pistons completely straight and without angles up. The publication will be useful to you: “Installing the piston of the fourth cylinder at TDC on a car.”
3) Then take a “13” wrench in your hands and use it to slightly loosen the nut securing the tension roller. Loosen until the roller begins to rotate. Then turn the roller by hand so that the belt loosens. Grasp the belt and carefully remove it from the rollers and pulleys. You need to start from the top, with the camshaft pulley. It will not be possible to remove all the pulleys, so only release the belt at the top.
4) Next, remove the front right wheel (removal instructions are available here: “Correct replacement of wheels on modern cars”). Now take a socket wrench or any other wrench that can unscrew the bolt securing the generator drive pulley (the pulley is indicated by the red arrow).
Note! The bolt is unscrewed with the help of a second person (assistant) and a mounting spatula (or a thick screwdriver with a straight blade). From the left side (in the direction of travel of the car) of the clutch housing, remove the plug marked in red. Then a spatula or screwdriver is inserted between the teeth of the flywheel (the teeth are indicated in blue) - the flywheel is kept from turning. You will have to use force, the main thing is not to overdo it. After unscrewing the bolt, remove the pulley and set it aside!
5) Now you will have excellent access to the crankshaft pulley and belt. At the last moment, the belt is removed from the lower pulley. It has now been completely removed.
Note! Although this does not apply to 8-valve cars of the Samara family, for general information we will explain: do not have the habit of turning the camshaft and crankshaft pulleys when the belt is not installed. Otherwise, you will mess up the valve timing (they are easy to adjust; you just need to align the flywheel and pulley to the marks). Turning the pulley, for example, on a 16-valve Priora, will cause the valve to meet the piston group and they may be slightly bent.
Installation
1. Carry out in the reverse order of removal, observing some nuances:
- firstly, we recommend that you clean the pulleys and tension roller from dirt and various types of grease that get on them over time;
- After cleaning, degrease the pulleys and tension roller using white spirit;
- start installation.
Install the belt first on the pulley from the bottom, moving to the top. As you put it on, it will sag, so pull it with your hands and make sure that it stands up straight and the pulleys are not distorted. After installation, make sure the marks match, then proceed to install the tension roller. Install the belt onto the tension roller (see photo 1), then climb down and reinstall the generator drive pulley. Be sure to ensure that the hole on the pulley, indicated by letter A, lines up with the mounting sleeve, indicated by letter B in the second photo. If you have a torque wrench (a very convenient thing that allows you to tighten bolts and nuts to a certain torque without overtightening them), tighten the bolt securing the generator drive pulley. The tightening torque is 99–110 N m (9.9–11.0 kgf m).
When do you need to change the timing belt, and how to do it on a VAZ 2114
- When do you need to change the timing belt, and how to do it on a VAZ 2114
- Where is the timing belt located in the VAZ 2114
- How to find out that the belt has failed, the frequency of replacing the timing belt
- Why does he chew his belt?
- Instructions for replacing the VAZ 2114 belt
- What are the consequences of untimely replacement of the timing belt?
The timing belt (gas distribution mechanism) is used to synchronize the operation of the engine. The main task of the belt is to transmit rotating torque from the crankshaft to the engine camshaft with a decrease in speed. If the belt breaks or falls off, the car engine will stall.
- Where is the timing belt located in the VAZ 2114
- How to find out that the belt has failed, the frequency of replacing the timing belt
- Why does he chew his belt?
- Instructions for replacing the VAZ 2114 belt
- What are the consequences of untimely replacement of the timing belt?
Where is the timing belt located in the VAZ 2114
The timing belt is a fairly noticeable part, which is located immediately under the hood of the car. It passes through the crankshaft and camshaft of the engine. Therefore, if you need to replace the VAZ 2114 timing belt, it can be easily recognized by the teeth on the inside. The belt also passes through several other parts of the engine, leaving it constantly subject to wear and thermal stress.
How to find out that the belt has failed, the frequency of replacing the timing belt
Why does he chew his belt?
The belt can chew for a number of reasons, which must be eliminated, because this affects the operation of the car. Main reasons:
- The problem may be mechanical damage to the teeth of the pulley or crankshaft.
- Displacement of the axes of the tension roller or toothed roller of the pump.
- The cause of the belt chewing may be its sagging.
- Poor quality timing belt.
If you notice that the timing belt is chewing, be sure to figure out the cause and, if necessary, replace it with a new one.
Instructions for replacing the VAZ 2114 belt
In order to know how to change the timing belt 2114, you need to read the car's operating instructions and follow simple rules.
First of all, you will need: a 10 mm socket wrench, 13 mm and 17 mm open-end wrenches, a large screwdriver, a wrench for tension rollers, a wheel wrench, a jack, and machine oil. Replacing the timing belt on a VAZ 2114 is carried out as follows:
- We align the timing gear and engine flywheel according to special marks.
- We park the car on a flat area.
- Using a jack, you need to lift the front right wheel so that it rotates freely.
- Open the hood, unscrew the three bolts that secure the protective cover using a 10 mm wrench.
- Loosen the belt tensioner using a 13 mm wrench. Let's take it off.
- You need to find a special mark (rectangular protrusion) on the camshaft gear. The mark must coincide with the mark on the fastening of the protective belt cover.
- We take out the special plug that is located on the crankcase. Under the plug there is a flywheel crown, it also has a mark. It should coincide with the protrusion on the left in the form of a triangle.
- After removing the upper part of the timing belt from the timing mechanism, turn the crankshaft using a 17mm wrench so that the flywheel marks match.
- Fix the flywheel with a screwdriver.
- We dismantle the front wheel, and then remove the arch protection.
- Now remove the generator pulley. We take out the pulley.
- Remove the timing belt from the crankshaft pulley.
- Using a 17 mm nag, unscrew and remove the tension roller fastening. Pull out the belt.
- We put the new belt on the crankshaft pulley without disturbing the marks.
- We put the belt on the timing gear.
- Lubricate the new tension roller with oil and install it in place.
- After this, you need to tighten it with a special key for the tension roller. If you don’t know how to tighten the timing belt on a VAZ 2114, look at the instructions. Adjust the tension roller so that the belt is not too tight or sagging.
Purpose
It is important to note that such 8-valve engines were installed on all (almost) VAZ models, so this manual is relevant for cars with such an engine, if you have a 16-valve engine, then look, replacing the timing belt on a VAZ 21154 is described a little lower . So:
- The timing belt is the most important element of the gas distribution mechanism; it is responsible for the timely injection of the fuel-air mixture and the emission of exhaust gases
- Its breakage is dangerous, since damage to the valves and even pistons is possible, after which a major overhaul may be required with the replacement of the piston group or the cylinder head - the price of inattention
- It is a rubber-metal belt with teeth on the inside; the teeth firmly engage the camshaft and crankshaft gears to ensure their synchronous operation.