Replacing the fuel line of a VAZ 2110 with your own hands
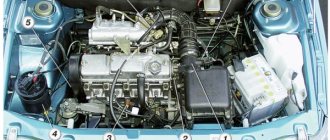
Here's the fuel system for the VAZ 2110 to help you get an idea of what you'll have to work with.
First, let's buy a fuel pump. Catalog number of the fuel pump is 2112-1139009-03.
We buy fuel pump gaskets. Buy good gaskets for the fuel pump, because poor quality ones will have to be replaced very quickly. Gasket catalog number 21103-1101138.
We purchase a fuel line using catalog number 21121104032.
Of course, we also need a high-quality fuel tank. Catalog number 21103-1101011.
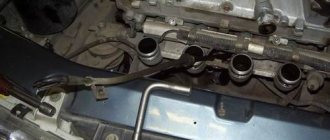
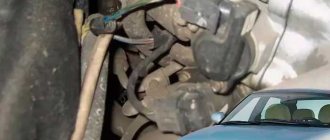
We remove the old fuel line.
Remove all fuel pipes.
Disconnect the tank mount to remove it. And we take it off.
We are laying a new fuel line.
This is what a new fuel line and a fresh tank look like, the fuel pump is already installed and everything is assembled.
Here is a useful video on replacing the fuel line:
Replacing fuel pipes on a VAZ 2110
- Registration
- Entrance
- To the beginning of the forum
- Forum Rules
- Old design
- FAQ
- Search
- Users
Good day, dear forum users!
I came across a surprise - I was leaving work and there was a shy oily spot under my beauty (21102, 2000). Approximately at the level of the rear door, under the bottom.
I climbed onto the overpass - it was leaking from the main line at the point of attachment to the bottom (the last fastening, which is closer to the rear of the car. Of course, I will change both lines, forward and return. But before I climbed under the bottom I wanted to consult with those who have already done such an operation : — In order to remove the pipes, do you need to remove the tank? — What additional spare parts are needed besides the pipes themselves and rubber rings? — Are the fuel lines for the tenth family the same or is there a difference between 2110, 11, 12? — Maybe it makes sense to change the brake pipes as well? — The studs are curled up fastening the plastic protection (“ski” goes like this - protects the tubes) How to secure it?
Thanks in advance for your answers. Regards, Alexey.
An acquaintance said that this problem occurs around the 6th year of life, it is necessary to change it together with the brake pipes, remove the plastic “Ski” immediately and throw it away (dampness, leaves, dirt, etc. accumulate under it, and this causes faster corrosion), The main story is only on clamps.
He told me everything he knew. I don't know the rest
An acquaintance said that this problem occurs around the 6th year of life, it is necessary to change it together with the brake pipes, remove the plastic “Ski” immediately and throw it away (dampness, leaves, dirt, etc. accumulate under it, and this causes faster corrosion), The main story is only on clamps.
Good day, dear forum users!
I came across a surprise - I was leaving work and there was a shy oily spot under my beauty (21102, 2000). Approximately at the level of the rear door, under the bottom.
I climbed onto the overpass - it was leaking from the main line at the point of attachment to the bottom (the last fastening, which is closer to the rear of the car. Of course, I will change both lines, forward and return. But before I climbed under the bottom I wanted to consult with those who have already done such an operation : — In order to remove the pipes, do you need to remove the tank? — What additional spare parts are needed besides the pipes themselves and rubber rings? — Are the fuel lines for the tenth family the same or is there a difference between 2110, 11, 12? — Maybe it makes sense to change the brake pipes as well? — The studs are curled up fastening the plastic protection (“ski” goes like this - protects the tubes) How to secure it?
Thanks in advance for your answers. Regards, Alexey.
10, 11, 12 identical tubes. Of course, it’s better to change the brake ones, too, but I decided to wait until they leak, they shouldn’t explode, I just fixed them properly. By the way, don’t forget to seal/anticorrode everything well. There's no point in protection from it. In addition to the tubes, see. I also remembered that the tubes are inserted into such plastic masks with grooves, the servicemen turned them over for a more reliable fastening.
This is how she was (schematically) _______________ | 000 | 000 | 000 | 000 |
this is how they turned it over
And don’t forget that gasoline will flow, prepare containers and it’s better that the tank is empty.
The device of the VAZ 2110 gas tank
There is nothing complicated about the design of the “tens” gas tank. In fact, this is an ordinary metal fuel tank with a capacity of 43 liters. Inside this tank there is a fuel level sensor and a fuel inlet pipe with a strainer.
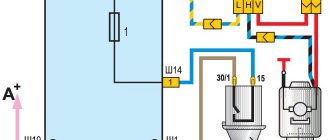
Diagram of the gas tank and fuel system of the VAZ 2110
An electric fuel pump is attached to this pipe externally, which pumps gasoline out of the tank and delivers it through the fuel line to the fine filter. Next, the gasoline goes to the pressure regulator and enters the fuel rail to the injectors, which spray it into the combustion chambers.
The answer to the question why the fuel pump in a car does not work will be given by this article: https://vazweb.ru/desyatka/pitanie/pochemu-ne-rabotaet-benzonasos.html
Recommendations
Every car enthusiast can do a lot to extend the life cycle of all elements of the unit in question. To ensure that your car's power system works flawlessly, use the following recommendations:
- Refuel only at approved gas stations.
- Replace fuel and air filters in a timely manner.
- Use cleaning additives with caution.
- Try not to drive on a half-empty gas tank, especially in winter.
A possible sign of the need to replace the fuel supply hose to the fuel rail is the smell of gasoline in the cabin. This hose begins to flow at the junction with the fuel supply line from the fuel tank (plastic tube). The location of this connection is below the battery near the partition of the engine compartment. Moreover, for many people the hose starts to leak in cold weather.
I started to leak when my Kalina was 4 years old, in frosts of -25, and heavily, in copious drops. When the engine warms up, the leak in many Kalinovods disappears. So it was with me. Since in such frost there is no point in getting under the hood yourself if there is no warm garage, and in such weather there are enough customers in the services, so I went. To be honest, it was scary, because I saw how quickly the cars were burning. Luckily there was a fire extinguisher in the trunk. When the temperature warmed up to -20, the leak disappeared when warming up.
This happens because in such frost the rubber rings in the seal become stiff, losing elasticity. When the engine warms up, they heat up, become elastic, expand, and stop leaking. This can also be caused by increased pressure in the engine power supply system - the pressure limiting valve (located in the gas tank) freezes. Since at -25 outside, the pressure in the fuel rail was somehow not ready to be measured, I couldn’t determine the reason for sure. Without waiting for the next frost, when it warms up, I decided to change the fuel hose.
The length of the original hose is 26 cm. After a long search, I found a hose of acceptable quality, but it turned out to be Chinese, and besides, it is 3 cm longer than the original - its length is 29 cm. The price is 350 rubles. For lack of anything better, I put it in. These extra 3 cm did not play a role. I was alarmed by the inscription on the hose - instead of GOST - TOAST. But I still didn’t “wash” the hose).
Reasons for replacing the gas tank on a VAZ 2110
There are two main reasons why a car owner will have to remove the gas tank on a VAZ 2110:
- mechanical damage to the gas tank. The tank can simply be pierced by catching it on a ledge, a stone, or some other obstacle on the road. This happens quite often. And the reason for this is the location of the tank on the “ten”. On earlier VAZ models (up to and including VAZ 2108), the gas tank was actually located in the trunk. Because of this, the trunk of these cars could not boast of spaciousness, but the gas tank was intact. Starting from the VAZ 2110, the tank is located lower, under the bottom of the car. On the one hand, the trunk capacity has increased. On the other hand, the risk of damage to the tank has increased manifold;
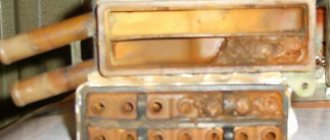
The tank on the VAZ 2110 is located low and is easily broken through - destruction of the gas tank due to corrosion. This is another consequence of the low location of the tank, which was mentioned above. The lower the gas tank, the more often it interacts with water, dirt and reagents that are sprinkled on the roads. And this interaction does not pass without a trace.
A completely rusted tank of a VAZ 2110
Whatever the reason, the car owner has no choice: if the tank leaks, it will have to be removed and welded (in the case when the tank is new and the damage is mechanical). If the tank is seriously damaged by chemical corrosion, then there is only one way out - replacement. Such spare parts cannot be restored.
An article devoted to checking the serviceability and replacing the fuel pressure regulator is here: https://vazweb.ru/desyatka/pitanie/regulyator-davleniya-topliva.html
Replacing the gas tank on a VAZ 2110
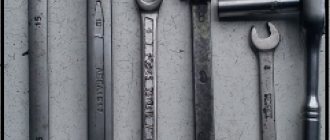
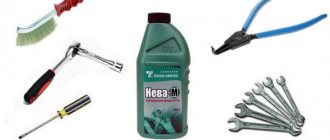
To successfully replace the tank on a VAZ 2110, we will need the following tools and materials:
- new gas tank for VAZ 2110;
- open-end wrenches - set;
- flat screwdriver.
Sequence of operations when replacing a tank
The success of the event lies in the scrupulous implementation of the following actions:
- The VAZ 2110 is installed on an overpass or on an inspection hole. The handbrake is applied.
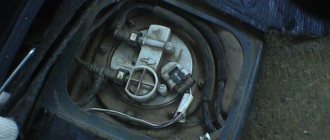
- In the cabin, the floor covering moves back, under which there is a fuel pump hatch. The power wires are disconnected from this pump and a pair of fuel pipes are unscrewed. This is done using a 17mm open-end wrench.
Power wires and fuel pipes are removed from the VAZ 2110 fuel pump - Now, using a screwdriver, loosen the clamp on the filler tube and disconnect it from the fuel hose. These manipulations are carried out from the inspection hole.
The clamp holding the VAZ 2110 filler tube is loosened and the tube is removed - There is another hose on the filler neck of the tank, which is supported by a clamp. This clamp is loosened with a socket head 8, after which the hose is moved to the side.
The hose on the neck of the VAZ 2110 is loosened with a socket head by 8 and then moved to the side - Access to the gas tank bolts is provided. These bolts hold the mounting strips on which the tank is suspended. There are two bolts, and they are unscrewed with a 10mm socket.
Two mounting bolts holding the bars on which the tank of the VAZ 2110 hangs - After unscrewing the bolts, the fastening strips are carefully bent down.
The slats on which the VAZ 2110 tank hangs bend down - The gas tank, freed from its fasteners, tilts down slightly.
The VAZ 2110 gas tank needs to be tilted down a little to get to the last hose - After this, access to the last, thinnest hose opens, which is removed from the tank manually.
The thinnest hose is removed from the VAZ 2110 gas tank manually - Since all hoses and mounting bolts have been disconnected, the tank can be carefully removed from under the machine.
The VAZ 2110 gas tank was dismantled and removed from under the car - A new tank is installed in its place, after which the fasteners are reassembled, and all removed hoses are installed in their original places.
Questions regarding maintenance and replacement of fuel hoses
Fuel hoses are constantly exposed to aggressive environments (gasoline from the inside, oils, exhaust gases and high temperatures outside), so over time they lose their strength characteristics. In order not to miss the moment to replace the hoses, they should be periodically inspected, monitored for the appearance of cracks or kinks, as well as leaks at the attachment points. Particular attention should be paid to the places where the hose comes into contact with other parts, at bends and at the places where the fittings are attached. If any problems arise - be it cracks or small leaks - the hose must be replaced as soon as possible.
The procedure for replacing hoses depends on the engine model and the types of mounting used. But in any case, you first need to remove the fuel and relieve pressure in the fuel system; this is generally done like this:
- Disconnect the fuel pump (disconnect the electrical connector from it; access to the pump may require removing the rear seats of the car);
- Start the engine;
- Wait until the engine has exhausted the remaining fuel from the system and stalls;
- Crank the engine with the starter for a few seconds.
Now you can begin replacing hoses and other parts of the fuel system. If we are talking about the classic VAZ family, then you should simply loosen the clamps and remove the hose from the fittings (or tubes); installing a new hose is done in the reverse order and preferably using new clamps.
To replace hoses with “Nut” type fasteners, use a “10” wrench to loosen and unscrew the nuts, install a new hose and tighten its nuts with the torque recommended by the manufacturer. When replacing hoses, the rubber O-rings should also be replaced; old O-rings should not be used. This work should be performed at positive air temperatures, since in cold weather the ring loses its elasticity and the connection will not be airtight.
The easiest way to replace hoses is with a quick-release connection - to remove the hose, you need to press a button or bracket. The new hose is simply installed on the fitting until it clicks. However, before installing a new hose, the mating fitting should be inspected and if it is damaged or worn, it should be replaced. Otherwise, when you first start the engine, the hose may simply be torn off by fuel pressure.
With timely and correct replacement of hoses, the fuel system of a VAZ vehicle will serve reliably, ensuring uninterrupted operation of the power unit in any conditions.
If such malfunctions occur in the operation of the carburetor engine of VAZ 2108, 2109, 21099 cars, such as unstable idling, failure when pressing the gas pedal, drop in power and throttle response, difficulty starting the engine, etc., you should pay attention to the fuel supply system to the carburetor, namely on the cleanliness of fuel lines and the cleanliness of the vehicle’s fuel tank. The presence of blockages and contaminants in them often leads to disruption of the fuel supply to the carburetor and further to the engine, followed by the occurrence of the above-mentioned malfunctions. Let's consider cleaning fuel lines on VAZ 2108, 2109, 21099 cars.
— Raise the back seat in the car.
Under it in the body there is a hatch for access to the fuel intake of the fuel tank. Remove the hatch by unscrewing the screws securing it.
— Remove the fuel hoses (main line and) from the fuel intake.
To do this, loosen the clamps and move them from the fittings on the fuel intake. The fit of the tubes on the fittings is very tight, so when moving, you can help yourself with a 10 mm open-end wrench.
— Place a cloth under the fuel pipes to prevent splashing.
— We disconnect, in the engine compartment, the fuel pipes from the fine fuel filter (if there is none from the inlet pipe of the fuel pump) and the non-return valve fitting. To do this, you need to loosen the clamps securing them.
Cleaning fuel lines of VAZ 2108, 2109, 21099
— We blow compressed air from a compressor or a conventional pump into the fuel pipes in the direction from the engine to the tank.
First to the main highway, then to the return line. The duration of the purge is arbitrary.
— We check the ease of air passage through the fuel lines.
To do this, we blow them through again, but this time with our mouth and evaluate them. If necessary, repeat blowing with compressed air.
We assemble everything in reverse order.
Notes and additions
— You shouldn’t limit yourself to cleaning only the fuel lines. You should also clean the entire fuel supply system, namely the fuel tank, mesh filters in the carburetor, in the fuel pump and on the fuel intake, and replace the fine fuel filter.
— On VAZ 2108, 2109, 21099 cars a check valve is installed. When cleaning the fuel lines, it is worth removing it completely and rinsing it with gasoline. Blow with compressed air. You can check its performance by blowing it with your mouth. Air should flow freely in one direction and not at all in the other. In case of malfunction, replace the check valve.
— You can quickly clean the fuel lines on a VAZ 2108, 2109, 21099 car. To do this, we disconnect the pipes only in the engine compartment from the check valve and the fine fuel filter. Remove the cap from the gas tank. We blow with compressed air for a short time until active seething of the fuel appears in the tank. We check by blowing through the lines with our mouth.
Check fuel pipes, hoses and their connections as follows.
Metal fuel pipes are laid under the bottom of the car and secured with clamps and self-tapping screws. Inspect them periodically for leaks and damage.
If, when replacing the fuel filter, there is dirt in it and the fuel lines, be sure to disconnect the lines and blow them out with compressed air. Also check the condition of the strainer on the fuel pump assembly.
Flushing the gas tank of a VAZ 2110
Flushing the gas tank is an operation that must be performed at least once every two years, regardless of whether the tank is in good condition or not. Over time, contaminants accumulate in the tank, which can subsequently impair the performance of both the fuel pump and other components of the fuel system.
Tank flushing sequence
To clean the gas tank, you must perform the following manipulations:
- The gas tank is removed from the VAZ 2110 as described above. After this, you need to drain all remaining gasoline from the gas tank.
- Now you need to rinse the tank. To do this, any detergent is poured into it. Even household dishwashing liquid diluted in water will do.
- After filling the liquid, the tank must be allowed to stand for at least half an hour.
- After this time, the washing liquid is drained and the tank is rinsed with clean water.
After draining the washing liquid, the VAZ 2110 tank is washed with clean water - Next, a special composition for cleaning gas tanks, previously diluted in water, is poured into the tank. The best option would be to fill with PROLINE JC liquid. This is a concentrated and very aggressive composition that can easily cope with any contaminants.
The cleaning composition PROLINE JC is optimal for washing the gas tank of the VAZ 2110 - The final stage is drying the gas tank. The best option would be to blow out the tank using a compressor. The problem is that not every garage has a compressor of suitable power. If there is no compressor, there is only one way out: wait until the tank dries out on its own. This is a long process that can take three days.
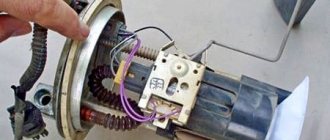
Repair of studs on the gas tank of a VAZ 2110
The fuel pump is attached to the gas tank using studs. They, like any other part, wear out and break over time. As a result, the driver is forced to repair them. For repairs you need the following:
- bolts for 8, 25 mm long (8 pieces);
- file;
- hacksaw for metal;
- M5 tap;
- electric drill with a 4.5 mm drill bit.
Stud repair sequence:
- Use a hacksaw to cut off all the old studs. The surface of the gas tank underneath is processed with a file.
The surface of the VAZ 2110 gas tank, carefully processed with a file - Now the pressure ring from the fuel pump is applied to the gas tank. This ring has 8 holes. New holes are drilled through them in the gas tank. In this case, it is necessary to ensure that the drilled holes do not coincide with the holes from the old studs.
The VAZ 2110 fuel pump is held in place by a ring with eight holes - In the resulting holes, an M5 internal thread is cut using a tap.
In the new holes on the VAZ 2110 tank, threads are cut with a tap - 8 bolts are screwed into the holes so that their heads are inside the tank.
New bolts are screwed into the VAZ 2110 tank so that their heads are inside the tank - After this, the tank can be installed in place and the fuel pump connected to it.
The fuel pump is one of the most important components of the fuel system. The following material will help you carry out independent diagnostics of this mechanism: https://vazweb.ru/desyatka/pitanie/toplivnyj-nasos.html
Replacing the fuel pump rod
Installation location of the gasoline pump on a VAZ 2101
So, you need two gaskets to replace - thin and thick. To be honest, I don’t remember the exact thickness, but if you say so in a store, the seller will understand you. The fact is that there are usually no other gaskets available J. The main thing is to ensure that the new rod protrudes beyond the spacer by no more than 1.3 mm. But it is unacceptable for the protrusion of the rod to be less than 0.8 mm. Take the average value - one millimeter. This will be quite enough for the normal operation of the fuel system.
The fact is that with a larger rod overhang, the likelihood that the diaphragm in the VAZ 2101 fuel pump will break increases. Well, if the protrusion is smaller than 0.8 millimeters, then all the symptoms described above will appear. Please note that the gaskets are placed between the spacer and the engine block. There is no need to install them under the fuel pump housing. You can easily confuse them; they will easily fit there too.
Important nuances
When replacing the gas tank and the studs on it, we must not forget about several important points:
- Fire safety. Work on the gas tank, as well as on any part of the vehicle’s fuel system, should only be carried out in a well-ventilated area or in the open air. There should be no sources of open fire or flammable materials nearby. And, of course, you should always have a fire extinguisher at hand;
During any work on the VAZ 2110 fuel system, a fire extinguisher must be nearby - If a car owner is going to change the tank on his car, he needs to try to use up as much gasoline as possible. It's simple: the more gasoline is consumed, the less it will remain in the tank and the easier it will be to remove this tank;
- You can change the studs only on a completely dry gas tank. As mentioned above, it takes at least 3 days to completely dry the tank. And this is a situation in which haste is categorically unacceptable. Even if the tank looks dry, this does not mean that it is. We should not forget about gasoline vapors that may remain in the tank. If this is so, then any accidental spark from the file will lead to the ignition of these vapors and the explosion of the gas tank;
- Before screwing new bolts into the gas tank, it is recommended to treat them with anaerobic sealant. The best option for this is the professional sealant THREADLOCKER, which improves the tightness of the threaded connection and reliably protects it from corrosion.
When screwing new studs into a VAZ 2110 tank, it is recommended to treat them with THREADLOCKER sealant
Replacing the tank is not a very complicated procedure. Even a novice car enthusiast can do it. To successfully complete this operation, he will need not so much repair skills as physical strength: removing a large tank with remaining gasoline from under the car is quite difficult. And if the car owner cannot boast of a strong physique, then at this stage he cannot do without an assistant.
Location and correct installation
Tools
Prepare the same:
Option one
Warning: During engine operation and after stopping it, a pressure of 284–325 kPa (which is 2.9–3.3 kg/cm2) remains in the fuel system, so before performing work that involves disconnecting fuel pipes or hoses, you must reduce gasoline pressure in the fuel system.
Removing and replacing the fuel filter on a VAZ 2112 with a threaded connection is performed in the following order:
Attention: Upon completion of work, do not forget to reconnect the block with the fuel pump wiring to the main wiring harness
Now you can safely remove the filter without fear of dousing yourself in gasoline from head to toe:
Fuel filter VAZ 2112 with threaded connection
This completes the replacement of the 2112 VAZ fuel filter with threaded fasteners.
Option two
Replacing the fuel filter on a VAZ 21124 with fasteners in the form of wire earrings is performed in the following sequence:
Press the lock with your fingers
Warning: Be sure to place a container prepared in advance for draining gasoline under the tips.
Similarly, remove the tip from the second tube
Using a “10” wrench, unscrew the coupling bolt of the clamp securing the filter
Warning: After completing the installation of the fuel filter, be sure to check with the engine running that there are no gasoline leaks in the connections of the fuel filter with the fuel pipes; if necessary, repeat the procedure for connecting the pipes until they are completely and securely fixed. If this does not eliminate leaks from the connections, replace the rubber O-rings on the tips of the fuel pipes. It is important to note that the tube tips themselves are quite fragile and sometimes break when trying to remove the O-rings from them. Therefore, it is recommended to completely replace the fuel hoses to eliminate fuel leaks.
This completes the replacement of VAZ 21124 fuel filters. Everything is fast and simple. If you don't understand anything about the replacement, watch the video.
Diagram of the fuel system of the 16-valve injection VAZ-2112
The fuel system is one of the most important components in any car. After all, without it it is simply impossible to imagine the full operation of the vehicle. And so that you can imagine what the fuel system on your VAZ-2112 consists of, below we will present you with its detailed diagram, with a detailed description of each of the main elements.
Detailed diagram of the fuel system
Detailed diagram of the fuel system.
1 — nozzles; 2 — fitting plug for monitoring fuel pressure; 3 — injector ramp; 4 — bracket for fastening fuel pipes; 5 — fuel pressure regulator; 6 — adsorber with solenoid valve; 7 — hose for suction of gasoline vapors from the adsorber; 8 — throttle assembly; 9 - two-way valve; 10 - gravity valve; 11 - safety valve; 12 - separator; 13 — separator hose; 14 — fuel tank plug; 15 - filling pipe; 16 — filling pipe hose; 17 — fuel filter; 18 — fuel tank; 19 — electric fuel pump; 20 — fuel drain line; 21 - fuel supply line.
Below we will look at the main elements of the fuel system separately.
Fuel tank
Dismantled VAZ-2112 gas tank.
The filled gasoline is supplied from the tank, which is located in the rear of the car, in the area where the sofa is located . The tank is made of steel and assembled by welding two stamped parts. Gasoline is supplied to the tank through a special neck, from a gas-resistant hose made of rubber, secured together with clamps.
Gasoline pump
Fuel pump VAZ-2112 1139009
A gas pump is an electrical functional device, submersible, installed directly into the gas tank itself. This pump is started by a signal from the ECU controller, which is responsible for fuel injection, through a relay when the ignition is turned on. If the fuel pump doesn't pump, the engine won't start! The operating pressure of the pump is at least 2.8-3 bar (atmospheres - approx.). In order to get to it, just lift the rear sofa and unscrew the technical hatch.
Fine filter
The new filter is ready for installation.
From the fuel pump, through a flexible steel hose, gasoline passes under pressure to the fine filter. The filter is made of steel and cannot be disassembled. A special paper filter element is installed inside. On the housing cover there is a special arrow, created for visual indication during installation, showing the direction of movement of gasoline in the system.
Step by step replacement
1. Before replacing the filter, you need to relieve the pressure in the fuel system.
2. Remove the rear seat. In the following articles I will talk about this in detail.
3. Unscrew the two screws and remove the fuel pump cover.
4. Disconnect the power connector from the fuel pump.
Use your finger to pull up the connector lock and move it towards the rear of the car.
5. Start the engine and wait until it stalls. This will happen in 5-10 seconds.
6. Next we will work under the car. It is advisable for the car to be parked in a pit.
7. The fuel filter is located slightly to the right of the muffler in the direction of travel of the car.
8. Unscrew the fuel pipe on the left side using wrenches seventeen and nineteen.
Use a nineteen key to hold the filter, and use a seventeen key to unscrew the tube.
After removing the fuel pipe, a small amount of gasoline will flow out of the filter. It is advisable to place a container so that gasoline does not run onto the floor.
9. On the right side, unscrew the fuel pipe using the same principle as the left one.
10. Use a ten key to loosen the fuel filter clamp bolt.
11. Remove the fuel filter.
12. Before installing the filter, please note that there are rubber O-rings at the ends of the fuel pipes. If the rings are damaged, they need to be replaced.
13. There is an arrow on the filter. When installing, it should face the direction of fuel flow.
14. Tighten the fuel filter clamp bolt.
15. Screw on and tighten the fuel pipes one by one. We tighten it in the same way as we tore it off. That is, we hold it with one key and tighten it with the other.
16. Connect the fuel pump power connector.
17. Install and secure the fuel pump cover.
18. Install the rear seat.
19. Before starting the engine, pump the fuel a couple of times. That is, turn the ignition on and off several times.
Video lesson
Source
Replacing the fuel line for a VAZ 2110 injector
Anyone who has at least once carefully examined Matryokha’s bottom knows that the brake and fuel pipes laid there along the entire bottom on the left are for some reason protected by a plastic ski. The role of this ski in protecting the tubes is questionable - firstly, it only extends from the middle of the bottom, and secondly, a good stone will still pierce the plastic once or twice. However, in the gap between this ski and the tubes, wet dirt accumulates, which never dries out and eats these tubes to holes, as they say in about 8 years. Recently, my father’s ten (21102 99g 60000) suffered the same fate - having stood in the garage for another winter, Having left in the spring, he discovered that the brake pedal was falling through, and brake fluid was pouring from below in a stream (!). I thought - a sorcerer, but no - highways. In total, a replacement is on the way.
This change was made this weekend. The actual report on this operation:
You need STEEL pipes (the stores are now full of copper ones, they are much more expensive, they don’t seem to rust, but according to rumors they don’t crimp well), a liter of brake fluid (replacing the lines is best combined with a complete replacement of the brake fluid), a good wrench for the brake pipes. It’s better to immediately buy turnkey bleeder fittings “for 10” and replace the standard ones with them. Next, buy a set of line holders for 2110 - on the old ones, the iron clamps rot and no longer hold. If you succeed, you can only buy iron clamps - the mating part is made of plastic - it does not rot. We also replace all the washers and nuts under the bottom with new ones - they are usually barely alive. You will need about 8 M6 nuts, 6 groovers and 6 wide flat washers - it is convenient to place them under the nut so that the clamp holds the tubes better.
Now we remove the “ski”, remembering which tube went where, unscrew them from the “sorcerer” and from the GTZ. We place a container under the GTZ and drain the old fuel fluid completely by gravity (you can suck it out with a blower, but you still won’t get it all out). LET'S REMEMBER which tube is in which holder! This is important because then it will be easier to install new ones (they will have to be bent in place).
We take out the tubes - first the back part, and then, turning around the axis, the front part. The stabilizer is in the way at the front, and (at 8V) the rear gearbox support is in the way.
Next, the most interesting thing is that the fuel lines are also steel and run in the same “corrosion-dangerous” place. On their father's car they looked "on the edge." I tried to clean them of rust flakes with a cord brush - and one immediately became “soaked” in gasoline! Since this outcome was not foreseen in advance, we decided to postpone replacing the fuel pipes until the next day. We installed new brakes without securing them in the holders, bled the system and completed the work on the brakes.
Operating principle of the fuel filter
Depending on the make of the car, the design of the fuel filter may differ. But the basic principle of operation and operation scheme is the same for all models.
The principle of operation of the fuel filter: 1 - filter element for injection cars, 2 - its housing.
The gasoline filter is located in the fuel line and looks like a metal or plastic bulb with two terminals. To which the main pipelines are connected. Inside the housing there is a filter element, which is usually made of special paper.
The device works like this:
- The fuel moves along the line and enters the housing through the inlet pipe;
- During the passage of fuel through the bowels of the unit, mechanical impurities (dirt, sand, rust, etc.) are retained on it. The purification fraction depends on the type of model used.
- Purified gasoline leaves the flask through the outlet pipe and moves to the engine.
Frequency of replacing the fuel filter
According to the technical passport, this element must be replaced on a VAZ 2110 car every 30,000 km. This recommendation must be followed provided that high-quality fuel is used. If dirt, water or low-quality gasoline may get into the gas tank, the unit should be replaced more often. And due to the low quality of gasoline at domestic gas stations. In practice, experts recommend reducing the interval between device replacements to 20–25 thousand km.
Also, reasons for premature replacement of a part may be:
- Increased fuel consumption;
- Violation of engine stability;
- Decrease in power of the power unit;
- Deterioration of dynamic performance;
- Water or foreign objects getting into the gas tank;
Types and design of VAZ fuel hoses
All fuel hoses used on VAZ cars can be divided into two groups according to applicability:
- For models with carburetor engines;
- For models with engines with a fuel injection system (injectors).
Hoses of the first type are used in all VAZ Classic cars (2101 - 2107), as well as on some later ones (2108, 2109, early modifications of the Lada-110 family). These are ordinary reinforced rubber hoses that do not have special fasteners; they are fixed to the fittings using clamps. All hoses used in these cars are the same, differing only in length (from 400 to 1000 mm).
Hoses of the second type are installed on some early (21099, 2113 - 2115) and all current VAZ models, starting with Lada Kalina. These hoses come in a variety of designs, applicability and mounting types.
According to their purpose, fuel hoses for injection engines are divided into the following types:
- Fuel supply hose to the ramp;
- Hoses for draining fuel from the ramp (return hoses) - usually there are two of them, one is located on the ramp side, the other is on the tank side;
- Hoses for connecting the fuel filter - one from the tank to the filter, the second from the filter to the ramp;
- Filler hose;
- Hoses for connecting the adsorber (separator), in fact these are air hoses, but they belong to the fuel system.
Fuel filter location
For different types of engines installed in VAZ 2110 cars. The installation location and the process of replacing the element differ.
Location of the fuel filter on the injection VAZ 2110
On injection "tens" the fuel filter is located under the bottom of the car. Specifically, behind the gas tank and attached to the beam using a metal bracket. During inspection it is quite easy to detect. The unit looks like a metal flask with two hoses connected to it. To facilitate access and change the unit, the machine must be placed on an overpass or a special lift.
Location of the fuel filter on a carburetor VAZ 2110
On the carburetor model of the VAZ 2110 car, the fuel filter is located in the engine compartment. And the procedure is much easier. Specifically, the element is located near the brake fluid reservoir. The unit looks like a transparent plastic flask with a special element inside. Fuel lines are connected to the device body using metal clamps.
Preparatory activities
You don't have to spend a lot of time replacing the fuel filter. The process is easy and does not require the involvement of experienced specialists. In addition, the services of technicians from service stations are expensive. You can do everything yourself and no less efficiently than experienced specialists.
To get started, arm yourself with a set of tools and auxiliary materials, which include:
Let’s say right away that if you don’t want or are not ready to do such work with your own hands, it’s not too late to stop. You can entrust your VAZ 2110 and the replacement of the fuel filter on it to specialists. It will cost money, but you guarantee yourself a high-quality task.
If the work doesn’t scare you, then let’s get started.