We show how to replace the reverse frog in a VAZ 2110, 2111, 2112 and diagnose it. This part is responsible for turning on the reversing headlights when reverse gear is engaged. Regarding diagnostics, if, when you engage reverse gear, the lights on the rear lights do not light up, then there is a high probability that the reason is the reverse frog, which is installed in the gearbox housing. To check, you need two bare, stripped wires; disconnect the plug and connect the contacts to our wire:
We turn on the ignition and go look at the rear lights, if they are on, then the problem is with the frog itself. If you change the reverse frog, then remove the plug and unscrew it using a 22mm wrench; this should be done on a lift or from the inspection hole. Be prepared for oil to pour out of the gearbox.
Video of replacing the reverse frog in a VAZ 2110, VAZ 2112, VAZ 2111:
Let's consider the causes and possible ways to eliminate problems with brake lights in a VAZ-2110 car. It is worth noting that solving this problem will only require knowledge, time and a little experience, so before contacting a service station, you can try to solve everything on your own.
Classification of devices and principles of their operation
Devices that allow you to securely lock the engine compartment have appeared a long time ago, and today there are many modifications of them. All devices, according to their operating principle, can be divided into two groups:
- mechanical interlocks;
- electromechanical blockers.
Regardless of the operating principle, the hood switch can use a factory-installed lock to lock the engine compartment, or it can be equipped with an additional locking system.
Mechanical devices
Mechanical locks are devices that do not use electric drive systems to lock and unlock the hood, that is, everything happens using mechanical elements.
The operating principle of such devices is quite simple. In the engine compartment, it is necessary to secure a metal hose along a certain trajectory, one end of which will be located in the car interior, and the other under the hood. A control cable will be threaded through the metal hose, which acts on the hood locking system.
We turn on the brake lights forcibly
Relay K1 is successfully replaced with a pad with jumpers. In Fig. 1 just shows its diagram. If there is no such platform, you can temporarily close contacts 4-5. First, check everything mentioned above.
Have an observer watch what happens to the lamps. Press the pedal with one touch and release it. If the lamps do not turn on, check that the fuse is working properly. It's burned out, which means you're looking for a short circuit.
How to and how not to check the “0 Volt” potential
Let’s agree right away that we only work with a voltmeter. Voltage “+12” is caused by connecting one probe to ground. The presence of potential “zero” is checked differently: any of the probes is connected to a terminal with positive voltage, and then the second probe is connected to the wire being tested.
Consider the error: one probe is connected to ground, the second to the terminal being tested, and vol. Here they conclude that there is a “mass” potential, but this is wrong! If the contact with ground is broken, the device will also show “0”. That is, the number “0” does not contain information.
Trunk limit switch
Standardly, a limit switch is installed in the trunk to activate the backlight in it; on cars with a standard alarm system, it also serves to control opening during active security. The limit switch can also be used by the standard central locking, blocking locking if the trunk is not slammed shut.
If we are talking about a cheap car with a minimum configuration, then you will have to connect the trunk limit switch yourself when installing the alarm. It’s easiest for owners of those cars where more expensive equipment includes a standard trunk alarm switch: as with doors, here it is enough to install the original part in the designated place. Otherwise, alas, you will have to drill a hole and install a universal one. Increasingly, the switch is not installed as a separate part in the trunk, but is built into the lock itself, as is the case with the doors.
Sometimes this leads to serious problems: for example, on the Renault Koleos, a failure of the trunk locking mechanism has become a “trademark disease”, and in the author’s practice, the “anti-record” is only a week after purchasing a new car. The lock, not locking, did not allow the built-in limit switch to operate, and this, as on other cars on similar platforms, blocked the locking of the central locking as a whole; due to the non-locking trunk, the owner could not lock the doors. In such cases, it was necessary to tightly block the trunk lock in a locked state until a new one arrived for a warranty replacement.
Algorithm for performing self-installation of an on-board computer
Connection block for on-board computer VAZ 2110
- after which, on the central dashboard you will need to find a diagnostic block of 9 contact wires;
- A 9-pin block is found on all VAZ “tens”;
- then, you need to connect the car’s on-board computer to the block.
Note. You must remember to draw the so-called K line.
Algorithm for drawing line K
It is imperative to use a pre-prepared meter wire in order to establish the appropriate connections;
Brake pads for VAZ 2110 included
- the prepared wire must be inserted into the block, and specifically into the second contact;
- the other end of the pre-prepared wire must be connected to the diagnostic block, having first pulled it under the dashboard.
Note. In order to easily install the wire, you need to temporarily turn the right side of the dashboard to one side.
- after the corresponding wire reaches the diagnostic block, it will need to be connected to the “M” socket;
- Now you can connect the on-board computer with complete confidence by installing it in the appropriate place;
- The final step is to conduct a full check of the functionality of the on-board computer.
Note. Before you begin installing any car computer, you should read the attached recommendations. Since there are many completely different models of car on-board computers, some of them require certain installation specifics.
The brake light does not light up on a VAZ 2110
Do it normally, it will be fine!
If you drive more quietly, you will be further away from where you are going.
SaNeK ReSpEcT
, Replace the brake light switch
Post edited by Aleks_N
– Apr 15 2009, 19:49
Do it normally, it will be fine!
If you drive more quietly, you will be further away from where you are going.
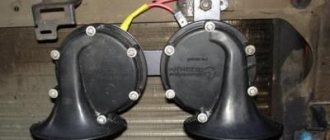
Is there a separate fuse for the brake light? the dimensions are on fire. everything is on, only the sonic signal is not on, and not a single one
Post edited by SaNeK ReSpEcT
– Apr 15 2009, 20:25
Do it normally, it will be fine!
If you drive more quietly, you will be further away from where you are going.
1) A wide harness runs from the fuse block along the left side of the body along the car, check the harness connector under the trunk trim on the right side near the rear arch (if you look at the car from the rear), there is a common connector for all rear lights and other devices - maybe a banal “non-contact” ”, either oxidation, or simply not making contact, or due to the fact that something is shorting and heating up. 2) Using a voltmeter, measure the voltage that goes to the rear lights - connect directly to the connector that fits the light. 3) Simply close the two contacts on the frog - if you close them together, the brake lights should light up, this way you can identify the shortcomings of the frog, but you cannot short the wires for the frog to ground!
On the tenth family, glitches occur frequently due to additional signals on the spoiler when the spoiler is installed - the wires are pressed against the body and they short out, and glitches also occur when installing the wheel arch liners and they touch the wires.
The VAZ 2110 has fuse F17 (7.5 A), which is responsible for the brake light
, interior lighting bulbs, individual lighting, ignition switch lighting, trip computer - all in one “bottle”, here is the diagram of the VAZ 2110 https://cxem.net/avto/electronics/4-68-2.jpg Good luck with the repair.
Post edited by Julien
– Apr 15 2009, 21:07
On-board computer does not work on VAZ 2110
On-board computers on the VAZ-2110. Renault Csenic I phase 2 2001 faced a problem that the on-board computer does not show fuel consumption. connection On-board computer VAZ-2110: instructions
Using on-board computers on VAZ2110
You can get a complete picture of the engine. With its help, data is read from sensors and displayed. It’s easier while driving; the driver can find out at any time about fuel consumption, on-board voltage, engine speed, and errors. But for everyone, even the most expensive and advanced on-board computer, there are pros and cons.
Advantages of injection engines
The engine designs are the same, only the following systems differ significantly:
- Fuel injection.
- Ignition.
- Engine control.
The main advantages of injection engines:
- In the event of a malfunction, diagnostic tools will provide an accurate diagnosis in minutes. On rare occasions it is necessary to service the machine.
- Works perfectly at idle with all sensors stable. Starting the engine in winter is much easier.
- Fuel consumption (depending on the firmware, however) is much less than that of carburetor engines.
- Injection systems require little or no intervention. Sensors and actuators rarely fail.
The cost of spare parts is much higher than for carburetor engines. But they break less often. I apologize for the quality and sound of what I had on hand. Phone, computer diagnostics showed that the rear left sensor was not working. If the injector is new or has just been repaired, if used properly it will last more than one year without damage. If the sensors fail, they are replaced within a few minutes. And some devices need to be repaired.
The brake lights on the VAZ-2112 do not light up or work, why?
On all cars of the Tenth Family, the power lines for the lights contain many elements. There are lamp health relays, switches and fuses. Therefore, if the brake lights on a VAZ-2112 do not light up, you need to check the entire chain. But the reason may look simple: sometimes the lamps do not turn on because the socket does not contact ground. Circuits are easy to analyze, but finding the cause of a breakdown is difficult. Let's look into the details.
If one of the lamps does not light, it is simply replaced. See the example in the video - you need a P21W base.
Standard version of the brake light operating diagram
Power is supplied to fuse F17 from the battery, then the current goes to limit switch contact 11, and then, if the limit switch is closed, a circuit is formed with the filament of lamps 7
But pay attention: part of the circuit is relay K1, more precisely, its pins 5 and 4
Basic network diagram
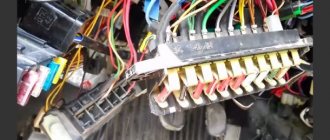
If the brake lights do not light up, on the VAZ-2112, as on all Tens, check one fuse. It is called F17 and is located in the mounting block to the left of the driver.
Main mounting block
It is important to know: voltage is always present at one of the fuse terminals. Check it out!
A few words about the “serviceability relay”
The lamp health relay is called K1, and it is the largest in the mounting block. If you remove this relay, then when you press the pedal you can dial the voltage at terminal 5 (but not 4). Look at the diagram again, and it will become clear what we are talking about.
The largest relay in the block
All relay contacts are numbered. Check the voltage at the block terminals:
- 6 – “mass” potential;
- 2 – voltage “+12”, but only after turning on the ignition;
- 5 – “+12” by pressing the pedal;
- 4 – terminal rings as a ground tap.
If the potential “0” is not generated at terminal “4,” it means that the lamp filaments are burnt out or there is a break in the wiring. Now consider something else: the ground potential has been detected, but the lamps do not light. This is where suspicions of a short circuit arise.
We turn on the brake lights forcibly
Relay K1 is successfully replaced with a pad with jumpers. In Fig. 1 just shows its diagram. If there is no such platform, you can temporarily close contacts 4-5. First, check everything mentioned above.
How to and how not to check the “0 Volt” potential
Let’s agree right away that we only work with a voltmeter. Voltage “+12” is caused by connecting one probe to ground. The presence of potential “zero” is checked differently: any of the probes is connected to a terminal with positive voltage, and then the second probe is connected to the wire being tested.
How to connect a voltmeter
Consider the error: one probe is connected to ground, the second to the terminal being tested, and vol. Here they conclude that there is a “mass” potential, but this is wrong! If the contact with ground is broken, the device will also show “0”. That is, the number “0” does not contain information.
Wiring test for non-working brake lights (ground test)
Let's look at the basic diagram: the brake lights and the reversing lamps have a common ground pin. If contact with this pin is broken, the reverse lamps will not turn on. Well, brake lights too.
Connector for connecting “internal” lights
On the left side there is a connector through which the wiring goes to the fifth door. The connector has black and red wires. Check the voltages on them. Most often the ground on the black wire does not ring. But maybe the connector itself needs to be cleaned.
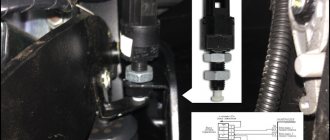
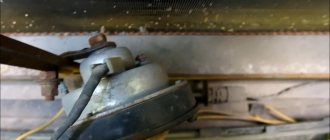
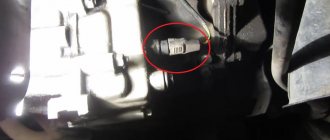
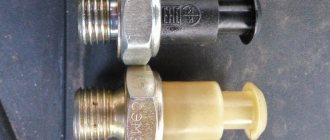
If the “plus” does not come to the red wire, we check the “frog”. It's simple here:
- Disconnect the connector with two wires from the limit switch;
- Using 17mm wrenches, loosen the two nuts: holding the lower nut, rotate the upper one;
Removing the frog brake
The end switch is removed as an assembly and checked with an ohmmeter.
By the way, one of the connector terminals receives a voltage of “12 Volts”. Check it!
Second option for connecting foglights
First, select an area to install the devices - for this purpose there is a small compartment below the bumper. By the way, headlights are different, some of them are corrugated, designed to diffuse light, and transparent ones illuminate with spots. Although transparent units are in great demand today among VAZ-2110 owners, experts consider them not so useful.
Installation begins by disconnecting the wires going to the fluid level sensor and washer reservoir. Disconnect the nut located on the washer tank and remove the entire bundle of cables located on the left under the side member.
When considering connector Ш1, you should take into account 3 wires: yellow and 2 yellow-black. Cut 2 pieces of yellow cable and stretch it inside the VAZ-2110 interior
Next, strip the cable, crimp it with male-type terminals of sufficient width and locate it inside the block so that the wire is connected to the one painted black and yellow.
Connect the block with 2 yellow wires together, press them to the harness, after which you can mount the washer tank in its original place.
Now you will need a wire (2 pieces) with a length of up to 0.5 m. Add the ground terminals and secure to the stud, also grab the ground wire coming from the headlight. When the cable from the fog lamp is already in the front side member, stretch the cable where you plan to fix the headlights. Don't forget to treat each cable with a ground terminal.
All that remains is to put the brackets on the bumper, and the female terminal blocks on the wires. Preparing headlights involves inserting light bulbs into the devices; experts do not recommend touching the light bulbs with your hands; when they heat up, the risk of heating increases and the devices may burst.
If you doubt that you have not touched the light bulbs, or you know for sure that you have touched them, you need to degrease the surface using alcohol. Next, connect the black cable to the housing base, and connect the yellow cable directly to the light bulb. Even a beginner, using this option for installing fog lights, will be able to figure out how to properly connect fog lights to a VAZ-2110, and will do it in just a couple of hours.
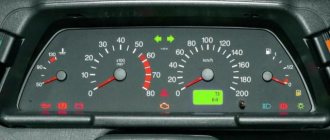
LED indicators
Each of the indicators has its own meaning and a symbolic, intuitive picture.
When the indicator lights up, there is a malfunction in the following vehicle functions:
- Oil level.
- Washer fluid.
- Coolant.
- Doors.
- Headlights.
- Seat belts.
Data-lazy-type=”image” data-src=”https://vazremont.com/wp-content/uploads/2017/08/foto-3-3.jpg” alt=”LED indication bsk” width=” 533″ height=”330″ class=”lazy lazy-hidden aligncenter size-full wp-image-3746″ srcset=”” data-srcset=”https://vazremont.com/wp-content/uploads/2017/08 /foto-3-3..jpg 300w" sizes="(max-width: 533px) 100vw, 533px">
Injection "ten"
In addition to the wiring that is provided for the VAZ 2110 - carburetor, "ten" - injector, it is also equipped with a number of fuses that protect almost all of it from the possibility of short circuiting.
Structurally, fuses are not provided only for the electrical supply via a relay wire from the battery, in the car starting and ignition circuit, as well as for the wire going to the generator.
Electrical circuit of an injection car
In addition, the injector (as opposed to the carburetor) is a more complex system, and in order to repair it yourself, you need to understand it well. The controller in this wiring system “reads” the operation of all systems, thereby determining and setting many indicators - calculation of the fuel mixture, etc.
Basic and additional functions
On domestic VAZ 2110 cars, the on-board computer allows you to determine the air temperature outside, the speed of the car, the volume of gasoline in the tank and its average consumption. In addition, thanks to the BC, the driver will be able to find out how far the fuel in the tank will last. Depending on the model of the VAZ on-board computer, the device can show the operating parameters of the power unit and the voltage level in the car’s electrical circuit.
The main function performed by the State on-board computer is to identify combinations of errors in the components and systems of the vehicle, while connecting additional equipment is not necessary. In accordance with the instructions for the device, when the Check indicator appears on the BC screen or dashboard, you need to perform diagnostics of all systems. The received error codes are decrypted in accordance with the technical documentation; information on decoding the codes is also provided in this article
Another important function of the BC is the drying of spark plugs, which greatly simplifies engine starting, especially at low temperatures.
Message from BC about the need to replace the engine fluid
Depending on the VAZ 2110 computer model, the device can be additionally equipped with a tachometer, clock, voltmeter and even a calendar. IN practice, most BCs have volatile memory, as a result of which, when the battery is disconnected from the network, all error information will be saved. You can find many different BC models on sale, the most common of which are Gamma, Omega, Multitronics, and State 110. The latter option is optimally suited for the VAZ 2110, since models for cars are available with both an old and an improved dashboard.
The main functions of this bookmaker:
- the device provides the driver with data on fuel consumption, antifreeze temperature in the system, as well as mileage traveled;
- determining the distance for which the gasoline in the tank will last;
- providing information on car maintenance;
- demonstration of combinations of errors in engine operation;
- the ability to update the platform via the Network;
- another function is the presence of a plasmar necessary for warming up the spark plugs;
- there is a Fast and Furious option - its purpose is to reset the memory to standard settings;
- The Tropic function allows you to activate the fan when a certain engine temperature is reached.
It should be noted that these are not all the functions that a device for the domestic “ten” may have. On sale today you can find many different models of computers, the functionality of which can be expanded in accordance with the installed software. So, in general, the possibilities of a bookmaker depend on the model and, accordingly, on the financial capabilities of the buyer.
BC Gamma for “ten”
If you decide to purchase an on-board computer for a VAZ 2110, then it will be useful for you to find out what types can be found on sale:
- Universal BCs - such devices are designed for installation on any car; as a rule, they are used as an alternative to a rear view mirror. In some cases, universal devices can be installed on glass.
- Individual-type devices that are aimed at several car models at once. For example, domestic “eights”, “nines” and “tens” are one group, characterized by the presence of an old dashboard in the cabin.
How to and how not to check the “0 Volt” potential
Let’s agree right away that we only work with a voltmeter. Voltage “+12” is caused by connecting one probe to ground. The presence of potential “zero” is checked differently: any of the probes is connected to a terminal with positive voltage, and then the second probe is connected to the wire being tested.
Consider the error: one probe is connected to ground, the second to the terminal being tested, and vol. Here they conclude that there is a “mass” potential, but this is wrong! If the contact with ground is broken, the device will also show “0”. That is, the number “0” does not contain information.
Installing a block for automatic engine start
The device is assembled. The wires are signed. I also insulated everything and signed all the wires. I like order in everything, and I advise you to do the same.
In the car, I first removed one terminal from the battery so as not to get hurt myself and only then got into the wiring.
I connected the wires of our device to the engine starting system block. First, I took out the car alarm unit and identified the wires from the additional channels, and also figured out the sensors and door locks. I have a blue wire going to the handbrake. I didn’t capture the process itself on camera, but I think everything is clear here.
As a result, everything is connected perfectly for me.
I only have one green wire left free. You can stick it anywhere. I even thought about putting it on the radio. I imagined how I find my car in the dark by the sounds of my favorite radio wave - I smiled. Otherwise, it can be placed on headlights or side lights - it’s more convenient to look for. I haven't decided yet.
Having removed the steering casing, I hid the remote start unit there - it fit! That's the whole installation!
Using autorun in practice
I launched it from home. Here's my procedure:
- Disarmed.
- I start the fuel pump - this is my first additional channel. Be careful not to get confused!
- I block the doors.
- I'm starting the starter. The first time I didn't have enough 3 seconds for the engine to start, so I pressed the button twice.
- The engine started up and began to purr, making me happy.
- I go to the car and remove the lock from the key fob.
- I get into the car, insert the key into the ignition, turn it one notch.
- I take the handbrake off and listen to my car stall (the car thieves won’t be able to get away - it’s a trick).
- You can go.
If you change your mind or decide to reschedule the trip, go to the car, take the handbrake off and turn it off. (Although, as an option, you can install an additional relay for this purpose - a simple matter).
So, I have outlined everything, I hope it is accessible and understandable. This is my first master class, so I accept all comments, take into account wishes, and accept praise!
Didn't find the information you are looking for? on our forum.
We recommend reading:
Gasoline consumption of Lada Kalina per 100 km, average figures
VAZ 2112 16 valves technical specifications
Poor charging on a VAZ 2109 carburetor, reasons, how to fix it
What kind of oil to fill in VAZ 2115
Adjusting the carburetor on a VAZ 2106
How to adjust the clutch on a VAZ 2106
Lada Largus which gasoline to fill 92 or 95, manufacturer's recommendations
How to connect an ESP to a VAZ 2110
Methods for troubleshooting
Troubleshooting is not a complicated process and even novice car enthusiasts can do it (the author of the video is Avtoelektika VC).
First of all, you should check the integrity and condition of the wiring.
Using a multimeter, you need to test the wiring. Damaged or torn sections should be replaced intact or soldered. If there are traces of oxidation processes on the contacts, they need to be cleaned.
If the LEDs burn out, they need to be replaced in pairs. If the breaker fails, it must be replaced with a new one, as it cannot be repaired. Before replacing, turn off the vehicle's power by removing the negative terminal from the battery. Then disconnect the power wires from the breaker. Next, you need to loosen the lock nut and unscrew the main nut securing the switch to the bracket.
Kinds
Today you can find contact and contactless immobilizers, the latter of which are more in demand. The first ones are controlled using a key, and for the second ones a key fob or card is provided. They are combined with other anti-theft systems.
Key master
On the VAZ 2110, the immobilizer is found only on models with injection engines. When leaving the production line, the car's protective functions are not activated. A special set of keys is provided for this. One of them is red. This is the master key that activates the protection. The other two, which are black, are used by the car owner.
“Training”, that is, activation, is usually performed at a car dealership before preparing the car for sale. Although some clients are easily able to perform the procedure on their own.
The VAZ 2110 was the first to be equipped with APS-4 systems, but after some time improved APS-6 models appeared. The reading part is installed in the steering column, and the code is installed in the ignition key. APS-6 additionally serves to control fog lights and electric windows.
APS-6 module board
Sometimes an updated immobilizer comes in an old housing, which, apparently, was in abundance at production. If this is so, then there is a number 4 on the case, and the inscription APS 6 is printed on the board. Microcircuits may differ from each other due to different periods of their production.
The brake light does not light up on a VAZ 2110
Do it normally, it will be fine!
If you drive more quietly, you will be further away from where you are going.
SaNeK ReSpEcT
, Replace the brake light switch
Post edited by Aleks_N
– Apr 15 2009, 19:49
Do it normally, it will be fine!
If you drive more quietly, you will be further away from where you are going.
Is there a separate fuse for the brake light? the dimensions are on fire. everything is on, only the sonic signal is not on, and not a single one
Post edited by SaNeK ReSpEcT
– Apr 15 2009, 20:25
Do it normally, it will be fine!
If you drive more quietly, you will be further away from where you are going.
1) A wide harness runs from the fuse block along the left side of the body along the car, check the harness connector under the trunk trim on the right side near the rear arch (if you look at the car from the rear), there is a common connector for all rear lights and other devices - maybe a banal “non-contact” ”, either oxidation, or simply not making contact, or due to the fact that something is shorting and heating up. 2) Using a voltmeter, measure the voltage that goes to the rear lights - connect directly to the connector that fits the light. 3) Simply close the two contacts on the frog - if you close them together, the brake lights should light up, this way you can identify the shortcomings of the frog, but you cannot short the wires for the frog to ground!
On the tenth family, glitches occur frequently due to additional signals on the spoiler when the spoiler is installed - the wires are pressed against the body and they short out, and glitches also occur when installing the wheel arch liners and they touch the wires.
The VAZ 2110 has fuse F17 (7.5 A), which is responsible for the brake light
, interior lighting bulbs, individual lighting, ignition switch lighting, trip computer - all in one “bottle”, here is the diagram of the VAZ 2110 https://cxem.net/avto/electronics/4-68-2.jpg Good luck with the repair.
Post edited by Julien
– Apr 15 2009, 21:07
Wiring test for non-working brake lights (ground test)
Let's look at the basic diagram: the brake lights and the reversing lamps have a common ground pin. If contact with this pin is broken, the reverse lamps will not turn on. Well, brake lights too.
Connector for connecting “internal” lights. On the left side there is a connector through which the wiring goes to the fifth door. The connector has black and red wires. Check the voltages on them. Most often the ground on the black wire does not ring. But maybe the connector itself needs to be cleaned.
- Disconnect the connector with two wires from the limit switch;
- Using 17mm wrenches, loosen the two nuts: holding the lower nut, rotate the upper one;
- The end switch is removed as an assembly and checked with an ohmmeter.
By the way, one of the connector terminals receives a voltage of “12 Volts”. Check it!
The brake lights on the VAZ-2112 do not light up or work, why?
On all cars of the Tenth Family, the power lines for the lights contain many elements. There are lamp health relays, switches and fuses. Therefore, if the brake lights on a VAZ-2112 do not light up, you need to check the entire chain. But the reason may look simple: sometimes the lamps do not turn on because the socket does not contact ground. Circuits are easy to analyze, but finding the cause of a breakdown is difficult. Let's look into the details.
If one of the lamps does not light, it is simply replaced. See the example in the video - you need a P21W base.
Standard version of the brake light operating diagram
Power is supplied to fuse F17 from the battery, then the current goes to limit switch contact 11, and then, if the limit switch is closed, a circuit is formed with the filament of lamps 7
But pay attention: part of the circuit is relay K1, more precisely, its pins 5 and 4
Basic network diagram
If the brake lights do not light up, on the VAZ-2112, as on all Tens, check one fuse. It is called F17 and is located in the mounting block to the left of the driver.
Main mounting block
It is important to know: voltage is always present at one of the fuse terminals. Check it out!
A few words about the “serviceability relay”
The lamp health relay is called K1, and it is the largest in the mounting block. If you remove this relay, then when you press the pedal you can dial the voltage at terminal 5 (but not 4). Look at the diagram again, and it will become clear what we are talking about.
The largest relay in the block
All relay contacts are numbered. Check the voltage at the block terminals:
- 6 – “mass” potential;
- 2 – voltage “+12”, but only after turning on the ignition;
- 5 – “+12” by pressing the pedal;
- 4 – terminal rings as a ground tap.
If the potential “0” is not generated at terminal “4,” it means that the lamp filaments are burnt out or there is a break in the wiring. Now consider something else: the ground potential has been detected, but the lamps do not light. This is where suspicions of a short circuit arise.
We turn on the brake lights forcibly
Relay K1 is successfully replaced with a pad with jumpers. In Fig. 1 just shows its diagram. If there is no such platform, you can temporarily close contacts 4-5. First, check everything mentioned above.
How to and how not to check the “0 Volt” potential
Let’s agree right away that we only work with a voltmeter. Voltage “+12” is caused by connecting one probe to ground. The presence of potential “zero” is checked differently: any of the probes is connected to a terminal with positive voltage, and then the second probe is connected to the wire being tested.
How to connect a voltmeter
Consider the error: one probe is connected to ground, the second to the terminal being tested, and vol. Here they conclude that there is a “mass” potential, but this is wrong! If the contact with ground is broken, the device will also show “0”. That is, the number “0” does not contain information.
Wiring test for non-working brake lights (ground test)
Let's look at the basic diagram: the brake lights and the reversing lamps have a common ground pin. If contact with this pin is broken, the reverse lamps will not turn on. Well, brake lights too.
Connector for connecting “internal” lights
On the left side there is a connector through which the wiring goes to the fifth door. The connector has black and red wires. Check the voltages on them. Most often the ground on the black wire does not ring. But maybe the connector itself needs to be cleaned.
If the “plus” does not come to the red wire, we check the “frog”. It's simple here:
- Disconnect the connector with two wires from the limit switch;
- Using 17mm wrenches, loosen the two nuts: holding the lower nut, rotate the upper one; Removing the frog brake
- The end switch is removed as an assembly and checked with an ohmmeter.
By the way, one of the connector terminals receives a voltage of “12 Volts”. Check it!
carfrance.ru
What technical solutions exist
There are a lot of technical solutions for tuning VAZ cars. Starting from tuning the VAZ engine and gearbox to major changes in the design of the car.
After tuning a VAZ car with your own hands, the driver gets new driving sensations
The transformed car clearly stands out from the crowd of cars of the same type and attracts attention, but if the tuning of the vases with your own hands is done correctly, then operating the car will become much more convenient
And although such changes in cars are among the most expensive, many owners of VAZ cars, at the first opportunity and having the necessary funds, try to add something new and unique to their car.
There are as many VAZ car models as there are technical solutions for tuning them. And those decisions, in turn, are divided into several more.
We can safely say that there are several models, and as many VAZ cars exist with their owners, there are as many technical solutions for their tuning.
Since every car owner, when tuning a VAZ with his own hands, brings in something new, unique and distinctive from other cars of the same type.
It is impossible to consider every case of tuning vases with your own hands.
Therefore, we will look at the example of one solution, which, in turn, turned out to be successful.