Why do we need a speed sensor on the VAZ-2109? Let's figure it out. This device is responsible for the correct display of data on our speedometer and tachometer. He does this by transmitting electronic impulses to the electrical control unit. But due to long-term operation and significant load on the speed sensor itself of the VAZ-2109 car (more than 6 thousand pulses are transmitted to the control unit per 1 km), an error occurs during data transfer. Then car owners have questions: how to check the speed sensor? How to change it correctly?
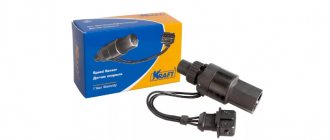
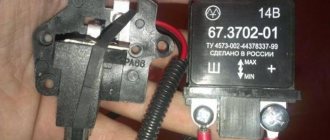
Vehicle speed sensor VAZ 2109 injector
For the proper operation of many vehicle systems, the presence of miniature devices operating in automatic mode is a prerequisite. When such a sensor breaks down, the efficiency of the internal combustion engine may decrease, as well as the comfort and safety when driving a motor vehicle. A vehicle speed detection device is one of the most important elements of a modern car.
Video with instructions for replacing the sensor
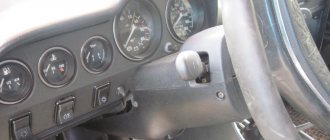
Where is the speed sensor located? It is located on the gearbox itself, to make it clearer for you, in this case, look at the photo below:
When do you need to change the speed sensor? Typically, the first signs of a speed sensor not working properly, or if it has completely failed, are:
• The speedometer needle readings are incorrect; it may float in the range from 0 to 200 km, or stop working altogether.
• Also, the car may start to idle unstably; in more frequent cases, the car’s engine simply stalls, and it doesn’t matter whether you are driving the car or not.
• Even with a faulty speed sensor, increased fuel consumption and loss of power in the car may be observed.
Design and principle of operation
It should be noted that the frequency of these pulses directly depends on the speed of rotation of the drive wheels. Thus, for every kilometer traveled by the car, approximately 6004 pulses are sent to its control unit. The vehicle speed and tachometer readings are calculated by the electronic control unit by analyzing the time intervals between received pulses.
Attention! As a consequence of the above, it is necessary to understand that installing wheels with a diameter different from the nominal size directly affects the speedometer readings.
In addition to its informational role, the speed sensor affects the operating modes of the engine itself, since depending on the speed of the vehicle, the control unit changes modes:
- Idle speed, which is slightly increased on a moving vehicle;
- Fuel cut-off when closing the throttle valve;
- Smooth switching to idle, which depends not only on the speed of the car, but also on the engine speed.
How to find out if our device is faulty
We may not always notice problems right away. This can turn into a huge problem - from a fine for speeding to road accidents and accidents.
Let's look at the main symptoms of a malfunction:
- It seems to you that the speedometer does not display the speed of your car correctly.
- Faulty idle.
- Lately you have been experiencing increased gas mileage.
- You can hear from the sound of the engine that it is not working at full power.
If we consider the complaints of car owners, then most often problems arise precisely with stopping the engine when the car is coasting, or during gear changes when the clutch is depressed.
Causes of speed sensor malfunction
Most often, malfunctions occur when the electrical circuit is broken, so diagnostics should begin with checking the wires and contacts. Oxidized or dirty contacts must be cleaned and coated with some kind of lubricant, for example “Litol”.
A possible broken wire should be looked for near the connector. At this point they bend and often fray. You also need to check the integrity of the wire insulation in the exhaust manifold area. It can melt, after which a short circuit occurs.
The cause of a sensor malfunction may be a worn speedometer cable. Over time, breaks and burrs appear on it, which subsequently lead to the sensor failure.
Causes of failure
Before you start replacing the reverse sensor (RDS), we recommend checking the condition of the rear lights and determining whether the signal may not be working for other reasons.
Possible reason
Your actions
Burnt out light bulbs
A common and fairly banal cause of problems, which, nevertheless, many ignore. Take out the light bulb, arm yourself with a multimeter and check if they have burned out. Replace if necessary
Wiring is damaged
The problem is no less common, but looking for the source of the problems in such a situation is a little more difficult. You will also need a multimeter, which you need to test the wiring and check the resistance readings
Poor regulator contact
It happens that during operation the contact of the sensor with the socket is broken. Lack of contact means that the device will not work normally. So check its condition
Wiring insulation is broken
If the insulation on the wires near the sensor is broken, this can lead to a short circuit. The result is quite obvious, so check the condition of the wiring and replace it if necessary
Fuse burned out
Depending on the type of fuse box, check the condition of the corresponding element in the mounting block. On old-style blocks this is fuse F16, and on new-style fuse blocks you should look at fuse 5. If they are melted, replacement will be required
But it is also important to determine the reason why the fuse blew
Sensor failure
A failure of the reverse control itself may be indicated by a situation where the lights do not light up at all or, on the contrary, light up without interruption. In the second case, the option of burnt out light bulbs is excluded by itself.
Replacing a reverse sensor is not a difficult or financially expensive job. Today, the DZH can be purchased at any auto parts store, and its cost is about 100 rubles.
Changing the speed sensor for VAZ-2109
In order to make a replacement, we will need the following: a new speed sensor (the old one cannot be repaired), as well as keys for “10” and “12”. First we need to disconnect the battery, then the speed sensor.
When dismantling a faulty device, you need to be very careful and carefully remove it from the stem to avoid breaking it. That's it, now we can install a new sensor - we'll do all the steps in reverse order. Carefully place the new sensor on the rod, connect it and at the very end, when all contacts are sealed (it is advisable to do this), connect the battery.
But that is not all. In order for our new sensor to display true results, immediately after its installation it is necessary to reset the electronic on-board computer data. Otherwise, do not expect correct data even if a new sensor is installed. Good luck with your installation, dismantling and long-term operation of your car!
Replacement
The instructions for replacing the reverse sensor will not cause difficulties for more or less experienced car owners, but beginners will have to try to do everything correctly and accurately.
You should not be afraid to change this sensor yourself, because if you follow the instructions and safety measures, everything will work out.
- It is advisable to have a garage with a pit at your disposal. This will make it most convenient for you to complete all operations to replace the sensor.
- Remove the negative terminal from the battery. All work related to car repair and especially its electrical component should begin with this step.
- Drain the gearbox oil. You don’t have to do this, but then when replacing the sensor, oil will start leaking out. By placing a container under the hole, you will save yourself from unnecessary cleaning and oiling of your own garage.
- Remove the crankcase protection, if any. Near the gearbox you will find the sensor you are looking for.
- Disconnect the sensor block from the gearbox.
- In the gearbox housing, the desired regulator is held in place using a mounting bolt. Unscrew the clamping bolt with a 22mm socket or ratchet.
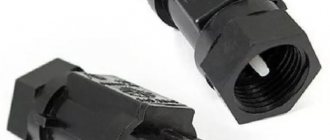
- Armed with the new sensor, you may notice that it somewhat resembles a classic spark plug. On one side of the sensor there is a wire, and on the other there is a button that closes a pair of contacts.
- New DZHs are required to be equipped with O-rings. Before installation, they must be lubricated with ordinary oil - machine oil, transmission oil.
- Install the new regulator in place of the removed device, first secure it by hand, and then tighten the mounting bolt.
- Next up is the electrical wiring. By connecting the block with wires, you will provide the sensor with the necessary power.
- Fill the gearbox with previously drained or new transmission oil. Replacing the reverse sensor is an excellent reason to change the lubricant in the gearbox housing. But the decision is yours.
- Check the gearbox oil level to ensure it meets the specifications.
- Replace the crankcase protection, remove the car from the jack and connect the negative terminal back to the battery.
- Get into the car and put the car in reverse gear.
- If after this the reverse light comes on, everything is fine.
Disconnect and change
Do not forget to complete a full performance check of the VAZ 2109 car with a brand new reverse sensor upon completion of the work.
Checking repairs
Theoretically, after replacing the sensor, everything should work as before. But it wouldn’t hurt to make sure of this.
- Engage reverse gear at the gearbox.
- Turn the ignition key. In this case, it is not at all necessary to start the engine. The light will light up if everything is working properly.
- If both lights come on, half the job is done.
- It would be a good idea to additionally check the operation of the sensor while driving. For this you will need an assistant.
- Drive out of the garage, then reverse back. And repeat this several times. If the lamps do not blink and turn on in time, you have succeeded. Congratulations.
If suddenly replacing the sensor does not produce any result, we strongly recommend that you carefully study the possibility of each of the above breakdowns, check the wiring, light bulbs and other components. Obviously, the problem is in one of them or several at once.
Loading …
How does he work
The operating principle is based on the following. For each kilometer traveled, the speed sensor (DS) transmits a certain number of pulses to the controller.
The number of impulses transmitted per 1 km is 6004. The faster the car moves, the faster the impulses are transmitted. Due to this, the controller determines the speed based on the time interval between received pulses.
It should be noted that the DS also has an additional function that allows you to partially save fuel for the VAZ 2109. When coasting at a speed of more than 20 kilometers per hour, the controller, relying on data from the DS, does not open the fuel supply.
Location
The location of the speed sensor is the same on almost all cars of the AvtoVAZ family.
DS location
Tips and tricks
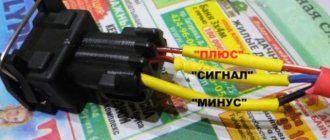
Despite the simplicity of the operation, even experienced craftsmen may encounter some problems during the installation and connection of the sensor. For example, if the wires going to the part are accidentally broken, they will need to be connected correctly. To do this, you should know the pinout of the VAZ 2109 speed sensor.
The wires transmit negative and positive contacts, and also connect a wire that transmits pulses to the receiving device. A designation by which one can judge whether the wires belong to one type or another is applied to the block. Pin connectors can be displayed using the following numeric or alphanumeric codes:
- «1», «2», «3».
- “-”, “A”, “+”.
In addition to correctly connecting the VAZ 2109 DS, you may need to reset the on-board computer error. If this is not done, then even if there is a working part, the automation may indicate a problem.
To make the process of replacing the speed sensor on VAZ family cars equipped with injection engines simpler, it is recommended to dismantle the adsorber before performing the work. This device is located on the access path to the car's DS. The operation will not take much time, but replacing the main part will become more comfortable and safe.
How does he work
The operating principle is based on the following. For each kilometer traveled, the speed sensor (DS) transmits a certain number of pulses to the controller.
The number of impulses transmitted per 1 km is 6004. The faster the car moves, the faster the impulses are transmitted. Due to this, the controller determines the speed based on the time interval between received pulses.
It should be noted that the DS also has an additional function that allows you to partially save fuel for the VAZ 2109. When coasting at a speed of more than 20 kilometers per hour, the controller, relying on data from the DS, does not open the fuel supply.
Location
The location of the speed sensor is the same on almost all cars of the AvtoVAZ family.
The sensor is located on the speedometer drive mechanism, that is, on the gearbox. To find the device, open the hood, remove the adsorber (this is not necessary, but it’s more convenient to get to the DS). On the side of the inner right CV joint there is a wire that goes to the gearbox. It is this that is connected to the connector of the desired sensor.
Where is
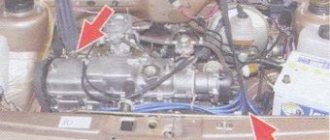
If you plan to replace the faulty part yourself, then first of all you need to find out where elements of this type are located on domestic cars of the VAZ family. You can find the axle shaft speed recording part in the immediate vicinity of these elements of the car. This element is located on the transmission housing near the right grenade.
To perform diagnostic operations or replace the speed sensor of a VAZ 2109 injector, you can approach it from the side of the engine compartment or from the lower side of the car. The first option is more convenient and requires less effort and time to prepare the car. For the second repair method, you will need to install the machine on an inspection hole, overpass, or raise the machine on a lift.
How to replace the speed sensor on a VAZ 2108-VAZ 21099?
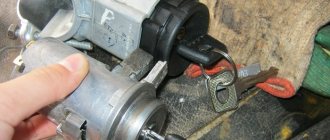
Removal: 1) First unscrew the nut that secures the “-” terminal to the battery, and then remove the terminal from it. (How to unscrew the nut that secures the terminal, read the article: “Replacing the battery”, in paragraph “1”)
2) Next, using your hands, disconnect the sensor harness (Indicated by a red arrow) and the wire block (Indicated by a blue arrow), which are connected together.
3) And then, taking a wrench in your hands, use it to unscrew the sensor itself, beyond the edges that are present on it.
Characteristic
Where is the speedometer sensor located in the VAZ 2115? As can be seen from the photo, the device is located in the upper part of the gearbox housing. However, accessing this controller is not very easy. To get to the device, you need to drive the car into a pit or overpass and crawl under the bottom of the car.
Functions and principle of operation
The purpose of the speed controller in injectors and carburetor engines is to transmit information about the vehicle speed to the dashboard. That is, the working sensor will be able to transmit 100% accurate information about the speed of movement to the device so that the driver can be guided by these data while driving.
As for the operating principle, the DS operates based on the Hall effect:
- the controller transmits voltage signals to the control unit with a frequency that should be directly proportional to the speed of rotation of the driving wheels of the vehicle;
- the control unit, in accordance with the received DS signals, regulates the operation of the power unit at idle speed and, using the idle speed sensor, controls the air supply bypassing the throttle;
- the frequency of the controller pulses itself should be directly proportional to the actual speed of movement.
Errors and symptoms
What signs can be used to determine the failure of the controller or the appearance of malfunctions in its operation:
- during diagnostics, error P0500 occurs - this combination indicates that there is no signal coming from the DS;
- another code - P0503 - indicates that the incoming signal is interrupted for some reason;
- one of the most likely signs of a breakdown is that the speedometer shows incorrect values, in particular, the needle on the dial moves chaotically in different directions;
- another symptom - the car engine began to idle intermittently;
- at idle speed fluctuates;
- Also, during acceleration, the driver may notice failures, that is, when he presses on the gas, there is no gain of power, the engine does not react to this in any way;
- fuel consumption has increased.
How to check the VAZ speed sensor
A failed speedometer sensor in a VAZ car is easily determined - in this case, the speedometer stops working, and it may also show some signs of life, but display incorrect information.
Using a tube, pliers or other available tools, rotate the sensor axis. In this case, you should see the voltmeter readings changing: the higher the speed, the higher the voltage (from 0.5 to 10 V). If this does not happen, the sensor requires replacement.
How to diagnose the ABS system
To obtain complete and reliable information about the state of the entire system, diagnostics should be carried out using special equipment. For this purpose, the manufacturer provides a special connector. After connection, the ignition is turned on and the test begins. The adapter issues error codes, each of which signals a breakdown of a specific component or element of the system.
A good model of such a device is Scan Tool Pro Black Edition from Korean manufacturers. The 32-bit chip makes it possible to diagnose not only the engine, but also all components and assemblies of the car. The cost of such a device is relatively low.
Diagnostics can also be carried out at service centers and service stations. However, even in garage conditions, if you have certain knowledge, identifying defects will not be difficult. To do this, you will need the following set of tools: soldering iron, tester, heat shrink and repair connectors.
The check is performed in the following sequence:
- the wheel being tested is jacked up;
- the control unit and controller outputs are dismantled;
- repair connectors are connected to the sensors;
- The resistance is measured with a multimeter.
A fully functional ABS sensor at rest has a resistance of 1 kOhm. When the wheel rotates, the readings should change; if this does not happen, the sensor is faulty. It should be remembered that different sensors have different meanings, so you need to study them before starting work.
Checking the ABS sensor with a multimeter
In addition to the device itself, you need to find a description of the sensor model. Further work is performed in the following sequence:
- The machine is placed on a flat, uniform surface, and its position is then recorded.
- The wheel is removed where the ABS sensor will be checked.
- The connector is disconnected and the contacts of both the sensor and the plug itself are cleaned.
- The wires and their connections are inspected for abrasions and other signs of damage to the insulation.
- The multimeter switch is switched to resistance measurement mode.
- The tester probes are applied to the output contacts of the sensor and readings are taken. Under normal conditions, the device display should show the number indicated in the sensor data sheet. If there is no such information, we take readings of 0.5 - 2 kOhm as the norm.
- Then, without removing the probes, the car wheel spins. If the sensor is working properly, the resistance will change, and the higher the rotation speed, the more the resistance changes.
- The multimeter is switched to voltage measurement mode and measurements are taken.
- At a wheel rotation speed of 1 revolution/sec. The indicator should be within 0.25 - 0.5 V. The higher the rotation speed, the greater the voltage.
- All sensors are checked in the same sequence.
In addition, the entire wiring harness is connected to each other to make sure there is no short circuit.
It should be remembered that the design and values of the sensors on the rear and front axles are different.
Based on the data obtained during measurements, the performance of the sensor is determined:
- the indicator is lower than normal - the sensor is unusable;
- a very low resistance value or near zero - short circuit of the coil turns;
- when bending the wiring harness, the resistance indicator changes - the wire strands are damaged;
- the resistance indicator tends to infinity - a break in the conductor or core in the induction coil.
You should know that if, during diagnostics, the resistance reading of one of the ABS sensors is very different from the others, it means it is faulty.
Before you start ringing the wires in the harness, you should find out the pinout of the control module plug. Then the connections between the sensors and the ECU are disconnected. And after that, you can start sequentially ringing the wires in the harness according to the pinout.
Checking the ABS sensor with an oscilloscope
An oscilloscope can also be used to determine the performance of ABS sensors. However, it is worth noting that this will require some experience in working with it. If you are one of the avid radio amateurs, then this will not seem difficult, but the average person may have a number of difficulties. And the main one is the cost of the device.
This device is more suitable for specialists and craftsmen of service centers and service stations. However, if you have such a device, it will be a good assistant and will help identify faults not only in the ABS system.
An oscilloscope is used to visualize the electrical signal. The amplitude and frequency of the current are displayed on a special screen, thanks to this you can obtain accurate information about the operation of a particular element.
So, the test begins using the same method as with a multimeter. Only at the multimeter connection point is an oscilloscope connected. And then the sequence is like this:
- the suspended wheel rotates at a frequency of approximately 2 - 3 revolutions per second;
- vibration readings are recorded on the instrument display.
After determining the integrity of one wheel, you should immediately begin checking on the opposite side of the axle. Afterwards, the data obtained is compared and conclusions are drawn based on them:
- provided that the readings are relatively identical, the sensors are in good working order;
- the absence of a step-like phenomenon when setting a smaller sinusoid signal indicates normal operation of the sensor;
- a stable amplitude with peak values not exceeding 0.5 V at the speeds mentioned above indicates the integrity of the sensor.
The speedometer on the VAZ 21099 injector does not work
The VAZ 2109 speedometer drive is an important part of the mechanism that provides the driver with useful and necessary information about the speed of the vehicle and the distance it has traveled. A drive failure, therefore, is an extremely undesirable defect that brings a lot of problems to the driver.
The VAZ 2109 speedometer drive is a common cause of its breakdown
The VAZ 2109 has a mechanical drive. Its driven and drive gears are mounted on the (secondary) shaft of the gearbox. From them, the torque is supplied through a flexible shaft to the car’s speedometer, which is located on the instrument panel.
Since the VAZ 2109 is produced with a high and low front panel, the specified flexible shaft can have different lengths (longer when the panel is high, shorter when low).
It is the break of this shaft that most often becomes the reason that the speedometer stops working, and this already leads to difficulties with cornering (changing gears correctly can be quite difficult) and unpleasant meetings with traffic police officers (the likelihood of a fine for speeding is high). As a rule, the shaft breaks near the entrance to the checkpoint. You can check for a break like this:
- the shaft (flexible) is disconnected from the speedometer on the instrument panel;
- start the engine and drive 20–30 meters, while carefully monitoring the end of the shaft.
Replacement
Even if you have experience in car repairs, you have never had to change a speed sensor, we recommend watching a training video about this, or looking at the operating manual for your VAZ 2114.
Stock up on the necessary set of tools and materials:
- Keys for 21, 14, 10 millimeters;
- Dry rags for cleaning the gearbox housing;
- New DS.
As for the new speed sensor, you can easily find it by catalog number - 2111-3843010. Its estimated cost today is around 300 rubles.
Let's start work.
- The device can be replaced through the engine compartment. But this option causes certain inconveniences due to the corrugated tube from the air filter and adsorber, which interfere with comfortable access to the desired object. You can remove them, but then unscrewing the sensor will still be problematic.
- To avoid unnecessary dismantling work and make the task easier for yourself, drive into the pit and get to the DS from below.
- The required device is located directly on the gearbox housing above the universal joint. Look in the area of the dipstick to check the amount of oil in the gearbox. This is where you will find DS.
- Once you enter the pit, wait a while for the engine housing to cool down. Open the hood to speed up the cooling process. Do not close when starting work. This will provide additional lighting.
- Disconnect the negative terminal from the battery of your VAZ 2114.
- Find the sensor you are looking for and use a dry rag to remove all dirt accumulated on the gearbox housing. It is not necessary to clean the entire box, just clear the area where the DS is located.
- Disconnect the contacts by removing the wiring block. To do this, simply press the spring-type lock.
- The DS should be unscrewed carefully, moving counterclockwise.
- It is not always possible to remove the sensor manually, since adhered dirt promotes sticking. Use a 21 mm wrench to remove the DS from its seat.
- After dismantling the DS, check the condition of the drive. We have already discussed exactly how to do this.
- If the rod is broken, you will have to remove the actuator completely.
- Using a 10 mm wrench, unscrew the fastening nut and remove it along with the washer.
- Using a 14 mm spanner, slightly loosen the drive in its socket, which will then allow you to carefully remove it from its seat.
- Be sure to make sure that the rod does not end up in the box. Otherwise, you will have to dismantle the gearbox and disassemble it. And this is a difficult task.
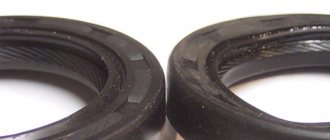
- Check the condition of the O-ring. Experts advise changing it regardless of the level of wear.
- Replace the rod, return the actuator to its place and reassemble in reverse order.
- The new sensor is carefully screwed into the socket, already clockwise.
- Return the terminals with wires, connect the contacts and check the operation of the device.
Replacing the DS
The DS should be screwed in as carefully as possible, since the sensor body is made of plastic. It is very easy to damage it.
Replacing a device such as a DS is not difficult. Follow the sequence of operations, act carefully and use high-quality replacement parts. Plus, don’t forget to first make sure that it is the DS that is causing the trouble. Otherwise, the work may be done in vain.
Loading …